2006 BMW M5 stop start
[x] Cancel search: stop startPage 67 of 231

Controls
65Reference
At a glance
Driving tips
Communications
Navigation
Entertainment
Mobility
Entering a distance manually
1.Select "Distance to dest." and press the
controller.
2.Turn the controller to select the distance to
your destination. If needed, hold it against a
slight resistance to enter a larger differ-
ence.
3.Press the controller to apply the setting.
The distance is automatically preset during the
destination guidance of the navigation sys-
tem
*.
Trip computer
The trip computer is suitable, for example, for a
vacation trip.
1.Open the start menu.
2.Open "Navigation".
Without navigation system
*:
Open "Car Data".
3.Select "Car Data" and press the controller.
4.Select "Trip computer" and press the con-
troller.
>Departure time
>Driving time
>Distance traveled>Average speed
>Average fuel consumption
Starting or stopping the trip computer, or reset-
ting all values:
1.Select "Set" and press the controller.
2.Select the desired menu item.
3.Press the controller.
Display options
You can display the computer or the trip com-
puter in the assistance window.
1.Move the controller to the right to change to
the assistance window and press the con-
troller.
2.Select "Onboard info" or "Trip computer".
3.Press the controller.
Page 72 of 231

Everything under control
70 5.Select the speed value and press the con-
troller.
6.Turn the controller to set the limit. If
needed, hold it against a slight resistance
to enter a larger difference.
7.Press the controller to apply the setting.
The limit is automatically activated.
Applying your current speed as limit
Select "Select current speed" and press the
controller. The system adopts your current
speed as the limit.
Activating limit
Select "On" and press the controller.
Limit is automatically activated.
Stopwatch
iDrive, for explanation of principle, refer to
page16.
1.Open the start menu.
2.Open "Navigation".
Without navigation system
*:
Open "Car Data".
3.Select "Car Data" and press the controller.
4.Select "Stopwatch" and press the control-
ler.
Starting, stopping or resetting
>Select "Start" and press the controller.
The stopwatch starts at the displayed time.
>Select "Reset" and press the controller.
The stopwatch is reset and it restarts if it
was running beforehand.
>Select "Stop" and press the controller.
This stops the timer.
Taking an intermediate time reading
Select "Interim time" and press the controller.
The interim time appears below the ongoing
primary stopwatch count.
All of the remaining functions remain
available at all times while the stopwatch
is running. The stopwatch continues operation
in the background.<
Settings on Control Display
iDrive, for explanation of principle, refer to
page16.
1.Press the button once or twice until
the start menu appears.
2.Press the controller to open the menu.
Page 86 of 231

Lamps
84 6.Turn the controller to select the desired
duration.
7.Press the controller to apply the setting.
Daytime running lamps*
If desired, the light switch can remain in posi-
tion 0, 1 or 3.
In position0 and 3 the exterior lighting is auto-
matically switched off after the vehicle is
switched off. In position1 the parking lamps
light up after the ignition is switched off.
Switch on the parking lamps if required as
described under Parking lamps.
Adaptive Head Light*
The concept
Adaptive Head Light is a variable headlamp
control system that enables better illumination
of the road surface. Depending on the steering
angle and other parameters, the light from the
headlamp follows the course of the road.
Activating Adaptive Head Light
In switch position3, the Adaptive Head Light is
active and the automatic headlamp control
is
switched on, refer to page83.
To avoid dazzling oncoming traffic, the Adap-
tive Head Light is not active when driving in
reverse and points toward the passenger side
when the vehicle is stopped.
Malfunction
The LED next to the symbol for automatic head-
lamp control flashes. Adaptive Head Light is
malfunctioning or has failed. Have the system
checked as soon as possible.
High beams/
roadside parking lamps
1High beams
2Headlamp flasher
3Roadside parking lamps
Roadside parking lamps, left or right*
You also enjoy the option of lighting up just one
side of your vehicle when parking. When using
this function, comply with national regulations:
Switching on
After parking the vehicle, press the lever in the
desired direction3, past the resistance point.
The roadside parking lamps drain the bat-
tery. Do not leave them switched on for
long periods of time, as otherwise it may no
longer be possible to start the engine.<
Switching off
Briefly press the lever in the opposite direc-
tion3 up to the resistance point.
High-beam assistant*
The concept
This system automatically switches the high
beams on and off again. A sensor on the front of
the inside rearview mirror controls the process.
The assistant ensures that the high beams are
switched on whenever the traffic situation
allows. This reduces the strain on you while at
the same time providing you with the best pos-
sible visibility. Of course, you can intervene at
Page 88 of 231

Lamps
86
Instrument lighting
The lighting intensity can be adjusted with the
knurled wheel with the parking lamps/low
beams switched on.
Interior lamps
The interior lamps, footwell lamps, door entry
lighting
and courtesy lamps* are controlled
automatically.
With the courtesy lamps, LED lights are located
in the door handles to illuminate the exterior
area before the doors.
To protect the battery, all lamps in the
vehicle are switched off approx. 15 min-
utes after radio readiness is switched off, refer
to Start/Stop button on page53.<
Switching interior lamps on and off
manually
Press the button.
If you want the interior lamps to remain off con-
tinuously, maintain pressure on the button for
approx. 3 seconds.
Reading lamps
Reading lamps are located in the front and rear
adjacent to the interior lamps. Press the button
briefly to switch the lamps on and off.
Page 92 of 231

Climate
90 body. Therefore, open these vents for maxi-
mum cooling.
AUC Automatic recirculated-air
control/recirculated-air mode
You can respond to pollutants or
unpleasant odors in the immediate
environment by suspending the
supply of outside air. The system then recircu-
lates the air currently within the vehicle. During
AUC operation, a sensor detects pollutants in
the outside air and controls the shut-off auto-
matically.
By pressing the button repeatedly, you can
request three operating modes:
>LED off: outside air flows in continuously.
>Right LED on, AUC mode: the system
detects pollutants in the outside air and
shuts off the supply as needed.
>Left LED on, recirculated-air mode: the
supply of outside air is permanently shut off.
If condensation starts to form on the
inside window surfaces during operation
in the recirculated-air mode, you should switch
it off while also increasing the air volume as
required.
The recirculated-air mode should not be used
over an extended period of time, as the air qual-
ity inside the vehicle deteriorates continu-
ously.<
Residual heat
The heat stored in the engine is
used to heat the passenger com-
partment, e.g. while stopped at a
school to pick up a child.
The function can be switched on when the fol-
lowing conditions are met:
>up to 15 minutes after switching off the
engine
>with engine at operating temperature
>with sufficient battery voltage
>at an outside temperature below 777/
256The LED lights up when the function is
switched on.
From radio readiness the interior temperature,
the air volume and the air distribution can be
set.
Switching off automatic climate control
The air volume, the heater and the
cooling function are all switched
off.
You can restart the automatic cli-
mate control by pressing any of its buttons
except the REST button.
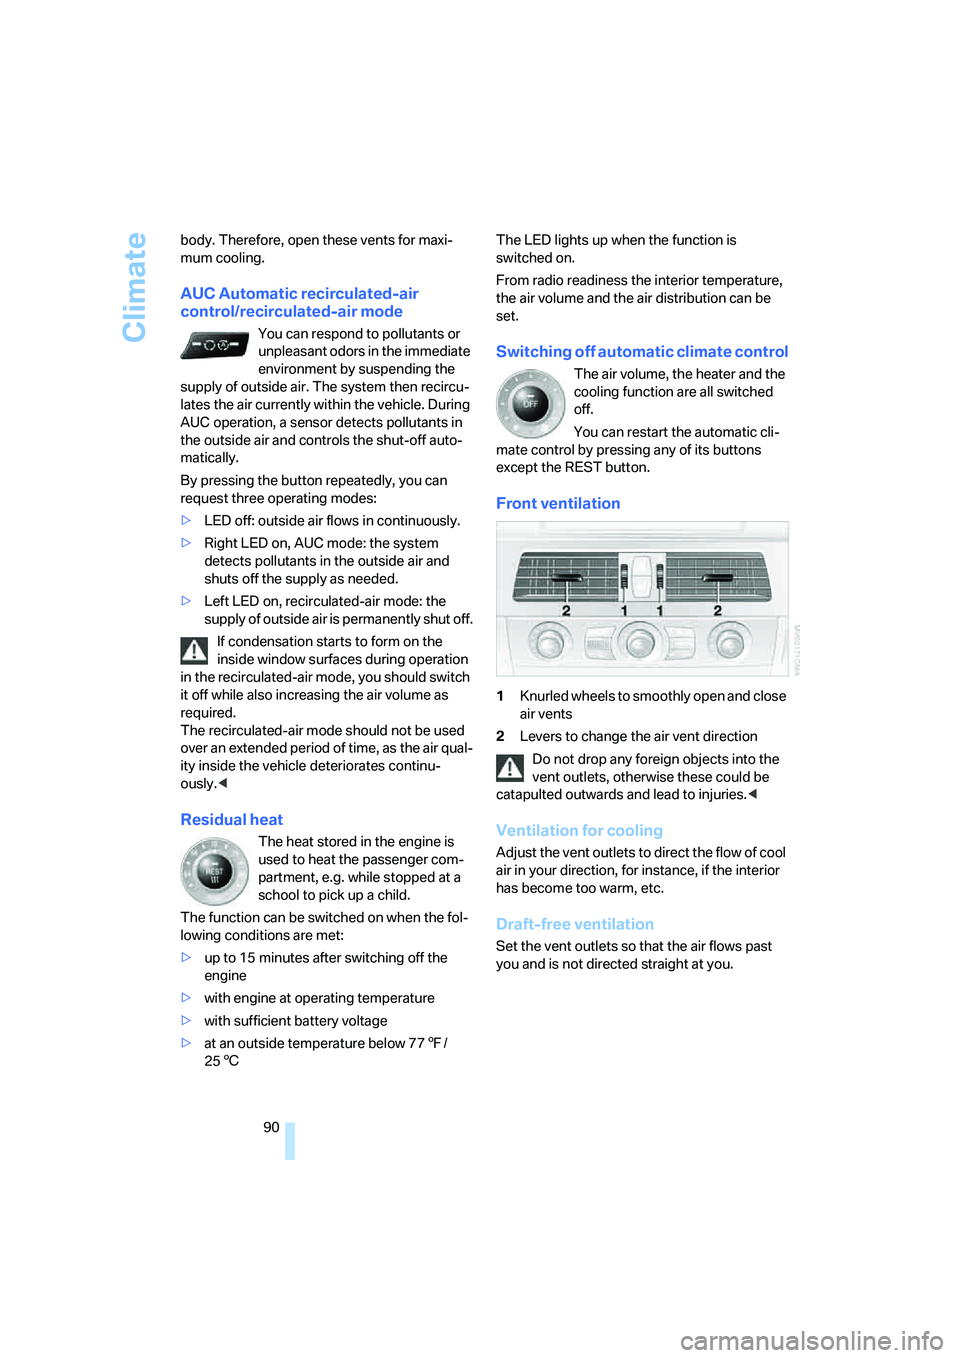
Front ventilation
1Knurled wheels to smoothly open and close
air vents
2Levers to change the air vent direction
Do not drop any foreign objects into the
vent outlets, otherwise these could be
catapulted outwards and lead to injuries.<
Ventilation for cooling
Adjust the vent outlets to direct the flow of cool
air in your direction, for instance, if the interior
has become too warm, etc.
Draft-free ventilation
Set the vent outlets so that the air flows past
you and is not directed straight at you.
Page 131 of 231

Navigation
Driving tips
129Reference
At a glance
Controls
Communications
Entertainment
Mobility
What to do if …
What to do if …
>a navigation DVD is inserted, but an instruc-
tion to insert the DVD appears on the Con-
trol Display?
The navigation DVD may not be the correct
DVD for the navigation system. This infor-
mation is indicated on the DVD label.
>you request the current position of your
vehicle, but do not receive a precise dis-
play?
The system is unable to receive enough
GPS signals at your current position due to
obstructions, your position is not yet avail-
able on your navigation DVD, or the system
is in the process of calculating your posi-
tion. Reception is best when you have an
unobstructed view to the sky.
>the destination guidance does not accept a
destination?
The data of the destination is not stored on
the navigation DVD that is loaded. Select a
destination that is as close as possible to
the original.
>the destination guidance does not accept
an address without the street name?
On the navigation DVD, no downtown area
can be determined for the city or town
entered. Enter any street, or a destination
such as the railway station in the selected
town, and then start the destination guid-
ance.
>you want to enter a destination for the des-
tination guidance, but it is not possible to
select the letters for your desired entry?
The data of the destination is not stored on
the navigation DVD that is loaded. In this
case, the system will not offer you any let-
ters to choose from. Select a destination
that is as close as possible to the original.>the system stops furnishing directions on
which way to turn as you approach intersec-
tions?
You are driving in an area that has not yet
been completely recorded on the naviga-
tion DVD. Instead of an arrow indicating a
turn, you will see an arrow which indicates
the general direction of your planned route.
Or you have left the recommended route
and the system requires a few seconds to
calculate a new recommended route.
>the navigation system does not react to
entries?
If the battery was disconnected, it takes
about 10 minutes before the system is once
again operational.
Page 157 of 231

155
Entertainment
Reference
At a glance
Controls
Driving tips Communications
Navigation
Mobility
Making calls with car phone:
BMW Assist calls
You can use the car phone via the hands-free
system for BMW Assist calls.
When the status information "Communication"
or "BMW Assist" is displayed in "BMW Ser-
vice", only BMW Assist calls are possible.
It may not be possible to establish a telephone
connection using the mobile phone while a con-
nection is being established to BMW Assist or
while a call to BMW Assist is already in
progress. If this happens, you must log off the
mobile phone from the vehicle if you wish to
place a call with the mobile phone.
Commissioning
Logging on mobile phone on vehicle
The following prerequisites must be met:
>The mobile phone is ready to operate.
>The Bluetooth link on the vehicle, refer to
page157, and on the mobile phone is
active.
>Depending on the mobile phone, preset-
tings on the mobile phone are necessary:
e.g. via the menu item Bluetooth activated
or the menu item Connection not with con-
firmation.
>For logging on, specify any desired number
as the Bluetooth passkey, e.g. 1. This Blue-
tooth passkey is no longer required follow-
ing successful logon.
>The ignition is switched on.
Only log on the mobile phone with the
vehicle stopped, otherwise the passen-
gers and other road user can be endangered
due to a lack of attentiveness on the part of the
driver.<
Switching on ignition
1.Insert the remote control as far as possible
into the ignition lock.
2.S w i t c h o n t h e s w i t c h o n i g n i t i o n b y p r e s s i n g
the Start/Stop button without depressing
the brake or clutch pedal.
Preparation with iDrive
iDrive, for explanation of principle, refer to
page16.
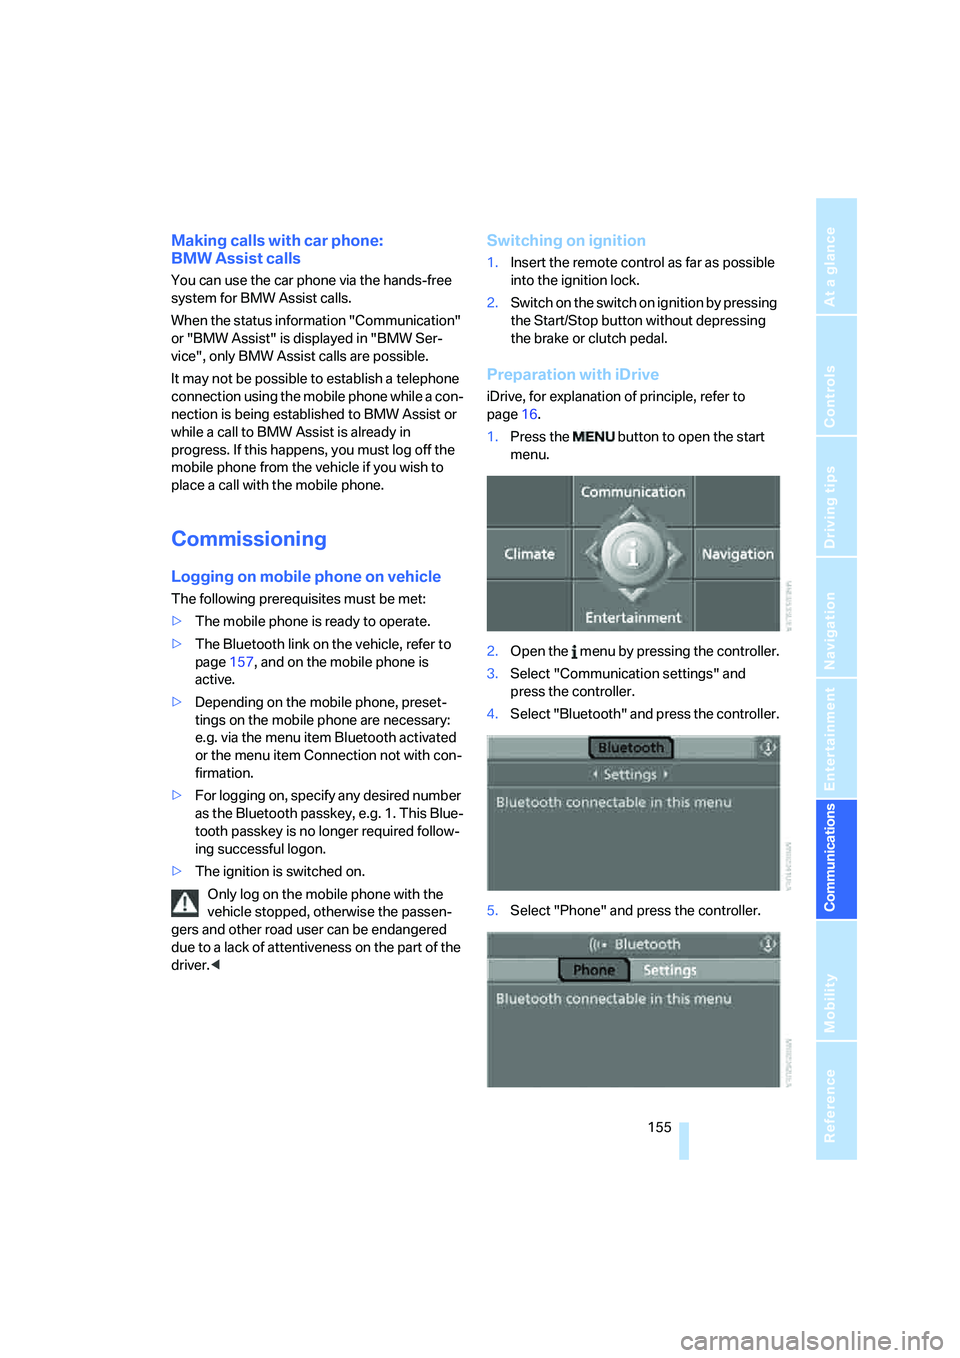
1.Press the button to open the start
menu.
2.Open the menu by pressing the controller.
3.Select "Communication settings" and
press the controller.
4.Select "Bluetooth" and press the controller.
5.Select "Phone" and press the controller.
Page 183 of 231

Mobility
181Reference
At a glance
Controls
Driving tips
Communications
Navigation
Entertainment
Under the hood
Never attempt to perform any service or
repair operations on your vehicle without
the required professional technical training.
If you do not know what repair procedures to
follow, have work on your vehicle done only by
your BMW center or a workshop that works
according to BMW repair procedures with cor-
respondingly trained personnel. If this work is
not carried out properly, there is a danger of
subsequent damage and related safety haz-
ards.<
Hood
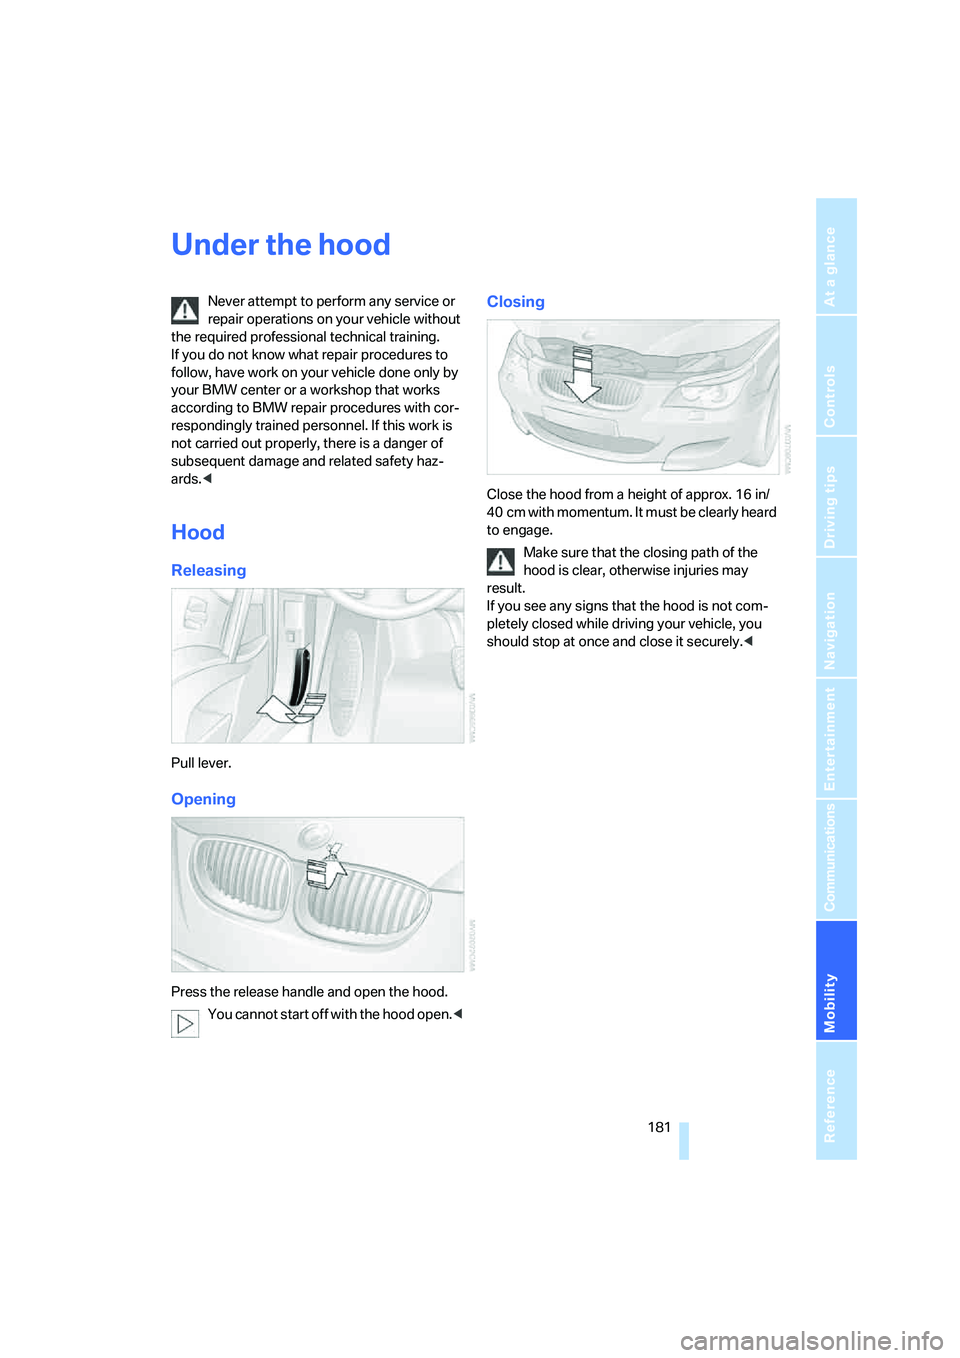
Releasing
Pull lever.
Opening
Press the release handle and open the hood.
You cannot start off with the hood open.<
Closing
Close the hood from a height of approx. 16 in/
40 cm with momentum. It must be clearly heard
to engage.
Make sure that the closing path of the
hood is clear, otherwise injuries may
result.
If you see any signs that the hood is not com-
pletely closed while driving your vehicle, you
should stop at once and close it securely.<