Page 41 of 170

41
Despite trap protection, always
make sure that the sunroof can
close without obstruction, otherwise in
some cases, e.g. with thin objects, it is
not guaranteed that the closing opera-
tion will be interrupted.
Trap protection is restricted when the
switch is pressed and held beyond the
pressure point. The sunroof opens only
slightly. If the switch is pressed and
held beyond the pressure point again
within approx. 2 seconds, trap protec-
tion is overridden.<
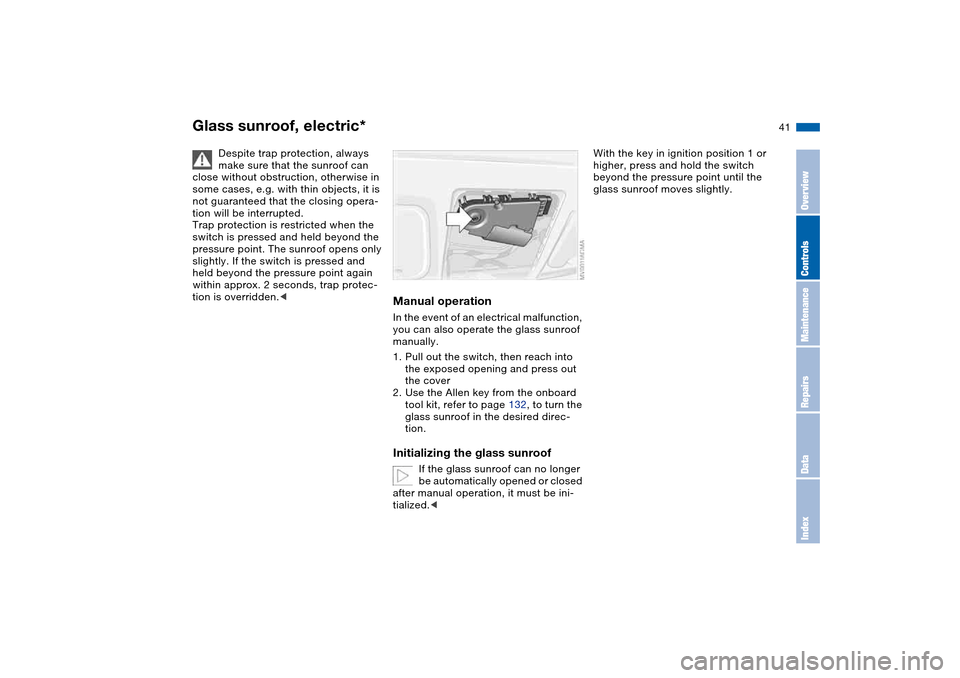
Manual operationIn the event of an electrical malfunction,
you can also operate the glass sunroof
manually.
1. Pull out the switch, then reach into
the exposed opening and press out
the cover
2. Use the Allen key from the onboard
tool kit, refer to page 132, to turn the
glass sunroof in the desired direc-
tion.Initializing the glass sunroof
If the glass sunroof can no longer
be automatically opened or closed
after manual operation, it must be ini-
tialized.<
With the key in ignition position 1 or
higher, press and hold the switch
beyond the pressure point until the
glass sunroof moves slightly.
Glass sunroof, electric*
OverviewControlsMaintenanceRepairsDataIndex
Page 43 of 170

43
SeatsWhen adjusting your seat, always
observe the following precautions
Never try to adjust your seat while
operating the vehicle. The seat
could respond with an unexpected
movement, and the ensuing loss of
vehicle control could lead to an acci-
dent. Never ride with the backrest
reclined to an extreme angle. This is
especially important for the front pas-
senger to remember. If you do, there is
a risk that you will slide under the safety
belt in an accident, thus reducing the
protection provided by the safety belt.<
Seat adjustment>Manual seat adjustment, refer to
page 43
>Power seat adjustment, refer to
page 44
>Head restraint, refer to page 45.
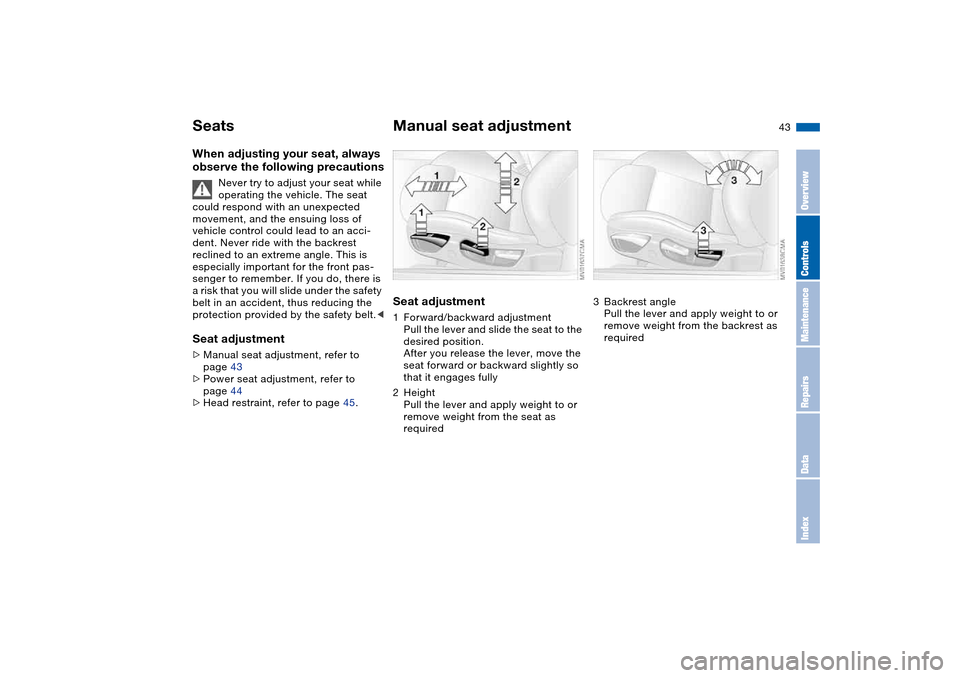
Manual seat adjustmentSeat adjustment1Forward/backward adjustment
Pull the lever and slide the seat to the
desired position.
After you release the lever, move the
seat forward or backward slightly so
that it engages fully
2Height
Pull the lever and apply weight to or
remove weight from the seat as
required
3Backrest angle
Pull the lever and apply weight to or
remove weight from the backrest as
required
OverviewControlsMaintenanceRepairsDataIndex
Page 51 of 170
51
Steering wheelTo adjust
Never attempt to adjust the steer-
ing wheel while driving the vehicle
– it could respond with unexpected
movement, posing a potential accident
hazard.<
1. Push the locking lever downward
2. Adjust steering column reach and
height for your selected seating posi-
tion
3. Pull the lever back up.
OverviewControlsMaintenanceRepairsDataIndex
Page 52 of 170

52Passenger safety systems
Airbags1Front airbags on the driver and pas-
senger sides
2Head airbags for driver and front pas-
senger
3Side airbags on the driver and pas-
senger sides – front and rear*Protective effectThe front airbags protect the driver and
passenger in the event of a head-on
collision where the protection provided
by the safety belt alone would not be
adequate. The head and side airbags
help provide protection in the event of a
collision from the side. The respective
side airbag helps support the seat
occupant's upper body.
For information on the correct sitting
position, refer to page 42.
The side airbags in the rear pas-
senger area* of your vehicle may
already have been deactivated by a
BMW center. You may have them acti-
vated if you desire to do so. Please
contact your BMW center for additional
information.<
The airbags do not deploy in
response to minor collisions, rear
impacts and certain kinds of vehicle
rollover.<
Do not apply adhesive materials to
the cover panels of the airbags,
cover them or modify them in any other
way. Do not attempt to remove the air-
bag restraint system from the vehicle. In
the event of a malfunction, deactivation
or triggered activation – as a response
to an accident – of the airbag restraint
system, consult your BMW center for
inspection, repair or disassembly. Mod-
ifications may not be made on either
the wiring or the individual components
in the airbag system. These include the
upholstered covers on the steering
wheel, instrument panel, side trim pan-
els of the doors and front roof pillars,
and on the sides of the headliner. Do
not attempt to remove or dismantle the
steering wheel. Unprofessional
attempts to service the system could
lead to failure in an emergency or
undesired airbag activation, either of
which could result in personal injury. Do
not touch the individual components
directly after the system has been trig-
gered, as otherwise there is a danger of
burns.<
Page 54 of 170
54
This is the right way a larger child
should sit wearing the seat belt when
rear side airbags are provided.Indicator lamp
The indicator lamp indicates the
operational status of the airbag
system when the ignition key is
in position 1 or higher.
System operational:
>The indicator lamp comes on briefly
when the ignition key is turned to
position 1 or higher.
System malfunction:
>Indicator lamp does not come on or
>indicator lamp lights up continuously.
If there is a system malfunction,
there is a risk that the airbags will
not be triggered within their normal
response range, even if the level of
impact would normally have triggered
them. Have your BMW center inspect
the airbag system immediately.<
Airbags
Page 56 of 170
56
Child-restraint system with tether
strapIf you use a child-restraint system with
a tether strap, three additional tether
anchorage points have been provided.
Depending on the location selected for
seating in the rear passenger area,
attach the tether strap to the corre-
sponding anchorage point to secure the
child-restraint system, as shown in the
illustration.
If the respective seating position is fit-
ted with a headrest, lift the headrest
and pass the tether strap between the
headrest and the seat back.
It is recommended to readjust the head
restraint in the lowest possible position.
Adjust the tether strap according to the
child-restraint manufacturer's instruc-
tions.
All rear seating positions in your vehicle
meet the recommendations of
SAE J1819, an industry recommended
practice for securing child-restraint sys-
tems in motor vehicles.
Transporting children safely
Page 66 of 170

66
Sequential M gearbox with Drivelogic*The conceptThe sequential M gearbox with
Drivelogic is an automated manual
gearbox with which clutching and shift-
ing is assumed by an electro-hydraulic
system.
The SMG Drivelogic is operated via two
shift paddles on the steering wheel and
the selector lever in the center console.
It offers the following functions:
>Sequential and automated shifting
mode
>Ability to choose between different
driving programs – Drivelogic
>Gradient assistance, refer to page 69
>Upshift display and shift lights, refer
to page 70
>RPM matching on downshifts
>Driving dependent functions:
The respective driving situation, e.g.
cornering, mountain driving or brak-
ing, is detected by sensors and taken
into account for shifting, e.g. to
achieve optimum gear selection dur-
ing deceleration and subsequent
acceleration
>Slip recognition at the rear axle for
increasing driving stability, e.g. dur-
ing downshifting on slippery road
surfaces>Operating safety through protection
against misshifting.
Under normal operating conditions, fuel
consumption is lowest when driving in
the first driving program of the auto-
mated shifting mode.
Selector lever positionsR: Reverse position
N: Neutral position
Forward position with one-touch mode:
>S: sequential mode
>D: automated mode
>+: upshifting in sequential mode
>–: downshifting in sequential mode.
The SMG Drivelogic is ready for opera-
tion from ignition key position two or
higher.
For your safety, it is only possible to
engage a driving position with the vehi-
cle stopped approx. two seconds after
engaging position 0 with the footbrake
depressed – shift-lock function.
Page 68 of 170

68
Shifting gears with shift paddles on
steering wheel:
>To upshift, briefly pull the right pad-
dle +
>To downshift, briefly pull the left pad-
dle –.
Shift paddles with various widths
matched to the shape of your
hand are available from your BMW cen-
ter.<
Shifting gears with selector lever:
>To upshift, pull the selector lever
backward in the + direction
>To downshift, push the selector lever
in the – direction.
No automatic upshifting is carried out in
the sequential mode.
You accelerate from higher gears, e.g.
during passing, by manually downshift-
ing.
In the following situations the
SMG Drivelogic in the sequential mode
assists you:
>Upshifts and downshifts are only exe-
cuted at appropriate combinations of
engine rpm and vehicle speed. For
instance, downshifts that would
result in excessive engine speed are
not executed
>During a stop the gearbox is auto-
matically downshifted into the first
gear so that, e.g. before a traffic light,
it is only necessary to accelerate to
continue driving
>As speed diminishes, the gearbox
downshifts automatically, without you
taking any action, just before the
vehicle slows to below each gear's
minimum speed.D – Automated modeEach time the engine is started, the
automated mode is activated as soon
as you move the selector lever into the
forward driving position.
In the automated mode all forward
gears are shifted automatically.To switch from sequential to automated
mode: tap the selector lever to the right
toward D. Watch the display in the
instrument cluster, refer to page 67.
For rapid acceleration, e.g. during
passing, depress the accelerator pedal
completely – kickdown. The gearbox
now downshifts depending on the
selected driving program.
Even in the automated mode, you can
help specify the shifting point: if a gear-
dependent minimum speed is
exceeded, you can upshift by slowly
reducing pressure on the accelerator
pedal. In the process, the respective
driving situation is detected by sensors
and taken into account.
Sequential M gearbox with Drivelogic*