2006 BMW 760LI SEDAN ESP
[x] Cancel search: ESPPage 144 of 247
Destination input
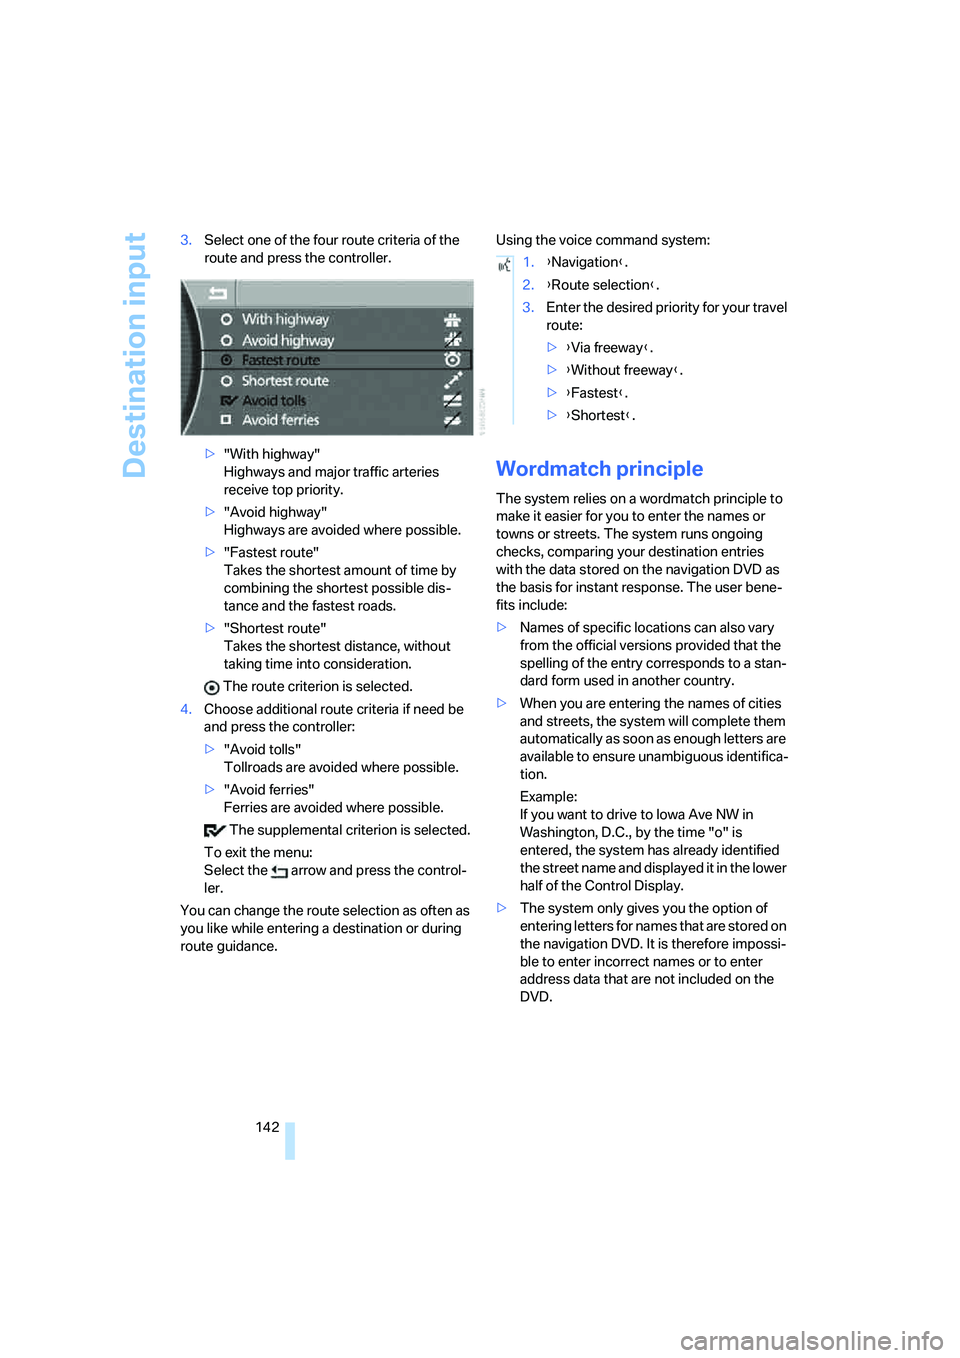
142 3.Select one of the four route criteria of the
route and press the controller.
>"With highway"
Highways and major traffic arteries
receive top priority.
>"Avoid highway"
Highways are avoided where possible.
>"Fastest route"
Takes the shortest amount of time by
combining the shortest possible dis-
tance and the fastest roads.
>"Shortest route"
Takes the shortest distance, without
taking time into consideration.
The route criterion is selected.
4.Choose additional route criteria if need be
and press the controller:
>"Avoid tolls"
Tollroads are avoided where possible.
>"Avoid ferries"
Ferries are avoided where possible.
The supplemental criterion is selected.
To exit the menu:
Select the arrow and press the control-
ler.
You can change the route selection as often as
you like while entering a destination or during
route guidance.Using the voice command system:
Wordmatch principle
The system relies on a wordmatch principle to
make it easier for you to enter the names or
towns or streets. The system runs ongoing
checks, comparing your destination entries
with the data stored on the navigation DVD as
the basis for instant response. The user bene-
fits include:
>Names of specific locations can also vary
from the official versions provided that the
spelling of the entry corresponds to a stan-
dard form used in another country.
>When you are entering the names of cities
and streets, the system will complete them
automatically as soon as enough letters are
available to ensure unambiguous identifica-
tion.
Example:
If you want to drive to Iowa Ave NW in
Washington, D.C., by the time "o" is
entered, the system has already identified
the street name and displayed it in the lower
half of the Control Display.
>The system only gives you the option of
entering letters for names that are stored on
the navigation DVD. It is therefore impossi-
ble to enter incorrect names or to enter
address data that are not included on the
DVD.
1.{Navigation}.
2.{Route selection}.
3.Enter the desired priority for your travel
route:
>{Via freeway}.
>{Without freeway}.
>{Fastest}.
>{Shortest}.
Page 157 of 247
Navigation
Entertainment
Driving tips
155Reference
At a glance
Controls
Communications
Mobility
Radio
Your radio is equipped to receive the FM and
AM wavebands.
Listening to radio
Switch on audio or video sources, refer to
page153.
iDrive, for principle details, refer to page16.
1.Press the button to open the start
menu.
2.Move the controller toward "Entertain-
ment".
3.Select "FM" or "AM" and press the control-
ler.
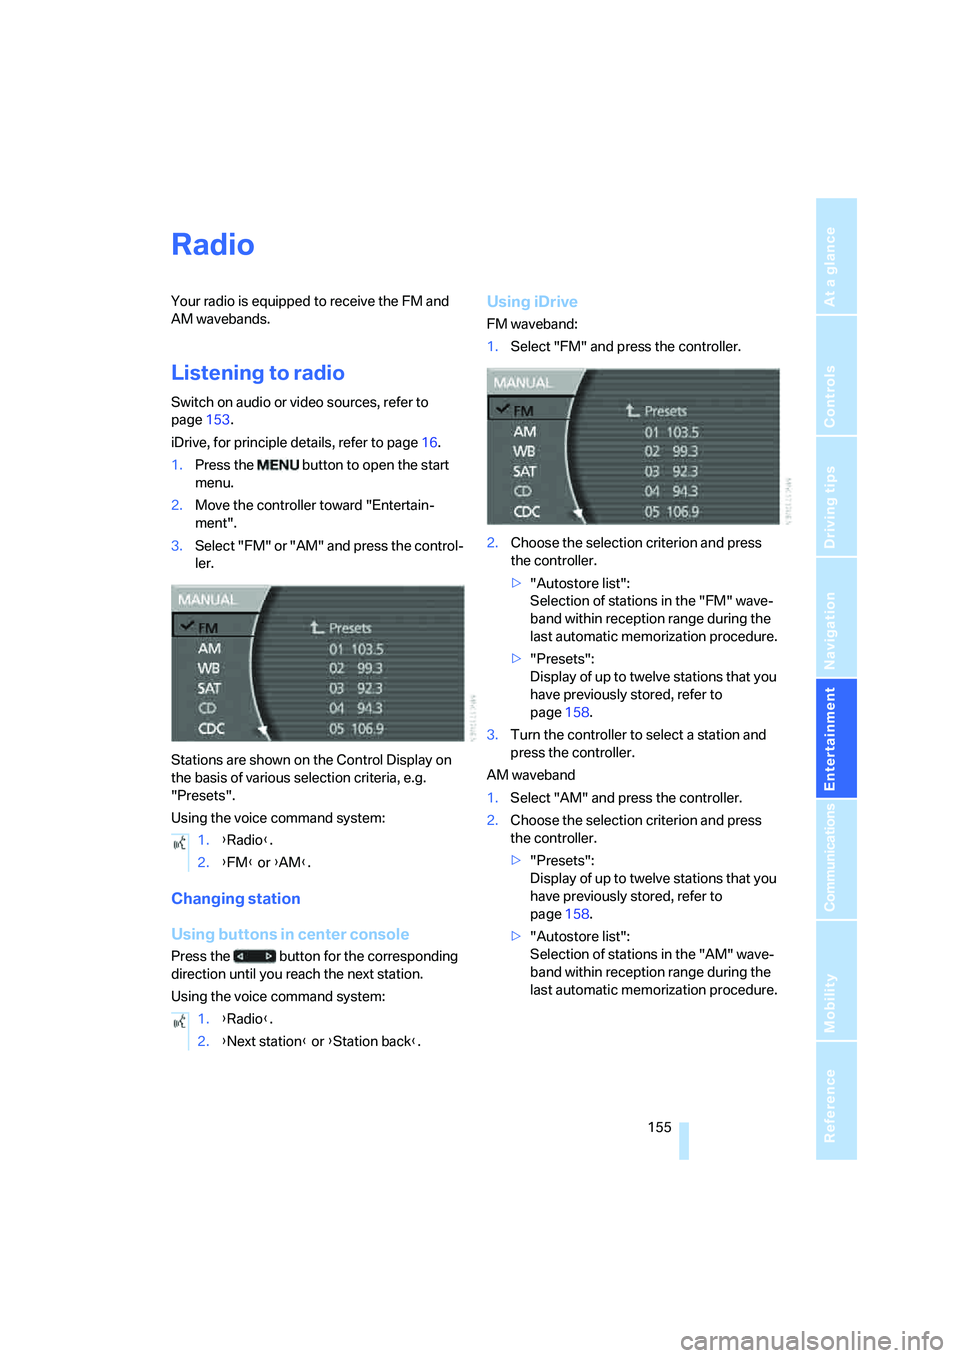
Stations are shown on the Control Display on
the basis of various selection criteria, e.g.
"Presets".
Using the voice command system:
Changing station
Using buttons in center console
Press the button for the corresponding
direction until you reach the next station.
Using the voice command system:
Using iDrive
FM waveband:
1.Select "FM" and press the controller.
2.Choose the selection criterion and press
the controller.
>"Autostore list":
Selection of stations in the "FM" wave-
band within reception range during the
last automatic memorization procedure.
>"Presets":
Display of up to twelve stations that you
have previously stored, refer to
page158.
3.Turn the controller to select a station and
press the controller.
AM waveband
1.Select "AM" and press the controller.
2.Choose the selection criterion and press
the controller.
>"Presets":
Display of up to twelve stations that you
have previously stored, refer to
page158.
>"Autostore list":
Selection of stations in the "AM" wave-
band within reception range during the
last automatic memorization procedure. 1.{Radio}.
2.{FM} or {AM}.
1.{Radio}.
2.{Next station} or {Station back}.
Page 162 of 247
Radio
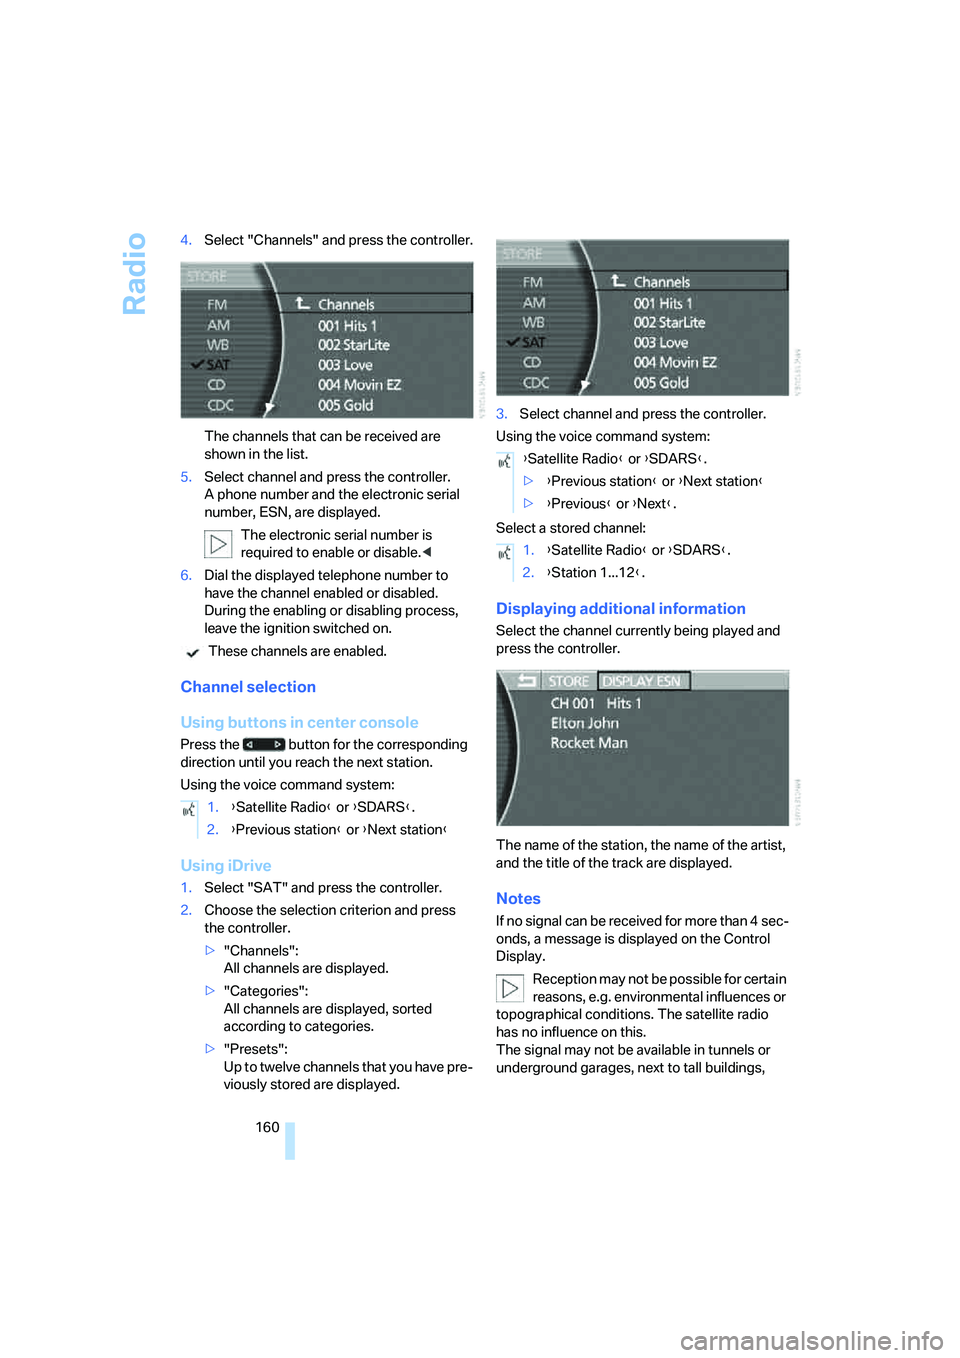
160 4.Select "Channels" and press the controller.
The channels that can be received are
shown in the list.
5.Select channel and press the controller.
A phone number and the electronic serial
number, ESN, are displayed.
The electronic serial number is
required to enable or disable.<
6.Dial the displayed telephone number to
have the channel enabled or disabled.
During the enabling or disabling process,
leave the ignition switched on.
These channels are enabled.
Channel selection
Using buttons in center console
Press the button for the corresponding
direction until you reach the next station.
Using the voice command system:
Using iDrive
1.Select "SAT" and press the controller.
2.Choose the selection criterion and press
the controller.
>"Channels":
All channels are displayed.
>"Categories":
All channels are displayed, sorted
according to categories.
>"Presets":
Up to twelve channels that you have pre-
viously stored are displayed.3.Select channel and press the controller.
Using the voice command system:
Select a stored channel:
Displaying additional information
Select the channel currently being played and
press the controller.
The name of the station, the name of the artist,
and the title of the track are displayed.
Notes
If no signal can be received for more than 4 sec-
onds, a message is displayed on the Control
Display.
Reception may not be possible for certain
reasons, e.g. environmental influences or
topographical conditions. The satellite radio
has no influence on this.
The signal may not be available in tunnels or
underground garages, next to tall buildings, 1.{Satellite Radio} or {SDARS}.
2.{Previous station} or {Next station}
{Satellite Radio} or {SDARS}.
>{Previous station} or {Next station}
>{Previous} or {Next}.
1.{Satellite Radio} or {SDARS}.
2.{Station 1...12}.
Page 165 of 247
Navigation
Entertainment
Driving tips
163Reference
At a glance
Controls
Communications
Mobility
Random play sequence
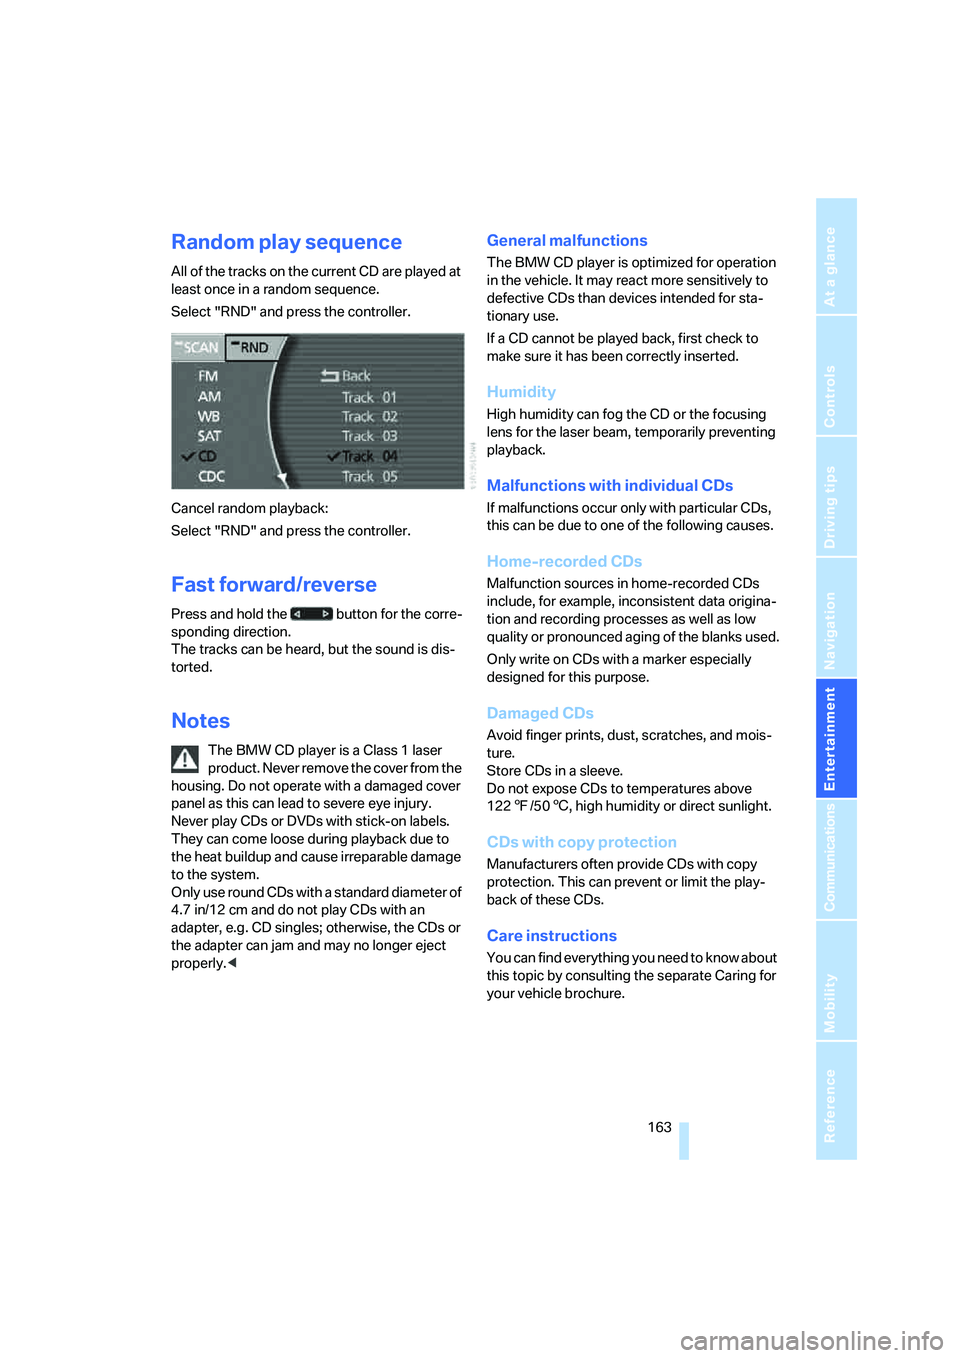
All of the tracks on the current CD are played at
least once in a random sequence.
Select "RND" and press the controller.
Cancel random playback:
Select "RND" and press the controller.
Fast forward/reverse
Press and hold the button for the corre-
sponding direction.
The tracks can be heard, but the sound is dis-
torted.
Notes
The BMW CD player is a Class 1 laser
product. Never remove the cover from the
housing. Do not operate with a damaged cover
panel as this can lead to severe eye injury.
Never play CDs or DVDs with stick-on labels.
They can come loose during playback due to
the heat buildup and cause irreparable damage
to the system.
Only use round CDs with a standard diameter of
4.7 in/12 cm and do not play CDs with an
adapter, e.g. CD singles; otherwise, the CDs or
the adapter can jam and may no longer eject
properly.<
General malfunctions
The BMW CD player is optimized for operation
in the vehicle. It may react more sensitively to
defective CDs than devices intended for sta-
tionary use.
If a CD cannot be played back, first check to
make sure it has been correctly inserted.
Humidity
High humidity can fog the CD or the focusing
lens for the laser beam, temporarily preventing
playback.
Malfunctions with individual CDs
If malfunctions occur only with particular CDs,
this can be due to one of the following causes.
Home-recorded CDs
Malfunction sources in home-recorded CDs
include, for example, inconsistent data origina-
tion and recording processes as well as low
quality or pronounced aging of the blanks used.
Only write on CDs with a marker especially
designed for this purpose.
Damaged CDs
Avoid finger prints, dust, scratches, and mois-
ture.
Store CDs in a sleeve.
Do not expose CDs to temperatures above
1227/506, high humidity or direct sunlight.
CDs with copy protection
Manufacturers often provide CDs with copy
protection. This can prevent or limit the play-
back of these CDs.
Care instructions
You can find everything you need to know about
this topic by consulting the separate Caring for
your vehicle brochure.
Page 166 of 247
CD changer
164
CD changer
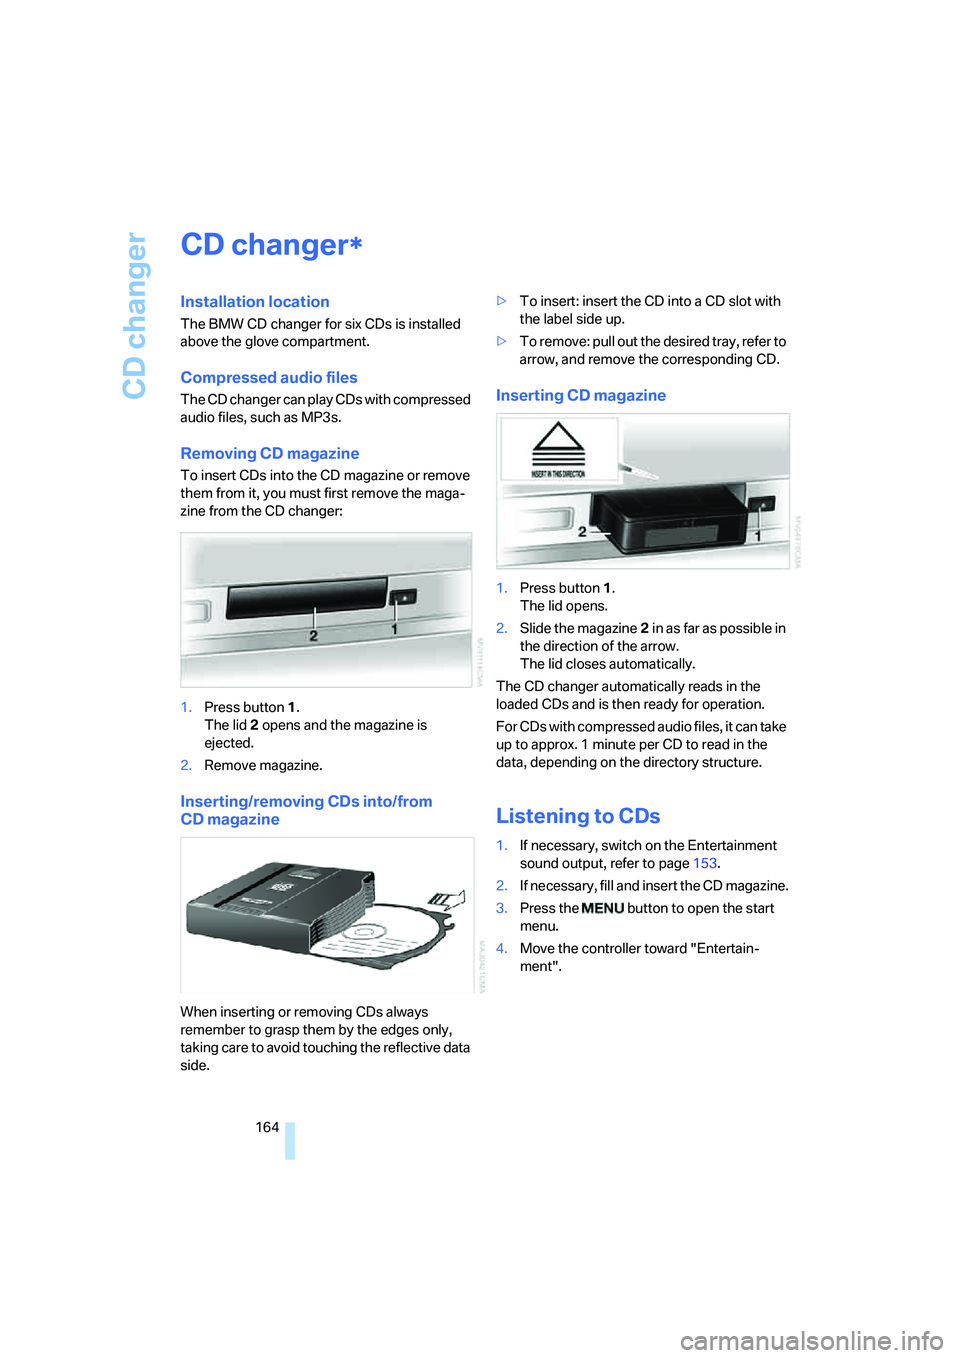
Installation location
The BMW CD changer for six CDs is installed
above the glove compartment.
Compressed audio files
The CD changer can play CDs with compressed
audio files, such as MP3s.
Removing CD magazine
To insert CDs into the CD magazine or remove
them from it, you must first remove the maga-
zine from the CD changer:
1.Press button1.
The lid2 opens and the magazine is
ejected.
2.Remove magazine.
Inserting/removing CDs into/from
CD magazine
When inserting or removing CDs always
remember to grasp them by the edges only,
taking care to avoid touching the reflective data
side.>To insert: insert the CD into a CD slot with
the label side up.
>To remove: pull out the desired tray, refer to
arrow, and remove the corresponding CD.
Inserting CD magazine
1.Press button1.
The lid opens.
2.Slide the magazine2 in as far as possible in
the direction of the arrow.
The lid closes automatically.
The CD changer automatically reads in the
loaded CDs and is then ready for operation.
For CDs with compressed audio files, it can take
up to approx. 1 minute per CD to read in the
data, depending on the directory structure.
Listening to CDs
1.If necessary, switch on the Entertainment
sound output, refer to page153.
2.I f n e ce s s a r y , f il l a n d in s e r t t h e C D m a g a z in e .
3.Press the button to open the start
menu.
4.Move the controller toward "Entertain-
ment".
*
Page 169 of 247
Navigation
Entertainment
Driving tips
167Reference
At a glance
Controls
Communications
Mobility
General malfunctions
The BMW CD changer is optimized for opera-
tion in the vehicle. It may react more sensitively
to defective CDs than devices intended for sta-
tionary use.
If a CD cannot be played back, first check to
make sure it has been correctly inserted.
Humidity
High humidity can fog the CD or the focusing
lens for the laser beam, temporarily preventing
playback.
Malfunctions with individual CDs
If malfunctions occur only with particular CDs,
this can be due to one of the following causes.
Home-recorded CDs
Malfunction sources in home-recorded CDs
include, for example, inconsistent data origina-
tion and recording processes as well as low
quality or pronounced aging of the blanks used.
Only write on CDs with a marker especially
designed for this purpose.
Damaged CDs
Avoid finger prints, dust, scratches, and mois-
ture.
Store CDs in a sleeve.
Do not expose CDs to temperatures above
1227/506, high humidity or direct sunlight.
CDs with copy protection
Manufacturers often provide CDs with copy
protection. This can prevent or limit the play-
back of these CDs.
Care instructions
You can find everything you need to know about
this topic by consulting the separate Caring for
your vehicle brochure.
Page 170 of 247
DVD changer
168
DVD changer
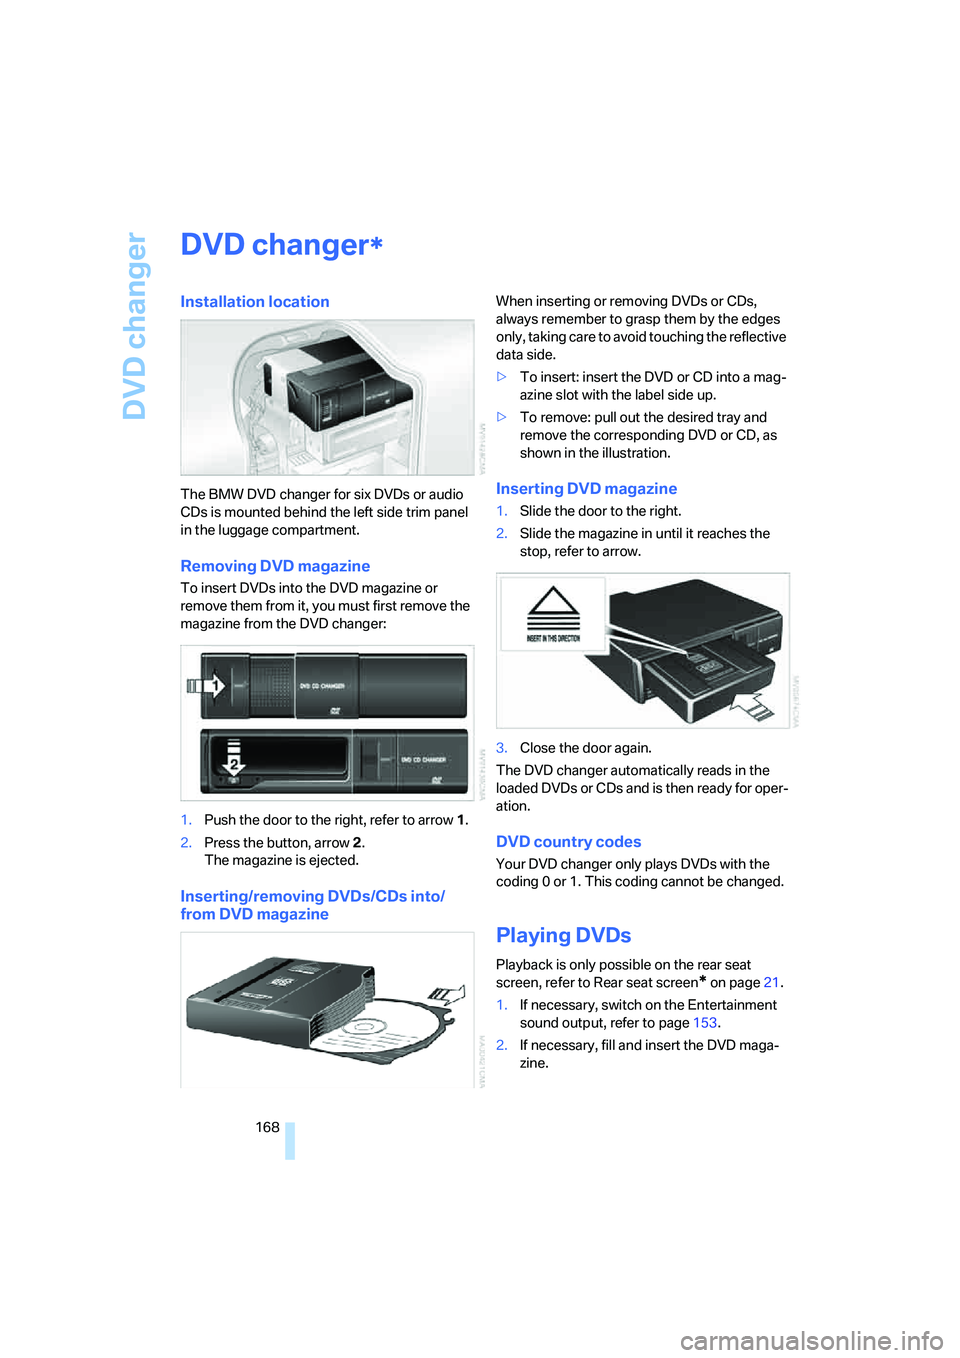
Installation location
The BMW DVD changer for six DVDs or audio
CDs is mounted behind the left side trim panel
in the luggage compartment.
Removing DVD magazine
To insert DVDs into the DVD magazine or
remove them from it, you must first remove the
magazine from the DVD changer:
1.Push the door to the right, refer to arrow1.
2.Press the button, arrow2.
The magazine is ejected.
Inserting/removing DVDs/CDs into/
from DVD magazine
When inserting or removing DVDs or CDs,
always remember to grasp them by the edges
only, taking care to avoid touching the reflective
data side.
>To insert: insert the DVD or CD into a mag-
azine slot with the label side up.
>To remove: pull out the desired tray and
remove the corresponding DVD or CD, as
shown in the illustration.
Inserting DVD magazine
1.Slide the door to the right.
2.Slide the magazine in until it reaches the
stop, refer to arrow.
3.Close the door again.
The DVD changer automatically reads in the
loaded DVDs or CDs and is then ready for oper-
ation.
DVD country codes
Your DVD changer only plays DVDs with the
coding 0 or 1. This coding cannot be changed.
Playing DVDs
Playback is only possible on the rear seat
screen, refer to Rear seat screen
* on page21.
1.If necessary, switch on the Entertainment
sound output, refer to page153.
2.If necessary, fill and insert the DVD maga-
zine.
*
Page 174 of 247
DVD changer
172
Notes
The DVD changer can play the following for-
mats:
>Video DVD
>CD-DA (audio CD)
The DVD Audio format is not supported by the
DVD changer. However, many audio DVDs
available in stores also contain a video track in
the DVD Video format in addition to the audio
track. These DVDs can be played back by the
DVD changer. Please refer to the information on
your DVD to determine whether your audio DVD
contains an additional video track.
DVDs are usually divided into tracks and chap-
ters and can contain different subtitles, camera
angles or sound tracks, languages and sound
formats. Depending on the version of the DVD,
these functions can be selected either directly
with the DVD control system or only via the
DVD-specific menu. Refer to the information on
your DVD for possible selections.
Dual-sided DVDs available from retail suppliers
are coated on both sides and bear no markings.
This means both sides are information carriers.
To play back the information on the other side,
remove the magazine and turn the DVD over.
Safety note
The BMW DVD changer is a Class 1 laser
product. Do not operate with a damaged
cover panel as this can lead to severe eye injury.
Never play CDs/DVDs with stick-on labels.
They can come loose during playback due to
the heat buildup and cause irreparable damage
to the system.
Only use round CDs/DVDs with a standard
diameter of 4.7 in/12 cm and do not play CDs/
DVDs with an adapter, e.g. CD singles; other-
wise, the CD/DVD or the adapter can jam and
may no longer eject properly.
Do not use combined CD/DVDs, e.g. DVD
Plus;
otherwise, the CD/DVD can jam, preventing it
from being ejected properly.<
General malfunctions
The BMW DVD changer is optimized for opera-
tion in the vehicle. It may react more sensitively
to defective CDs/DVDs than devices intended
for stationary use.
If a CD/DVD cannot be played back, first check
to make sure it has been correctly inserted.
Humidity
High humidity can fog the CD/DVD or the focus-
ing lens for the laser beam, temporarily prevent-
ing playback.
Malfunctions with particular CDs/DVDs
If malfunctions occur only with particular CDs/
DVDs, this can be due to one of the following
causes.
Home-recorded CDs/DVDs
Malfunction sources in home-recorded CDs/
DVDs include, for example, inconsistent data
origination and recording processes as well as
low quality or pronounced aging of the blanks
used.
Only write on CDs/DVDs with a marker espe-
cially designed for this purpose.
Damaged CDs/DVDs
Avoid finger prints, dust, scratches, and mois-
ture.
Store CDs/DVDs in a sleeve.
Do not expose CDs/DVDs to temperatures
above 1227/506, high humidity or direct
sunlight.
CDs/DVDs with copy protection
Manufacturers often provide CDs/DVDs with
copy protection. This can prevent or limit the
playback of these CDs/DVDs.
Care instructions
You can find everything you need to know about
this topic by consulting the separate Caring for
your vehicle brochure.