2006 BMW 750LI radio controls
[x] Cancel search: radio controlsPage 155 of 247
Navigation
Entertainment
Driving tips
153Reference
At a glance
Controls
Communications
Mobility
Switching on/off
In order to switch the Entertainment sound out-
put on/off: press the knob.
The unit will activate the last audio source
selected, radio or CD.
Using the voice command system:
Using with ignition off
The audio and video functions remain available
for use for a period of approx. 30 minutes after
you switch off the ignition.
Switch the sound output back on to enjoy this
function.
Adjusting volume
Turn the knob to the desired volume level.
The sound system automatically reverts
to its mute mode whenever you initiate or
accept a phone call.<
The setting is stored for the remote control cur-
rently in use.
Tone control
You can change various tone settings, e.g. tre-
ble and bass or the speed-dependent volume
control. The tone settings are set globally for all
of the audio sources.
The speakers and headphones in the rear can
be adjusted separately. The sound settings of
the headphones are made on the rear seat
screen with the headphones connected. Only
treble, bass and balance can be adjusted.
The setting is stored for the remote control cur-
rently in use.
Tone adjustment
iDrive, for principle details, refer to page16.
1.Press the button to open the start
menu.
2.Move the controller toward "Entertain-
ment".
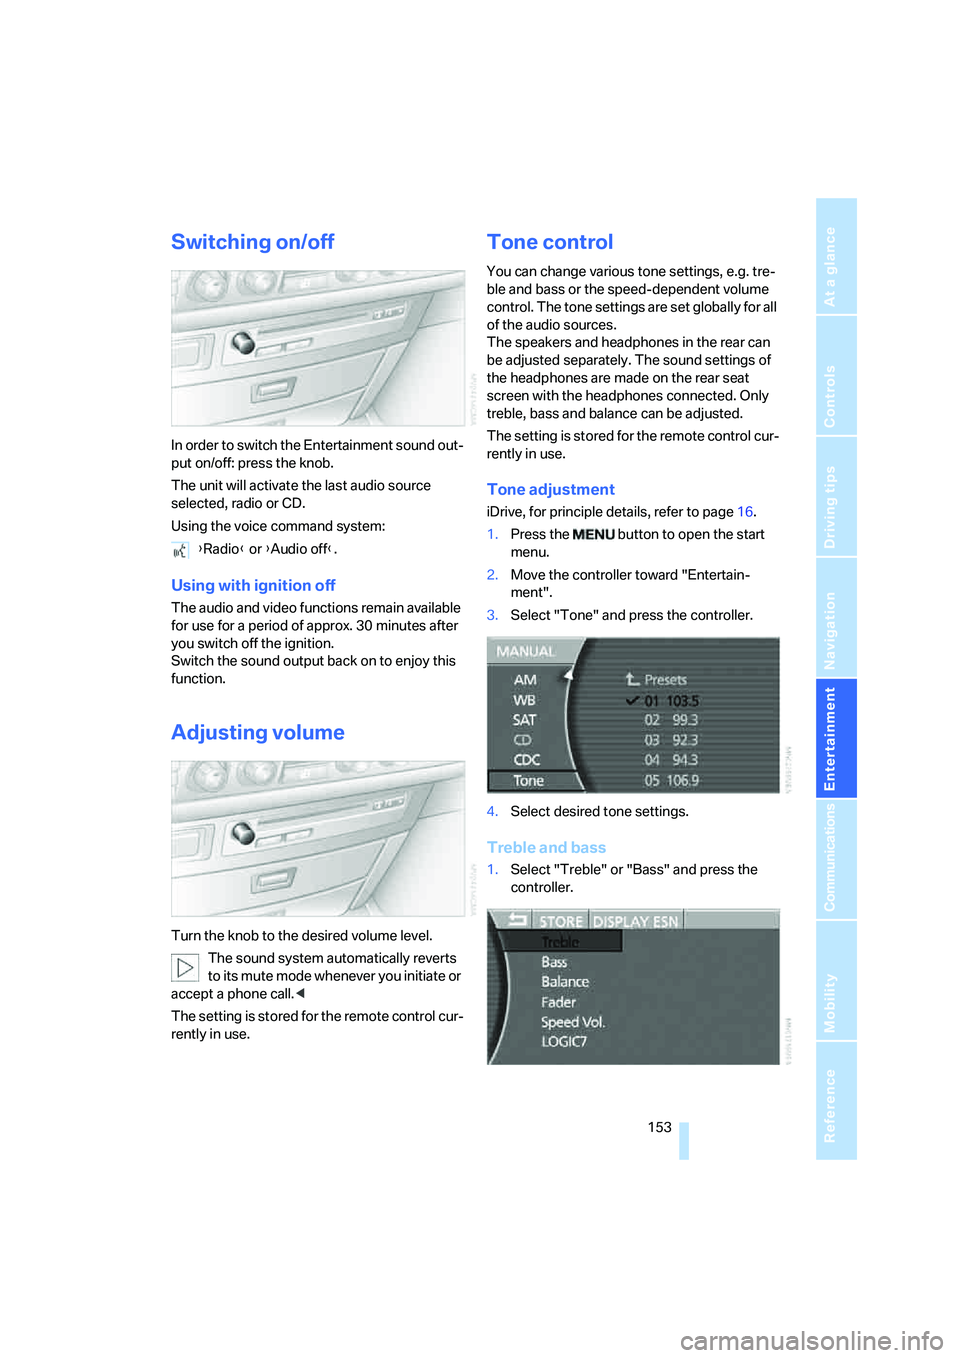
3.Select "Tone" and press the controller.
4.Select desired tone settings.
Treble and bass
1.Select "Treble" or "Bass" and press the
controller. {Radio} or {Audio off}.
Page 157 of 247
Navigation
Entertainment
Driving tips
155Reference
At a glance
Controls
Communications
Mobility
Radio
Your radio is equipped to receive the FM and
AM wavebands.
Listening to radio
Switch on audio or video sources, refer to
page153.
iDrive, for principle details, refer to page16.
1.Press the button to open the start
menu.
2.Move the controller toward "Entertain-
ment".
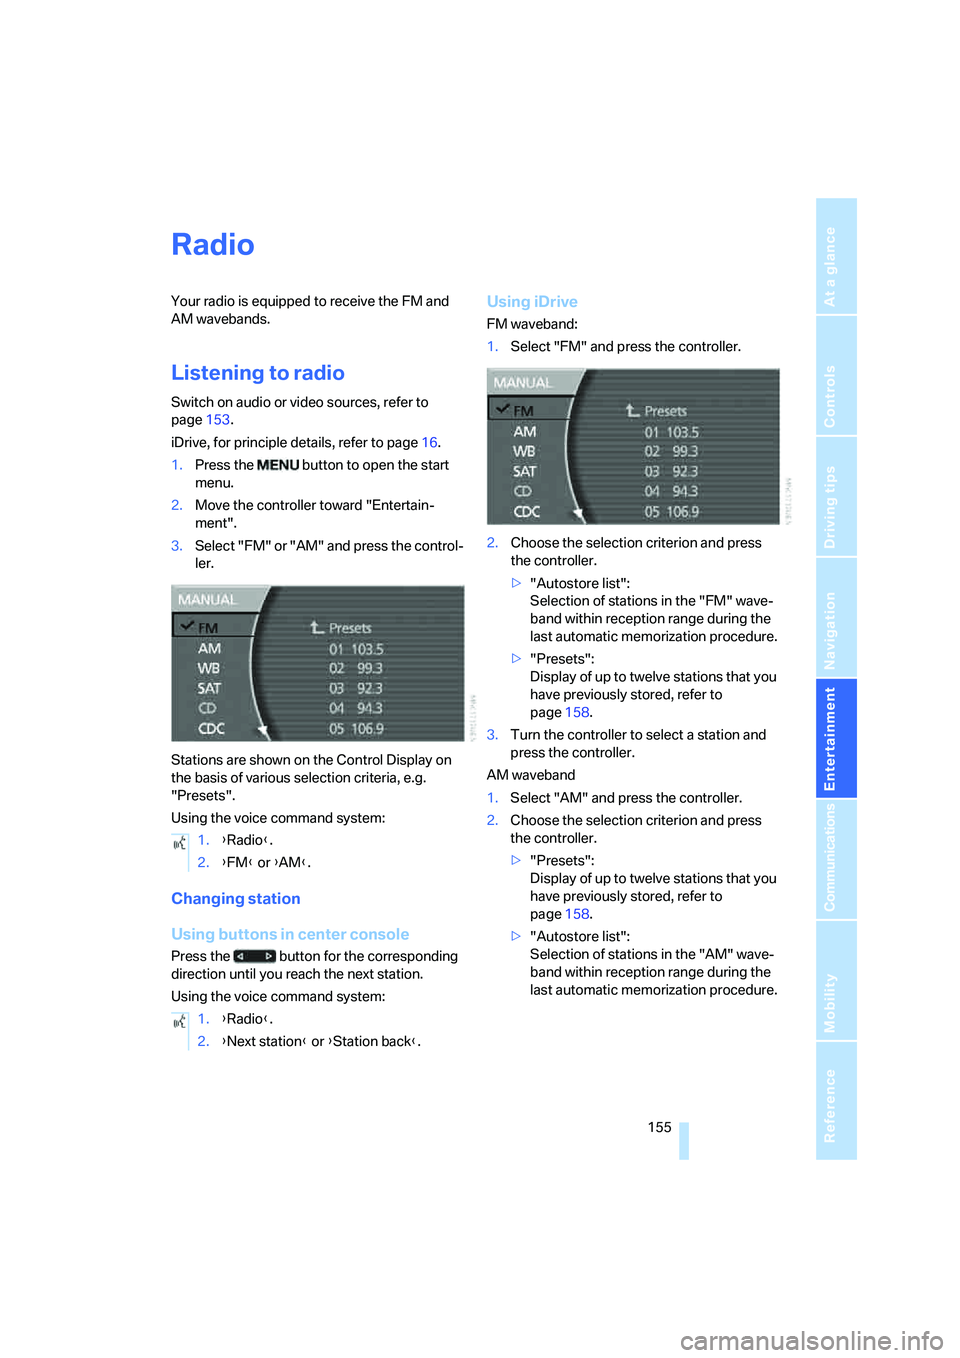
3.Select "FM" or "AM" and press the control-
ler.
Stations are shown on the Control Display on
the basis of various selection criteria, e.g.
"Presets".
Using the voice command system:
Changing station
Using buttons in center console
Press the button for the corresponding
direction until you reach the next station.
Using the voice command system:
Using iDrive
FM waveband:
1.Select "FM" and press the controller.
2.Choose the selection criterion and press
the controller.
>"Autostore list":
Selection of stations in the "FM" wave-
band within reception range during the
last automatic memorization procedure.
>"Presets":
Display of up to twelve stations that you
have previously stored, refer to
page158.
3.Turn the controller to select a station and
press the controller.
AM waveband
1.Select "AM" and press the controller.
2.Choose the selection criterion and press
the controller.
>"Presets":
Display of up to twelve stations that you
have previously stored, refer to
page158.
>"Autostore list":
Selection of stations in the "AM" wave-
band within reception range during the
last automatic memorization procedure. 1.{Radio}.
2.{FM} or {AM}.
1.{Radio}.
2.{Next station} or {Station back}.
Page 159 of 247
Navigation
Entertainment
Driving tips
157Reference
At a glance
Controls
Communications
Mobility
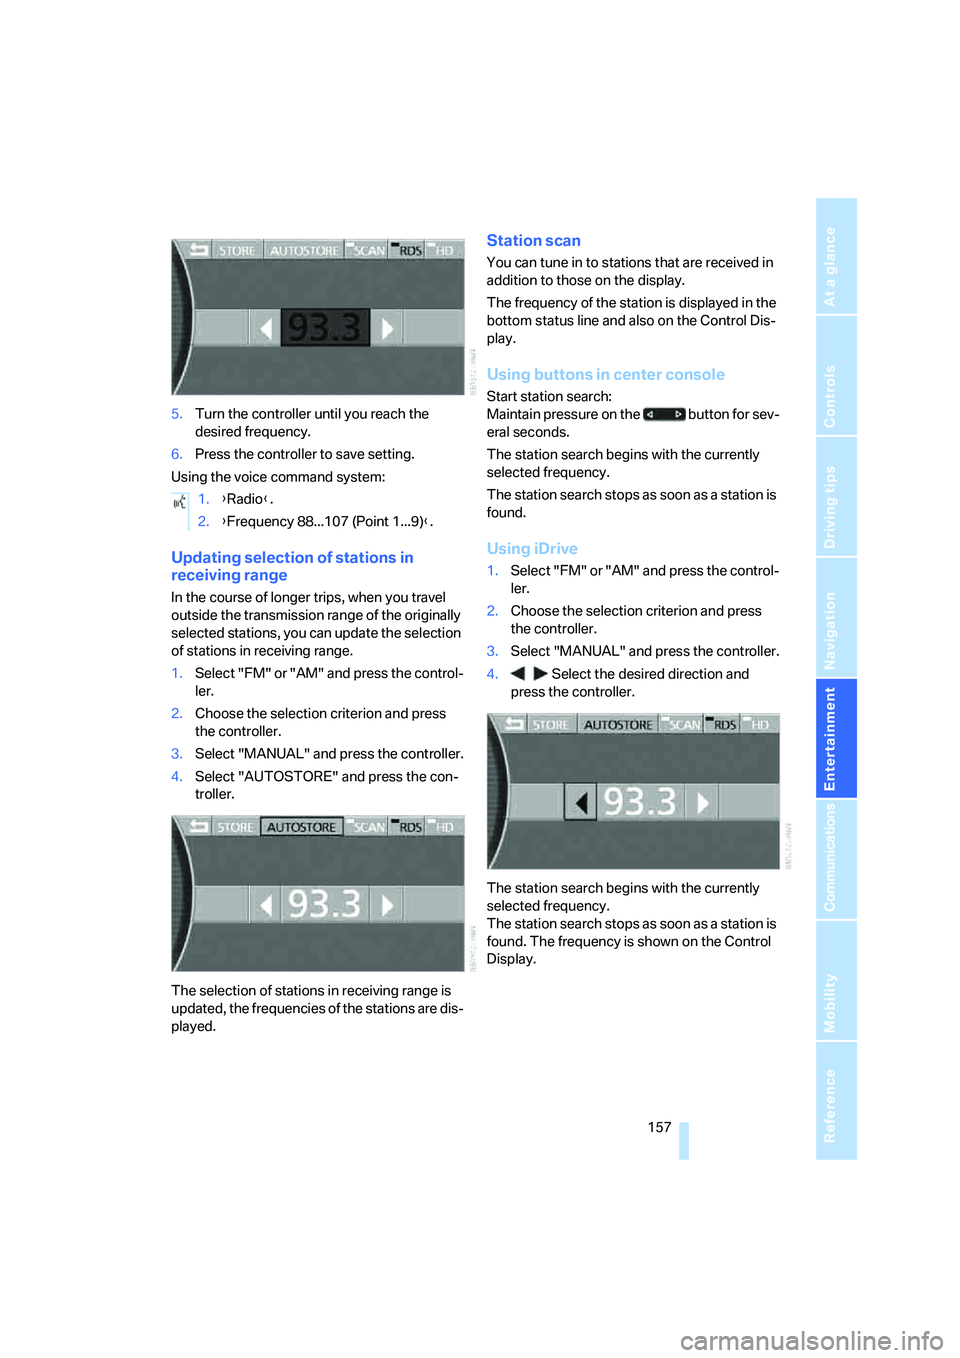
5.Turn the controller until you reach the
desired frequency.
6.Press the controller to save setting.
Using the voice command system:
Updating selection of stations in
receiving range
In the course of longer trips, when you travel
outside the transmission range of the originally
selected stations, you can update the selection
of stations in receiving range.
1.Select "FM" or "AM" and press the control-
ler.
2.Choose the selection criterion and press
the controller.
3.Select "MANUAL" and press the controller.
4.Select "AUTOSTORE" and press the con-
troller.
The selection of stations in receiving range is
updated, the frequencies of the stations are dis-
played.
Station scan
You can tune in to stations that are received in
addition to those on the display.
The frequency of the station is displayed in the
bottom status line and also on the Control Dis-
play.
Using buttons in center console
Start station search:
Maintain pressure on the button for sev-
eral seconds.
The station search begins with the currently
selected frequency.
The station search stops as soon as a station is
found.
Using iDrive
1.Select "FM" or "AM" and press the control-
ler.
2.Choose the selection criterion and press
the controller.
3.Select "MANUAL" and press the controller.
4. Select the desired direction and
press the controller.
The station search begins with the currently
selected frequency.
The station search stops as soon as a station is
found. The frequency is shown on the Control
Display. 1.{Radio}.
2.{Frequency 88...107 (Point 1...9)}.
Page 161 of 247
Navigation
Entertainment
Driving tips
159Reference
At a glance
Controls
Communications
Mobility
there is interference, it can take a while for
the station names to appear.
Switching RDS on/off
1.Select "FM" and press the controller.
2.Choose the selection criterion and press
the controller.
3.Select "MANUAL" and press the controller.
4.Select "RDS" and press the controller.
RDS is available in the FM waveband.<
Weather reports
Weather Radio is a service of the National Oce-
anic and Atmospheric Administration (NOAA)
of the US Department of Trade. Weather
reports are repeated every 4 to 6 minutes and
are routinely updated at intervals of 1 to
3 hours, and more often when necessary. Most
stations operate 24 hours a day. In case of a
storm, the National Weather Service interrupts
the routine weather news and transmits special
warning messages instead. Should you have
questions regarding NOAA Weather Radio,
please contact the nearest office of the National
Weather Service or write to the National
Weather Service at: W/OM1, National Oceanic
and Atmospheric Administration, 1325 East-
West Highway, Silver Spring, MD 20910.
Calling up weather reports
iDrive, for principle details, refer to page16.
1.Press the button to open the start
menu.
2.Move the controller toward "Entertain-
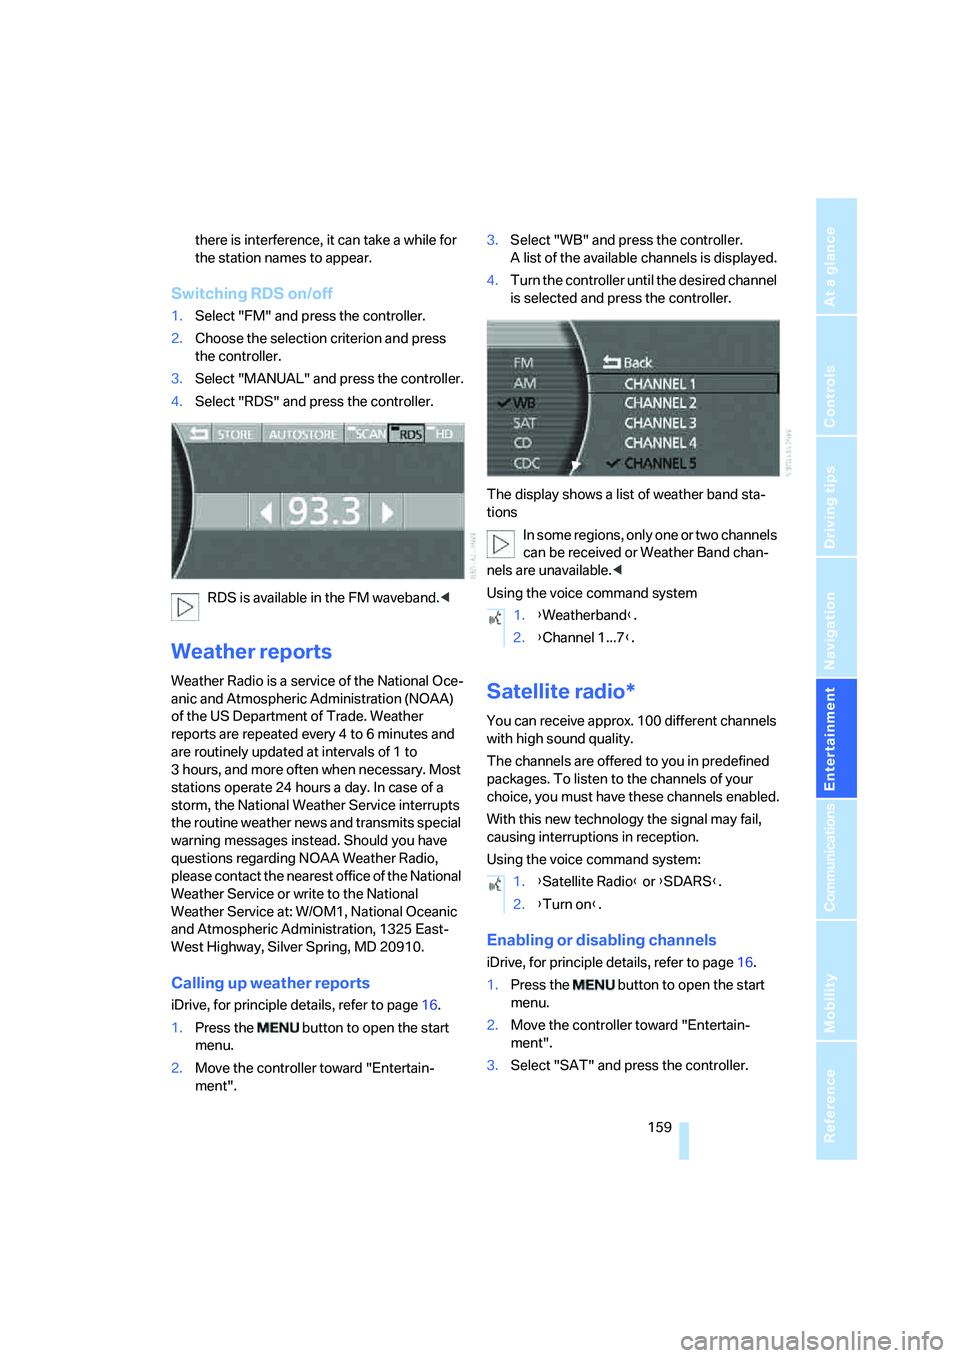
ment".3.Select "WB" and press the controller.
A list of the available channels is displayed.
4.Turn the controller until the desired channel
is selected and press the controller.
The display shows a list of weather band sta-
tions
In some regions, only one or two channels
can be received or Weather Band chan-
nels are unavailable.<
Using the voice command system
Satellite radio*
You can receive approx. 100 different channels
with high sound quality.
The channels are offered to you in predefined
packages. To listen to the channels of your
choice, you must have these channels enabled.
With this new technology the signal may fail,
causing interruptions in reception.
Using the voice command system:
Enabling or disabling channels
iDrive, for principle details, refer to page16.
1.Press the button to open the start
menu.
2.Move the controller toward "Entertain-
ment".
3.Select "SAT" and press the controller.
1.{Weatherband}.
2.{Channel 1...7}.
1.{Satellite Radio} or {SDARS}.
2.{Turn on}.
Page 163 of 247
Navigation
Entertainment
Driving tips
161Reference
At a glance
Controls
Communications
Mobility
near trees, mountains or other sources of radio
interference.
Reception is usually possible again as soon as
the signal is available again.<
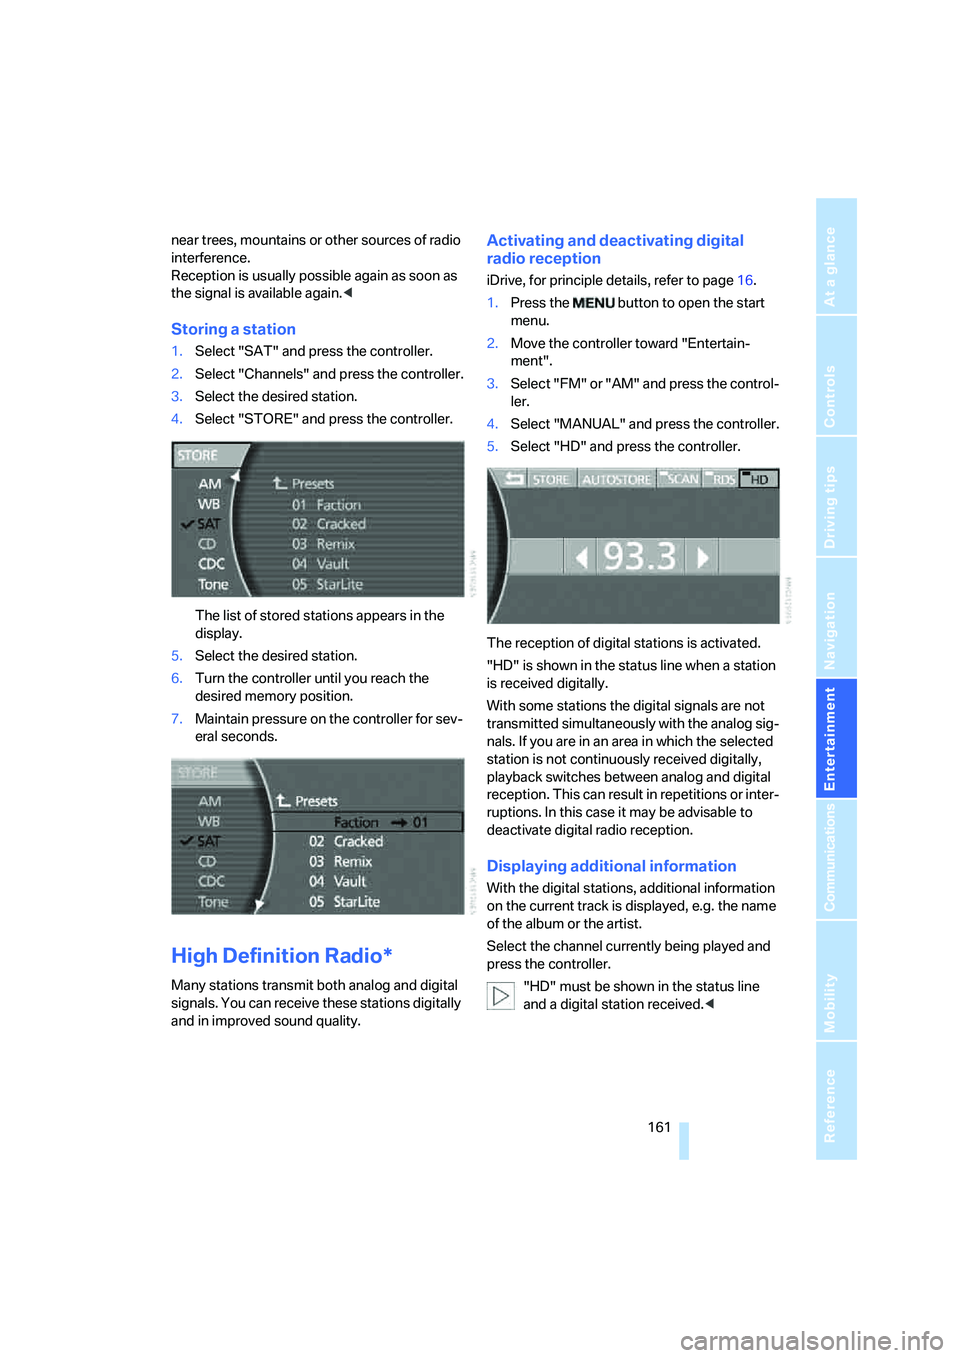
Storing a station
1.Select "SAT" and press the controller.
2.Select "Channels" and press the controller.
3.Select the desired station.
4.Select "STORE" and press the controller.
The list of stored stations appears in the
display.
5.Select the desired station.
6.Turn the controller until you reach the
desired memory position.
7.Maintain pressure on the controller for sev-
eral seconds.
High Definition Radio*
Many stations transmit both analog and digital
signals. You can receive these stations digitally
and in improved sound quality.
Activating and deactivating digital
radio reception
iDrive, for principle details, refer to page16.
1.Press the button to open the start
menu.
2.Move the controller toward "Entertain-
ment".
3.Select "FM" or "AM" and press the control-
ler.
4.Select "MANUAL" and press the controller.
5.Select "HD" and press the controller.
The reception of digital stations is activated.
"HD" is shown in the status line when a station
is received digitally.
With some stations the digital signals are not
transmitted simultaneously with the analog sig-
nals. If you are in an area in which the selected
station is not continuously received digitally,
playback switches between analog and digital
reception. This can result in repetitions or inter-
ruptions. In this case it may be advisable to
deactivate digital radio reception.
Displaying additional information
With the digital stations, additional information
on the current track is displayed, e.g. the name
of the album or the artist.
Select the channel currently being played and
press the controller.
"HD" must be shown in the status line
and a digital station received.<
Page 181 of 247
179
Entertainment
Reference
At a glance
Controls
Driving tips Communications
Navigation
Mobility
Getting started
Inserting mobile phone
If you insert or remove the mobile phone during
a call, the call may be interrupted depending on
the mobile phone model.
1.Remove the protective cap from the mobile
phone's antenna connector if necessary, so
that the mobile phone can engage in the
snap-in adapter.
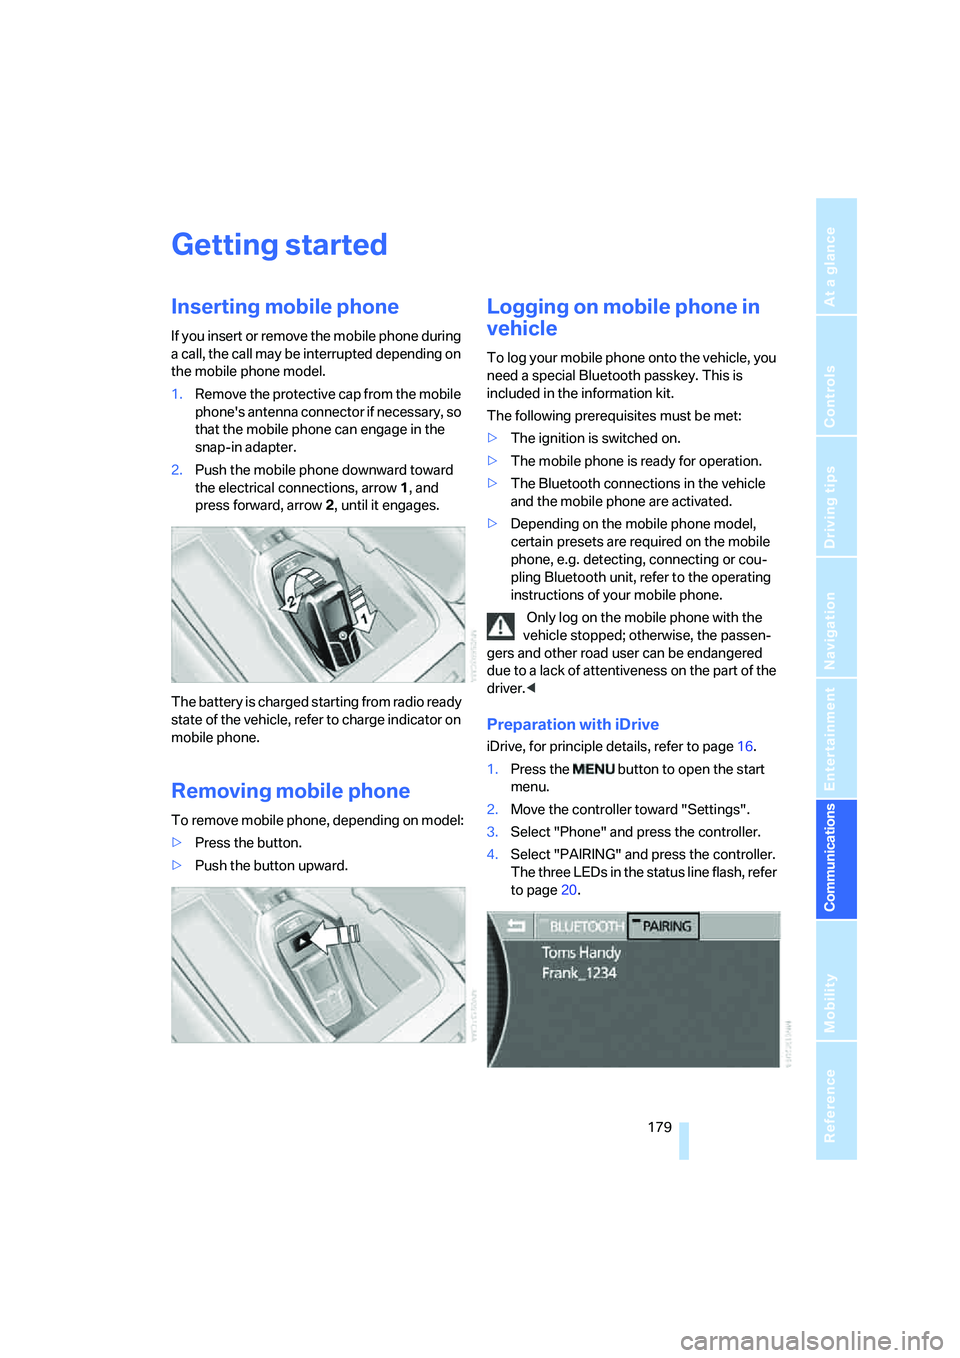
2.Push the mobile phone downward toward
the electrical connections, arrow1, and
press forward, arrow2, until it engages.
The battery is charged starting from radio ready
state of the vehicle, refer to charge indicator on
mobile phone.
Removing mobile phone
To remove mobile phone, depending on model:
>Press the button.
>Push the button upward.
Logging on mobile phone in
vehicle
To log your mobile phone onto the vehicle, you
need a special Bluetooth passkey. This is
included in the information kit.
The following prerequisites must be met:
>The ignition is switched on.
>The mobile phone is ready for operation.
>The Bluetooth connections in the vehicle
and the mobile phone are activated.
>Depending on the mobile phone model,
certain presets are required on the mobile
phone, e.g. detecting, connecting or cou-
pling Bluetooth unit, refer to the operating
instructions of your mobile phone.
Only log on the mobile phone with the
vehicle stopped; otherwise, the passen-
gers and other road user can be endangered
due to a lack of attentiveness on the part of the
driver.<
Preparation with iDrive
iDrive, for principle details, refer to page16.
1.Press the button to open the start
menu.
2.Move the controller toward "Settings".
3.Select "Phone" and press the controller.
4.Select "PAIRING" and press the controller.
The three LEDs in the status line flash, refer
to page20.
Page 213 of 247
Mobility
211Reference
At a glance
Controls
Driving tips
Communications
Navigation
Entertainment
After mounting
1.Tighten the lug bolts in a diagonal pattern.
To ensure safety, always have the
lug bolts checked with a calibrated
torque wrench as soon as possible to
ensure that they are tightened to the speci-
fied torque. The tightening torque is
100lbft/140Nm.<
2.Reverse the removal sequence when stor-
ing the wheel and tools in the vehicle.
3.Check and correct the tire inflation pressure
at the earliest opportunity.
Protect valve stems and valve stem
seal caps from dirt and contamina-
tion. Dirt in valve stems is a frequent source
of gradual air loss.<
4.Reinitialize the Flat Tire Monitor, refer to
page90, or reset the Tire Pressure Monitor,
refer to page92.
5.Replace the damaged tire as soon as possi-
ble and have the new wheel/tire balanced.
Driving with spare tire
On certain wheel-tire combinations, the
size of the spare tire differs from that of
the rest of the tires. The spare tire is fully capa-
ble of running in all load and speed ranges.
However, to recreate the original conditions,
the tire should be replaced as soon as possi-
ble.<
Vehicle battery
Maintenance
The battery is 100 % maintenance-free, i.e., the
electrolyte will last for the life of the battery
when the vehicle is operated in a temperate cli-
mate. Your BMW center will be happy to advise
you on all questions concerning the battery.
Charging battery
Charge the battery in the vehicle only via the
terminals in the engine compartment and with
the engine off. Connections, refer to Jump
starting on page213.
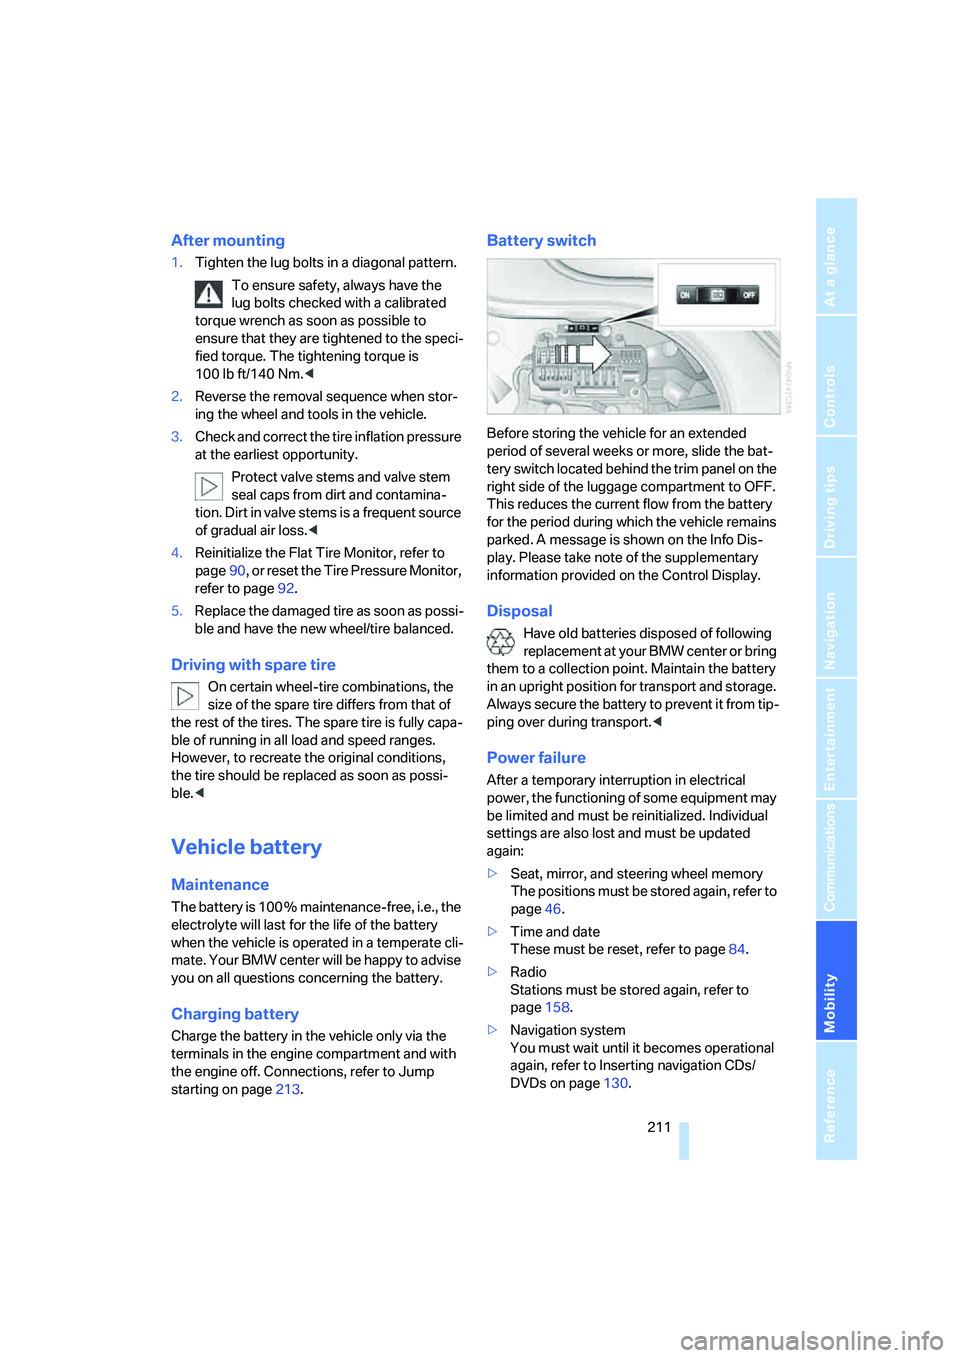
Battery switch
Before storing the vehicle for an extended
period of several weeks or more, slide the bat-
tery switch located behind the trim panel on the
right side of the luggage compartment to OFF.
This reduces the current flow from the battery
for the period during which the vehicle remains
parked. A message is shown on the Info Dis-
play. Please take note of the supplementary
information provided on the Control Display.
Disposal
Have old batteries disposed of following
replacement at your BMW center or bring
them to a collection point. Maintain the battery
in an upright position for transport and storage.
Always secure the battery to prevent it from tip-
ping over during transport.<
Power failure
After a temporary interruption in electrical
power, the functioning of some equipment may
be limited and must be reinitialized. Individual
settings are also lost and must be updated
again:
>Seat, mirror, and steering wheel memory
The positions must be stored again, refer to
page46.
>Time and date
These must be reset, refer to page84.
>Radio
Stations must be stored again, refer to
page158.
>Navigation system
You must wait until it becomes operational
again, refer to Inserting navigation CDs/
DVDs on page130.
Page 227 of 247
Reference 225
At a glance
Controls
Driving tips
Communications
Navigation
Entertainment
Mobility
Audio152
– controls152
– switching on/off153
– tone control153
– volume153
"AUDIO", DVD changer171
Audio mode152
Automatic
– air distribution104
– air volume104
– cruise control67,69
– headlamp control99
– service notification187
– station storage157
– steering wheel adjustment,
refer to Assistance getting in
and out52
– tailgate operation33,36
Automatically switching
between high beams and
low beams, refer to High-
beam assistant100
Automatic car wash, refer to
Caring for your vehicle
brochure
Automatic climate control
– adjusting temperature105
– AUTO program104
– defrosting windows and
removing condensation106
– maximum cooling106
– rear air conditioner108
– rear refrigerator117
– residual heat106
– settings on Control
Display104
– switching cooling function
on and off manually107
– switching off105
Automatic closing of doors
and trunk lid, refer to
Automatic Soft Close35,36
Automatic curb monitor51
Automatic garage door
opener111
Automatic Hold59
– activation/deactivation59
– parking60Automatic lighting
– refer to Automatic headlamp
control99
– refer to Daytime running
lamps99
– refer to High-beam
assistant100
– refer to Interior lamps102
– refer to Pathway lighting99
Automatic recirculated-air
control AUC105
Automatic soft closing
– doors
35
– luggage compartment lid36
Automatic station search156
Automatic transmission with
Steptronic62
– buttons on steering
wheel63
– interlock62
– manually releasing trans-
mission lock64
– shiftlock62
– towing214
– tow-starting215
Automatic windshield washer
system65
"AUTO P"
– Automatic Hold activation/
deactivation59
– programmable buttons52
AUTO program, automatic
climate control104
– adjusting intensity104
"Autostore list", radio155
Average fuel consumption77
– setting units84
Average speed77
– setting units84
"Avoid ferries",
navigation142
"Avoid highway",
navigation142
Avoiding tolls142
Avoiding unintentional
alarms38
"Avoid route", navigation146
"Avoid sect.", navigation146
"Avoid tolls", navigation142Axle loads, refer to
Weights220
"A-Z", telephone183
B
Backrest contour, refer to
Lumbar support
adjustment45
Backrests, refer to Seats,
adjusting44
Backrest width adjustment,
refer to Front comfort seat
adjustment44
Backup lamps, replacing
bulbs209
"Balance", balance and
fader154
Bar, refer to Tow bar215
"Bass", Treble and bass153
Battery211
– jump starting213
– switch211
Battery change, remote
control in Comfort
Access39
"BC", computer77
Belts, refer to Safety belts48
Beverage holder, refer to Cup
holders115
Blower
– refer to Air volume106
– refer to Manually adjusting
air volume108
"BLUETOOTH"181
Bluetooth link, activating/
deactivating180
BMW Assist186
– "BMW Assist"186
– "BMW center"187
– "Customer Relations"188
– "Roadside Assistance"187
BMW Maintenance
System205
BMW Night Vision96
– cleaning camera98
– deactivating97
– making settings97