2006 BMW 750I window
[x] Cancel search: windowPage 12 of 247
Cockpit
10
Cockpit
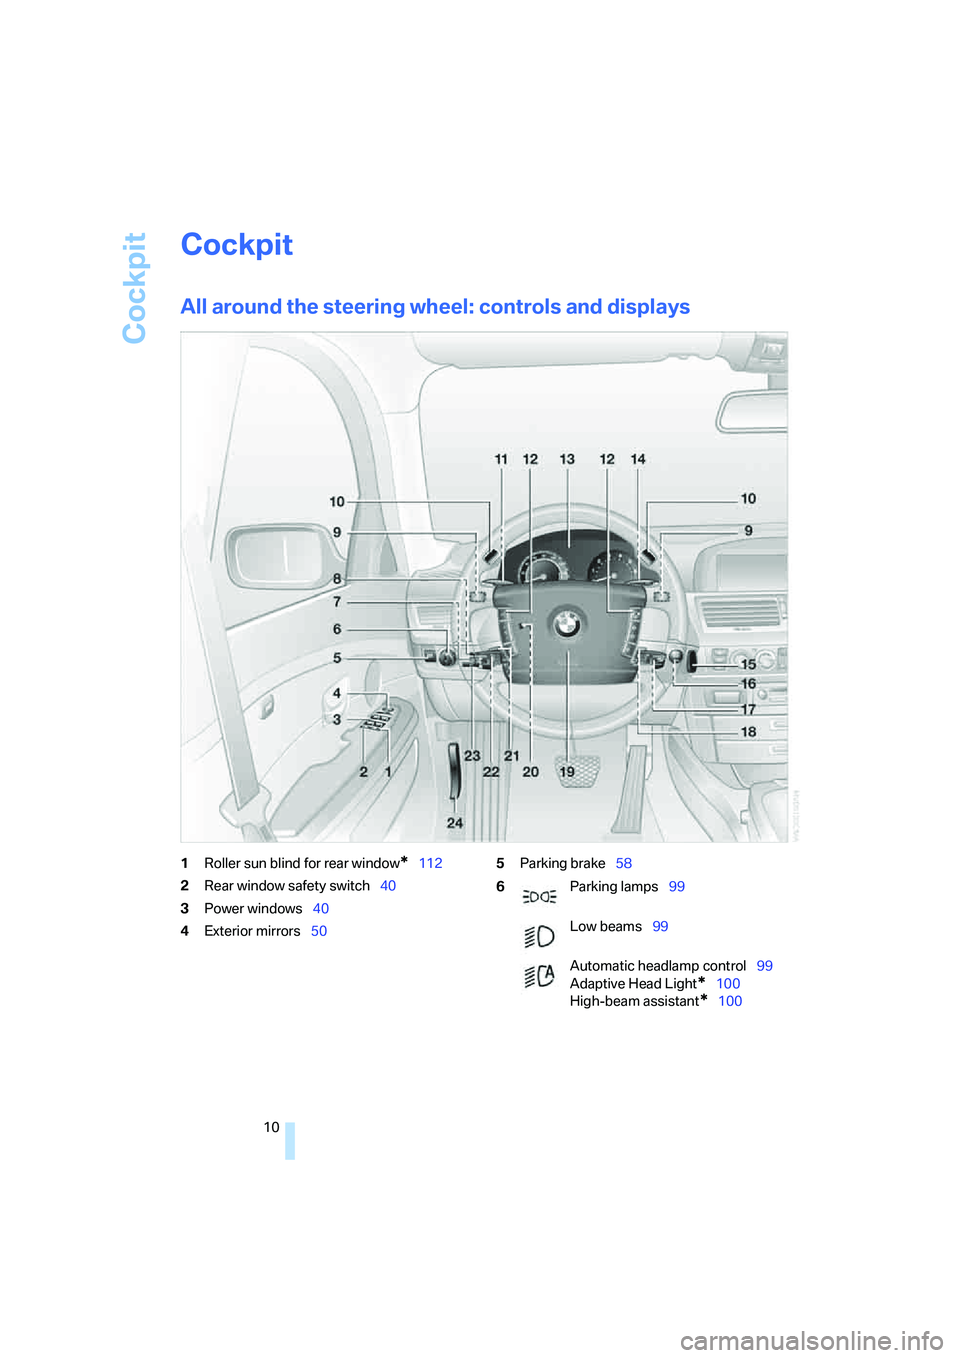
All around the steering wheel: controls and displays
1Roller sun blind for rear window*112
2Rear window safety switch40
3Power windows40
4Exterior mirrors505Parking brake58
6Parking lamps99
Low beams99
Automatic headlamp control99
Adaptive Head Light
*100
High-beam assistant
*100
Page 17 of 247

At a glance
15Reference
Controls
Driving tips
Communications
Navigation
Entertainment
Mobility
1Glass sunroof, electric*41
2Memory buttons for integrated universal
remote control
*111
3Reading lamps102
4Interior lamps102
5Passenger airbag status lamp95
6Initiating an emergency call178
7Control Display16
8Temperature, left side of passenger
compartment: turn,
maximum cooling: press106
9Air volume, left side of passenger compart-
ment: turn106
Defrosting windows and removing conden-
sation: press106
10Hazard warning flashers
11Air volume, right side of passenger
compartment106
12Temperature, right side of passenger
compartment: rotate,
residual heat: press106
13Rear window defroster
14Air conditioner mode107
15Opening the glove compartment
16Automatic air distribution and airflow as
well as intensity of the AUTO program,
right side of passenger compartment104
17Starting scan
>for stations152
>for tracks152
18Central locking system34
19Selecting AM or FM waveband
20Selecting radio, CD player, and CD changer
21Controller16
22 button and programmable
button16
23Snap-in adapter17924Seat adjustment44
25Glasses compartment115
26Storage compartments115
27Switching audio sources on/off and
adjusting volume153
28Retracting telephone keypad177
29Automatic air distribution and airflow as
well as intensity of the AUTO program,
left side of passenger compartment104
30Outside air/AUC Automatic recirculated-air
control/recirculated air105
31Switching off automatic climate
control105
Heated seats*49
Active seat ventilation
*50
Active seat for driver
*50
Seat, mirror and steering wheel
memory46
Page 19 of 247
At a glance
17Reference
Controls
Driving tips
Communications
Navigation
Entertainment
Mobility
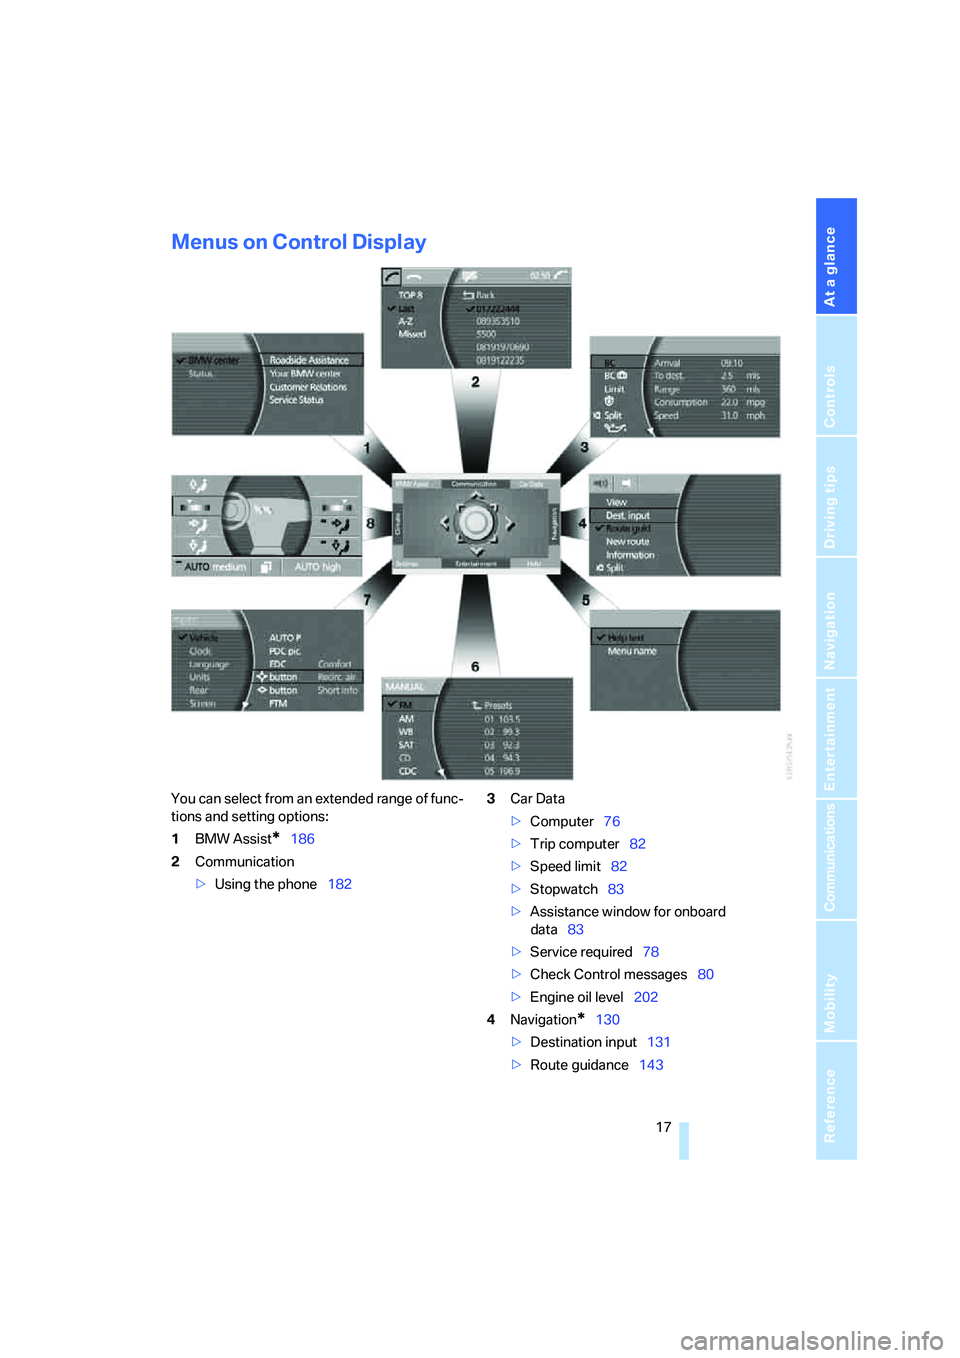
Menus on Control Display
You can select from an extended range of func-
tions and setting options:
1BMW Assist
*186
2Communication
>Using the phone1823Car Data
>Computer76
>Trip computer82
>Speed limit82
>Stopwatch83
>Assistance window
for onboard
data83
>Service required78
>Check Control messages80
>Engine oil level202
4Navigation
*130
>Destination input131
>Route guidance143
Page 22 of 247
iDrive
20
Symbols
Some functions and information are displayed
in the form of symbols:
The function is switched on
Back.
The function is switched on
"Split": to show the current display in
the assistance window.
Assistance window
Additional information can be displayed in the
assistance window:
>Short help and supplementary information
texts about selected menu items.
>A function selected from the "Car Data"
menu, refer to page83.
>The route with a navigation system, refer to
page130.
Showing/hiding help texts
You can display help texts and supplementary
information on selected menu items in the
assistance window.
1.Press the button to open the start
menu.
2.Move the controller toward "Help".3.Select "Help text" and press the controller.
The symbol indicates the menu that is cur-
rently activated. The help texts are displayed in
the assistance window.
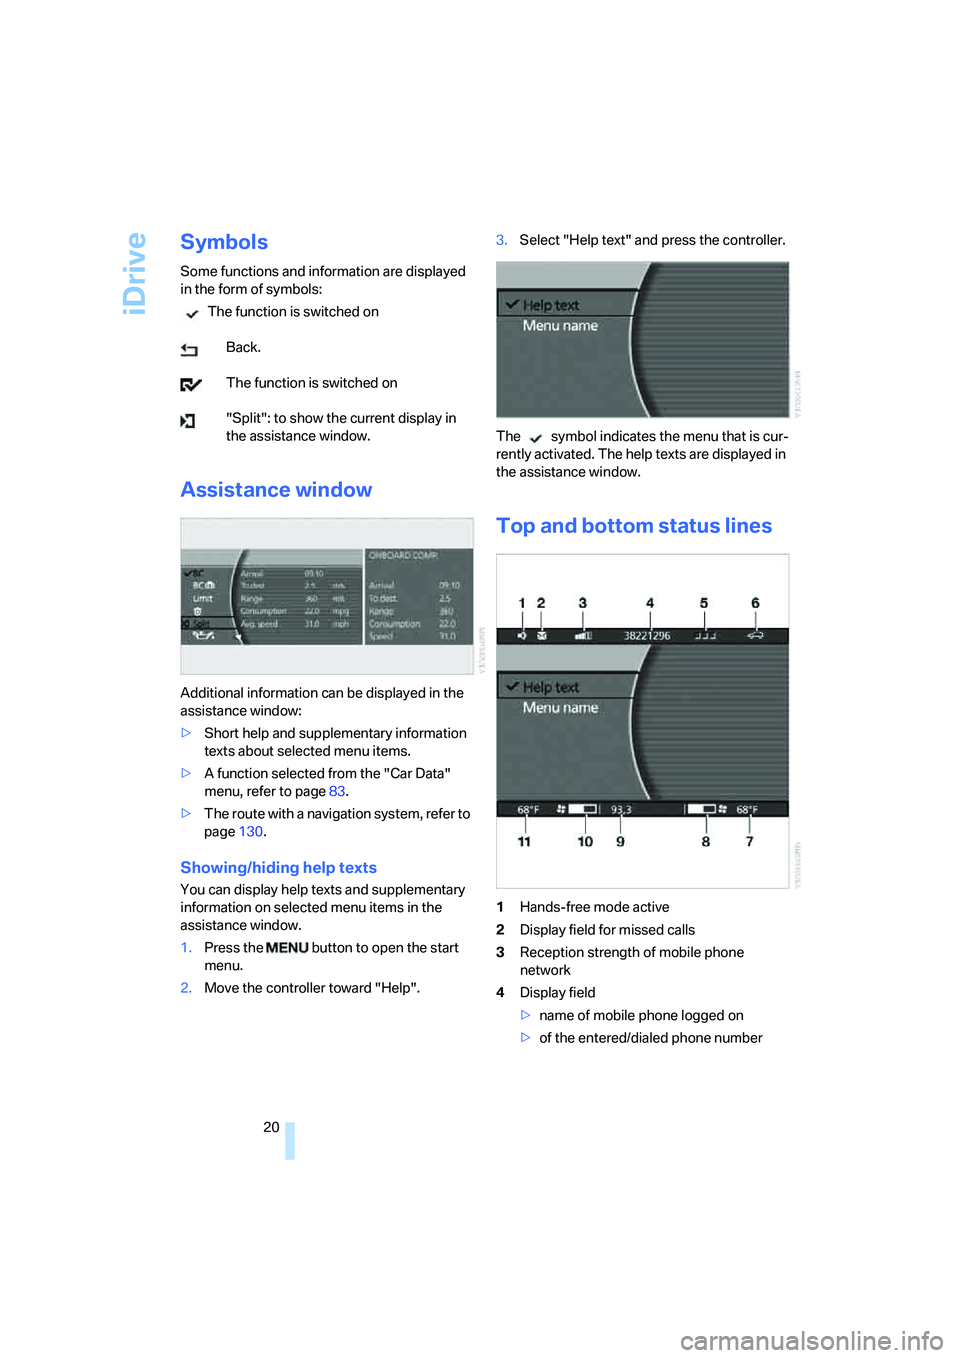
Top and bottom status lines
1Hands-free mode active
2Display field for missed calls
3Reception strength of mobile phone
network
4Display field
>name of mobile phone logged on
>of the entered/dialed phone number
Page 23 of 247
At a glance
21Reference
Controls
Driving tips
Communications
Navigation
Entertainment
Mobility
5Telephone status
>Green, yellow and red flashing:
Linking of a mobile phone.
>Green:
Incoming or outgoing call.
>Red:
No network available.
>Yellow:
The network of another provider is being
used, partner network.
>Flashing yellow:
The network of another provider is being
used, external network.
Roaming in a partner or external net-
work incurs higher call charges than
in your home network.<
6Display of Check Control81
>You can use the "Car Data" menu to dis-
play the message on the Control Dis-
play.
Status service requirement display78
>Red:
At least one service interval has been
exceeded.
7Display of temperature selection and inten-
sity of the AUTO program, right side of pas-
senger compartment
8Air volume, right side of passenger com-
partment
9Entertainment
Display for radio, CD, and DVD
With compressed audio files, the informa-
tion about the track is displayed166
10Air volume, left side of passenger compart-
ment
11Display of temperature selection and inten-
sity of the AUTO program, left side of pas-
senger compartment
Assistance window*
The status lines in the assistance window show
the following:
>Outside temperature
>Navigation system destination>Time
>Date
Rear seat screen*
Some of the functions of iDrive can also be
operated via the rear seat screen. Certain func-
tions are only available via iDrive. These func-
tions can only be operated to a limited degree
on the rear screen, e.g. the speed limit can only
be displayed. The settings are made via iDrive.
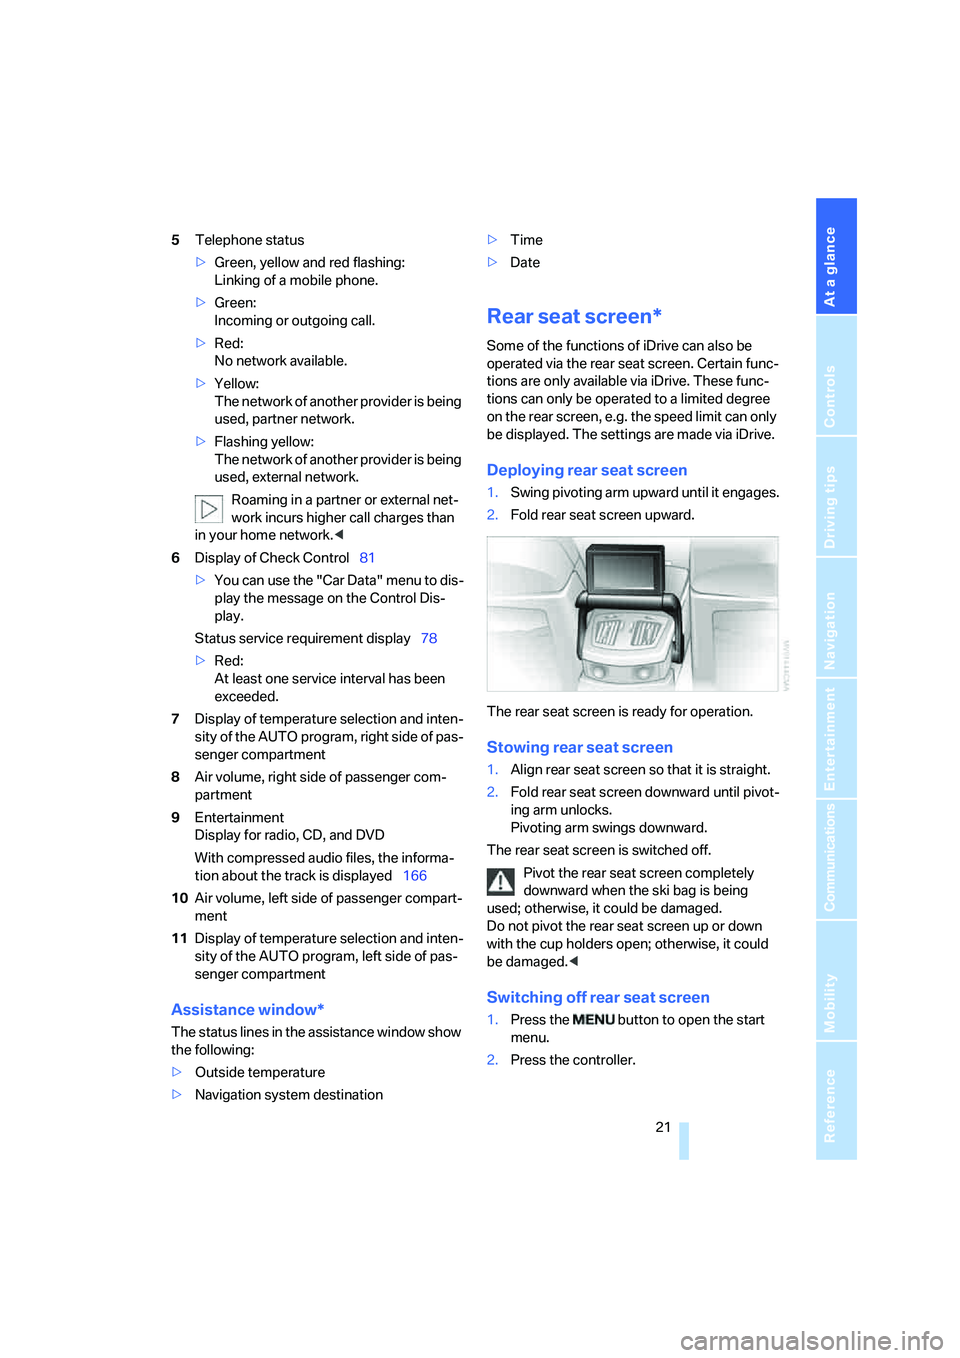
Deploying rear seat screen
1.Swing pivoting arm upward until it engages.
2.Fold rear seat screen upward.
The rear seat screen is ready for operation.
Stowing rear seat screen
1.Align rear seat screen so that it is straight.
2.Fold rear seat screen downward until pivot-
ing arm unlocks.
Pivoting arm swings downward.
The rear seat screen is switched off.
Pivot the rear seat screen completely
downward when the ski bag is being
used; otherwise, it could be damaged.
Do not pivot the rear seat screen up or down
with the cup holders open; otherwise, it could
be damaged.<
Switching off rear seat screen
1.Press the button to open the start
menu.
2.Press the controller.
Page 27 of 247
At a glance
25Reference
Controls
Driving tips
Communications
Navigation
Entertainment
Mobility
Volume adjustment
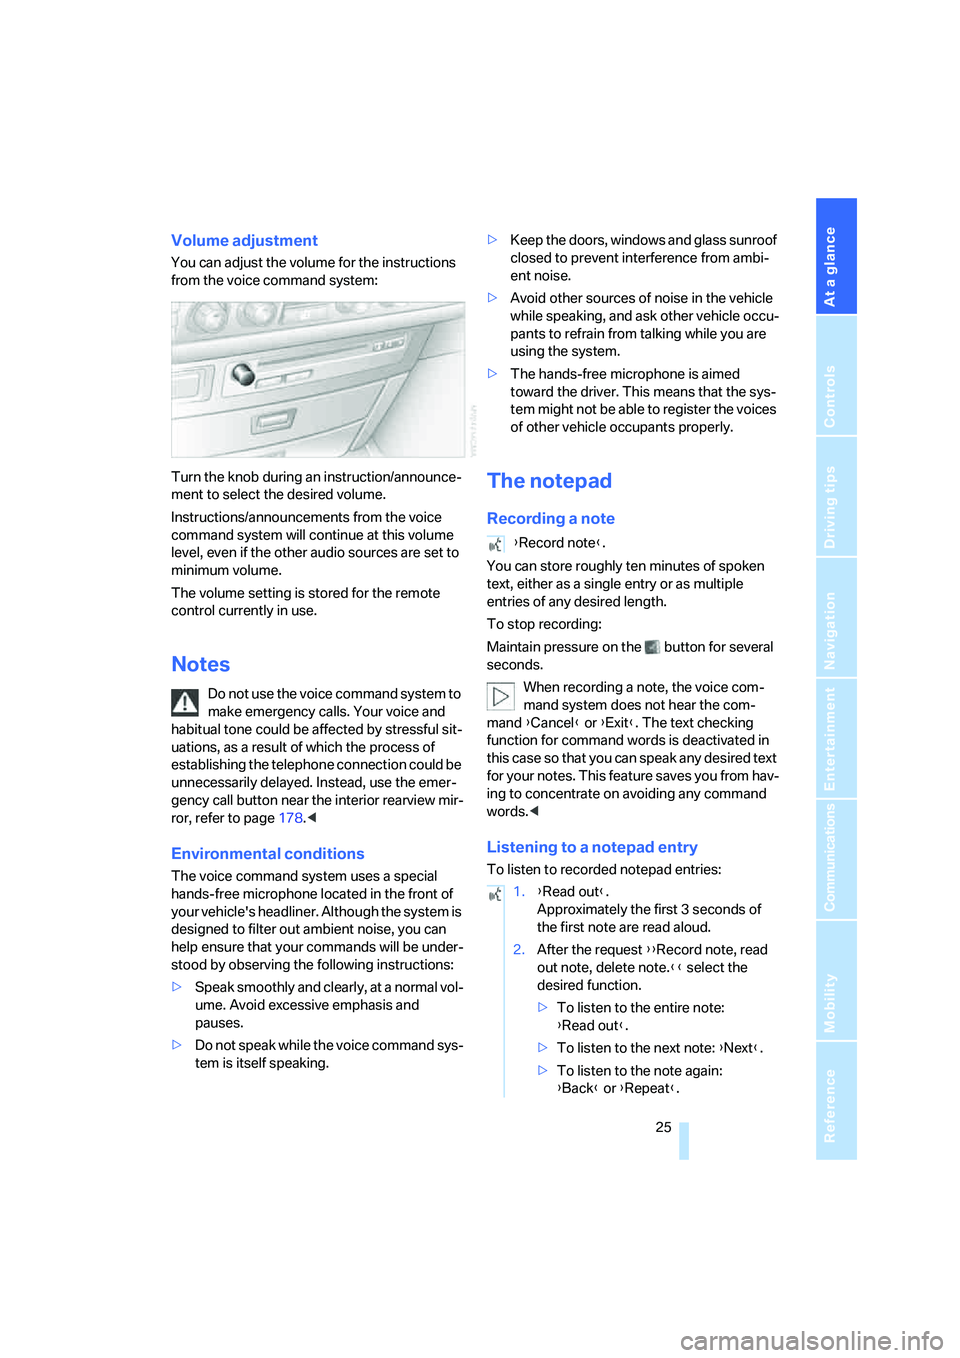
You can adjust the volume for the instructions
from the voice command system:
Turn the knob during an instruction/announce-
ment to select the desired volume.
Instructions/announcements from the voice
command system will continue at this volume
level, even if the other audio sources are set to
minimum volume.
The volume setting is stored for the remote
control currently in use.
Notes
Do not use the voice command system to
make emergency calls. Your voice and
habitual tone could be affected by stressful sit-
uations, as a result of which the process of
establishing the telephone connection could be
unnecessarily delayed. Instead, use the emer-
gency call button near the interior rearview mir-
ror, refer to page178.<
Environmental conditions
The voice command system uses a special
hands-free microphone located in the front of
your vehicle's headliner. Although the system is
designed to filter out ambient noise, you can
help ensure that your commands will be under-
stood by observing the following instructions:
>Speak smoothly and clearly, at a normal vol-
ume. Avoid excessive emphasis and
pauses.
>Do not speak while the voice command sys-
tem is itself speaking.>Keep the doors, windows and glass sunroof
closed to prevent interference from ambi-
ent noise.
>Avoid other sources of noise in the vehicle
while speaking, and ask other vehicle occu-
pants to refrain from talking while you are
using the system.
>The hands-free microphone is aimed
toward the driver. This means that the sys-
tem might not be able to register the voices
of other vehicle occupants properly.
The notepad
Recording a note
You can store roughly ten minutes of spoken
text, either as a single entry or as multiple
entries of any desired length.
To stop recording:
Maintain pressure on the button for several
seconds.
When recording a note, the voice com-
mand system does not hear the com-
mand {Cancel} or {Exit}. The text checking
function for command words is deactivated in
this case so that you can speak any desired text
for your notes. This feature saves you from hav-
ing to concentrate on avoiding any command
words.<
Listening to a notepad entry
To listen to recorded notepad entries:
{Record note}.
1.{Read out}.
Approximately the first 3 seconds of
the first note are read aloud.
2.After the request {{Record note, read
out note, delete note.}} select the
desired function.
>To listen to the entire note:
{Read out}.
>To listen to the next note: {Next}.
>To listen to the note again:
{Back} or {Repeat}.
Page 34 of 247

Opening and closing
32
Central locking system
The concept
The central locking system is ready for opera-
tion whenever the driver's door is closed. This
simultaneously engages and releases the locks
on the following:
>Doors
>Luggage compartment lid
>Fuel filler door
The central locking system can be operated
from the outside:
>via the remote control
>via the driver's door lock
>with Comfort Access
* via the door handles
and from inside via the button for the central
locking system.
When the system is locked from inside, the fuel
filler door remains unlocked. Refer to page34.
Each time the central locking system is locked
or unlocked from outside the vehicle, this simul-
taneously engages or disengages the anti-theft
system. The alarm system is also armed or dis-
armed. The remote control also switches the
interior lamps on and off.
For additional details on alarm system
refer to
page37.
In an accident of corresponding severity, the
central locking system automatically unlocks
the vehicle. In addition, the hazard warning
flashers and interior lamps switch on.
Opening and closing: from
outside
Using remote control
Because any persons or animals left unat-
tended in a parked vehicle could lock the
doors from the inside, you should always keep
the remote control with you; this precaution
ensures that you will remain able to unlock the
vehicle from the outside at all times.<1Unlocking, comfort opening, and deactivat-
ing alarm system
2Locking and securing, arming alarm sys-
tem, switching off tilt alarm sensor and inte-
rior motion sensor, switching on interior
lamps and perimeter lighting
3Opening luggage compartment lid
4Switching on interior lamps and pathway
lighting, activating panic mode
*. You can
find details about home lighting on page99.
If it is no longer possible to lock the vehi-
cle with a remote control, its battery is
discharged. Use this remote control during an
extended drive; this will recharge the battery,
refer to page30.
In the event of malfunctions, please contact
your BMW center. which is also your source for
replacement keys.<
Unlocking
1. Press the button. The hazard warning
flashers blink twice.
Driver's door and fuel filler door are
unlocked.
2.Press the button again.
All other doors and the luggage compart-
ment lid are unlocked.
The interior lamps and the door-mounted
perimeter lamps come on.
Comfort opening
Press the button longer. The windows and
the glass sunroof open. The glass sunroof will
not move if it is already in its raised position.
Page 40 of 247

Opening and closing
38
Tilt alarm sensor
The tilt of the vehicle is monitored. The alarm
system reacts, e.g. in case of an attempted
wheel theft or towing.
Interior motion sensor
In order for the interior motion sensor to func-
tion properly, the windows and glass sunroof
must be completely closed.
Avoiding unintentional alarms
The tilt alarm sensor and interior motion sensor
may be switched off at the same time. This pre-
vents unintentional alarms, e.g. in the following
situations:
>In duplex garages
>When transporting on car-carrying trains
>When animals are to remain in the vehicle
Switching off tilt alarm sensor and
interior motion sensor
Press the button on the remote control
again as soon as the vehicle is locked.
The indicator lamp lights up briefly and then
flashes continuously. The tilt alarm sensor and
the interior motion sensor are switched off until
the next time the vehicle is unlocked and subse-
quently locked again.
Comfort Access*
With Comfort Access, you can have access to
your vehicle without having to hold the remote
control in your hand. It is sufficient to carry the
remote control on your person, e.g. in a jacket
pocket. The vehicle automatically detects the
associated remote control in the immediate
vicinity or in the passenger compartment.
Comfort Access supports the following func-
tions:
>Locking/unlocking the vehicle
>Unlocking the luggage compartment lid
separately
>Starting the engine
Functional requirements
>The vehicle can only be locked if the remote
control is outside the vehicle.
>The next unlocking and locking cycle is not
possible until after approx. 2 seconds.
>The engine can only be started if the remote
control is inside the vehicle.
Comparison to conventional remote
control
You can control the functions mentioned previ-
ously with the Comfort Access or by pressing
the buttons on the remote control. Therefore
please first familiarize yourself with the instruc-
tions for opening and closing, starting on
page32.
The specific features involved in the use of
Comfort Access are described below.
If a short delay occurs when opening or
closing the windows and the glass sun-
roof, then this indicates that the system is
checking whether a remote control is located in
the vehicle. Please repeat opening or closing if
necessary.<
Unlocking
Pull a door handle. This corresponds to press-
ing the button.
Only the door of the door handle you have
pulled is unlocked.
You unlock the other doors from the inside,
using the central locking system button, refer to
page34.<
Engaging locks
Push a door handle. This corresponds to press-
ing the button.
Before locking, make sure that the igni-
tion and all current-consuming devices
are switched off in order to minimized the drain
on the battery.<
If a remote control is detected in the inte-
rior, the vehicle is unlocked again or not
locked in the first place.<