2006 BMW 745Li rear entertainment
[x] Cancel search: rear entertainmentPage 125 of 247

Driving tips
123Reference
At a glance
Controls
Communications
Navigation
Entertainment
Mobility
Interior and exterior mirrors,
automatic dimming feature*
Two photocells in the interior rearview mirror
control this function. One is integrated into the
mirror's lens, the other is located offset from
this on the rear of the mirror housing.
For trouble-free operation, keep the photocells
clean and do not cover the area between the
interior rearview mirror and the windshield. Do
not attach any kind of stickers to the windshield
in front of the mirror either.
Hydroplaning
When driving on wet or slushy roads,
reduce road speed. If you do not, a wedge
of water can form between tires and road sur-
face. This phenomenon is referred to as hydro-
planing, and is characterized by a partial or
complete loss of contact between tires and
road surface, ultimately undermining your abil-
ity to steer and brake the vehicle.<
Driving through water
Only drive through water with a maximum
depth of 1 ft/30 cm, and then only at walk-
ing speed at the most. Otherwise, you run the
risk of damaging the vehicle's engine, electrical
systems, and transmission.<
Safe braking
Your BMW is equipped with ABS as standard
equipment. In situations that require it, it is best
to apply the brakes fully. Since the vehicle
maintains steering responsiveness, you can
nevertheless avoid possible obstacles with a
minimum of steering effort.Pulsation at the brake pedal combines with
sounds from the hydraulic circuits to indicate to
the driver that ABS is in its active mode.
Driving in wet conditions
When driving in wet conditions and in heavy
rain, it is a good idea to apply light pressure to
the brake pedal every few miles. Monitor traffic
conditions to ensure that this maneuver does
not endanger other road users. The heat gener-
ated helps dry the pads and rotors to ensure
that full braking efficiency will then be available
when you need it.
Hills
To prevent overheating and reduced effi-
ciency of the brake system, drive long or
steep downhill grades in the gear that requires
the least amount of braking. Otherwise, even
light but consistent pedal pressure can lead to
high temperatures, brake wear and possibly
even brake failure.<
You can further enhance the engine's braking
action by selecting a lower gear in the automatic
transmission's manual mode, downshifting as
far as first gear on extremely steep stretches,
refer to page63. This strategy helps you avoid
placing excessive loads on the brake system.
Do not drive in idle or with the engine
switched off; otherwise, there will be no
engine braking action or support of the braking
force and steering.
Never allow floor mats, carpets or any other
objects to protrude into the area of movement
of the pedals and impair their operation.<
Corrosion on brake rotors
When the vehicle is driven only occasionally,
during extended periods when the vehicle is not
used at all, and in operating conditions where
brake applications are less frequent, there is an
increased tendency for corrosion to form on
rotors, while contaminants accumulate on the
brake pads. This occurs because the minimal
pressure that must be exerted by the pads dur-
ing brake applications to clean the rotors is not
reached.
Page 127 of 247

Driving tips
125Reference
At a glance
Controls
Communications
Navigation
Entertainment
Mobility
Stowing cargo
>Place heavy cargo as far forward and as low
as possible, placing it directly behind the
bulkhead behind the rear seats.
>Cover sharp edges and corners.
>For very heavy cargo when the rear seat is
not occupied, secure each outside rear
safety belt in the opposite buckle.
Securing cargo
>Use the luggage net* or securing straps to
secure small and lightweight luggage and
cargo.
>Heavy-duty straps
* for securing larger and
heavier objects are available at your BMW
center. Four lashing eyes for attaching
these heavy-duty straps are provided in the
luggage compartment, refer to illustration.
>Please follow the special instructions sup-
plied with the heavy-duty straps.
Always position and secure the load as
described above. If you do not, it can
endanger the passengers, for example during
braking or evasive maneuvers.
Attach heavy-duty straps only to the lashing
eyes, refer to illustration, otherwise, the heavy-
duty straps could come loose or the vehicle
could be damaged.Never exceed either the approved gross vehicle
weight or either of the approved axle loads, refer
to page220, as excessive loads can impair the
operational safety of the vehicle and may also
put you in violation of highway safety laws.
You should never transport heavy or hard
objects unsecured in the passenger compart-
ment, as they could fly around and pose a safety
hazard to the vehicle's occupants during abrupt
braking or evasive maneuvers .<
Roof-mounted luggage rack*
A special rack system is available as an option
for your BMW. Please comply with the precau-
tions included with the installation instructions.
Anchorage points
The anchorage points are located inside the
door openings.
Loading roof rack
Because roof racks raise the vehicle's center of
gravity when loaded, they have a major effect on
its handling and steering response.
You should therefore always remember not to
exceed the approved roof load capacity, the
approved gross vehicle weight or the axle loads
when loading the rack.
You can find the specified weights under
Weights starting on page220.
Make sure that the roof load is distributed
evenly, and that it does not extend outward to
beyond the limits of the loading surface. Always
load the heaviest pieces first – on the bottom.
Be sure that adequate clearance is maintained
for raising the glass sunroof, and that objects do
Page 155 of 247

Navigation
Entertainment
Driving tips
153Reference
At a glance
Controls
Communications
Mobility
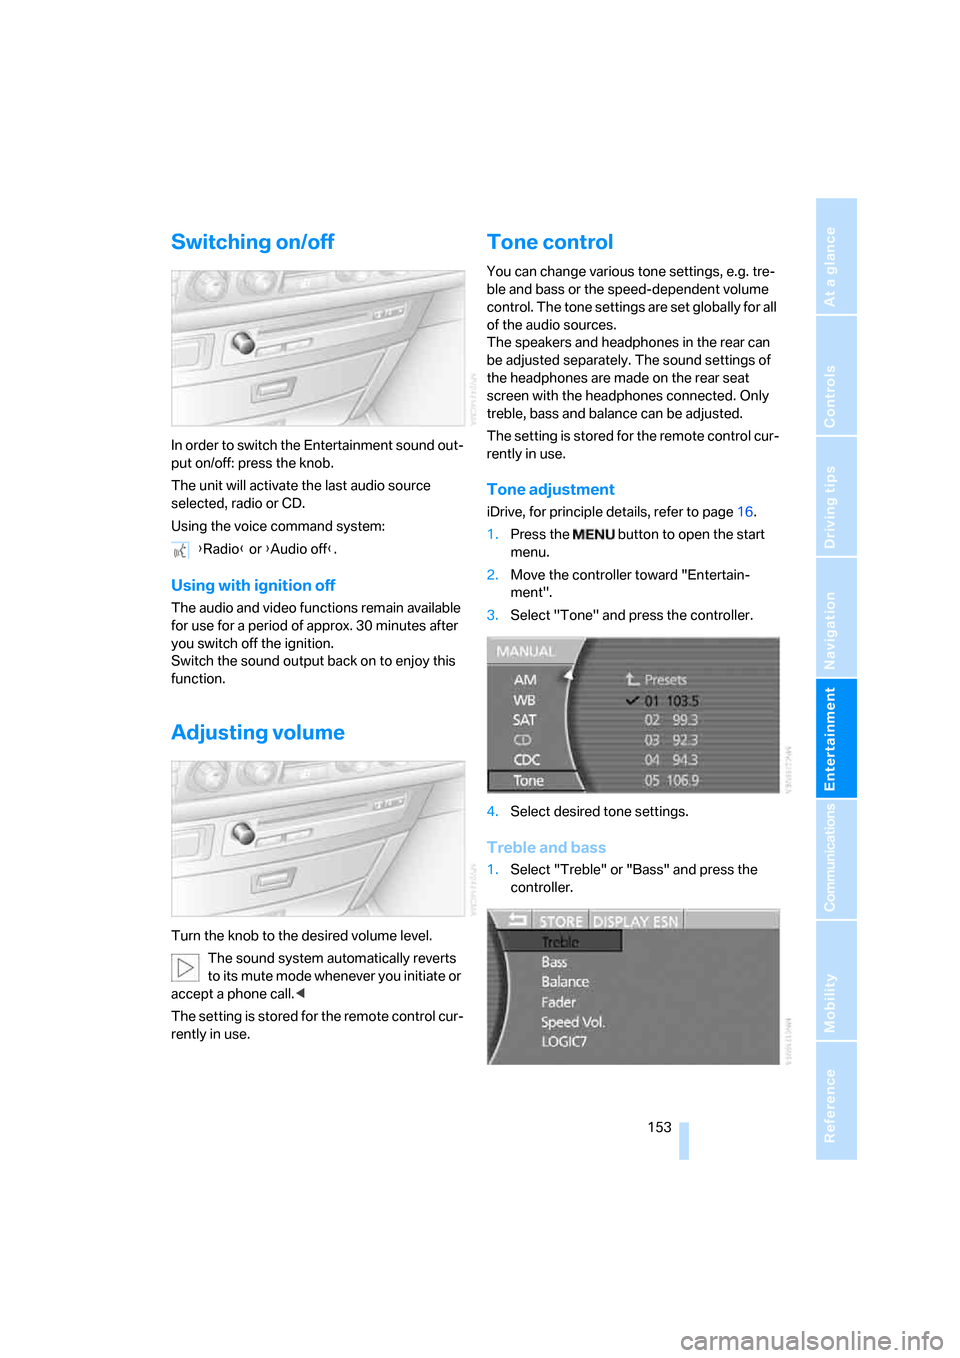
Switching on/off
In order to switch the Entertainment sound out-
put on/off: press the knob.
The unit will activate the last audio source
selected, radio or CD.
Using the voice command system:
Using with ignition off
The audio and video functions remain available
for use for a period of approx. 30 minutes after
you switch off the ignition.
Switch the sound output back on to enjoy this
function.
Adjusting volume
Turn the knob to the desired volume level.
The sound system automatically reverts
to its mute mode whenever you initiate or
accept a phone call.<
The setting is stored for the remote control cur-
rently in use.
Tone control
You can change various tone settings, e.g. tre-
ble and bass or the speed-dependent volume
control. The tone settings are set globally for all
of the audio sources.
The speakers and headphones in the rear can
be adjusted separately. The sound settings of
the headphones are made on the rear seat
screen with the headphones connected. Only
treble, bass and balance can be adjusted.
The setting is stored for the remote control cur-
rently in use.
Tone adjustment
iDrive, for principle details, refer to page16.
1.Press the button to open the start
menu.
2.Move the controller toward "Entertain-
ment".
3.Select "Tone" and press the controller.
4.Select desired tone settings.
Treble and bass
1.Select "Treble" or "Bass" and press the
controller. {Radio} or {Audio off}.
Page 170 of 247

DVD changer
168
DVD changer
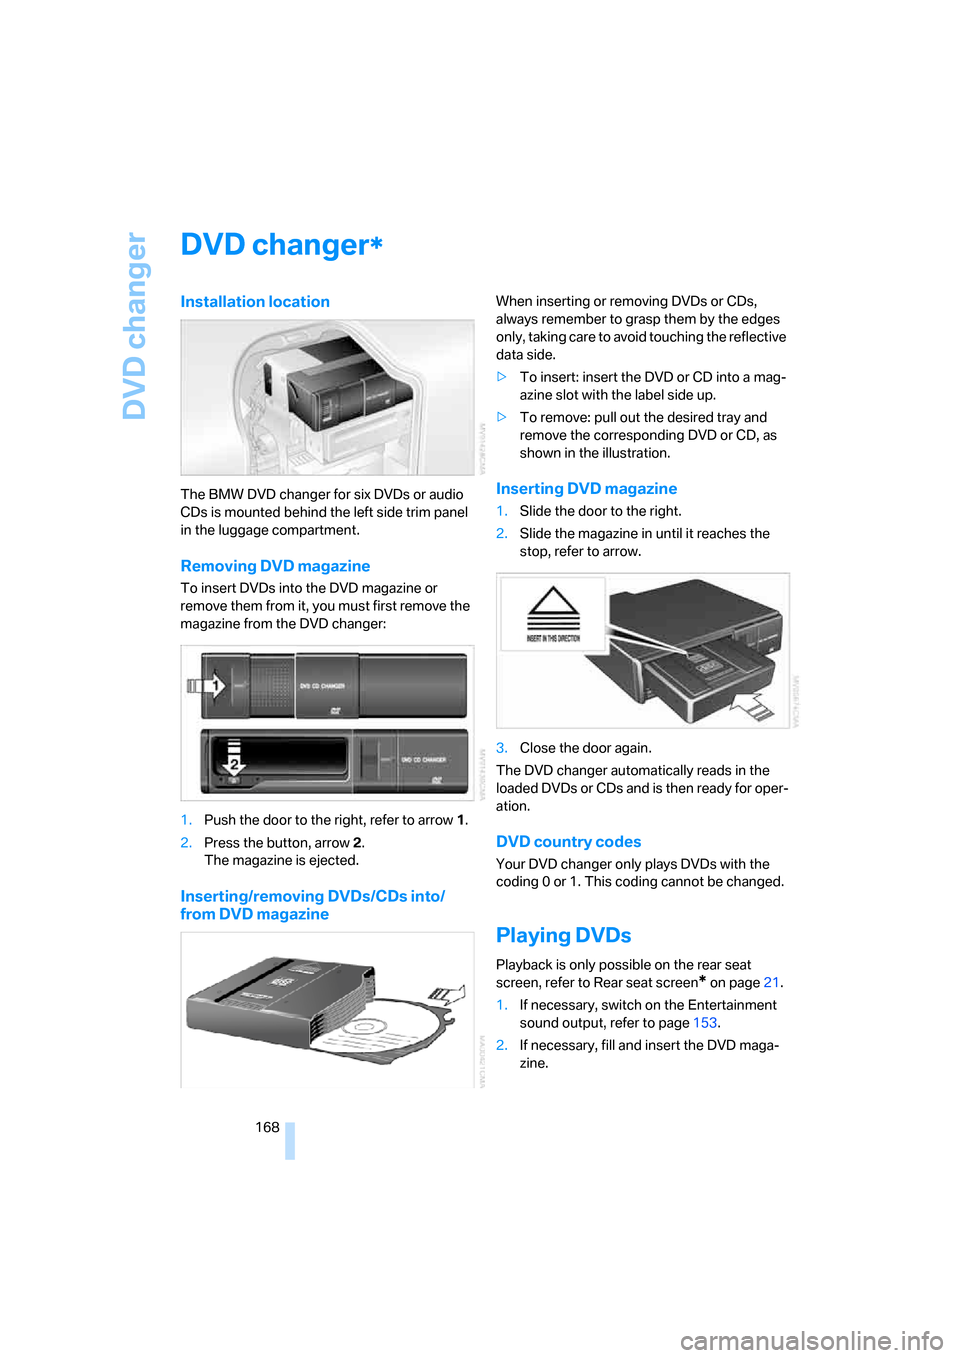
Installation location
The BMW DVD changer for six DVDs or audio
CDs is mounted behind the left side trim panel
in the luggage compartment.
Removing DVD magazine
To insert DVDs into the DVD magazine or
remove them from it, you must first remove the
magazine from the DVD changer:
1.Push the door to the right, refer to arrow1.
2.Press the button, arrow2.
The magazine is ejected.
Inserting/removing DVDs/CDs into/
from DVD magazine
When inserting or removing DVDs or CDs,
always remember to grasp them by the edges
only, taking care to avoid touching the reflective
data side.
>To insert: insert the DVD or CD into a mag-
azine slot with the label side up.
>To remove: pull out the desired tray and
remove the corresponding DVD or CD, as
shown in the illustration.
Inserting DVD magazine
1.Slide the door to the right.
2.Slide the magazine in until it reaches the
stop, refer to arrow.
3.Close the door again.
The DVD changer automatically reads in the
loaded DVDs or CDs and is then ready for oper-
ation.
DVD country codes
Your DVD changer only plays DVDs with the
coding 0 or 1. This coding cannot be changed.
Playing DVDs
Playback is only possible on the rear seat
screen, refer to Rear seat screen
* on page21.
1.If necessary, switch on the Entertainment
sound output, refer to page153.
2.If necessary, fill and insert the DVD maga-
zine.
*
Page 173 of 247

Navigation
Entertainment
Driving tips
171Reference
At a glance
Controls
Communications
Mobility
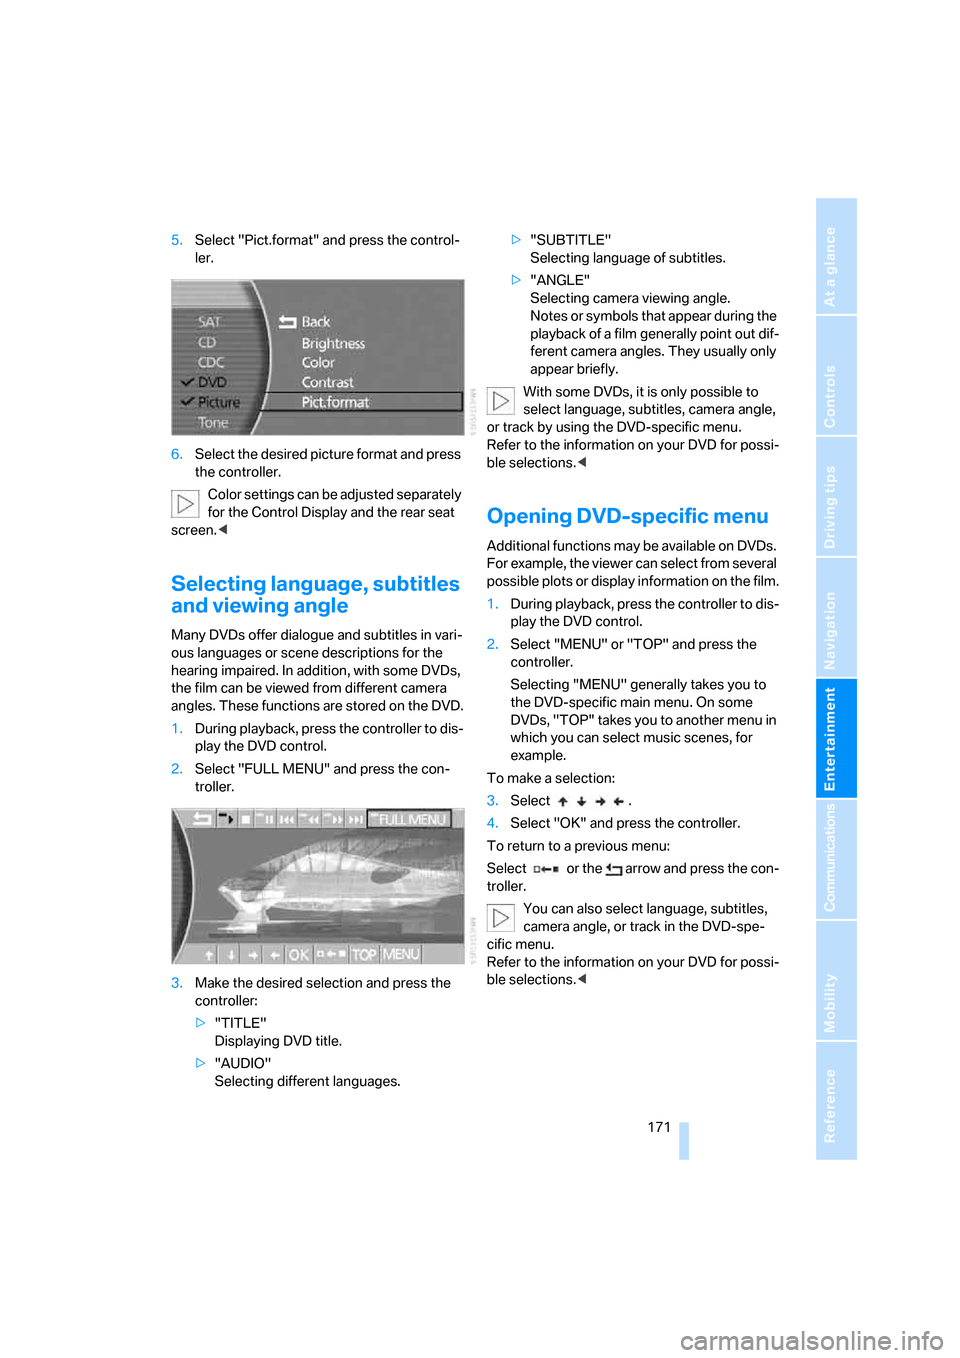
5.Select "Pict.format" and press the control-
ler.
6.Select the desired picture format and press
the controller.
Color settings can be adjusted separately
for the Control Display and the rear seat
screen.<
Selecting language, subtitles
and viewing angle
Many DVDs offer dialogue and subtitles in vari-
ous languages or scene descriptions for the
hearing impaired. In addition, with some DVDs,
the film can be viewed from different camera
angles. These functions are stored on the DVD.
1.During playback, press the controller to dis-
play the DVD control.
2.Select "FULL MENU" and press the con-
troller.
3.Make the desired selection and press the
controller:
>"TITLE"
Displaying DVD title.
>"AUDIO"
Selecting different languages.>"SUBTITLE"
Selecting language of subtitles.
>"ANGLE"
Selecting camera viewing angle.
Notes or symbols that appear during the
playback of a film generally point out dif-
ferent camera angles. They usually only
appear briefly.
With some DVDs, it is only possible to
select language, subtitles, camera angle,
or track by using the DVD-specific menu.
Refer to the information on your DVD for possi-
ble selections.<
Opening DVD-specific menu
Additional functions may be available on DVDs.
For example, the viewer can select from several
possible plots or display information on the film.
1.During playback, press the controller to dis-
play the DVD control.
2.Select "MENU" or "TOP" and press the
controller.
Selecting "MENU" generally takes you to
the DVD-specific main menu. On some
DVDs, "TOP" takes you to another menu in
which you can select music scenes, for
example.
To make a selection:
3.Select .
4.Select "OK" and press the controller.
To return to a previous menu:
Select or the arrow and press the con-
troller.
You can also select language, subtitles,
camera angle, or track in the DVD-spe-
cific menu.
Refer to the information on your DVD for possi-
ble selections.<
Page 183 of 247

181
Entertainment
Reference
At a glance
Controls
Driving tips Communications
Navigation
Mobility
4.Select "Phone" and press the controller.
5.Select "BLUETOOTH" and press the con-
troller.
>The LED next to "BLUETOOTH" lights up
in green:
The Bluetooth connection is activated.
>The LED next to "BLUETOOTH" does not
light up:
The Bluetooth connection is deactivated.
Snap-in adapter*
The snap-in adapter is inserted into the rear
inside of the center armrest.
Inserting
1.Press buttons to open cover of center arm-
rest.2.Press area around button, arrows1, and
take out the cover, arrow2.
3.Insert top of snap-in adapter, arrow3, and
press lower region forward, arrow4.
Removing
Press area around button, arrows1, and take
out snap-in adapter, arrow2.
Page 197 of 247

Mobility
195Reference
At a glance
Controls
Driving tips
Communications
Navigation
Entertainment
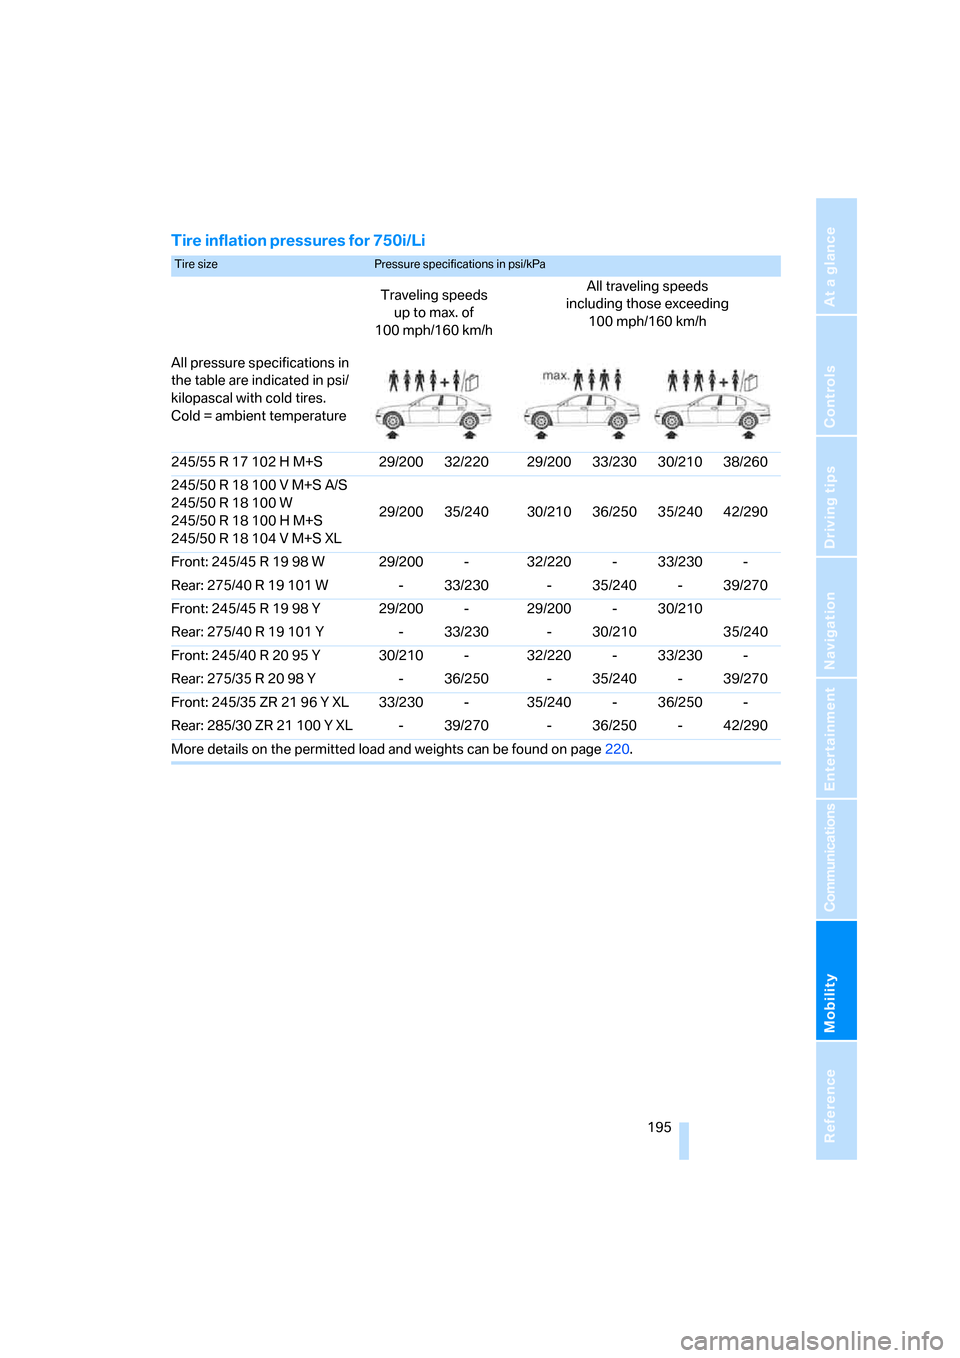
Tire inflation pressures for 750i/Li
Tire size Pressure specifications in psi/kPa
Traveling speeds
up to max. of
100 mph/160 km/hAll traveling speeds
including those exceeding
100 mph/160 km/h
All pressure specifications in
the table are indicated in psi/
kilopascal with cold tires.
Cold = ambient temperature
245/55 R 17 102 H M+S 29/200 32/220 29/200 33/230 30/210 38/260
245/50 R 18 100 V M+S A/S
245/50 R 18 100 W
245/50 R 18 100 H M+S
245/50 R 18 104 V M+S XL29/200 35/240 30/210 36/250 35/240 42/290
Front: 245/45 R 19 98 W 29/200 - 32/220 - 33/230 -
Rear: 275/40 R 19 101 W - 33/230 - 35/240 - 39/270
Front: 245/45 R 19 98 Y 29/200 - 29/200 - 30/210
Rear: 275/40 R 19 101 Y - 33/230 - 30/210 35/240
Front: 245/40 R 20 95 Y 30/210 - 32/220 - 33/230 -
Rear: 275/35 R 20 98 Y - 36/250 - 35/240 - 39/270
Front: 245/35 ZR 21 96 Y XL 33/230 - 35/240 - 36/250 -
Rear: 285/30 ZR 21 100 Y XL - 39/270 - 36/250 - 42/290
More details on the permitted load and weights can be found on page220.
Page 207 of 247

Mobility
205Reference
At a glance
Controls
Driving tips
Communications
Navigation
Entertainment
Maintenance
The BMW Maintenance
System
The BMW Maintenance System serves to
retain the operating and road safety of your
BMW. The service schedule also includes oper-
ations related to the vehicle's comfort and con-
venience features, such as replacement of the
filters for the inside air. The aim is to optimize
maintenance procedures with a view to reduc-
ing the cost of running the vehicle.
Should the day come when you decide to sell
your BMW, you will find that a complete dealer
service history is an asset of inestimable value.
CBS Condition Based Service
Sensors and special algorithms take the differ-
ent driving conditions of your BMW into
account. As a result, Condition Based Service
determines the current and future maintenance
requirements. By letting you define a service
and maintenance regimen that reflects your
own individual requirements, the system forms
the basis for trouble-free driving.
You can have the remaining times or distances
to selected maintenance requirements as well
as legally required deadlines displayed on the
Control Display, refer to page78:
>Engine oil
>Brakes, separate for front and rear
>Microfilter
>Brake fluid
>Spark plugs>Vehicle check
>Legally prescribed inspections depending
on national regulations
Your vehicle stores this information continu-
ously in the ignition key while the vehicle is
being driven. After accessing the data stored in
the vehicle key, your BMW Service Advisor can
suggest precisely the right array of service pro-
cedures for your own individual vehicle. This is
why it is important when you take your vehicle in
for service to give the BMW Service Advisor the
last remote control you used for driving.
Storage periods with the battery discon-
nected are not taken into account by the
CBS maintenance system. Have the time-
dependent service and maintenance opera-
tions, such as brake fluid and coolant, and if
necessary engine oil and the micro/activated
charcoal filter, updated by a BMW center.<
Service and Warranty Information
Booklet for US models and
Warranty and Service Guide Booklet
for Canadian models
Please consult your Service and Warranty Infor-
mation Booklet for US models and Warranty
and Service Guide Booklet for Canadian models
for additional information on service require-
ments.
BMW recommends that you have service
and repair operations performed at your
BMW center.
Take the time to ensure that these service pro-
cedures are confirmed by entries in your vehi-
cle's Service and Warranty Information Booklet
for US models and Warranty and Service Guide
Booklet for Canadian models. These entries
verify that your vehicle has received the speci-
fied regular maintenance.<