2006 BMW 745i remote control
[x] Cancel search: remote controlPage 113 of 247
Controls
111Reference
At a glance
Driving tips
Communications
Navigation
Entertainment
Mobility
Practical interior accessories
Integrated universal remote
control*
The concept
The integrated universal remote control can
replace as many as three hand-held transmit-
ters for various remote-controlled accessories,
such as door openers and house alarm sys-
tems. The integrated universal remote control
registers and stores signals from the original
hand-held transmitters.
The signal of an original hand-held transmitter
can be programmed into one of the three mem-
ory buttons1. Then the respective devices can
be actuated using the programmed memory
buttons. The LED2 flashes to confirm trans-
mission of the signal.
Should you sell your vehicle one day, be sure to
delete the stored programs beforehand for your
security, refer to page112.
To prevent possible damage or injury,
during programming or before each use
of the programmed device by the integrated
universal remote control, always inspect the
immediate area to make certain that no people,
animals or objects are within the swiveling and
movement range of the device. Also, comply
with the safety precautions of the original hand-
held transmitter.<
Checking compatibility
If you see this symbol on the packaging
or in the manual supplied with the orig-
inal hand-held transmitter, it is safe to
assume that it is compatible with the integrated
universal remote control.
If you have additional questions, please contact
your BMW center or call: 1-800-355-3515.
Information is also provided on the Internet at:
www.bmwusa.com or
www.homelink.com.
HomeLink is a registered trademark of
Johnson Controls, Inc.
Programming
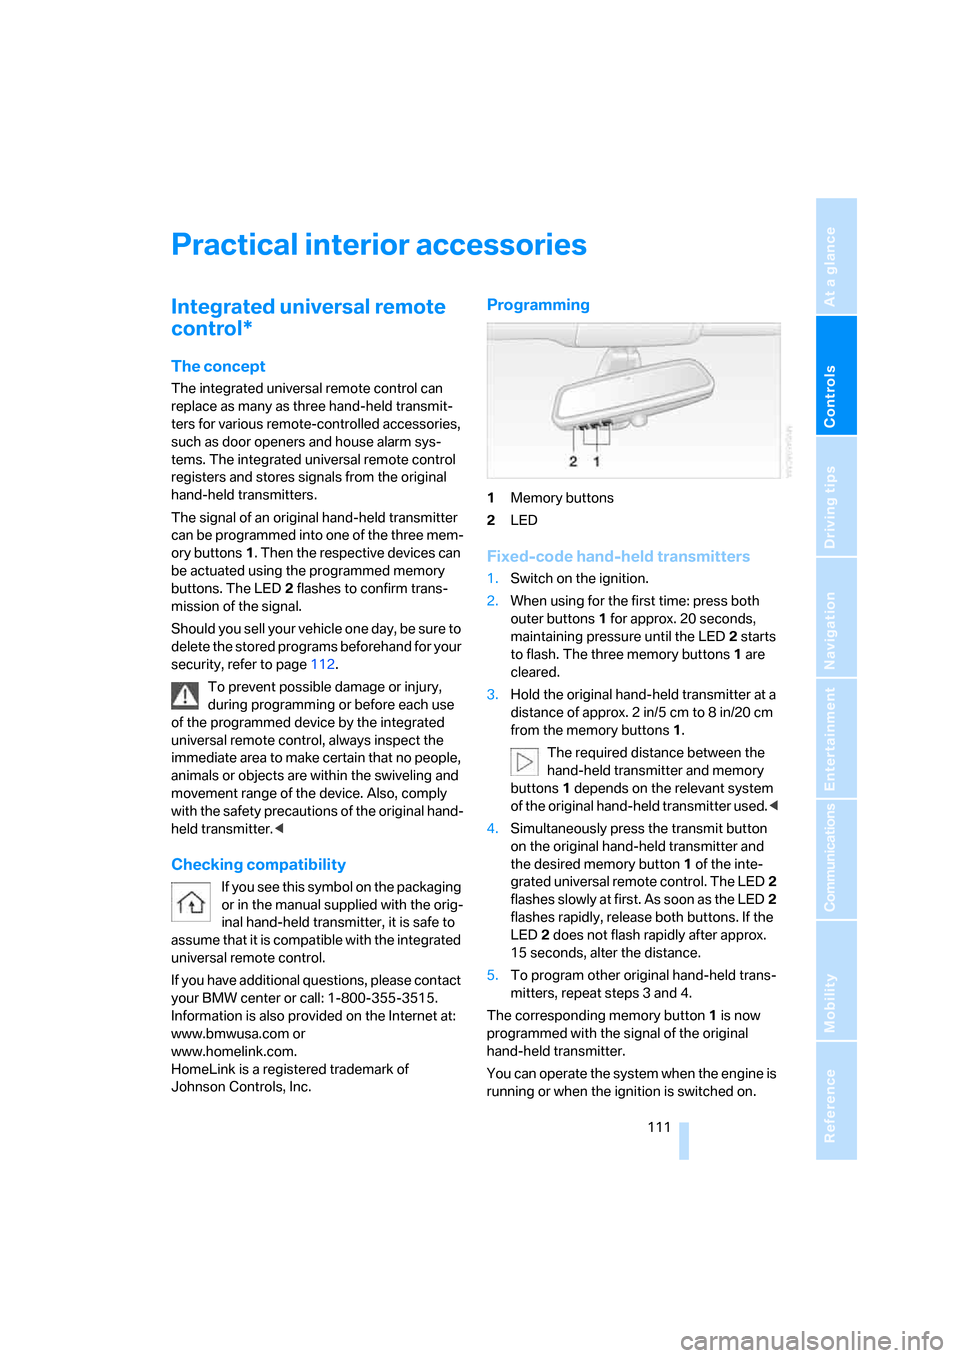
1Memory buttons
2LED
Fixed-code hand-held transmitters
1.Switch on the ignition.
2.When using for the first time: press both
outer buttons1 for approx. 20 seconds,
maintaining pressure until the LED2 starts
to flash. The three memory buttons1 are
cleared.
3.Hold the original hand-held transmitter at a
distance of approx. 2in/5cm to 8in/20cm
from the memory buttons1.
The required distance between the
hand-held transmitter and memory
buttons1 depends on the relevant system
of the original hand-held transmitter used.<
4.Simultaneously press the transmit button
on the original hand-held transmitter and
the desired memory button1 of the inte-
grated universal remote control. The LED2
flashes slowly at first. As soon as the LED2
flashes rapidly, release both buttons. If the
LED2 does not flash rapidly after approx.
15 seconds, alter the distance.
5.To program other original hand-held trans-
mitters, repeat steps 3 and 4.
The corresponding memory button1 is now
programmed with the signal of the original
hand-held transmitter.
You can operate the system when the engine is
running or when the ignition is switched on.
Page 114 of 247
Practical interior accessories
112 If the device cannot be operated after
repeated programming, check whether
the original hand-held transmitter uses an alter-
nating-code system. To do so, either read the
instructions of the original hand-held transmit-
ter or press and hold down the programmed
memory button1 of the integrated universal
remote control. If the LED2 on the integrated
universal remote control flashes rapidly for a
short time and then remains lit for approx.
2 seconds, then this indicates that the original
hand-held transmitter is equipped with an alter-
nating-code system. In the case of an alternat-
ing-code system, program the memory but-
tons1 as described in the Alternating-code
transmitters section below.<
Alternating-code transmitters
Consult the operating instructions of the unit
you wish to set when programming the univer-
sal remote control. You will find information
there on the possibilities for synchronization.
When programming hand-held transmitters
that employ an alternating code, please follow
the supplementary instructions below:
Programming will be easier with the aid of
a second person.<
1.Park your vehicle within the range of the
remote-controlled device.
2.Program the integrated universal remote
control as described above in the Fixed-
code hand-held transmitters section.
3.Locate the button on the receiver of the
device you want to set up, e.g. on the upper
section of its motor.
4.Press the button on the receiver of the
device you want to set up. After step 4, you
have approx. 30 seconds for step 5.
5.Press the programmable memory button1
on the integrated universal remote control
three times.
The corresponding memory button1 is now
programmed with the signal of the original
hand-held transmitter.
If you have any additional questions,
please contact your BMW center.<
Clearing memory buttons
Press both outer buttons1 for approx. 20 sec-
onds, maintaining pressure until the LED2
starts to flash:
All of the memory buttons have been cleared.
It is not possible to clear individual memory
buttons1.
Roller sun blinds*
Rear window blind
Briefly press the button on the driver's door with
the ignition in radio ready state or higher.
Roller sun blinds for rear side windows
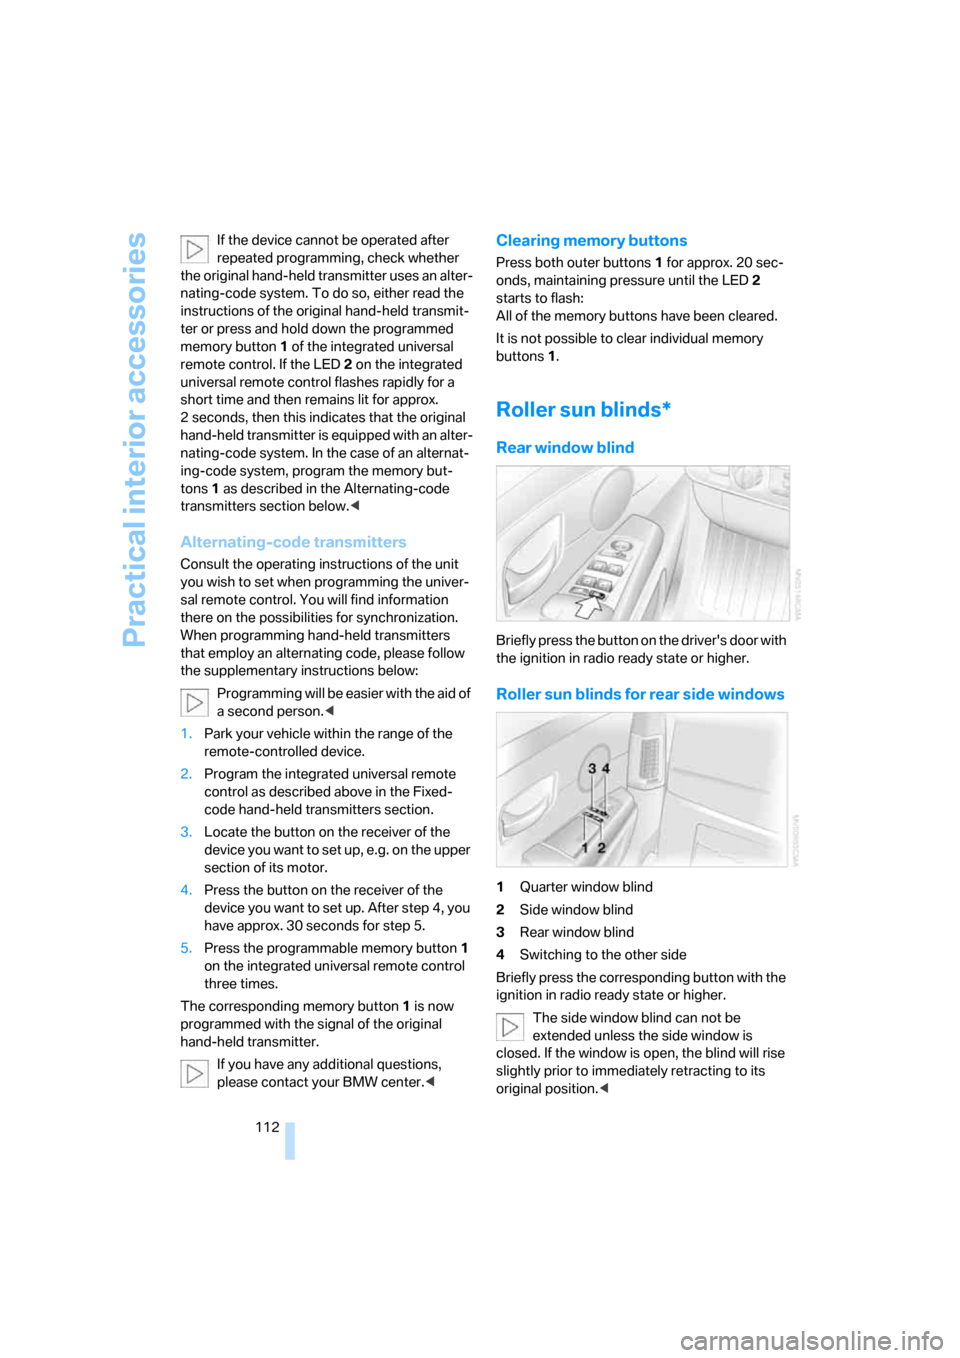
1Quarter window blind
2Side window blind
3Rear window blind
4Switching to the other side
Briefly press the corresponding button with the
ignition in radio ready state or higher.
The side window blind can not be
extended unless the side window is
closed. If the window is open, the blind will rise
slightly prior to immediately retracting to its
original position.<
Page 115 of 247
Controls
113Reference
At a glance
Driving tips
Communications
Navigation
Entertainment
Mobility
To avoid injuries, make sure that the clos-
ing region of the roller blind is clear.
Press the safety switch on the driver's door,
refer to page40. The LED must light up. This
precaution prevents children from operating
the sun blinds using the rear switches, etc.
When leaving the vehicle parked, remove the
remote control from the ignition lock and close
the doors; this precaution prevents children
from operating the roller sun blinds and injuring
themselves.<
Automatically extending and retracting
sun blinds
You can run the sun blinds up and down
together when you press and hold the button3
longer.
Glove compartment
Opening
Press button. The glove compartment opens
automatically and the light comes on.
Closing
Fold the cover up.
To prevent injury in the event of an acci-
dent, close the glove compartment
immediately after use.<
Rechargeable flashlight
The flashlight is located on the left side of the
glove compartment.
The flashlight can remain plugged in continu-
ously. Remove the flashlight from the socket
when needed.
Be sure that the flashlight is switched off
when it is inserted into its holder. Failure
to comply with this precaution could lead to
overcharging and damage.<
Front center armrest
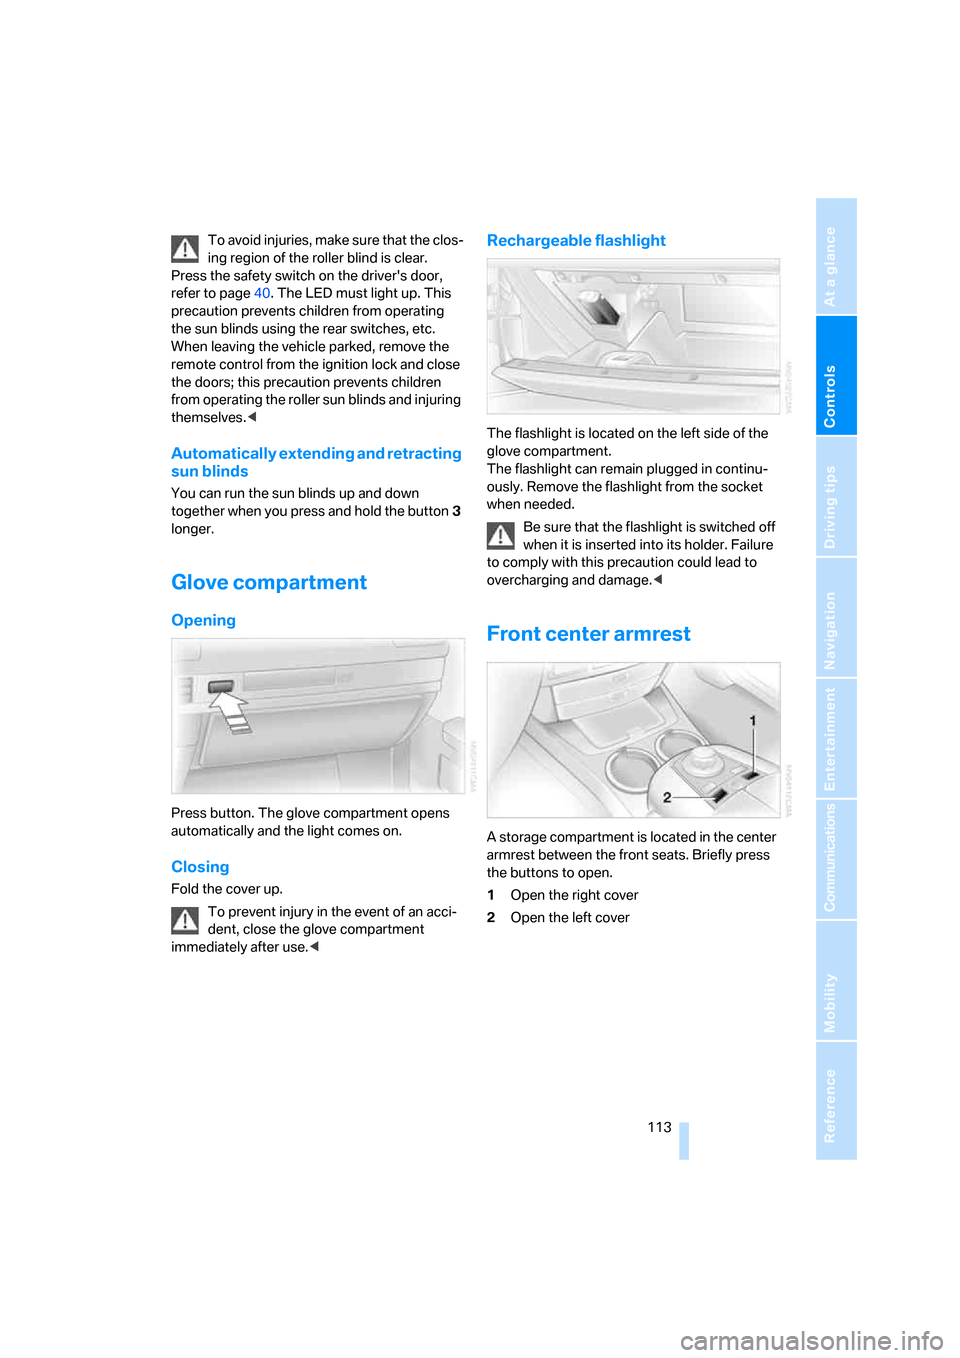
A storage compartment is located in the center
armrest between the front seats. Briefly press
the buttons to open.
1Open the right cover
2Open the left cover
Page 116 of 247
Practical interior accessories
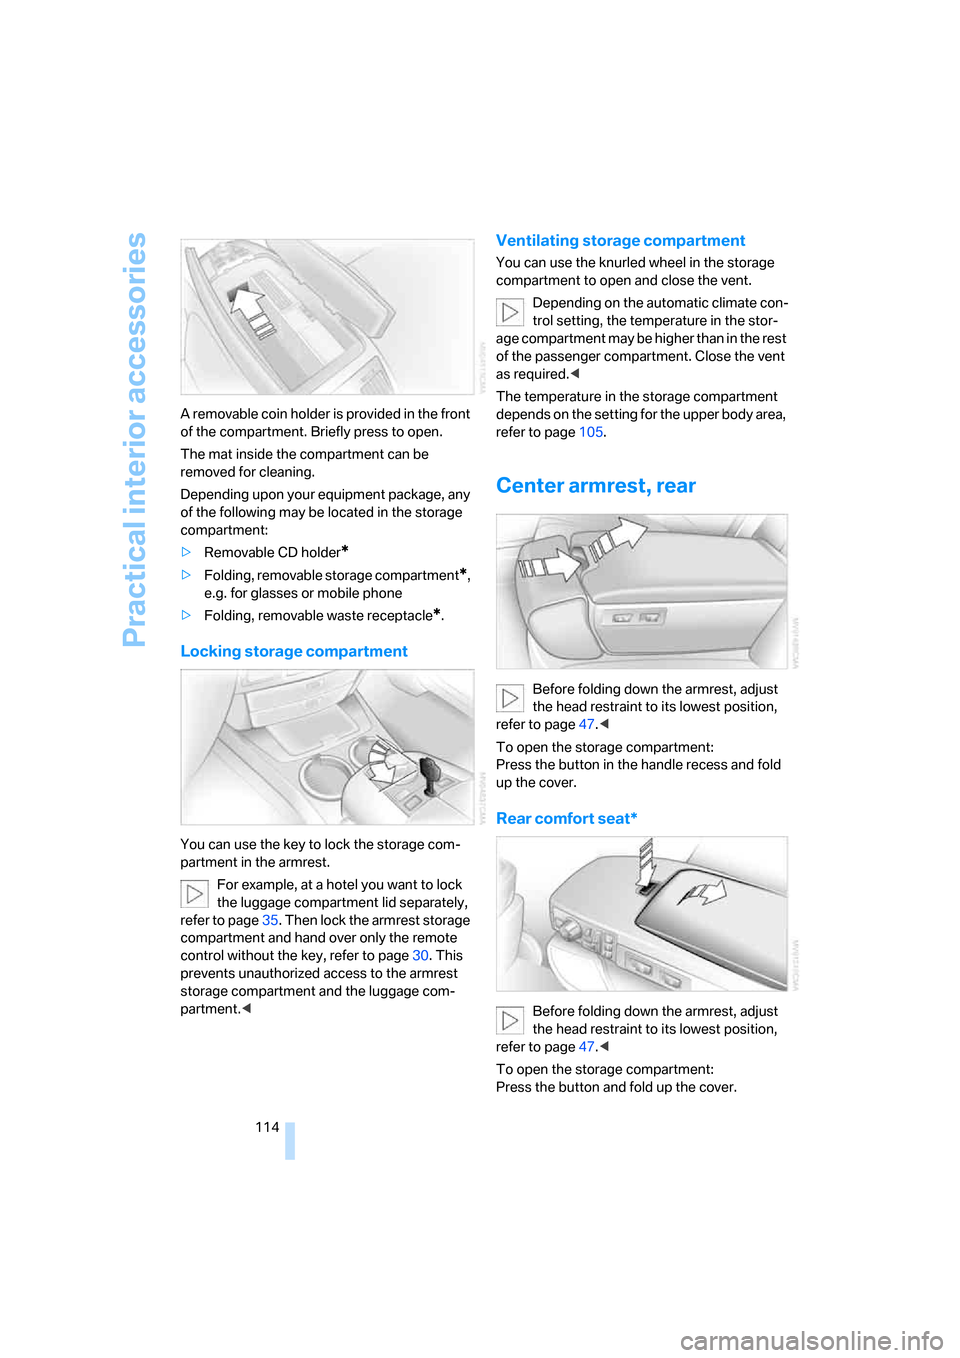
114 A removable coin holder is provided in the front
of the compartment. Briefly press to open.
The mat inside the compartment can be
removed for cleaning.
Depending upon your equipment package, any
of the following may be located in the storage
compartment:
>Removable CD holder
*
>Folding, removable storage compartment*,
e.g. for glasses or mobile phone
>Folding, removable waste receptacle
*.
Locking storage compartment
You can use the key to lock the storage com-
partment in the armrest.
For example, at a hotel you want to lock
the luggage compartment lid separately,
refer to page35. Then lock the armrest storage
compartment and hand over only the remote
control without the key, refer to page30. This
prevents unauthorized access to the armrest
storage compartment and the luggage com-
partment.<
Ventilating storage compartment
You can use the knurled wheel in the storage
compartment to open and close the vent.
Depending on the automatic climate con-
trol setting, the temperature in the stor-
age compartment may be higher than in the rest
of the passenger compartment. Close the vent
as required.<
The temperature in the storage compartment
depends on the setting for the upper body area,
refer to page105.
Center armrest, rear
Before folding down the armrest, adjust
the head restraint to its lowest position,
refer to page47.<
To open the storage compartment:
Press the button in the handle recess and fold
up the cover.
Rear comfort seat*
Before folding down the armrest, adjust
the head restraint to its lowest position,
refer to page47.<
To open the storage compartment:
Press the button and fold up the cover.
Page 118 of 247
Practical interior accessories
116 To extinguish a cigarette, tap off the ash and
gently press the tip into the funnel.
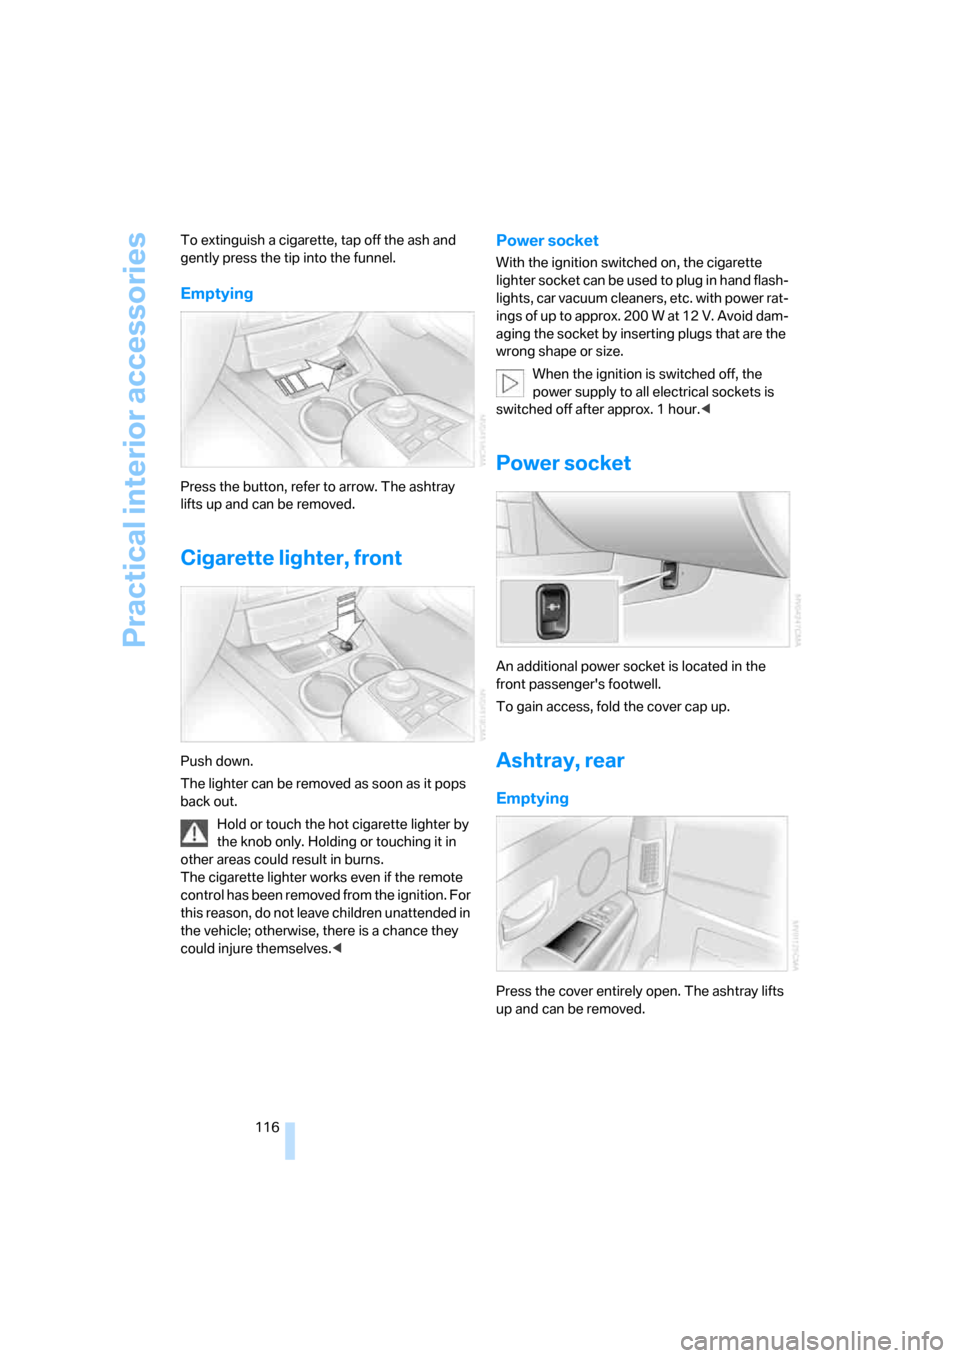
Emptying
Press the button, refer to arrow. The ashtray
lifts up and can be removed.
Cigarette lighter, front
Push down.
The lighter can be removed as soon as it pops
back out.
Hold or touch the hot cigarette lighter by
the knob only. Holding or touching it in
other areas could result in burns.
The cigarette lighter works even if the remote
control has been removed from the ignition. For
this reason, do not leave children unattended in
the vehicle; otherwise, there is a chance they
could injure themselves.<
Power socket
With the ignition switched on, the cigarette
lighter socket can be used to plug in hand flash-
lights, car vacuum cleaners, etc. with power rat-
ings of up to approx. 200 W at 12 V. Avoid dam-
aging the socket by inserting plugs that are the
wrong shape or size.
When the ignition is switched off, the
power supply to all electrical sockets is
switched off after approx. 1 hour.<
Power socket
An additional power socket is located in the
front passenger's footwell.
To gain access, fold the cover cap up.
Ashtray, rear
Emptying
Press the cover entirely open. The ashtray lifts
up and can be removed.
Page 147 of 247
Navigation
Driving tips
145Reference
At a glance
Controls
Communications
Entertainment
Mobility
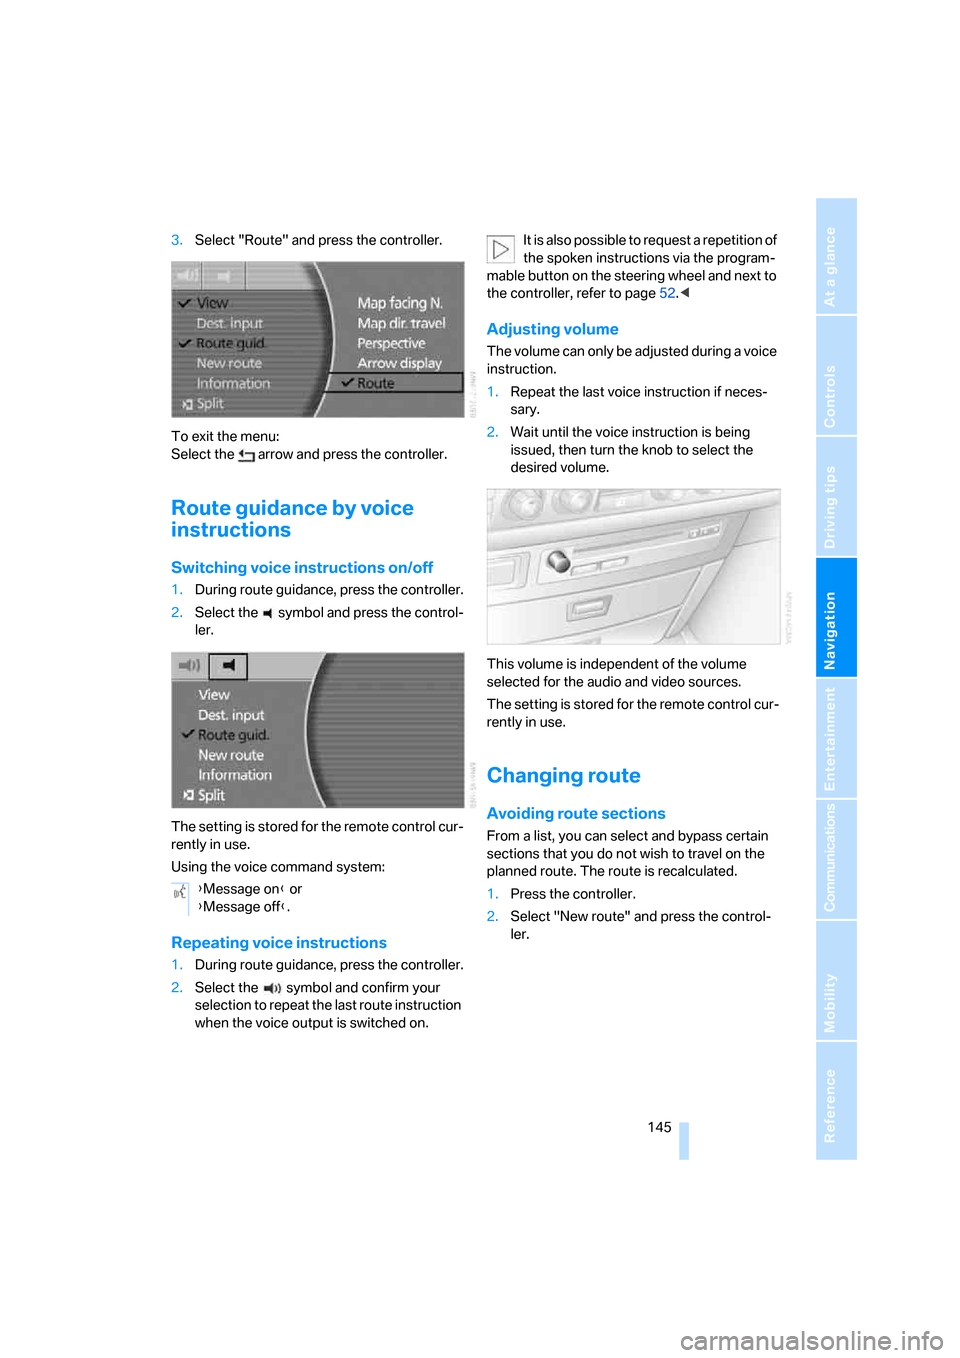
3.Select "Route" and press the controller.
To exit the menu:
Select the arrow and press the controller.
Route guidance by voice
instructions
Switching voice instructions on/off
1.During route guidance, press the controller.
2.Select the symbol and press the control-
ler.
The setting is stored for the remote control cur-
rently in use.
Using the voice command system:
Repeating voice instructions
1.During route guidance, press the controller.
2.Select the symbol and confirm your
selection to repeat the last route instruction
when the voice output is switched on.It is also possible to request a repetition of
the spoken instructions via the program-
mable button on the steering wheel and next to
the controller, refer to page52.<
Adjusting volume
The volume can only be adjusted during a voice
instruction.
1.Repeat the last voice instruction if neces-
sary.
2.Wait until the voice instruction is being
issued, then turn the knob to select the
desired volume.
This volume is independent of the volume
selected for the audio and video sources.
The setting is stored for the remote control cur-
rently in use.
Changing route
Avoiding route sections
From a list, you can select and bypass certain
sections that you do not wish to travel on the
planned route. The route is recalculated.
1.Press the controller.
2.Select "New route" and press the control-
ler. {Message on} or
{Message off}.
Page 155 of 247
Navigation
Entertainment
Driving tips
153Reference
At a glance
Controls
Communications
Mobility
Switching on/off
In order to switch the Entertainment sound out-
put on/off: press the knob.
The unit will activate the last audio source
selected, radio or CD.
Using the voice command system:
Using with ignition off
The audio and video functions remain available
for use for a period of approx. 30 minutes after
you switch off the ignition.
Switch the sound output back on to enjoy this
function.
Adjusting volume
Turn the knob to the desired volume level.
The sound system automatically reverts
to its mute mode whenever you initiate or
accept a phone call.<
The setting is stored for the remote control cur-
rently in use.
Tone control
You can change various tone settings, e.g. tre-
ble and bass or the speed-dependent volume
control. The tone settings are set globally for all
of the audio sources.
The speakers and headphones in the rear can
be adjusted separately. The sound settings of
the headphones are made on the rear seat
screen with the headphones connected. Only
treble, bass and balance can be adjusted.
The setting is stored for the remote control cur-
rently in use.
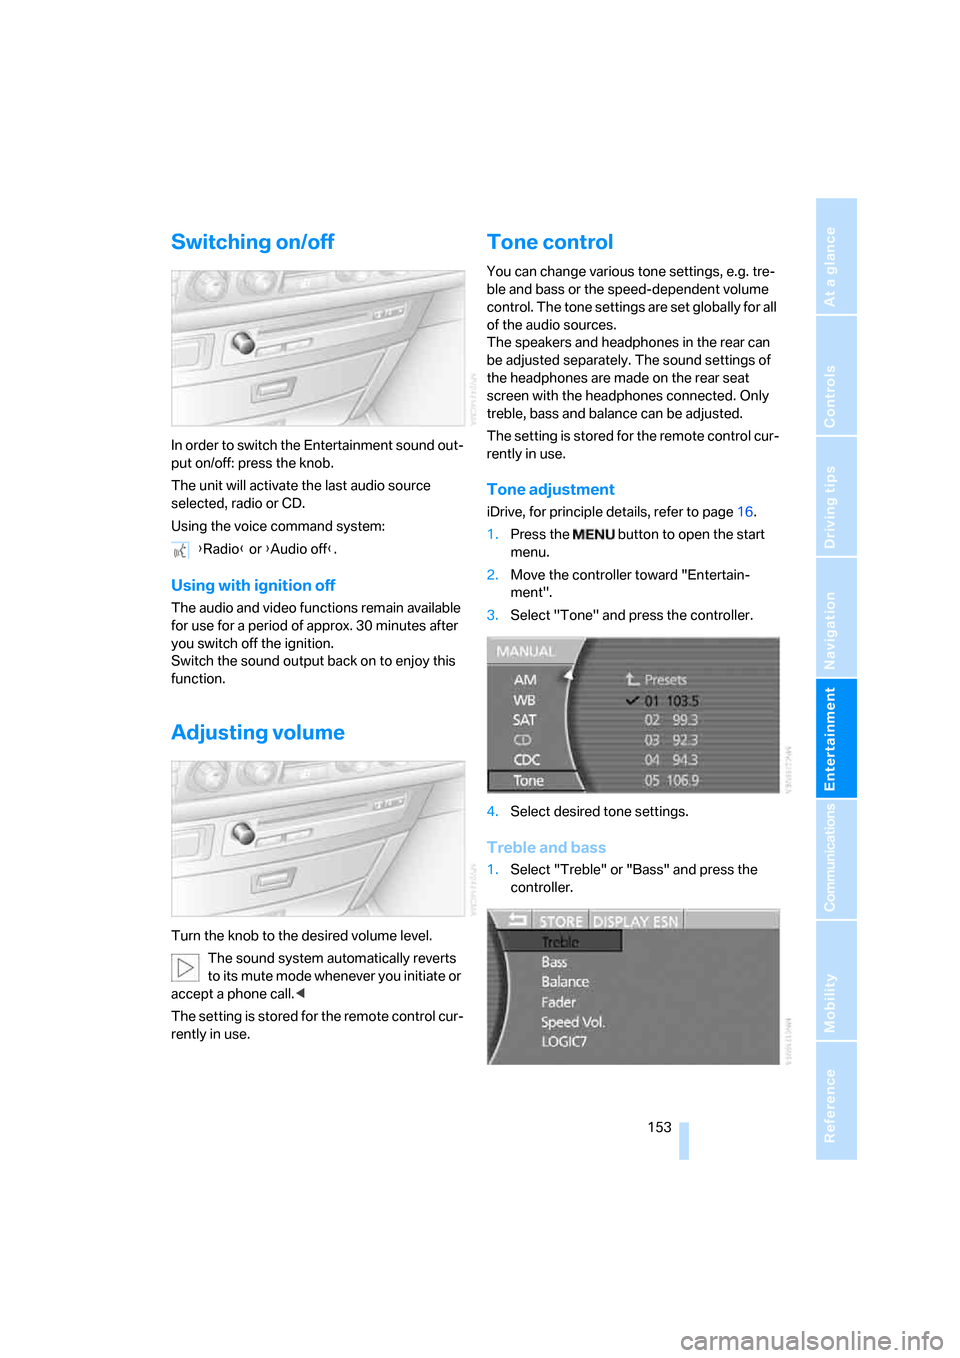
Tone adjustment
iDrive, for principle details, refer to page16.
1.Press the button to open the start
menu.
2.Move the controller toward "Entertain-
ment".
3.Select "Tone" and press the controller.
4.Select desired tone settings.
Treble and bass
1.Select "Treble" or "Bass" and press the
controller. {Radio} or {Audio off}.
Page 160 of 247
Radio
158
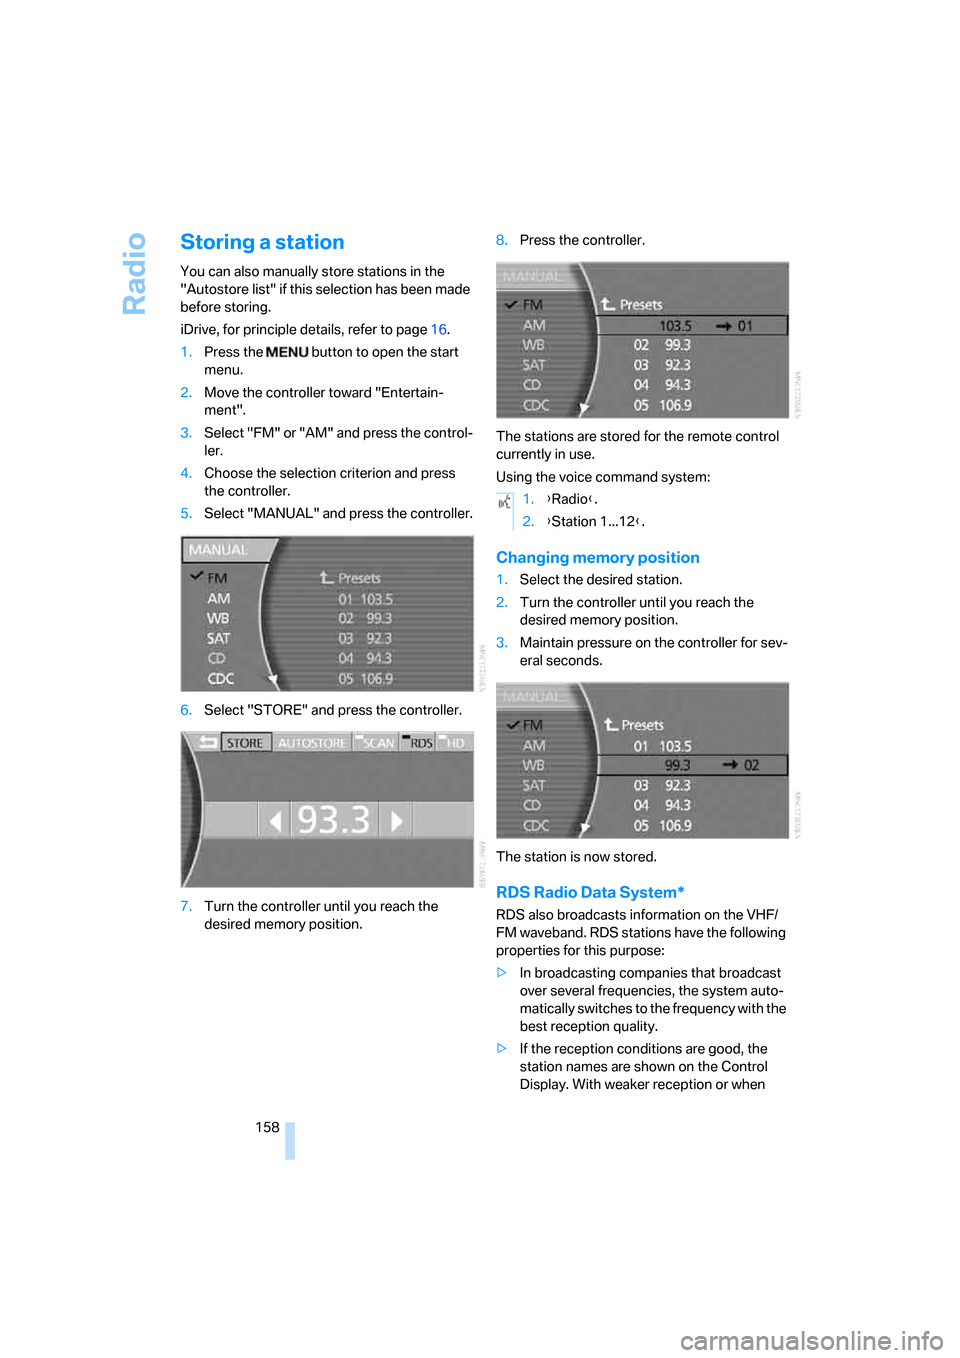
Storing a station
You can also manually store stations in the
"Autostore list" if this selection has been made
before storing.
iDrive, for principle details, refer to page16.
1.Press the button to open the start
menu.
2.Move the controller toward "Entertain-
ment".
3.Select "FM" or "AM" and press the control-
ler.
4.Choose the selection criterion and press
the controller.
5.Select "MANUAL" and press the controller.
6.Select "STORE" and press the controller.
7.Turn the controller until you reach the
desired memory position.8.Press the controller.
The stations are stored for the remote control
currently in use.
Using the voice command system:
Changing memory position
1.Select the desired station.
2.Turn the controller until you reach the
desired memory position.
3.Maintain pressure on the controller for sev-
eral seconds.
The station is now stored.
RDS Radio Data System*
RDS also broadcasts information on the VHF/
FM waveband. RDS stations have the following
properties for this purpose:
>In broadcasting companies that broadcast
over several frequencies, the system auto-
matically switches to the frequency with the
best reception quality.
>If the reception conditions are good, the
station names are shown on the Control
Display. With weaker reception or when
1.{Radio}.
2.{Station 1...12}.