2006 BMW 745i Starting
[x] Cancel search: StartingPage 146 of 247

Route guidance
144 3.Select "Arrow display" and press the con-
troller.
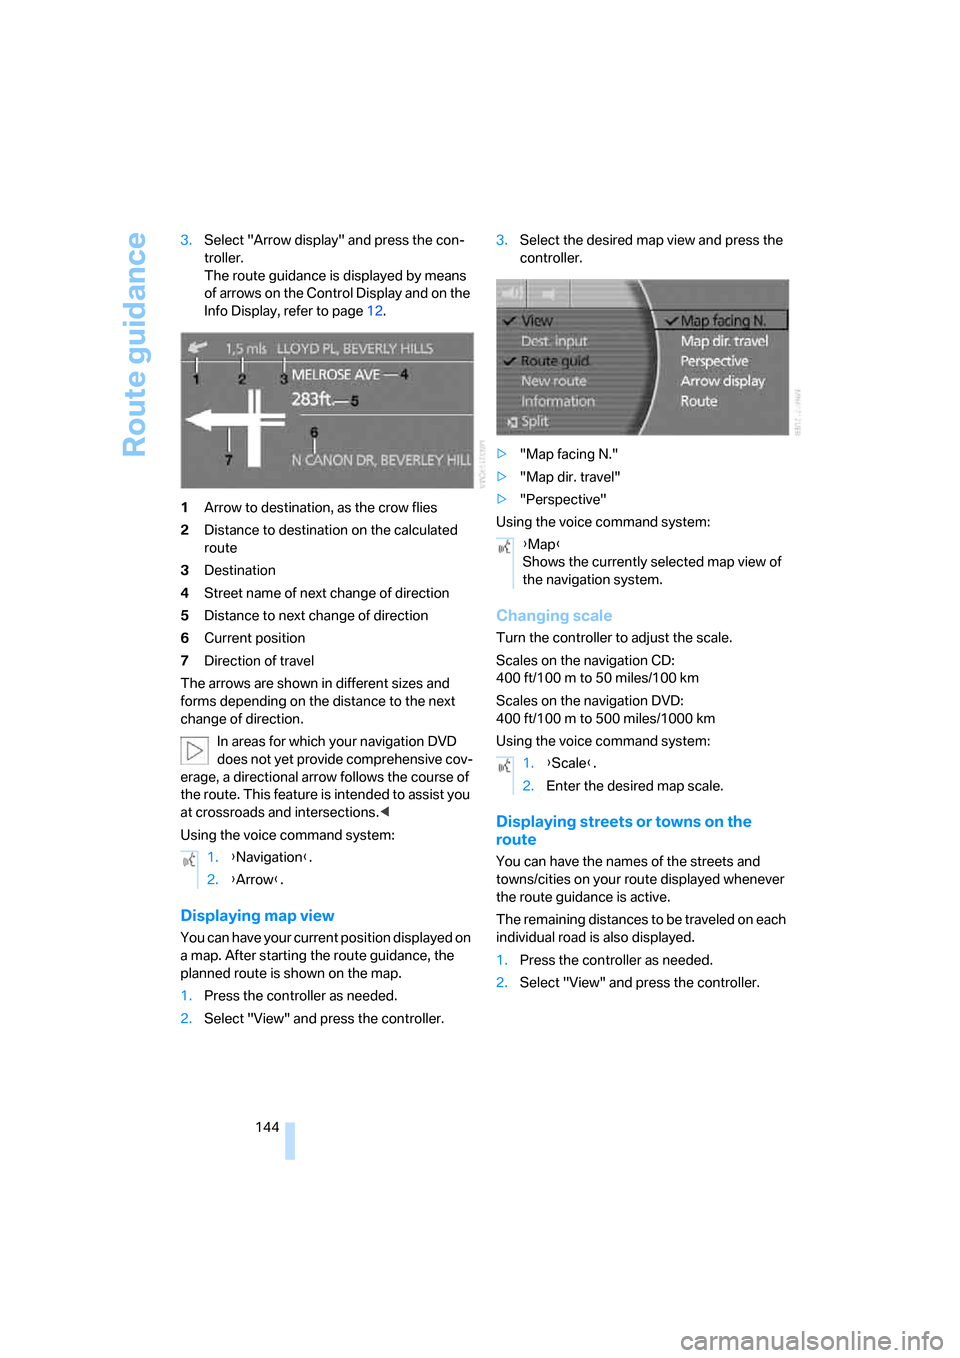
The route guidance is displayed by means
of arrows on the Control Display and on the
Info Display, refer to page12.
1Arrow to destination, as the crow flies
2Distance to destination on the calculated
route
3Destination
4Street name of next change of direction
5Distance to next change of direction
6Current position
7Direction of travel
The arrows are shown in different sizes and
forms depending on the distance to the next
change of direction.
In areas for which your navigation DVD
does not yet provide comprehensive cov-
erage, a directional arrow follows the course of
the route. This feature is intended to assist you
at crossroads and intersections.<
Using the voice command system:
Displaying map view
You can have your current position displayed on
a map. After starting the route guidance, the
planned route is shown on the map.
1.Press the controller as needed.
2.Select "View" and press the controller.3.Select the desired map view and press the
controller.
>"Map facing N."
>"Map dir. travel"
>"Perspective"
Using the voice command system:
Changing scale
Turn the controller to adjust the scale.
Scales on the navigation CD:
400 ft/100 m to 50 miles/100 km
Scales on the navigation DVD:
400ft/100m to 500miles/1000km
Using the voice command system:
Displaying streets or towns on the
route
You can have the names of the streets and
towns/cities on your route displayed whenever
the route guidance is active.
The remaining distances to be traveled on each
individual road is also displayed.
1.Press the controller as needed.
2.Select "View" and press the controller. 1.{Navigation}.
2.{Arrow}.
{Map}
Shows the currently selected map view of
the navigation system.
1.{Scale}.
2.Enter the desired map scale.
Page 181 of 247

179
Entertainment
Reference
At a glance
Controls
Driving tips Communications
Navigation
Mobility
Getting started
Inserting mobile phone
If you insert or remove the mobile phone during
a call, the call may be interrupted depending on
the mobile phone model.
1.Remove the protective cap from the mobile
phone's antenna connector if necessary, so
that the mobile phone can engage in the
snap-in adapter.
2.Push the mobile phone downward toward
the electrical connections, arrow1, and
press forward, arrow2, until it engages.
The battery is charged starting from radio ready
state of the vehicle, refer to charge indicator on
mobile phone.
Removing mobile phone
To remove mobile phone, depending on model:
>Press the button.
>Push the button upward.
Logging on mobile phone in
vehicle
To log your mobile phone onto the vehicle, you
need a special Bluetooth passkey. This is
included in the information kit.
The following prerequisites must be met:
>The ignition is switched on.
>The mobile phone is ready for operation.
>The Bluetooth connections in the vehicle
and the mobile phone are activated.
>Depending on the mobile phone model,
certain presets are required on the mobile
phone, e.g. detecting, connecting or cou-
pling Bluetooth unit, refer to the operating
instructions of your mobile phone.
Only log on the mobile phone with the
vehicle stopped; otherwise, the passen-
gers and other road user can be endangered
due to a lack of attentiveness on the part of the
driver.<
Preparation with iDrive
iDrive, for principle details, refer to page16.
1.Press the button to open the start
menu.
2.Move the controller toward "Settings".
3.Select "Phone" and press the controller.
4.Select "PAIRING" and press the controller.
The three LEDs in the status line flash, refer
to page20.
Page 195 of 247

Mobility
193Reference
At a glance
Controls
Driving tips
Communications
Navigation
Entertainment
Fuel specifications
Do not use leaded gasoline; otherwise,
permanent damage to the catalytic con-
verter will result.<
Required fuel
Super Premium Gasoline/AKI 91
This gasoline is highly recommended.
However, you may also use gasoline with a
lower AKI rating. The minimum AKI rating is 87.
If you use gasoline with this minimum AKI rat-
ing, the engine may produce knocking sounds
when starting at high outside temperatures.
This has no effect on the engine life.
Use high-quality brands
Field experience has indicated significant dif-
ferences in fuel quality: volatility, composition,
additives, etc., among gasolines offered for sale
in the United States and Canada. Fuels contain-
ing up to and including 10Ξ ethanol or other
oxygenates with up to 2.8Ξ oxygen by weight,
that is, 15Ξ MTBE or 3Ξ methanol plus an
equivalent amount of co-solvent, will not void
the applicable warranties with respect to
defects in materials or workmanship.
The use of poor-quality fuels may result in
drivability, starting and stalling problems,
especially under certain environmental condi-
tions such as high ambient temperature and
high altitude.
Should you encounter drivability problems
which you suspect could be related to the fuel
you are using, we recommend that you respond
by switching to a recognized high-quality brand
such as gasoline that is advertised as Top Tier
Detergent Gasoline.
Failure to comply with these recommendations
may result in unscheduled maintenance.<
Page 196 of 247

Wheels and tires
194
Wheels and tires
Tire inflation pressure
Information for your safety
The condition of the tires and the maintenance
of the specified tire pressure are crucial not only
to the tire's service life, but also to driving com-
fort and most importantly, driving safety.
Checking pressure
Only check tire inflation pressure when the tires
are cold. This means after a maximum of
1,25 miles/2 km driving or when the vehicle has
been parked for at least 2 hours. When tires are
warm, the tire inflation pressure increases.
Check the tire inflation pressure regularly
and correct it as needed, including the
spare wheel: at least twice a month and before
starting long trips. If you fail to observe this pre-
caution, you may be driving on tires with incor-
rect tire pressures, a condition that can not only
compromise your vehicle's driving stability, but
also lead to tire damage and the risk of an acci-
dent. Do not drive with deflated, i.e. flat tires,
except run-flat tires. A flat tire will seriously
impair your vehicle's handling and braking
response. Attempts to drive on a flat tire can
lead to loss of control over the vehicle.<
After correcting the tire inflation pressure,
reinitialize the Flat Tire Monitor, refer to
page90, or reset the Tire Pressure Monitor,
refer to page92.<
Pressure specifications
The tables below provide all the correct inflation
pressures for the specified tire sizes at ambient
temperature.
The inflation pressures apply to the tire
sizes and tire brands respectively
approved and recommended by BMW; a list of
these is available from your BMW center.
>Tire sizes for your vehicle
>Load conditions
>Maximum allowable driving speed
Tire inflation pressures for driving
up to 100 mph/160 km/h
For normal driving up to 100 mph/160 km/h
adjust pressures to the respective tire inflation
pressures listed on the following pages in the
column for traveling speeds up to a max. of
100 mph/160 km/h to achieve optimum driving
comfort.
These pressure specifications can be found on
the door post when you open the driver's door.
The permissible top speed for these tire
inflation pressures is 100 mph/160 km/h.
Do not exceed this speed; otherwise, tire dam-
age and accidents may result.<
Tire inflation pressures for driving
above 100 mph/160 km/h
In order to drive at maximum speeds in
excess of 100 mph/160 km/h, please
observe, and, if necessary, adjust tire pressures
for speeds exceeding 100 mph/160 km/h from
the relevant table on the following pages.
Otherwise, tire damage and accidents could
occur.<
Observe all national and local maximum speed
limits; otherwise, violations of the law could
occur.
Page 204 of 247

Under the hood
202
Engine compartment
1Brake fluid reservoir, located beneath the
microfilter cover204
2Reservoir for windshield and headlamp
washer system663Engine oil filler neck, refer to Adding engine
oil
4Body ground, negative terminal213
5Coolant expansion tank204
6Jump starting terminal214
Engine oil
The engine oil consumption depends on driving
style and driving conditions.
Checking oil level
Your vehicle is equipped with an electronic oil
level control.
To obtain the most accurate possible oil level
reading, the measurement should be taken
when the engine is at operating temperature,
i.e. following an uninterrupted drive of at least
6 miles/10 km. You can display the oil level
while driving or when stopped on a level surface
with the engine running.
The current oil level can be viewed on the Con-
trol Display.
iDrive, for principle details, refer to page16.1.Press the button to open the start
menu.
2.Move the controller toward "Car Data".
3.Select and press the controller.
The oil level is displayed.
Turn the controller to exit the list.
Page 213 of 247

Mobility
211Reference
At a glance
Controls
Driving tips
Communications
Navigation
Entertainment
After mounting
1.Tighten the lug bolts in a diagonal pattern.
To ensure safety, always have the
lug bolts checked with a calibrated
torque wrench as soon as possible to
ensure that they are tightened to the speci-
fied torque. The tightening torque is
100lbft/140Nm.<
2.Reverse the removal sequence when stor-
ing the wheel and tools in the vehicle.
3.Check and correct the tire inflation pressure
at the earliest opportunity.
Protect valve stems and valve stem
seal caps from dirt and contamina-
tion. Dirt in valve stems is a frequent source
of gradual air loss.<
4.Reinitialize the Flat Tire Monitor, refer to
page90, or reset the Tire Pressure Monitor,
refer to page92.
5.Replace the damaged tire as soon as possi-
ble and have the new wheel/tire balanced.
Driving with spare tire
On certain wheel-tire combinations, the
size of the spare tire differs from that of
the rest of the tires. The spare tire is fully capa-
ble of running in all load and speed ranges.
However, to recreate the original conditions,
the tire should be replaced as soon as possi-
ble.<
Vehicle battery
Maintenance
The battery is 100 % maintenance-free, i.e., the
electrolyte will last for the life of the battery
when the vehicle is operated in a temperate cli-
mate. Your BMW center will be happy to advise
you on all questions concerning the battery.
Charging battery
Charge the battery in the vehicle only via the
terminals in the engine compartment and with
the engine off. Connections, refer to Jump
starting on page213.
Battery switch
Before storing the vehicle for an extended
period of several weeks or more, slide the bat-
tery switch located behind the trim panel on the
right side of the luggage compartment to OFF.
This reduces the current flow from the battery
for the period during which the vehicle remains
parked. A message is shown on the Info Dis-
play. Please take note of the supplementary
information provided on the Control Display.
Disposal
Have old batteries disposed of following
replacement at your BMW center or bring
them to a collection point. Maintain the battery
in an upright position for transport and storage.
Always secure the battery to prevent it from tip-
ping over during transport.<
Power failure
After a temporary interruption in electrical
power, the functioning of some equipment may
be limited and must be reinitialized. Individual
settings are also lost and must be updated
again:
>Seat, mirror, and steering wheel memory
The positions must be stored again, refer to
page46.
>Time and date
These must be reset, refer to page84.
>Radio
Stations must be stored again, refer to
page158.
>Navigation system
You must wait until it becomes operational
again, refer to Inserting navigation CDs/
DVDs on page130.
Page 215 of 247

Mobility
213Reference
At a glance
Controls
Driving tips
Communications
Navigation
Entertainment
Giving and receiving assistance
Select "BMW Assist" if you have applied for this
information service, refer to Roadside Assis-
tance on page187.
Warning triangle*
The warning triangle is conveniently stored in
the onboard tool kit mounted on the inside of
the luggage compartment lid.
First-aid kit*
The first-aid kit is also located in the container
of the onboard tool kit.
Some of the articles contained in the first-aid kit
have a limited service life. Check the expiration
dates of the contents regularly and replace the
contents concerned in a timely fashion as
needed.
Jump starting
When your battery is discharged, you can use
two jumper cables to start your vehicle with
power from the battery in a second vehicle. You
can also use the same method to help start
another vehicle. Use only jumper cables with
fully-insulated terminal clamps.To avoid the risk of potentially fatal injury,
always avoid all contact with electrical
components while the engine is running. Care-
fully adhere to the following sequence, both to
prevent damage to one or both vehicles, and to
guard against possible personal injury.<
Preparing
1.Check whether the battery of the other
vehicle has a voltage of 12 Volts and
approximately the same capacitance in Ah.
This information is listed on the battery.
2.Switch off the engine of the assisting vehi-
cle.
3.Switch off any electrical systems and com-
ponents in both vehicles.
Ensure that there is no contact between
the bodywork of the two vehicles; other-
wise, there is a danger of short circuits.<
Connecting jumper cables
To avoid personal injury from sparks,
follow this sequence when connecting
jumper cables.<
In your BMW, the so-called jump starting termi-
nal in the engine compartment functions as the
positive battery terminal. The symbol + is
embossed on the cover.
1.Remove the cover of the BMW jump start-
ing terminal, refer to arrow1.
2.Attach one positive/+ clamp of the jumper
cable to the positive battery terminal or to a
jump starting terminal on the assisting vehi-
cle.
3.Attach the second positive/+ clamp of the
jumper cable to the positive battery terminal
or to a jump starting terminal on the vehicle
to be started.
Page 216 of 247

Giving and receiving assistance
214 4.Attach one negative/– clamp of the jumper
cable to the negative battery terminal or to
an engine or body ground of the assisting
vehicle.
Your BMW has a special nut that serves as a
body ground or negative terminal, refer to
arrow2.
5.Attach the second negative/– clamp of the
jumper cable to the negative battery termi-
nal or to an engine or body ground on the
vehicle to be started.
Starting engine
1.Start the engine of the assisting vehicle and
allow it to run for several minutes at a fast
idle.
2.Start the engine on the other vehicle in the
usual way.
If the first start attempt is not successful,
wait a few minutes before another attempt
in order to allow the discharged battery to
recharge.
3.Allow the engines to run for several min-
utes.
4.Disconnect the jumper cables again in the
reverse sequence.
If need be, have the battery checked and
recharged.
Never use spray fluids to start the
engine.<
Towing and tow starting
Observe applicable laws and regulations
for tow-starting and towing.<
Do not transport any passengers other
than the driver in a vehicle that is being
towed.<
Using tow fitting
The threaded tow fitting is stored in the
onboard tool kit and must always remain in the
vehicle. It can be screwed in at the front or rear
of the BMW.
Only use the tow fitting that comes with
the vehicle and screw it in as far as it will
go. Use the tow fitting for towing only on roads.
Avoid lateral loading of the tow fitting, e.g. do
not lift the vehicle by the tow fitting. Otherwise,
damage to the tow fitting and the vehicle can
occur.<
Access to screw thread
Press the arrow symbol to push out the cover.
Being towed
Do not tow the vehicle by the rear axle;
because there is no steering lock, the
wheels could turn to an extreme angle during
towing. There is no power assist with the
engine stopped. This then requires increased
effort for braking and steering.<
Switch on the hazard warning flashers depend-
ing on the local regulations. If the electrical sys-
tem fails, mark the vehicle to be towed, e.g. with
a sign or warning triangle in the rear window.