2006 BMW 650I COUPE light
[x] Cancel search: lightPage 12 of 236
At a glance
11Reference
Controls
Driving tips
Communications
Navigation
Entertainment
Mobility
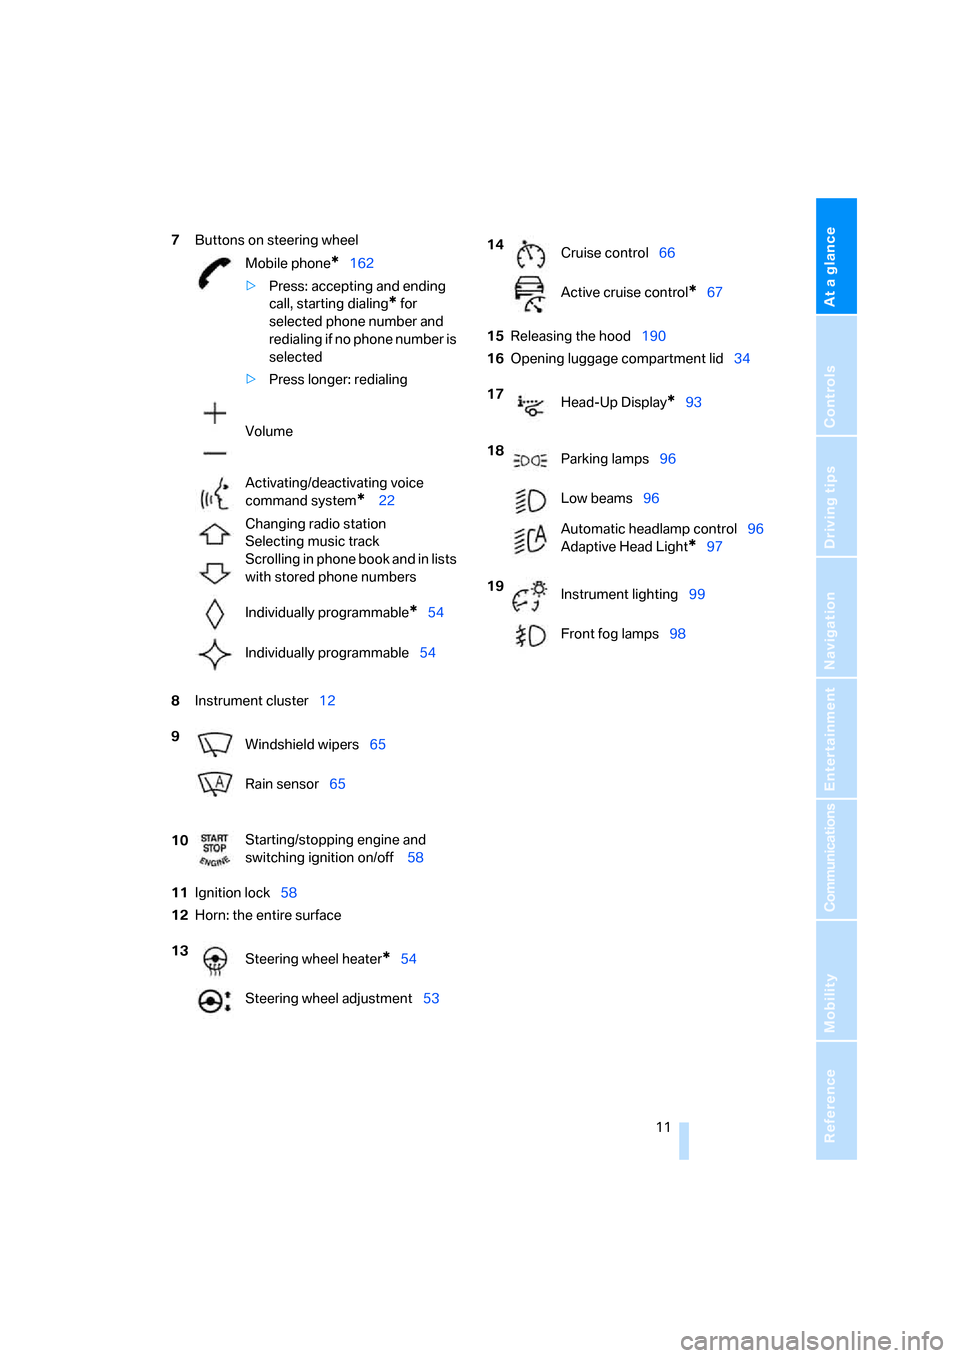
7Buttons on steering wheel
8Instrument cluster12
11Ignition lock58
12Horn: the entire surface15Releasing the hood190
16Opening luggage compartment lid34 Mobile phone
*162
>Press: accepting and ending
call, starting dialing
* for
selected phone number and
redialing if no phone number is
selected
>Press longer: redialing
Volume
Activating/deactivating voice
command system
* 22
Changing radio station
Selecting music track
Scrolling in phone book and in lists
with stored phone numbers
Individually programmable
*54
Individually programmable54
9
Windshield wipers65
Rain sensor65
10Starting/stopping engine and
switching ignition on/off 58
13
Steering wheel heater
*54
Steering wheel adjustment53
14
Cruise control66
Active cruise control
*67
17
Head-Up Display
*93
18
Parking lamps96
Low beams96
Automatic headlamp control96
Adaptive Head Light
*97
19
Instrument lighting99
Front fog lamps98
Page 14 of 236
At a glance
13Reference
Controls
Driving tips
Communications
Navigation
Entertainment
Mobility
Indicator and warning lamps
The concept
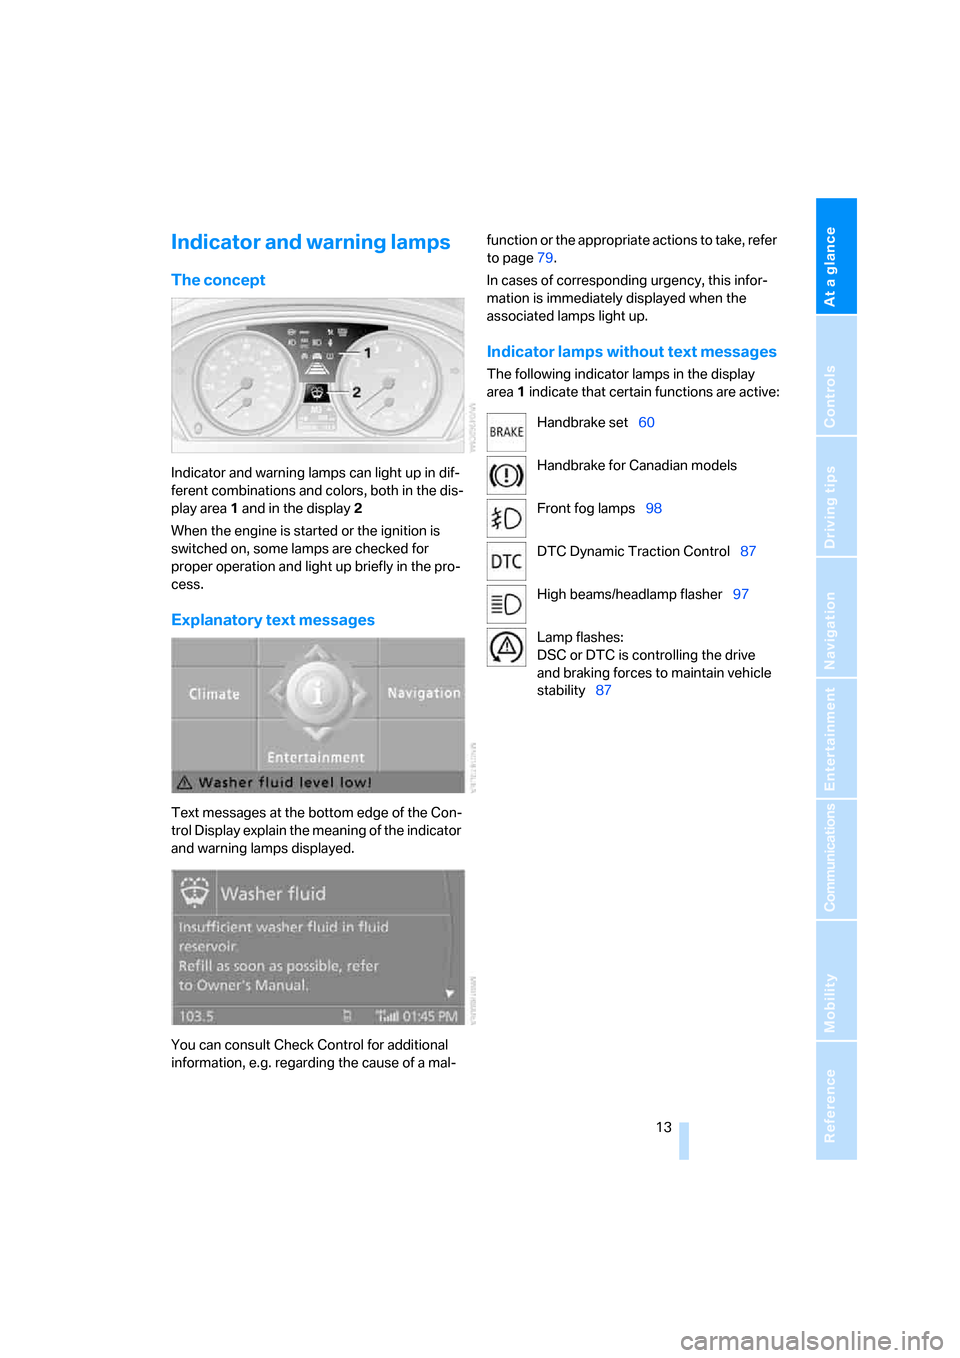
Indicator and warning lamps can light up in dif-
ferent combinations and colors, both in the dis-
play area1 and in the display2
When the engine is started or the ignition is
switched on, some lamps are checked for
proper operation and light up briefly in the pro-
cess.
Explanatory text messages
Text messages at the bottom edge of the Con-
trol Display explain the meaning of the indicator
and warning lamps displayed.
You can consult Check Control for additional
information, e.g. regarding the cause of a mal-function or the appropriate actions to take, refer
to page79.
In cases of corresponding urgency, this infor-
mation is immediately displayed when the
associated lamps light up.
Indicator lamps without text messages
The following indicator lamps in the display
area1 indicate that certain functions are active:
Handbrake set60
Handbrake for Canadian models
Front fog lamps98
DTC Dynamic Traction Control87
High beams/headlamp flasher97
Lamp flashes:
DSC or DTC is controlling the drive
and braking forces to maintain vehicle
stability87
Page 20 of 236
At a glance
19Reference
Controls
Driving tips
Communications
Navigation
Entertainment
Mobility
Operating principle at a glance
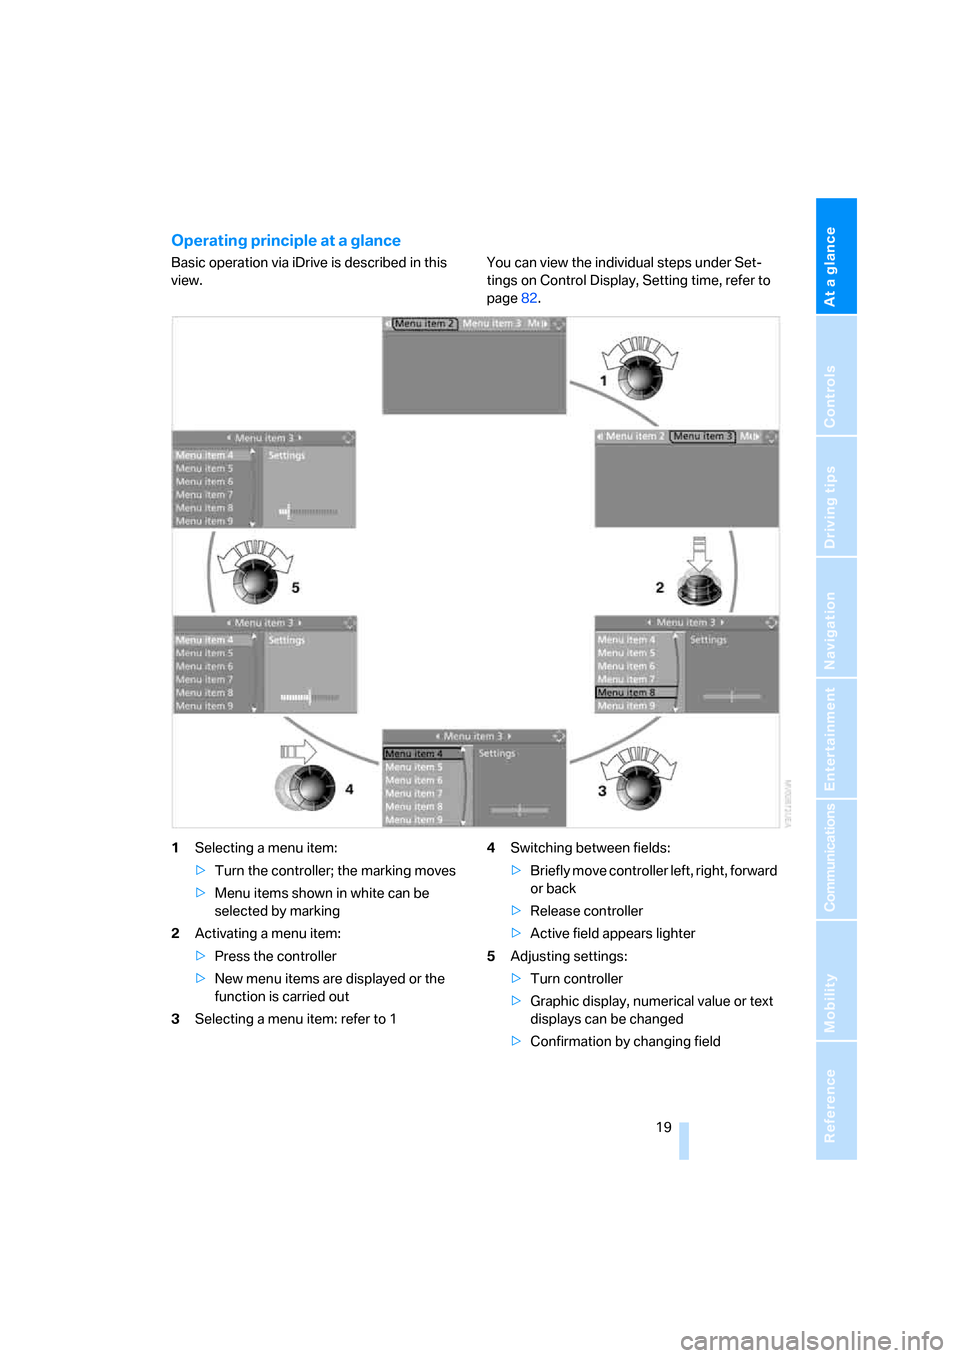
Basic operation via iDrive is described in this
view.You can view the individual steps under Set-
tings on Control Display, Setting time, refer to
page82.
1Selecting a menu item:
>Turn the controller; the marking moves
>Menu items shown in white can be
selected by marking
2Activating a menu item:
>Press the controller
>New menu items are displayed or the
function is carried out
3Selecting a menu item: refer to 14Switching between fields:
>Briefly move controller left, right, forward
or back
>Release controller
>Active field appears lighter
5Adjusting settings:
>Turn controller
>Graphic display, numerical value or text
displays can be changed
>Confirmation by changing field
Page 37 of 236
Opening and closing
36
Indicator lamp displays
>The indicator lamp below the interior rear-
view mirror flashes continuously: the sys-
tem is armed.
>The indicator lamp flashes after locking: the
doors or luggage compartment lid are not
properly closed. Even if you do not close the
alerted area, the system begins to monitor
the remaining areas, and the indicator lamp
flashes continuously after approx. 10 sec-
onds. However, the interior motion sensor
is not activated.
>After the vehicle is unlocked, the indicator
lamp goes out: no manipulation or
attempted intrusions have been detected in
the period since the system was armed.
>The indicator lamp flashes after unlocking
until the remote control is inserted into the
ignition lock, however for a maximum of
approx. 5 minutes: an attempted entry has
been detected in the period since the sys-
tem was armed.
Tilt alarm sensor
Monitors the inclination of the vehicle. The
alarm system reacts, for example, if someone
attempts to steal the wheels or tow the vehicle.
Interior motion sensor
Coupe:
In order for the interior motion sensor to func-
tion properly, the windows and glass sunroof
*
must be completely closed.
Convertible:
Monitors the interior up to the height of the seat
cushions. This means that the alarm system,
including the interior motion sensor, is armed even if the convertible top is open. Falling
objects, e.g. leaves, can trigger false alarms,
refer to Avoiding unintentional alarms.
Avoiding unintentional alarms
The tilt alarm sensor and interior motion sensor
may be switched off at the same time. This pre-
vents unintentional alarms, e.g. in the following
situations:
>In stacking garages
>When transporting on car-carrying trains
>When animals are to remain in the vehicle
Switching off the tilt alarm sensor and
interior motion sensor
Press the button on the remote control
once again immediately after locking.
The indicator lamp lights up briefly and then
flashes continuously. The tilt alarm sensor and
the interior motion sensor are switched off until
the vehicle is unlocked and locked again.
Comfort access*
Comfort access enables you to access your
vehicle without having to hold the remote con-
trol in your hand. It is sufficient to carry the
remote control with you, e.g. in your jacket
pocket. The vehicle automatically detects the
related remote control in the immediate vicinity
or in the interior.
Comfort access supports the following func-
tions:
>Unlocking/locking vehicle
>Starting engine
>Comfort locking
Functional requirement
>The vehicle can only be unlocked if the
vehicle detects that the remote control car-
ried is located outside the vehicle.
>The next unlocking and locking cycle is not
possible until after approx. 2 seconds.
Page 38 of 236

Controls
37Reference
At a glance
Driving tips
Communications
Navigation
Entertainment
Mobility
>The engine can only be started if the vehicle
detects that the remote control carried is
located in the vehicle.
Special features in contrast to ordinary
remote control
It is basically irrelevant whether you operate the
above-mentioned functions with the comfort
access feature or by pressing the buttons on
the remote control. Before doing so, please
familiarize yourself with the information on
opening and closing, starting on page28.
The special features when using comfort
access are described below.
Unlocking
Completely grasp a door handle, arrow1.
This corresponds to pressing the button.
If a remote control is detected in the interior
after unlocking, the electric steering-wheel lock
disengages, refer to page58.
Locking doors
Touch the surface, arrow2 on the driver's door
or3 on the passenger door with a finger for
approx. 1 second. This corresponds to pressing
the button.
For comfort closing, hold a finger on the sur-
face, arrow2 or 3.
If a remote control accidentally left in the
luggage compartment is detected inside
the locked vehicle after the luggage compart-
ment lid has been closed, then the luggage
compartment lid opens again. The hazard warn-
ing flashers flash and an acoustic signal
*
sounds.<
Switching on radio readiness
By briefly pressing the Start/Stop button, you
switch on the radio readiness, refer to page58.
When doing so, do not depress the brake
pedal; otherwise, the engine will start
immediately.<
Starting engine
You can start the engine or switch on the igni-
tion if a remote control is located on the interior
of the vehicle. It need not be inserted in the igni-
tion lock, refer to page58.
If you take the remote control with you when
leaving the vehicle with the engine running, a
warning lamp lights up. In addition, a message
appears on the Control Display. As long as no
remote control is detected in the vehicle, it is
only possible to restart the engine within
approx. 10 seconds after it is switched off.
Switching off engine with automatic
transmission
The engine can only be switched off in the
selector lever position P, refer to page60.
To switch off the engine in the selector lever
position N, the remote control must be inserted
in the ignition lock.
Before driving into a car wash with
automatic transmission
1.Insert the remote control into the ignition
lock.
2.Depress brake pedal.
3.Place selector lever in position N.
4.Switch off the engine.
The vehicle can roll.
Malfunction
The comfort access function may malfunction
due to local radio waves. If this occurs, then
open or close the vehicle with the buttons on
the remote control or with a key. To start the
engine after this, insert the remote control in the
ignition lock.
Page 40 of 236
Controls
39Reference
At a glance
Driving tips
Communications
Navigation
Entertainment
Mobility
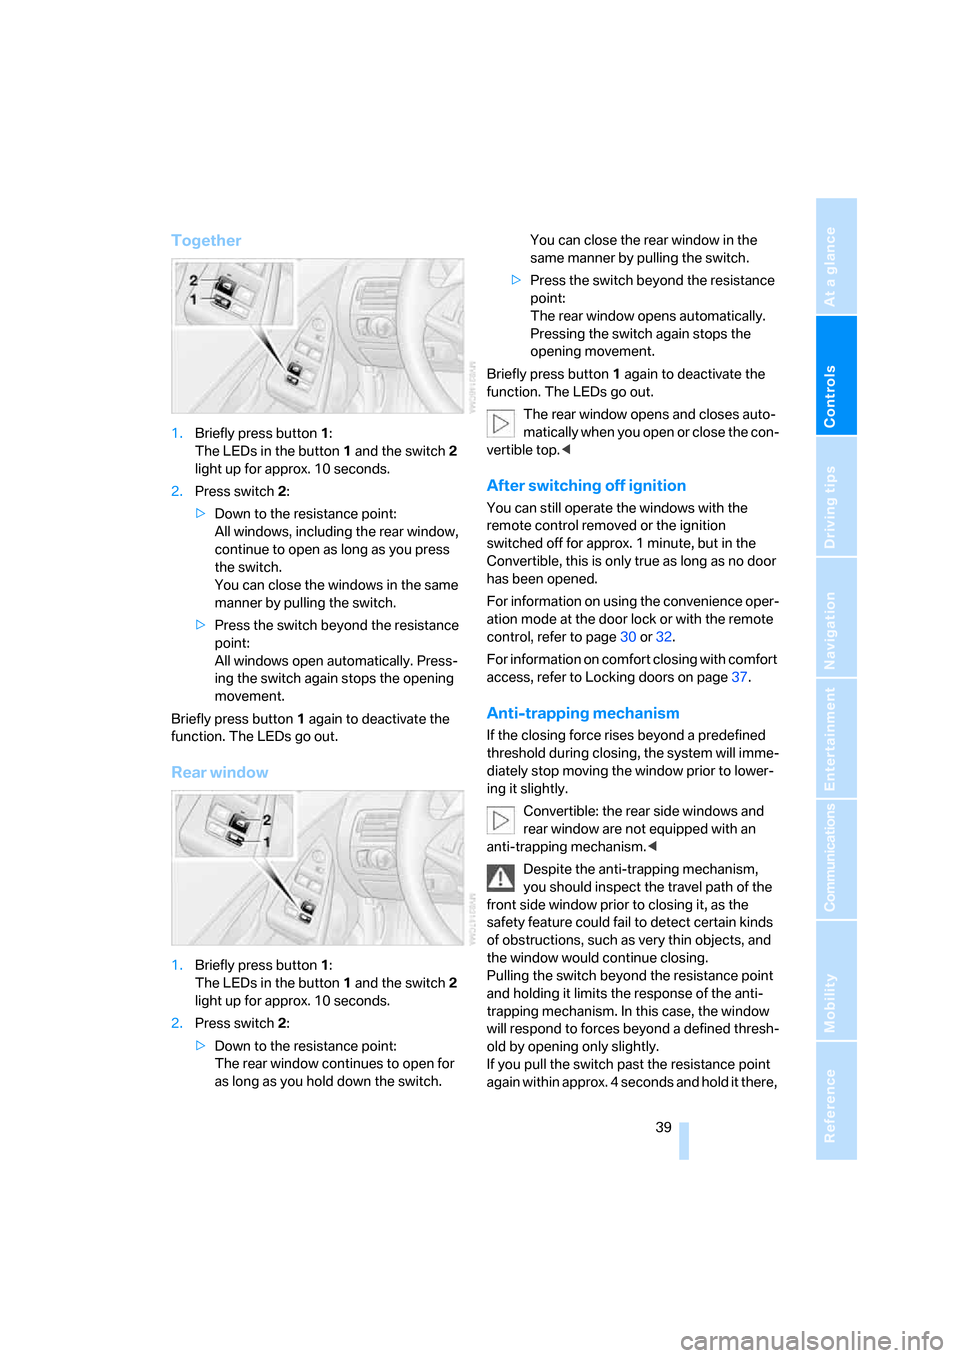
Together
1.Briefly press button1:
The LEDs in the button1 and the switch2
light up for approx. 10 seconds.
2.Press switch 2:
>Down to the resistance point:
All windows, including the rear window,
continue to open as long as you press
the switch.
You can close the windows in the same
manner by pulling the switch.
>Press the switch beyond the resistance
point:
All windows open automatically. Press-
ing the switch again stops the opening
movement.
Briefly press button 1 again to deactivate the
function. The LEDs go out.
Rear window
1.Briefly press button1:
The LEDs in the button1 and the switch2
light up for approx. 10 seconds.
2.Press switch 2:
>Down to the resistance point:
The rear window continues to open for
as long as you hold down the switch.You can close the rear window in the
same manner by pulling the switch.
>Press the switch beyond the resistance
point:
The rear window opens automatically.
Pressing the switch again stops the
opening movement.
Briefly press button 1 again to deactivate the
function. The LEDs go out.
The rear window opens and closes auto-
matically when you open or close the con-
vertible top.<
After switching off ignition
You can still operate the windows with the
remote control removed or the ignition
switched off for approx. 1 minute, but in the
Convertible, this is only true as long as no door
has been opened.
For information on using the convenience oper-
ation mode at the door lock or with the remote
control, refer to page30 or32.
For information on comfort closing with comfort
access, refer to Locking doors on page37.
Anti-trapping mechanism
If the closing force rises beyond a predefined
threshold during closing, the system will imme-
diately stop moving the window prior to lower-
ing it slightly.
Convertible: the rear side windows and
rear window are not equipped with an
anti-trapping mechanism.<
Despite the anti-trapping mechanism,
you should inspect the travel path of the
front side window prior to closing it, as the
safety feature could fail to detect certain kinds
of obstructions, such as very thin objects, and
the window would continue closing.
Pulling the switch beyond the resistance point
and holding it limits the response of the anti-
trapping mechanism. In this case, the window
will respond to forces beyond a defined thresh-
old by opening only slightly.
If you pull the switch past the resistance point
again within approx. 4 seconds and hold it there,
Page 41 of 236
Opening and closing
40 the anti-trapping mechanism will be deacti-
vated.<
Accessories in window area
After installing any accessory within the travel
range of the window – such as a clamp-on
antenna for a mobile phone, you will need to
have the system reinitialized for use under the
new conditions. Please contact your BMW cen-
ter for assistance.
Coupe:
Glass sunroof, electric with
raise function*
The glass sunroof and sliding visor are opera-
tional whenever the ignition is switched on.
To prevent injuries, exercise care when
closing the glass sunroof and keep it in
your field of vision until it is shut.
Always take along the remote control when you
leave the vehicle; otherwise, children could, for
example, operate the roof and injure them-
selves.<
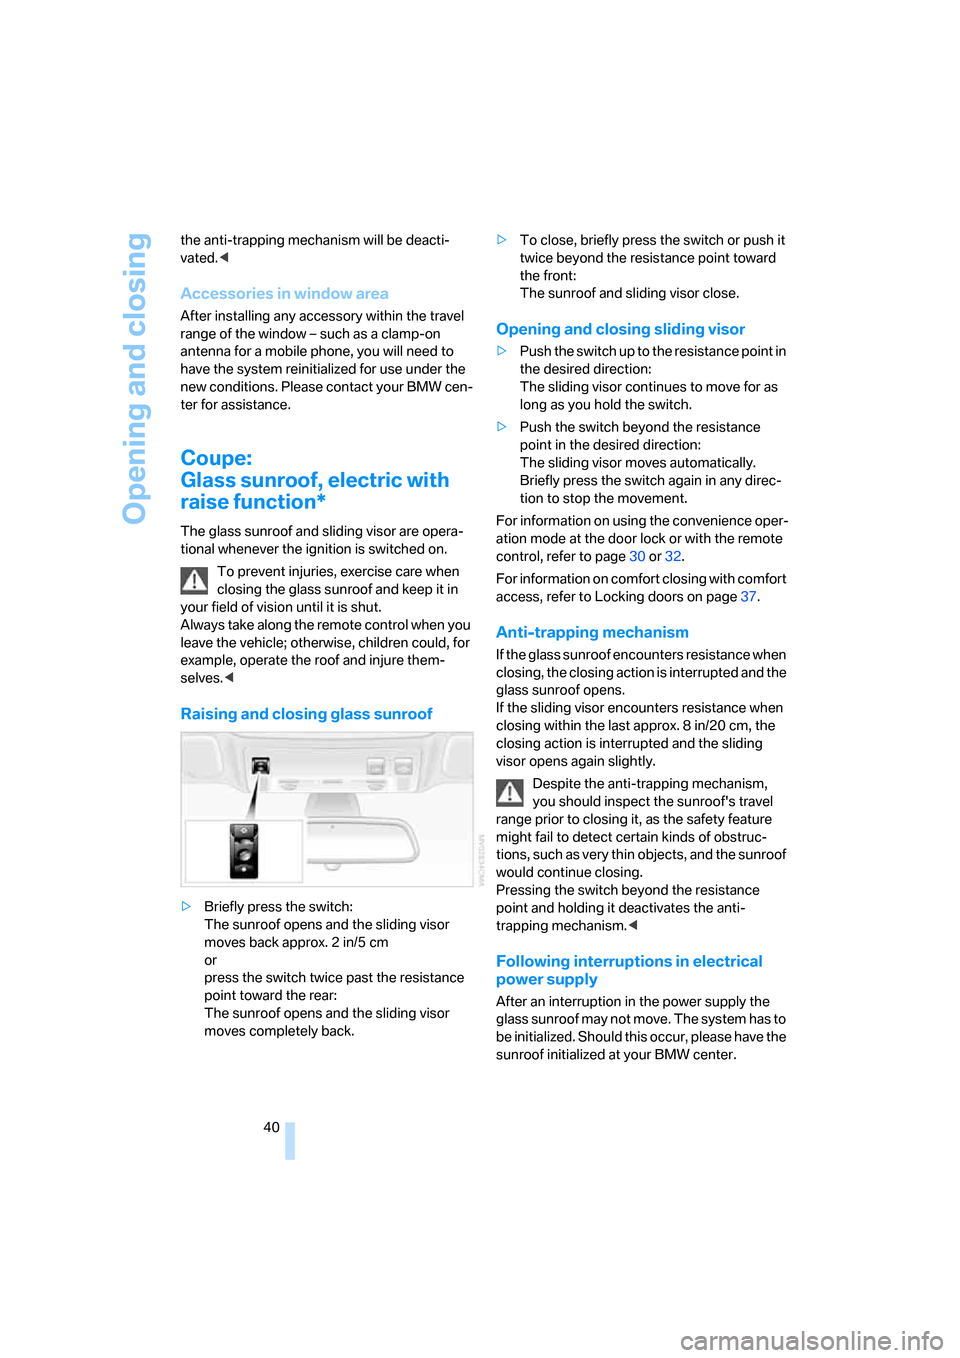
Raising and closing glass sunroof
>Briefly press the switch:
The sunroof opens and the sliding visor
moves back approx. 2 in/5 cm
or
press the switch twice past the resistance
point toward the rear:
The sunroof opens and the sliding visor
moves completely back.>To close, briefly press the switch or push it
twice beyond the resistance point toward
the front:
The sunroof and sliding visor close.
Opening and closing sliding visor
>Push the switch up to the resistance point in
the desired direction:
The sliding visor continues to move for as
long as you hold the switch.
>Push the switch beyond the resistance
point in the desired direction:
The sliding visor moves automatically.
Briefly press the switch again in any direc-
tion to stop the movement.
For information on using the convenience oper-
ation mode at the door lock or with the remote
control, refer to page30 or32.
For information on comfort closing with comfort
access, refer to Locking doors on page37.
Anti-trapping mechanism
If the glass sunroof encounters resistance when
closing, the closing action is interrupted and the
glass sunroof opens.
If the sliding visor encounters resistance when
closing within the last approx. 8 in/20 cm, the
closing action is interrupted and the sliding
visor opens again slightly.
Despite the anti-trapping mechanism,
you should inspect the sunroof's travel
range prior to closing it, as the safety feature
might fail to detect certain kinds of obstruc-
tions, such as very thin objects, and the sunroof
would continue closing.
Pressing the switch beyond the resistance
point and holding it deactivates the anti-
trapping mechanism.<
Following interruptions in electrical
power supply
After an interruption in the power supply the
glass sunroof may not move. The system has to
be initialized. Should this occur, please have the
sunroof initialized at your BMW center.
Page 42 of 236
Controls
41Reference
At a glance
Driving tips
Communications
Navigation
Entertainment
Mobility
Moving manually
In the event of an electrical malfunction, you can
move the panorama glass sunroof and the slid-
ing visor manually.
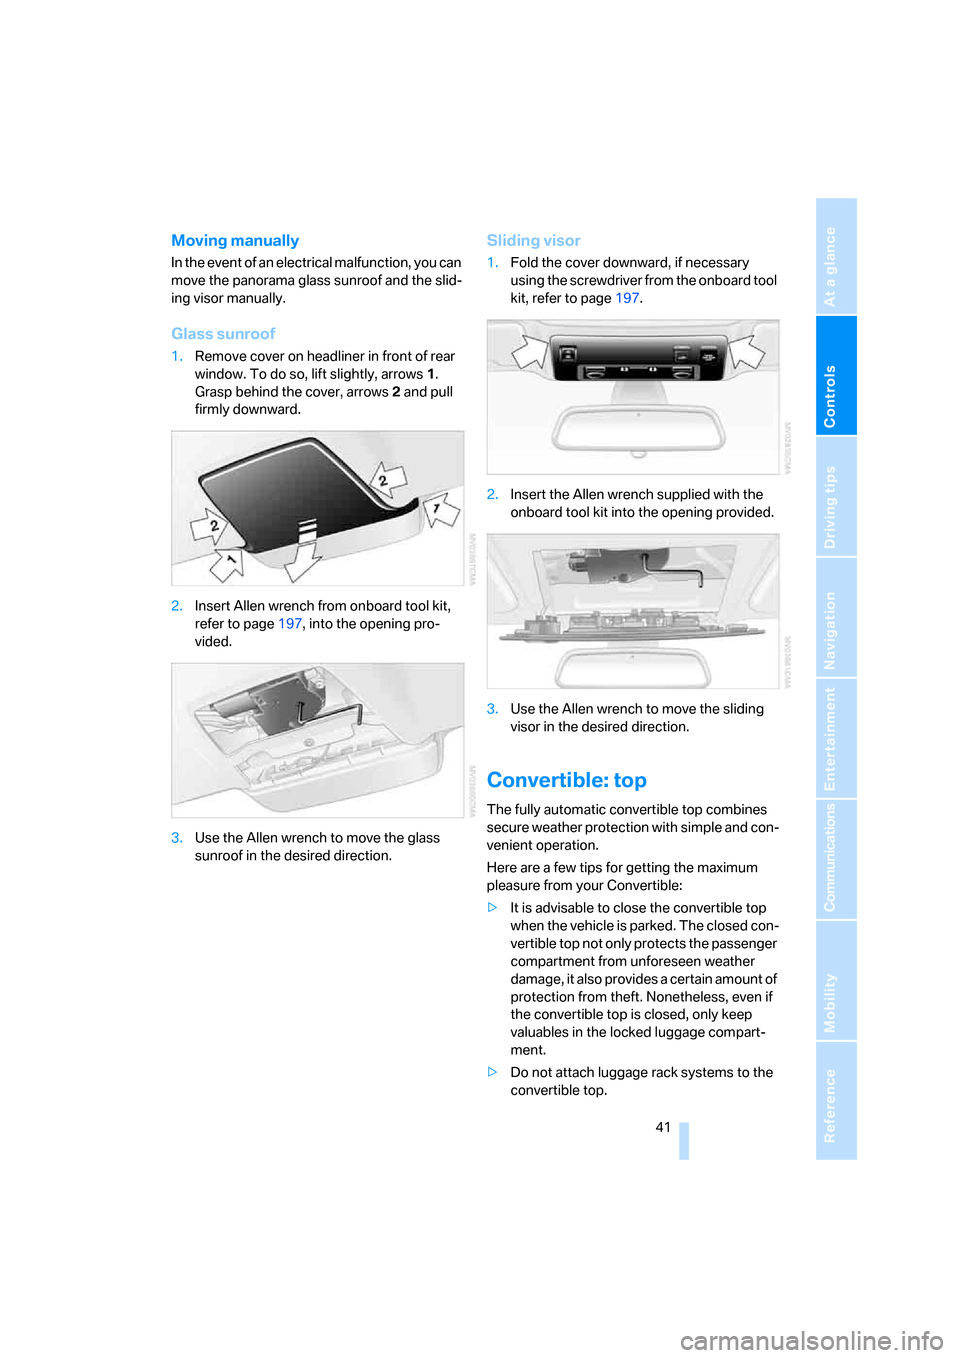
Glass sunroof
1.Remove cover on headliner in front of rear
window. To do so, lift slightly, arrows1.
Grasp behind the cover, arrows2 and pull
firmly downward.
2.Insert Allen wrench from onboard tool kit,
refer to page197, into the opening pro-
vided.
3.Use the Allen wrench to move the glass
sunroof in the desired direction.
Sliding visor
1.Fold the cover downward, if necessary
using the screwdriver from the onboard tool
kit, refer to page197.
2.Insert the Allen wrench supplied with the
onboard tool kit into the opening provided.
3.Use the Allen wrench to move the sliding
visor in the desired direction.
Convertible: top
The fully automatic convertible top combines
secure weather protection with simple and con-
venient operation.
Here are a few tips for getting the maximum
pleasure from your Convertible:
>It is advisable to close the convertible top
when the vehicle is parked. The closed con-
vertible top not only protects the passenger
compartment from unforeseen weather
damage, it also provides a certain amount of
protection from theft. Nonetheless, even if
the convertible top is closed, only keep
valuables in the locked luggage compart-
ment.
>Do not attach luggage rack systems to the
convertible top.