2006 BMW 550I navigation
[x] Cancel search: navigationPage 194 of 248
Mobility
193Reference
At a glance
Controls
Driving tips
Communications
Navigation
Entertainment
heat when tested under controlled conditions
on a specified indoor laboratory test wheel.
Sustained high temperature can cause the
material of the tire to degenerate and reduce
tire life, and excessive temperature can lead to
sudden tire failure. The grade C corresponds to
a level of performance which all passenger car
tires must meet under the Federal Motor Vehi-
cle Safety Standard No. 109. Grades B and A
represent higher levels of performance on the
laboratory test wheel than the minimum
required by law.
The temperature grade for this tire is
established for a tire that is properly
inflated and not overloaded. Excessive speed,
underinflation, or excessive loading, either sep-
arately or in combination, can cause heat
buildup and possible tire failure.<
RSC – run-flat tires
You will recognize run-flat tires by a circular
symbol containing the letters RSC on the side
of the tire, refer to page194.
M+S
Winter and all-season tires.
These have better winter properties than sum-
mer tires.
XL
Indicates specially reinforced tires.
Tire condition
Inspect your tires frequently for tread wear,
signs of damage and for foreign objects lodged
in the tread. Check the tread depth.
Minimum tread depth
The tread depth should not drop below 0.12 in/
3 mm, although, for example, European legisla-
tion only specifies a minimum tread depth of
0.063 in/1.6 mm. At tread depths below 0.12 in/
3 mm there is an increased risk of high-speed
hydroplaning, even when only small amounts of
water are present on the road surface.When winter tires wear down past a tread depth
of 0.16 in/4 mm, they become perceptibly less
suitable for winter conditions. For the sake of
safety, new tires should be installed.
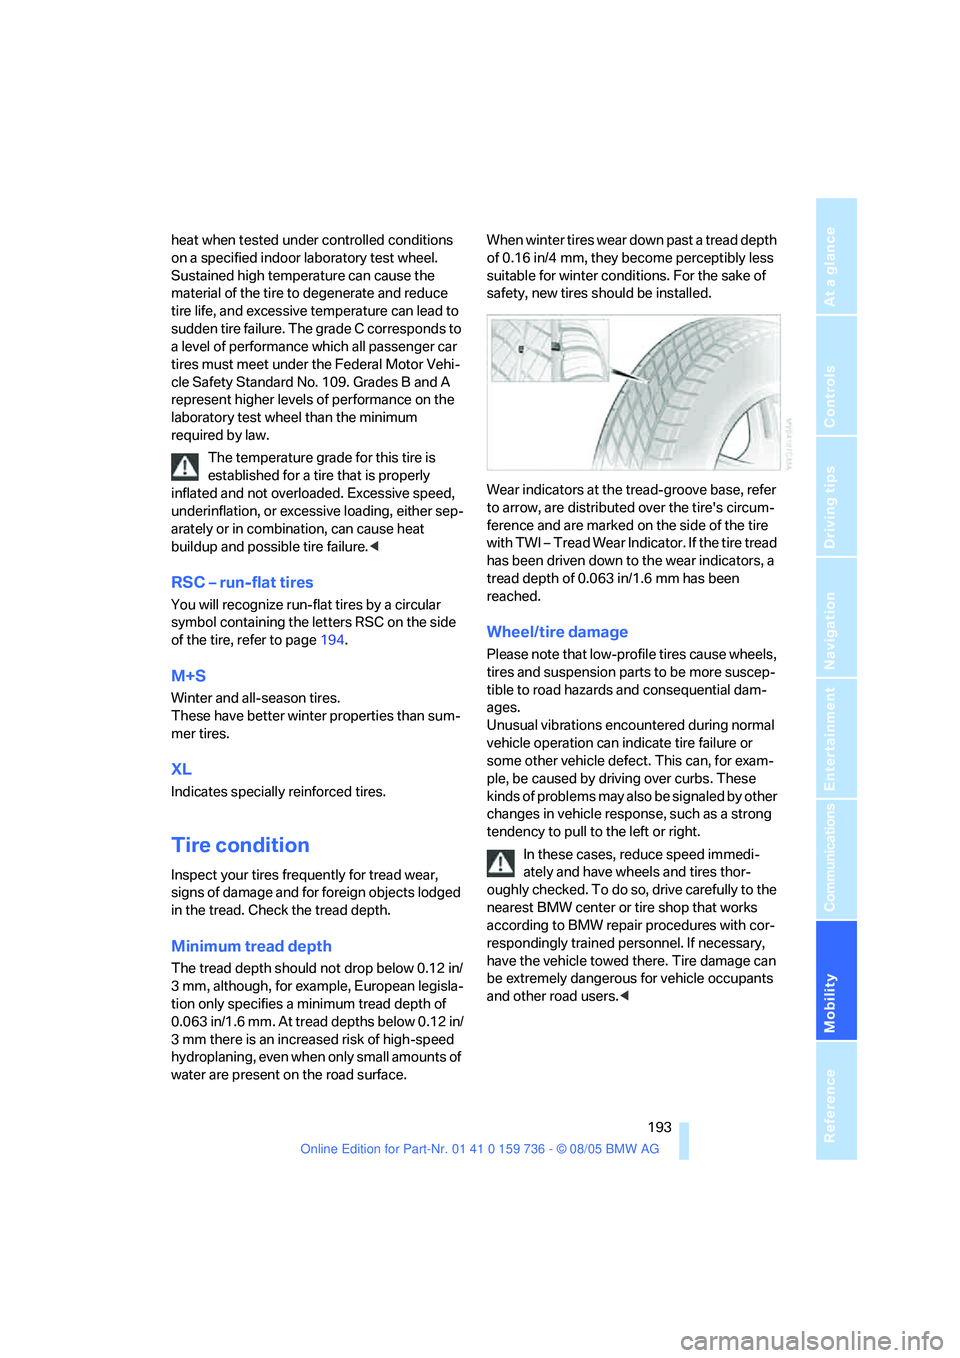
Wear indicators at the tread-groove base, refer
to arrow, are distributed over the tire's circum-
ference and are marked on the side of the tire
with TWI – Tread Wear Indicator. If the tire tread
has been driven down to the wear indicators, a
tread depth of 0.063 in/1.6 mm has been
reached.
Wheel/tire damage
Please note that low-profile tires cause wheels,
tires and suspension parts to be more suscep-
tible to road hazards and consequential dam-
ages.
Unusual vibrations encountered during normal
vehicle operation can indicate tire failure or
some other vehicle defect. This can, for exam-
ple, be caused by driving over curbs. These
kinds of problems may also be signaled by other
changes in vehicle response, such as a strong
tendency to pull to the left or right.
In these cases, reduce speed immedi-
ately and have wheels and tires thor-
oughly checked. To do so, drive carefully to the
nearest BMW center or tire shop that works
according to BMW repair procedures with cor-
respondingly trained personnel. If necessary,
have the vehicle towed there. Tire damage can
be extremely dangerous for vehicle occupants
and other road users.<
Page 196 of 248
Mobility
195Reference
At a glance
Controls
Driving tips
Communications
Navigation
Entertainment
For safety reasons, BMW recommends
that you do not have damaged run-flat
tires repaired; they should be replaced.<
Special characteristics of winter tires
BMW recommends winter tires for use in cold
winter driving conditions. Although all-season
M+S tires provide better winter traction than
summer tires, they generally fail to provide the
same levels of cold-weather performance as
winter tires.
Pay attention to speed
Always observe the maximum permissi-
ble speed for the winter tires, otherwise
tire damage may occur, which can result in acci-
dents.<
Storage
Always store wheels and tires in a cool, dry
place with as little exposure to light as possible.
Always protect tires against all contact with oil,
grease and fuels. Do not exceed the maximum
tire inflation pressure indicated on the side wall
of the tire.
Snow chains*
BMW only tests certain fine-link snow chains,
classifies them as road-safe and recommends
them. Consult your BMW center for more infor-
mation.
Use is only permissible in pairs on the rear
wheels.
Observe the manufacturer's instructions when
mounting snow chains. Do not exceed a speed
of 30 mph/50 km/h with the chains mounted.
After mounting snow chains, do not ini-
tialize the Flat Tire Monitor, otherwise
incorrect displays can occur.
When driving with snow chains, it may be prac-
tical to briefly activate DTC, refer to page85.<
Page 198 of 248
Mobility
197Reference
At a glance
Controls
Driving tips
Communications
Navigation
Entertainment
Engine compartment
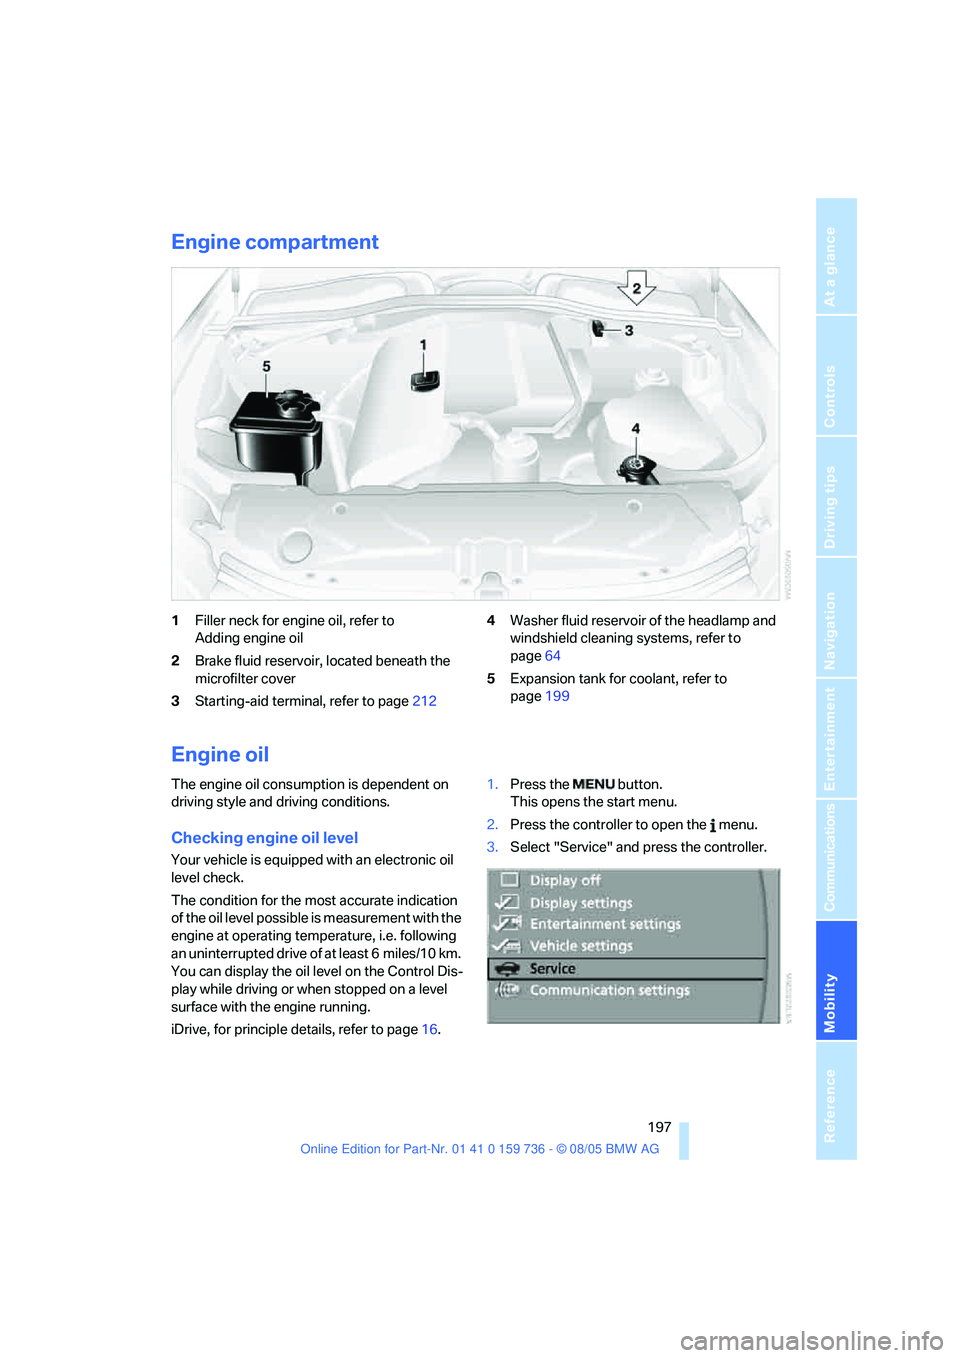
1Filler neck for engine oil, refer to
Adding engine oil
2Brake fluid reservoir, located beneath the
microfilter cover
3Starting-aid terminal, refer to page2124Washer fluid reservoir of the headlamp and
windshield cleaning systems, refer to
page64
5Expansion tank for coolant, refer to
page199
Engine oil
The engine oil consumption is dependent on
driving style and driving conditions.
Checking engine oil level
Your vehicle is equipped with an electronic oil
level check.
The condition for the most accurate indication
of the oil level possible is measurement with the
engine at operating temperature, i.e. following
an uninterrupted drive of at least 6 miles/10 km.
You can display the oil level on the Control Dis-
play while driving or when stopped on a level
surface with the engine running.
iDrive, for principle details, refer to page16.1.Press the button.
This opens the start menu.
2.Press the controller to open the menu.
3.Select "Service" and press the controller.
Page 200 of 248
Mobility
199Reference
At a glance
Controls
Driving tips
Communications
Navigation
Entertainment
Your BMW center will be happy to answer
detailed questions on BMW High Perfor-
mance Synthetic Oil or approved synthetic
oils.<
You can also call BMW of North America at
1-800-831-1117 or visit the website at
www.bmwusa.com to obtain this information.
Viscosity grades
Viscosity is a measure of an oil's flow rating and
is specified in SAE grades.
The choice of the right SAE grade is based on
the climatic conditions in the region in which
you normally drive your BMW.
Approved oils belong to the SAE grades
5W-40 and 5W-30.<
These oils can be used for driving at all outside
temperatures.
Coolant
Do not add coolant to the cooling system
when the engine is hot. Escaping coolant
can cause burns.<
Coolant is comprised of water and coolant addi-
tive. Not all commercially available additives are
suitable for your BMW. Ask your BMW center
for suitable additives.
Only use suitable additives, otherwise
engine damage may result. The additives
present a health hazard; observe the instruc-
tions on the containers.<
Comply with the appropriate environ-
mental protection regulations when dis-
posing of coolant additives.<
Checking coolant level
1.The engine must be at ambient tempera-
ture.
2.Turn the cap of the expansion tank counter-
clockwise to allow any accumulated pres-
sure to escape, then continue turning to
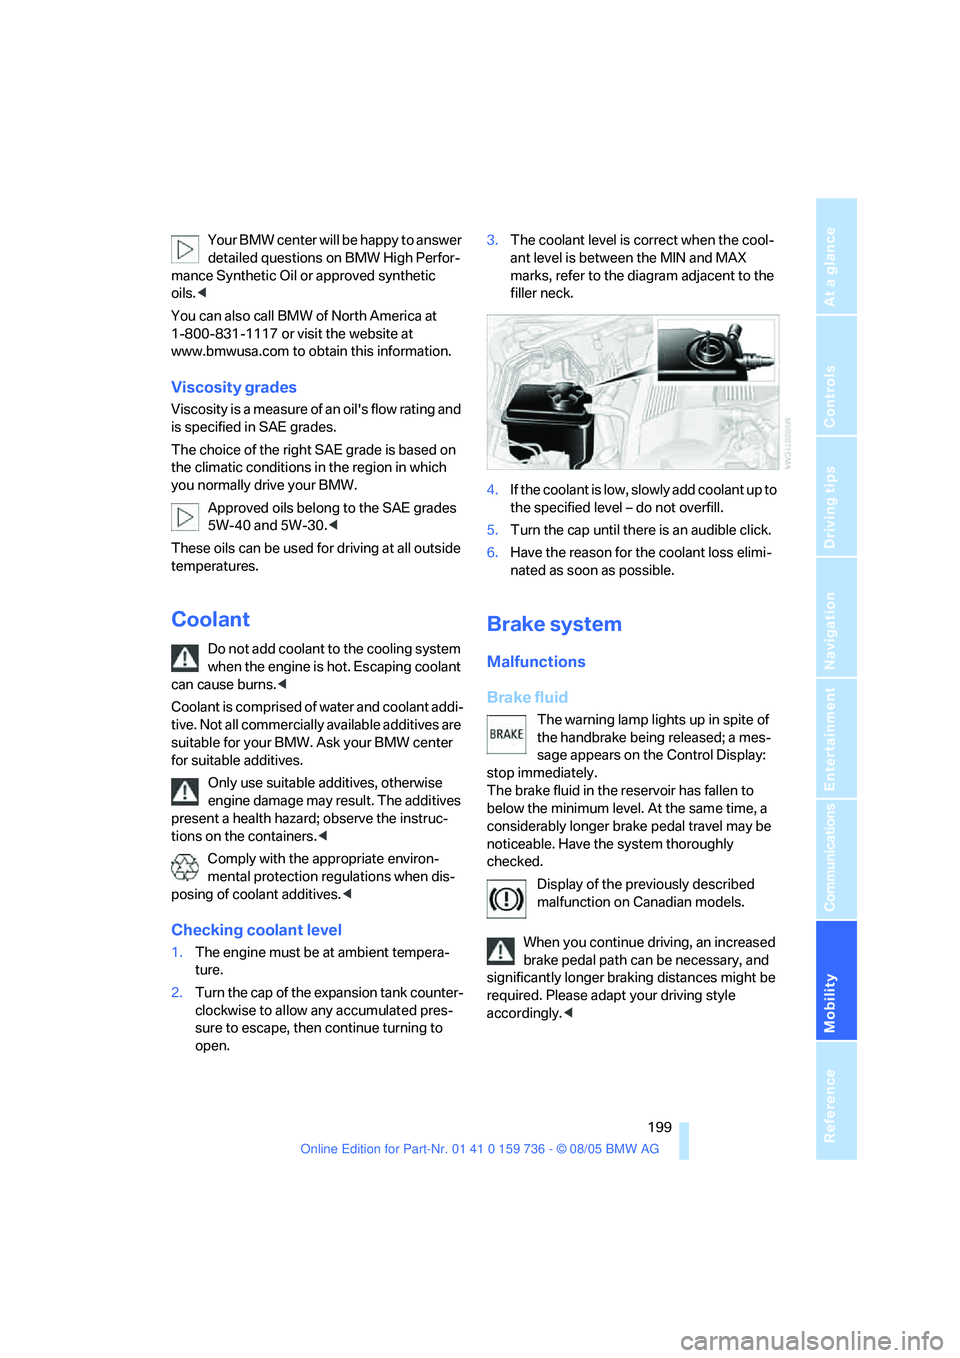
open.3.The coolant level is correct when the cool-
ant level is between the MIN and MAX
marks, refer to the diagram adjacent to the
filler neck.
4.If the coolant is low, slowly add coolant up to
the specified level – do not overfill.
5.Turn the cap until there is an audible click.
6.Have the reason for the coolant loss elimi-
nated as soon as possible.
Brake system
Malfunctions
Brake fluid
The warning lamp lights up in spite of
the handbrake being released; a mes-
sage appears on the Control Display:
stop immediately.
The brake fluid in the reservoir has fallen to
below the minimum level. At the same time, a
considerably longer brake pedal travel may be
noticeable. Have the system thoroughly
checked.
Display of the previously described
malfunction on Canadian models.
When you continue driving, an increased
brake pedal path can be necessary, and
significantly longer braking distances might be
required. Please adapt your driving style
accordingly.<
Page 202 of 248
Mobility
201Reference
At a glance
Controls
Driving tips
Communications
Navigation
Entertainment
Maintenance
The BMW maintenance
system
The BMW maintenance system supports the
preservation of the traffic and operating safety
of your BMW. The service schedule also
includes operations related to the vehicle's
comfort and convenience features, such as
replacement of the filters for the inside air.
The ultimate objective is to ensure economical
maintenance by providing the ideal service for
your vehicle.
Should the day come when you decide to sell
your BMW, a complete dealer service history
will prove to be an asset of inestimable value.
CBS Condition Based Service
Sensors and special algorithms take the differ-
ent driving conditions of your BMW into
account. Condition Based Service uses this to
determine the current and future service
requirements. By letting you define a service
and maintenance regimen that reflects your
own individual requirements, the system builds
the basis for trouble-free driving.
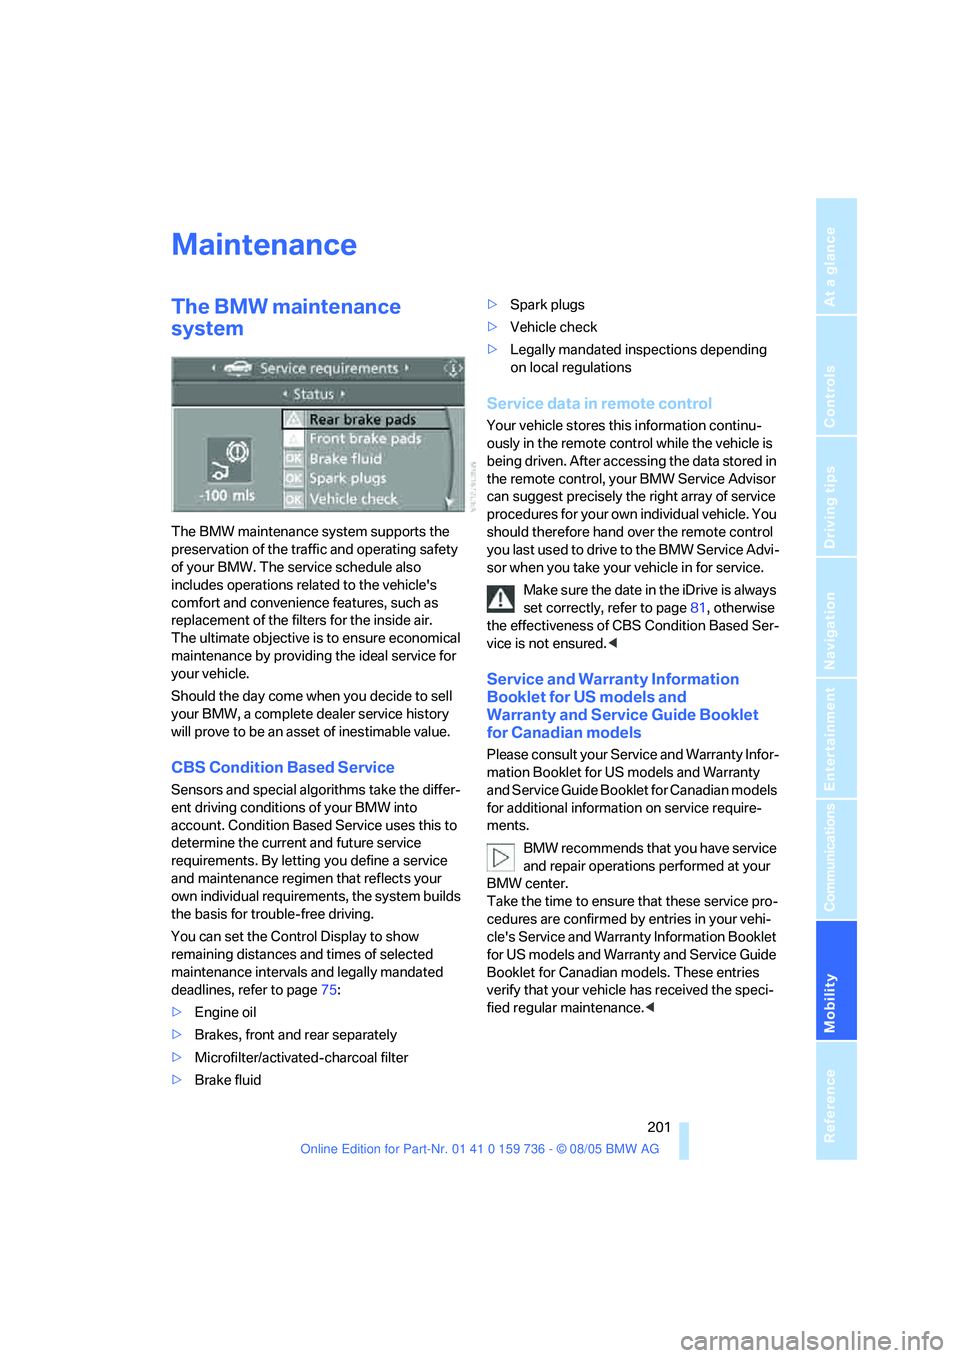
You can set the Control Display to show
remaining distances and times of selected
maintenance intervals and legally mandated
deadlines, refer to page75:
>Engine oil
>Brakes, front and rear separately
>Microfilter/activated-charcoal filter
>Brake fluid>Spark plugs
>Vehicle check
>Legally mandated inspections depending
on local regulations
Service data in remote control
Your vehicle stores this information continu-
ously in the remote control while the vehicle is
being driven. After accessing the data stored in
the remote control, your BMW Service Advisor
can suggest precisely the right array of service
procedures for your own individual vehicle. You
should therefore hand over the remote control
you last used to drive to the BMW Service Advi-
sor when you take your vehicle in for service.
Make sure the date in the iDrive is always
set correctly, refer to page81, otherwise
the effectiveness of CBS Condition Based Ser-
vice is not ensured.<
Service and Warranty Information
Booklet for US models and
Warranty and Service Guide Booklet
for Canadian models
Please consult your Service and Warranty Infor-
mation Booklet for US models and Warranty
and Service Guide Booklet for Canadian models
for additional information on service require-
ments.
BMW recommends that you have service
and repair operations performed at your
BMW center.
Take the time to ensure that these service pro-
cedures are confirmed by entries in your vehi-
cle's Service and Warranty Information Booklet
for US models and Warranty and Service Guide
Booklet for Canadian models. These entries
verify that your vehicle has received the speci-
fied regular maintenance.<
Page 204 of 248
Mobility
203Reference
At a glance
Controls
Driving tips
Communications
Navigation
Entertainment
Replacing components
Onboard toolkit
Sedan
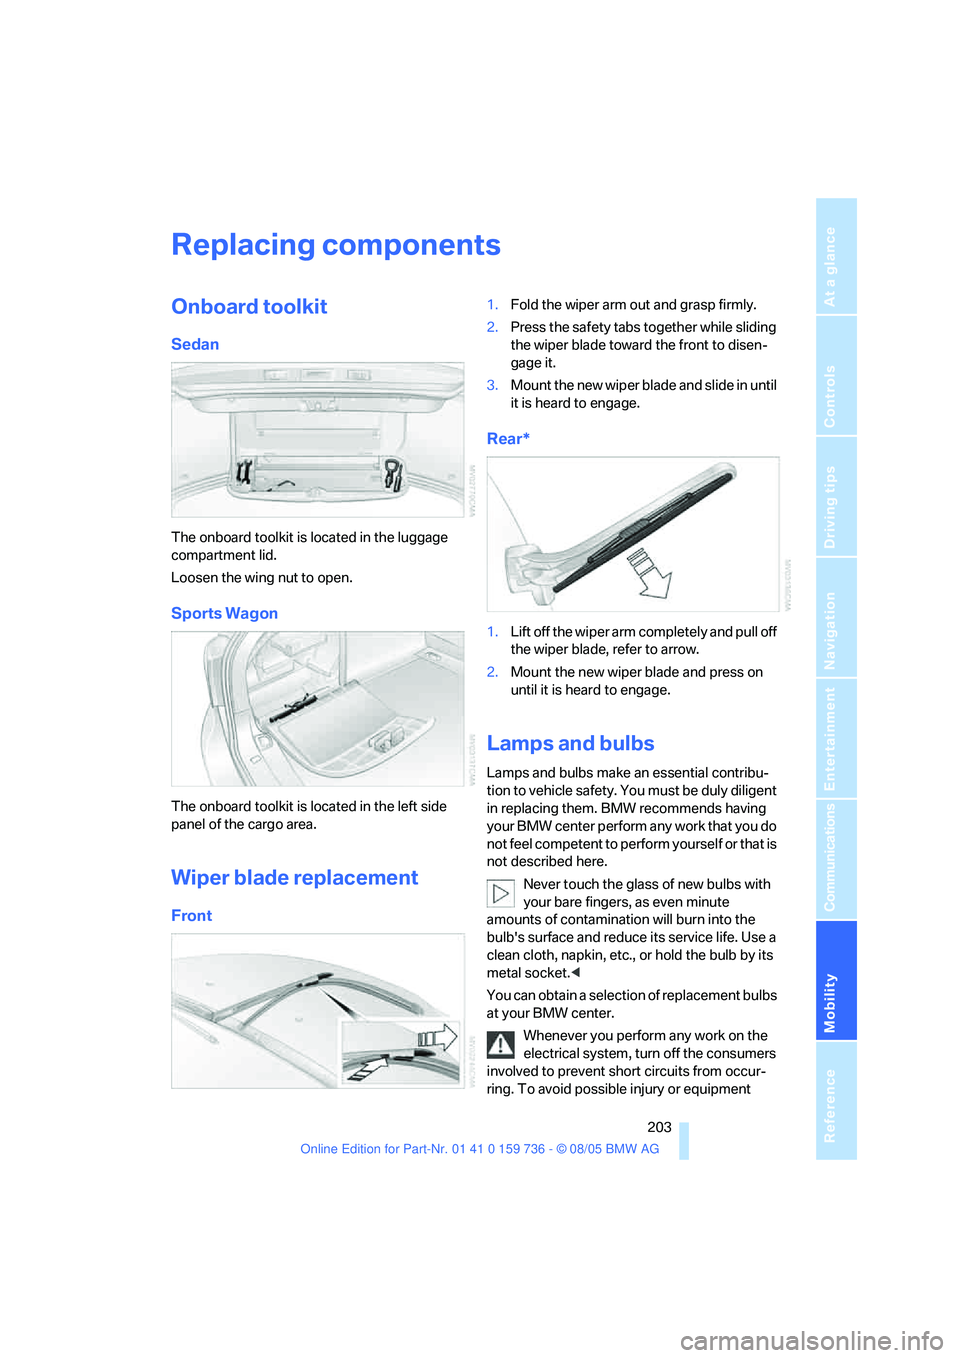
The onboard toolkit is located in the luggage
compartment lid.
Loosen the wing nut to open.
Sports Wagon
The onboard toolkit is located in the left side
panel of the cargo area.
Wiper blade replacement
Front
1.Fold the wiper arm out and grasp firmly.
2.Press the safety tabs together while sliding
the wiper blade toward the front to disen-
gage it.
3.Mount the new wiper blade and slide in until
it is heard to engage.
Rear*
1.Lift off the wiper arm completely and pull off
the wiper blade, refer to arrow.
2.Mount the new wiper blade and press on
until it is heard to engage.
Lamps and bulbs
Lamps and bulbs make an essential contribu-
tion to vehicle safety. You must be duly diligent
in replacing them. BMW recommends having
your BMW center perform any work that you do
not feel competent to perform yourself or that is
not described here.
Never touch the glass of new bulbs with
your bare fingers, as even minute
amounts of contamination will burn into the
bulb's surface and reduce its service life. Use a
clean cloth, napkin, etc., or hold the bulb by its
metal socket.<
You can obtain a selection of replacement bulbs
at your BMW center.
Whenever you perform any work on the
electrical system, turn off the consumers
involved to prevent short circuits from occur-
ring. To avoid possible injury or equipment
Page 206 of 248
Mobility
205Reference
At a glance
Controls
Driving tips
Communications
Navigation
Entertainment
system, there is a danger of fatal injuries when
work is carried out improperly.<
Parking and roadside parking lamps
In the event of a malfunction, please go to your
BMW center or a workshop that works accord-
ing to BMW repair procedures with correspond-
ingly trained personnel.
Turn signals, front
Bulb 21 watts, PY 21 W
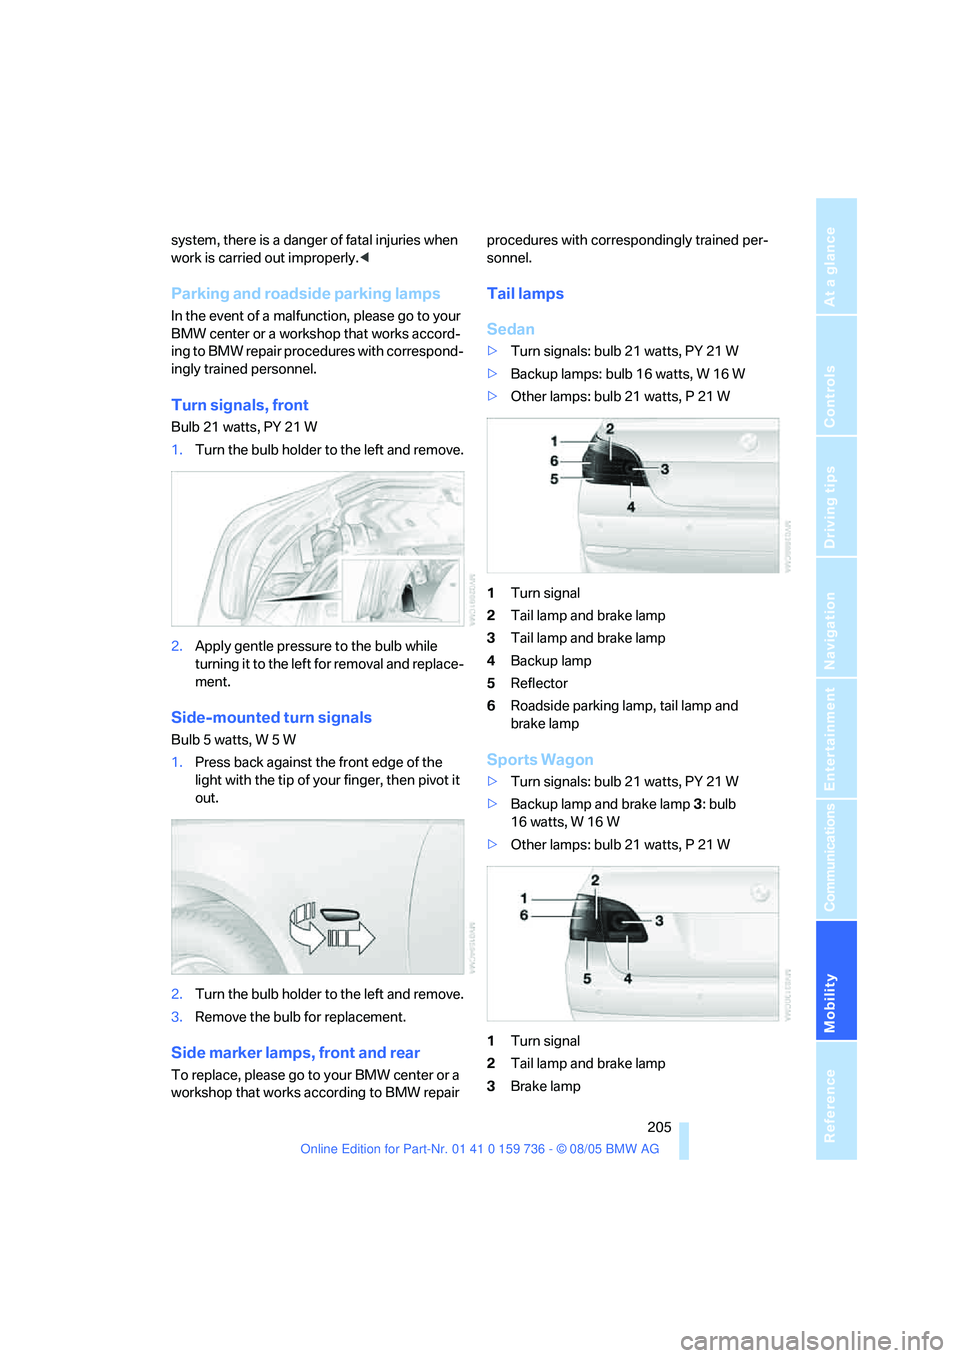
1.Turn the bulb holder to the left and remove.
2.Apply gentle pressure to the bulb while
turning it to the left for removal and replace-
ment.
Side-mounted turn signals
Bulb 5 watts, W 5 W
1.Press back against the front edge of the
light with the tip of your finger, then pivot it
out.
2.Turn the bulb holder to the left and remove.
3.Remove the bulb for replacement.
Side marker lamps, front and rear
To replace, please go to your BMW center or a
workshop that works according to BMW repair procedures with correspondingly trained per-
sonnel.
Tail lamps
Sedan
>Turn signals: bulb 21 watts, PY 21 W
>Backup lamps: bulb 16 watts, W 16 W
>Other lamps: bulb 21 watts, P 21 W
1Turn signal
2Tail lamp and brake lamp
3Tail lamp and brake lamp
4Backup lamp
5Reflector
6Roadside parking lamp, tail lamp and
brake lamp
Sports Wagon
>Turn signals: bulb 21 watts, PY 21 W
>Backup lamp and brake lamp 3: bulb
16 watts, W 16 W
>Other lamps: bulb 21 watts, P 21 W
1Turn signal
2Tail lamp and brake lamp
3Brake lamp
Page 208 of 248
Mobility
207Reference
At a glance
Controls
Driving tips
Communications
Navigation
Entertainment
Changing wheels
Safety precautions in the event of a flat
tire or wheel change: park the vehicle as
far as possible from passing traffic and on solid
ground. Switch on the hazard warning flashers.
Lock the steering wheel in straight-ahead set-
ting of the wheels. Apply the handbrake and
engage first gear, reverse gear or selector lever
position P.
Have all vehicle occupants get out of the vehicle
and ensure that they remain outside the imme-
diate area in a safe place, such as behind a
guardrail.
If a warning triangle
* or portable hazard warning
lamp is required, set it up on the roadside at an
appropriate distance from the rear of the vehi-
cle. Comply with all safety guidelines and regu-
lations.
Change the wheel only on a level, firm surface
which is not slippery. The vehicle or the jack
could slip to the side if you attempt to raise the
vehicle on a soft or slippery surface such as
snow, ice, tiles, etc.
Position the jack on a firm support surface.
Do not use a wooden block or similar object as a
support base for the jack, as this would prevent
it from extending to its full support height and
reduce its load-carrying capacity.
To avoid serious or fatal injury: never lie under
the vehicle, and never start the engine while it is
supported by the jack.<
What you will need
To avoid rattling noises later on, note the posi-
tions of the tools before removing them, then
return them to their initial positions after com-
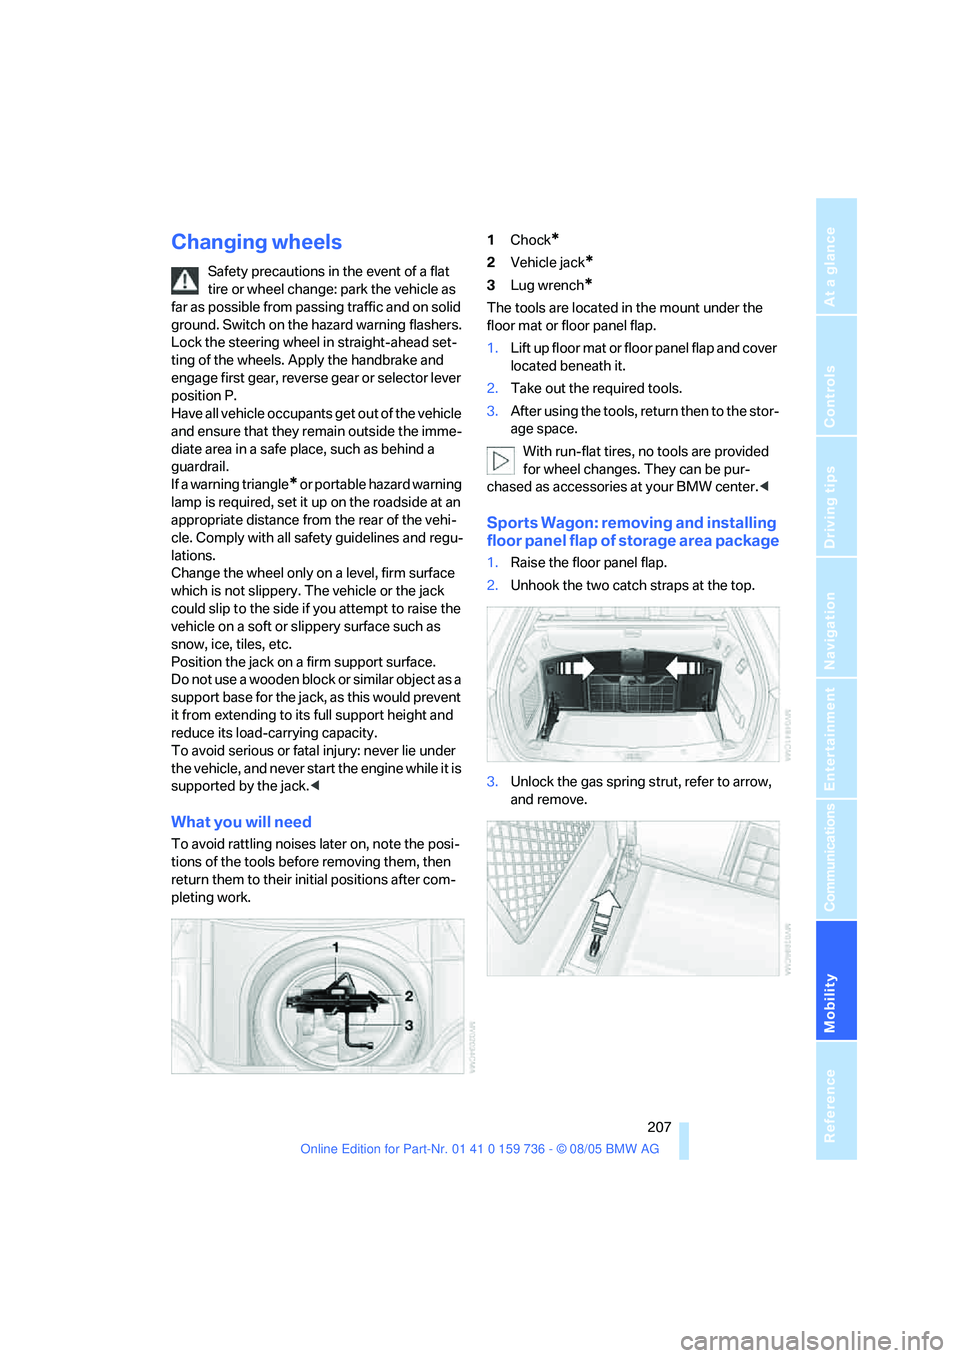
pleting work.1Chock
*
2Vehicle jack*
3Lug wrench*
The tools are located in the mount under the
floor mat or floor panel flap.
1.Lift up floor mat or floor panel flap and cover
located beneath it.
2.Take out the required tools.
3.After using the tools, return then to the stor-
age space.
With run-flat tires, no tools are provided
for wheel changes. They can be pur-
chased as accessories at your BMW center.<
Sports Wagon: removing and installing
floor panel flap of storage area package
1.Raise the floor panel flap.
2.Unhook the two catch straps at the top.
3.Unlock the gas spring strut, refer to arrow,
and remove.