2006 BMW 545I SEDAN steering
[x] Cancel search: steeringPage 186 of 259
Telephoning
184
Example: dialing phone numbers
Start the dialog:
Press the button on the steering wheel.
Adjusting volume
You can adjust the volume for the instructions
from the system:
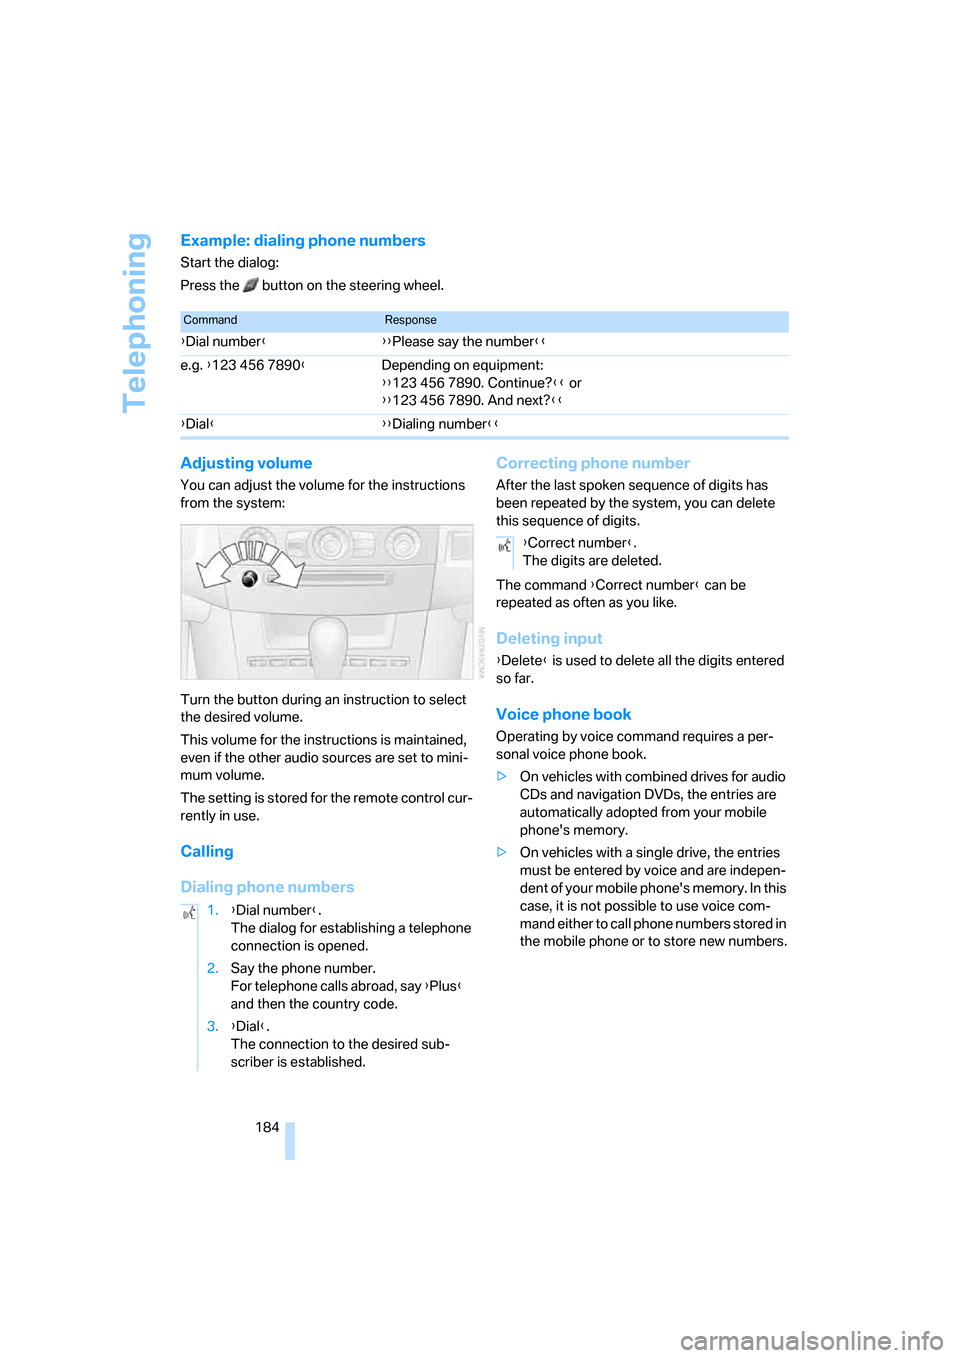
Turn the button during an instruction to select
the desired volume.
This volume for the instructions is maintained,
even if the other audio sources are set to mini-
mum volume.
The setting is stored for the remote control cur-
rently in use.
Calling
Dialing phone numbersCorrecting phone number
After the last spoken sequence of digits has
been repeated by the system, you can delete
this sequence of digits.
The command {Correct number} can be
repeated as often as you like.
Deleting input
{Delete} is used to delete all the digits entered
so far.
Voice phone book
Operating by voice command requires a per-
sonal voice phone book.
>On vehicles with combined drives for audio
CDs and navigation DVDs, the entries are
automatically adopted from your mobile
phone's memory.
>On vehicles with a single drive, the entries
must be entered by voice and are indepen-
dent of your mobile phone's memory. In this
case, it is not possible to use voice com-
mand either to call phone numbers stored in
the mobile phone or to store new numbers.
CommandResponse
{Dial number}{{Please say the number}}
e.g. {123 456 7890}Depending on equipment:
{{123 456 7890. Continue?}} or
{{123 456 7890. And next?}}
{Dial}{{Dialing number}}
1.{Dial number}.
The dialog for establishing a telephone
connection is opened.
2.Say the phone number.
For telephone calls abroad, say {Plus}
and then the country code.
3.{Dial}.
The connection to the desired sub-
scriber is established.
{Correct number}.
The digits are deleted.
Page 188 of 259
Telephoning
186
Mounting/removing snap-in
adapter
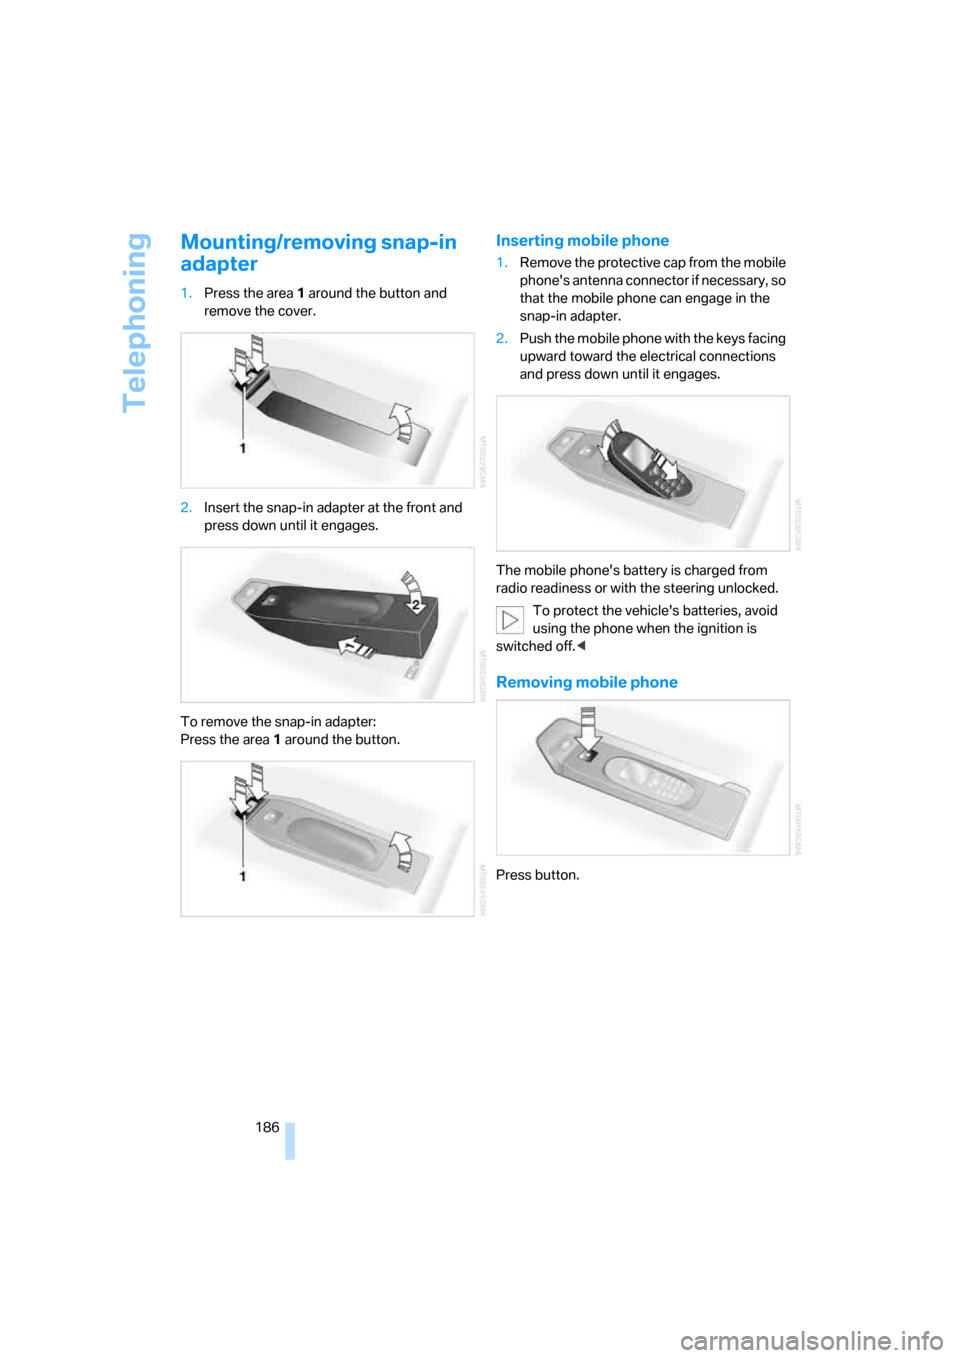
1.Press the area 1 around the button and
remove the cover.
2.Insert the snap-in adapter at the front and
press down until it engages.
To remove the snap-in adapter:
Press the area 1 around the button.
Inserting mobile phone
1.Remove the protective cap from the mobile
phone's antenna connector if necessary, so
that the mobile phone can engage in the
snap-in adapter.
2.Push the mobile phone with the keys facing
upward toward the electrical connections
and press down until it engages.
The mobile phone's battery is charged from
radio readiness or with the steering unlocked.
To protect the vehicle's batteries, avoid
using the phone when the ignition is
switched off.<
Removing mobile phone
Press button.
Page 217 of 259
Mobility
215Reference
At a glance
Controls
Driving tips
Communications
Navigation
Entertainment
Lamps in luggage compartment lid
License plate lamp
Bulb 5 watts, C 5 W
1.Insert screwdriver into the slot and press to
the right, refer to arrows. This releases the
lamp.
2.Remove the lamp and replace the bulb.
Sports Wagon:
Backup lamp
In the event of a malfunction, please go to your
BMW center or a workshop that works accord-
ing to BMW repair procedures with correspond-
ingly trained personnel.
Changing wheels
Safety precautions in the event of a flat
tire or wheel change: park the vehicle as
far as possible from passing traffic and on solid
ground. Switch on the hazard warning flashers.
Lock the steering wheel in straight-ahead set-
ting of the wheels. Apply the handbrake and
engage first gear, reverse gear or selector lever
position P.
Have all vehicle occupants get out of the vehicle
and ensure that they remain outside the imme-
diate area in a safe place, such as behind a
guardrail.
If a warning triangle
* or portable hazard warning
lamp is required, set it up on the roadside at an
appropriate distance from the rear of the vehi-
cle. Comply with all safety guidelines and regu-
lations. Change the wheel only on a level, firm surface
which is not slippery. The vehicle or the jack
could slip to the side if you attempt to raise the
vehicle on a soft or slippery surface such as
snow, ice, tiles, etc.
Position the jack on a firm support surface.
Do not use a wooden block or similar object as a
support base for the jack, as this would prevent
it from extending to its full support height and
reduce its load-carrying capacity.
To avoid serious or fatal injury: never lie under
the vehicle, and never start the engine while it is
supported by the jack.<
What you will need
To avoid rattling noises later on, note the posi-
tions of the tools before removing them, then
return them to their initial positions after com-
pleting work.
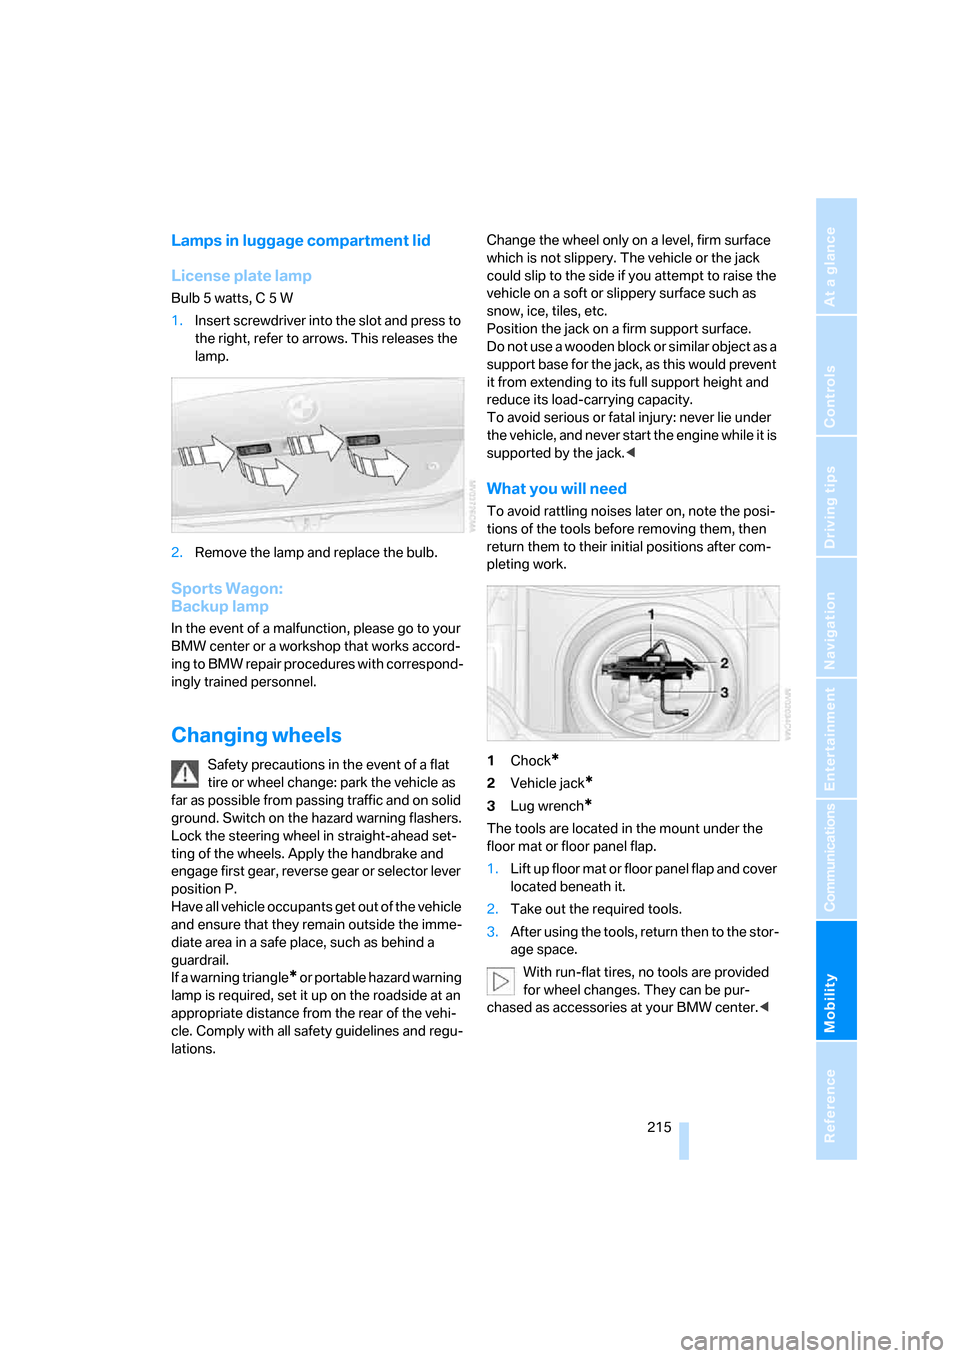
1Chock
*
2Vehicle jack*
3Lug wrench*
The tools are located in the mount under the
floor mat or floor panel flap.
1.Lift up floor mat or floor panel flap and cover
located beneath it.
2.Take out the required tools.
3.After using the tools, return then to the stor-
age space.
With run-flat tires, no tools are provided
for wheel changes. They can be pur-
chased as accessories at your BMW center.<
Page 219 of 259
Mobility
217Reference
At a glance
Controls
Driving tips
Communications
Navigation
Entertainment
face of the jack base rests on the ground
perpendicularly beneath the jacking point.
The vehicle jack is designed for
changing wheels only. Do not attempt
to raise another vehicle model with it or to
raise any load of any kind. To do so could
cause accidents and personal injury.<
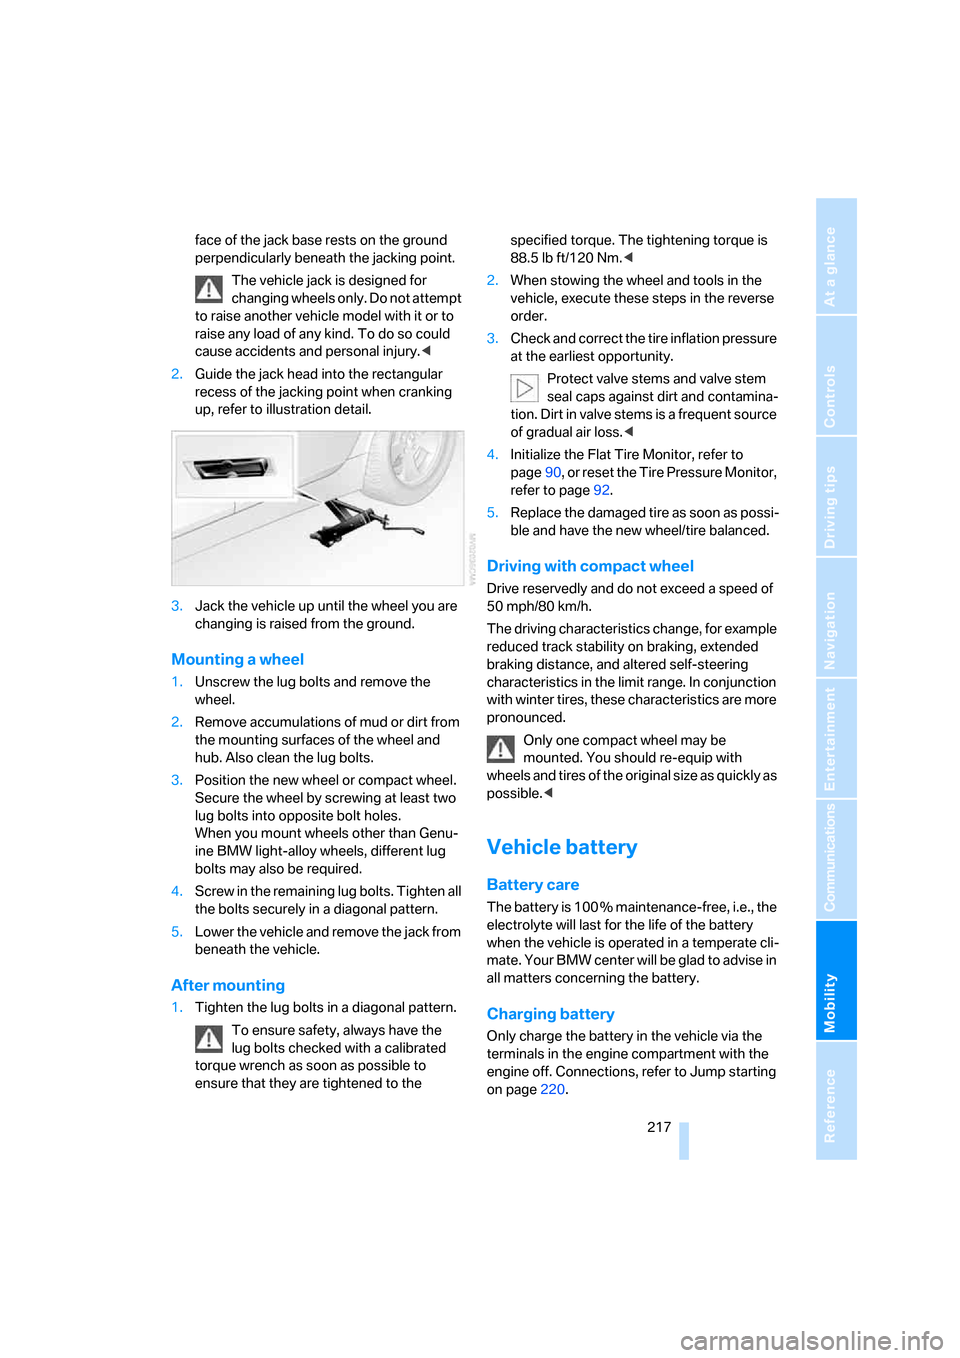
2.Guide the jack head into the rectangular
recess of the jacking point when cranking
up, refer to illustration detail.
3.Jack the vehicle up until the wheel you are
changing is raised from the ground.
Mounting a wheel
1.Unscrew the lug bolts and remove the
wheel.
2.Remove accumulations of mud or dirt from
the mounting surfaces of the wheel and
hub. Also clean the lug bolts.
3.Position the new wheel or compact wheel.
Secure the wheel by screwing at least two
lug bolts into opposite bolt holes.
When you mount wheels other than Genu-
ine BMW light-alloy wheels, different lug
bolts may also be required.
4.Screw in the remaining lug bolts. Tighten all
the bolts securely in a diagonal pattern.
5.Lower the vehicle and remove the jack from
beneath the vehicle.
After mounting
1.Tighten the lug bolts in a diagonal pattern.
To ensure safety, always have the
lug bolts checked with a calibrated
torque wrench as soon as possible to
ensure that they are tightened to the specified torque. The tightening torque is
88.5 lb ft/120 Nm.<
2.When stowing the wheel and tools in the
vehicle, execute these steps in the reverse
order.
3.Check and correct the tire inflation pressure
at the earliest opportunity.
Protect valve stems and valve stem
seal caps against dirt and contamina-
tion. Dirt in valve stems is a frequent source
of gradual air loss.<
4.Initialize the Flat Tire Monitor, refer to
page90, or reset the Tire Pressure Monitor,
refer to page92.
5.Replace the damaged tire as soon as possi-
ble and have the new wheel/tire balanced.
Driving with compact wheel
Drive reservedly and do not exceed a speed of
50 mph/80 km/h.
The driving characteristics change, for example
reduced track stability on braking, extended
braking distance, and altered self-steering
characteristics in the limit range. In conjunction
with winter tires, these characteristics are more
pronounced.
Only one compact wheel may be
mounted. You should re-equip with
wheels and tires of the original size as quickly as
possible.<
Vehicle battery
Battery care
The battery is 100 % maintenance-free, i.e., the
electrolyte will last for the life of the battery
when the vehicle is operated in a temperate cli-
mate. Your BMW center will be glad to advise in
all matters concerning the battery.
Charging battery
Only charge the battery in the vehicle via the
terminals in the engine compartment with the
engine off. Connections, refer to Jump starting
on page220.
Page 220 of 259

Replacing components
218
Disposal
Have old batteries disposed of by your
BMW center or hand them in to a recy-
cling center. Maintain the battery in an upright
position for transport and storage. Always
restrain the battery to prevent it from tipping
over during transport.<
Power failure
After a temporary power loss, the functioning of
some equipment may be limited and require
reinitialization. Individual settings are also lost
and must be updated:
>Seat, mirror and steering wheel memory
The positions must be stored again, refer to
page47.
>Time and Date
The values must be updated, refer to
page82.
>Radio
Stations must be stored again if necessary,
refer to page158.
>Navigation system
Wait until the system starts, refer to
page149.
Fuses
Never attempt to repair a blown fuse and
do not replace a defective fuse with a sub-
stitute of another color or amperage rating, as
this could lead to a circuit overload, ultimately
resulting in a fire in the vehicle.<
Sedan
Spare fuses, plastic tweezers and fuse alloca-
tion diagram are located in the compartment for
the onboard tool kit, refer to page211.
Sports Wagon
Reserve fuses and a pair of plastic tweezers are
contained in the onboard tool kit, refer to
page211. A fuse allocation diagram is located
in the cargo area behind the right-hand side
panel.
In glove compartment
1.Release both quick-release fasteners.
2.Fold the cover forward or remove.
Sedan: in luggage compartment
1.Lift up floor mat.
2.Release the quick-release fastener of the
right side panel and pull out the panel.
Sports Wagon: in cargo area
1.Unhook the retaining strap*, refer to
page119.
2.Open the right-hand side panel.
Page 224 of 259
Giving and receiving assistance
222 Sedan:
It is located in the toolkit in the luggage com-
partment lid, refer to page211.
Sports Wagon:
It is located in the toolkit behind the left side
panel in the cargo area, refer to page211.
Use only the tow fitting provided with the
vehicle and screw it all the way in. Use the
tow fitting for towing only on roads. Avoid lateral
loading of the tow fitting, e.g. do not lift the vehi-
cle by the tow fitting. Otherwise damage to the
tow fitting and the vehicle can occur.<
Access to screw thread
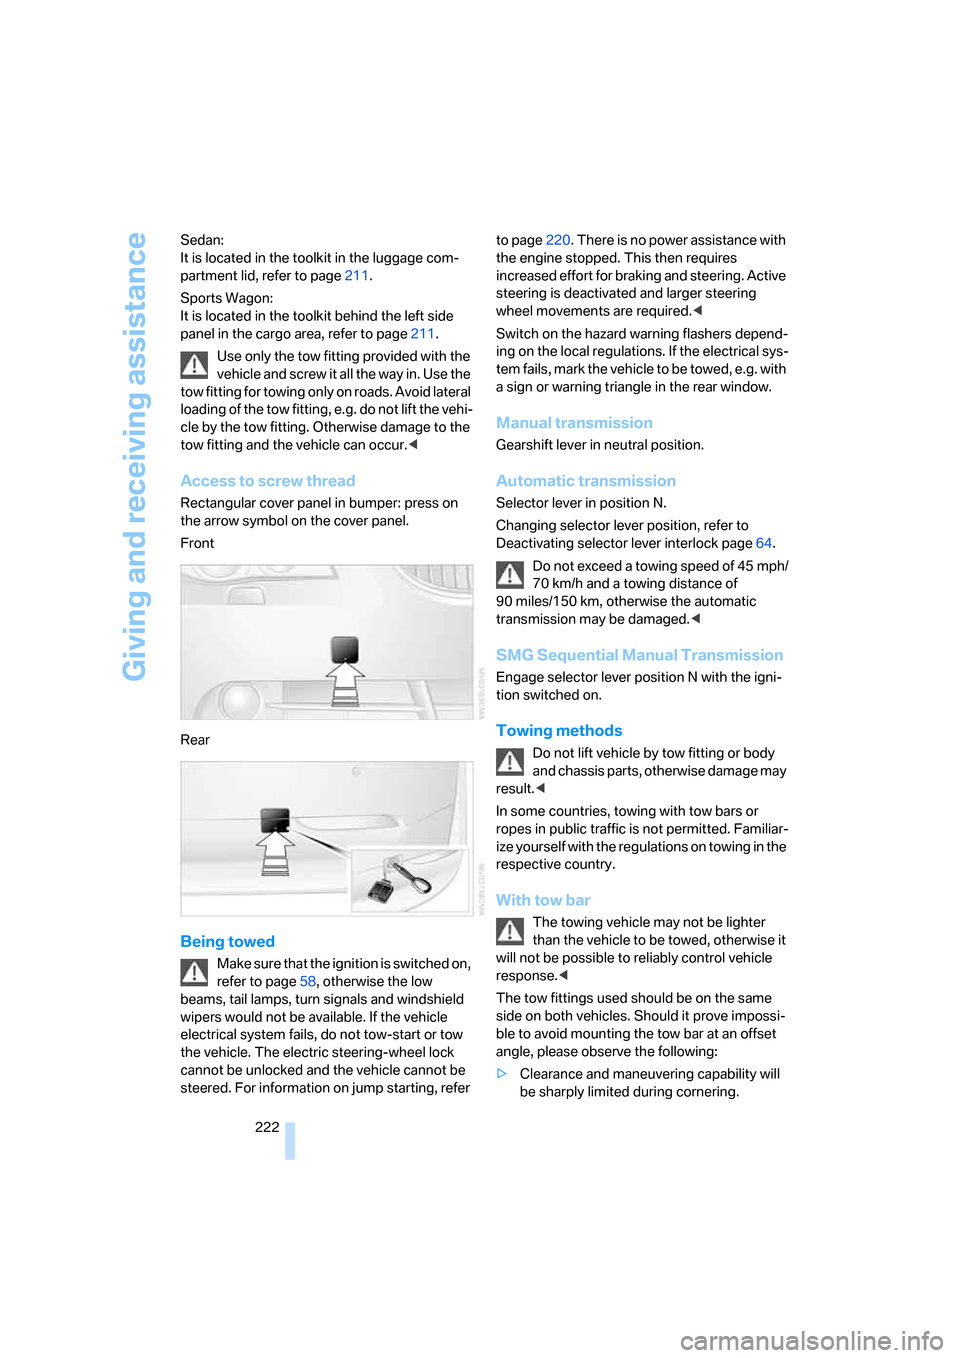
Rectangular cover panel in bumper: press on
the arrow symbol on the cover panel.
Front
Rear
Being towed
Make sure that the ignition is switched on,
refer to page58, otherwise the low
beams, tail lamps, turn signals and windshield
wipers would not be available. If the vehicle
electrical system fails, do not tow-start or tow
the vehicle. The electric steering-wheel lock
cannot be unlocked and the vehicle cannot be
steered. For information on jump starting, refer to page220. There is no power assistance with
the engine stopped. This then requires
increased effort for braking and steering. Active
steering is deactivated and larger steering
wheel movements are required.<
Switch on the hazard warning flashers depend-
ing on the local regulations. If the electrical sys-
tem fails, mark the vehicle to be towed, e.g. with
a sign or warning triangle in the rear window.
Manual transmission
Gearshift lever in neutral position.
Automatic transmission
Selector lever in position N.
Changing selector lever position, refer to
Deactivating selector lever interlock page64.
Do not exceed a towing speed of 45 mph/
70 km/h and a towing distance of
90 miles/150 km, otherwise the automatic
transmission may be damaged.<
SMG Sequential Manual Transmission
Engage selector lever position N with the igni-
tion switched on.
Towing methods
Do not lift vehicle by tow fitting or body
and chassis parts, otherwise damage may
result.<
In some countries, towing with tow bars or
ropes in public traffic is not permitted. Familiar-
ize yourself with the regulations on towing in the
respective country.
With tow bar
The towing vehicle may not be lighter
than the vehicle to be towed, otherwise it
will not be possible to reliably control vehicle
response.<
The tow fittings used should be on the same
side on both vehicles. Should it prove impossi-
ble to avoid mounting the tow bar at an offset
angle, please observe the following:
>Clearance and maneuvering capability will
be sharply limited during cornering.
Page 225 of 259
Mobility
223Reference
At a glance
Controls
Driving tips
Communications
Navigation
Entertainment
>When mounted at an angle, the tow bar will
exert lateral forces, tending to push the
vehicle sideways.
Only attach the tow bar to the tow fittings,
as attachment to other vehicle parts can
lead to damage.<
With tow rope
When starting off in the towing vehicle, make
sure that the tow rope is taut.
To avoid jerking and the associated
stresses on vehicle components when
towing, always use nylon ropes or nylon straps.
Only attach tow ropes to the tow fittings, as
attachment to other vehicle parts can lead to
damage.<
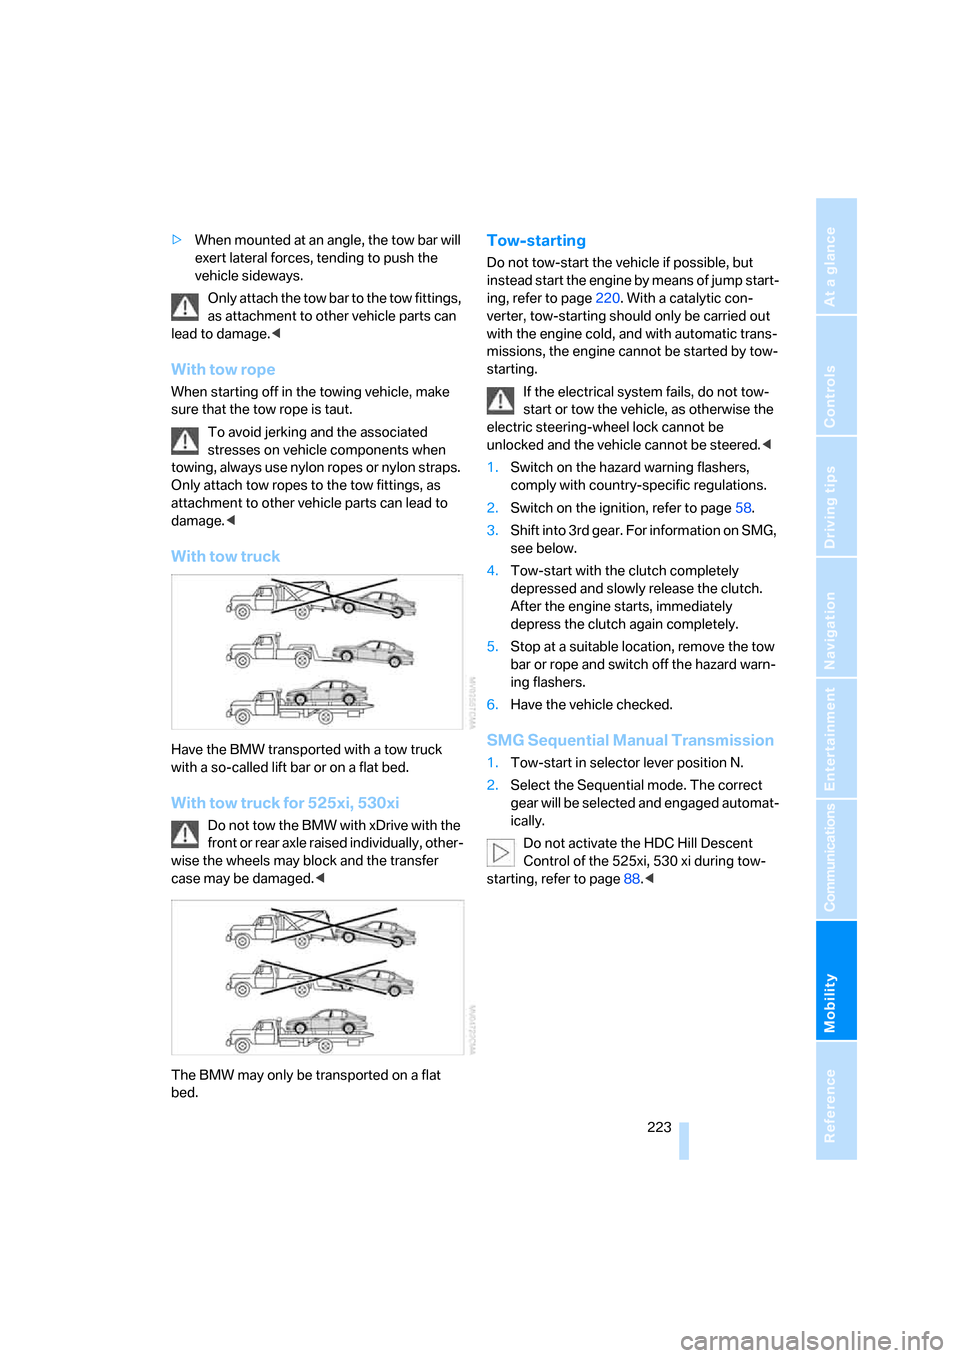
With tow truck
Have the BMW transported with a tow truck
with a so-called lift bar or on a flat bed.
With tow truck for 525xi, 530xi
Do not tow the BMW with xDrive with the
front or rear axle raised individually, other-
wise the wheels may block and the transfer
case may be damaged.<
The BMW may only be transported on a flat
bed.
Tow-starting
Do not tow-start the vehicle if possible, but
instead start the engine by means of jump start-
ing, refer to page220. With a catalytic con-
verter, tow-starting should only be carried out
with the engine cold, and with automatic trans-
missions, the engine cannot be started by tow-
starting.
If the electrical system fails, do not tow-
start or tow the vehicle, as otherwise the
electric steering-wheel lock cannot be
unlocked and the vehicle cannot be steered.<
1.Switch on the hazard warning flashers,
comply with country-specific regulations.
2.Switch on the ignition, refer to page58.
3.Shift into 3rd gear. For information on SMG,
see below.
4.Tow-start with the clutch completely
depressed and slowly release the clutch.
After the engine starts, immediately
depress the clutch again completely.
5.Stop at a suitable location, remove the tow
bar or rope and switch off the hazard warn-
ing flashers.
6.Have the vehicle checked.
SMG Sequential Manual Transmission
1.Tow-start in selector lever position N.
2.Select the Sequential mode. The correct
gear will be selected and engaged automat-
ically.
Do not activate the HDC Hill Descent
Control of the 525xi, 530 xi during tow-
starting, refer to page88.<
Page 236 of 259
Short commands of voice command system
234
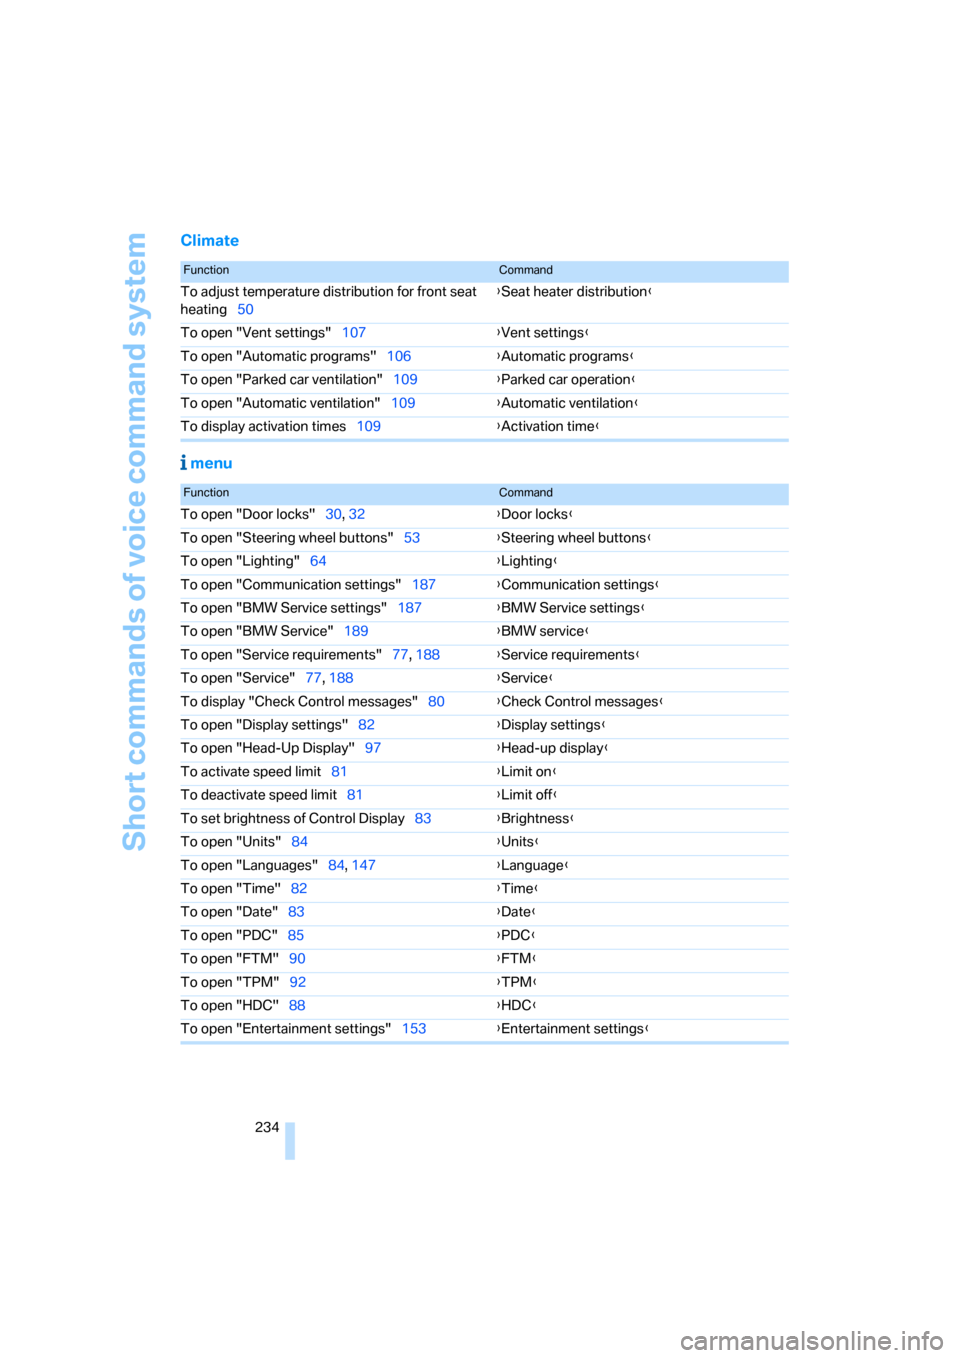
Climate
menu
FunctionCommand
To adjust temperature distribution for front seat
heating50{Seat heater distribution}
To open "Vent settings"107{Vent settings}
To open "Automatic programs"106{Automatic programs}
To open "Parked car ventilation"109{Parked car operation}
To open "Automatic ventilation"109{Automatic ventilation}
To display activation times109{Activation time}
FunctionCommand
To open "Door locks"30, 32{Door locks}
To open "Steering wheel buttons"53{Steering wheel buttons}
To open "Lighting"64{Lighting}
To open "Communication settings"187{Communication settings}
To open "BMW Service settings"187{BMW Service settings}
To open "BMW Service"189{BMW service}
To open "Service requirements"77, 188{Service requirements}
To open "Service"77, 188{Service}
To display "Check Control messages"80{Check Control messages}
To open "Display settings"82{Display settings}
To open "Head-Up Display"97{Head-up display}
To activate speed limit81{Limit on}
To deactivate speed limit81{Limit off}
To set brightness of Control Display83{Brightness}
To open "Units"84{Units}
To open "Languages"84, 147{Language}
To open "Time"82{Time}
To open "Date"83{Date}
To open "PDC"85{
PDC}
To open "FTM"90{FTM}
To open "TPM"92{TPM}
To open "HDC"88{HDC}
To open "Entertainment settings"153{Entertainment settings}