2006 BMW 545I SEDAN light
[x] Cancel search: lightPage 80 of 259
Everything under control
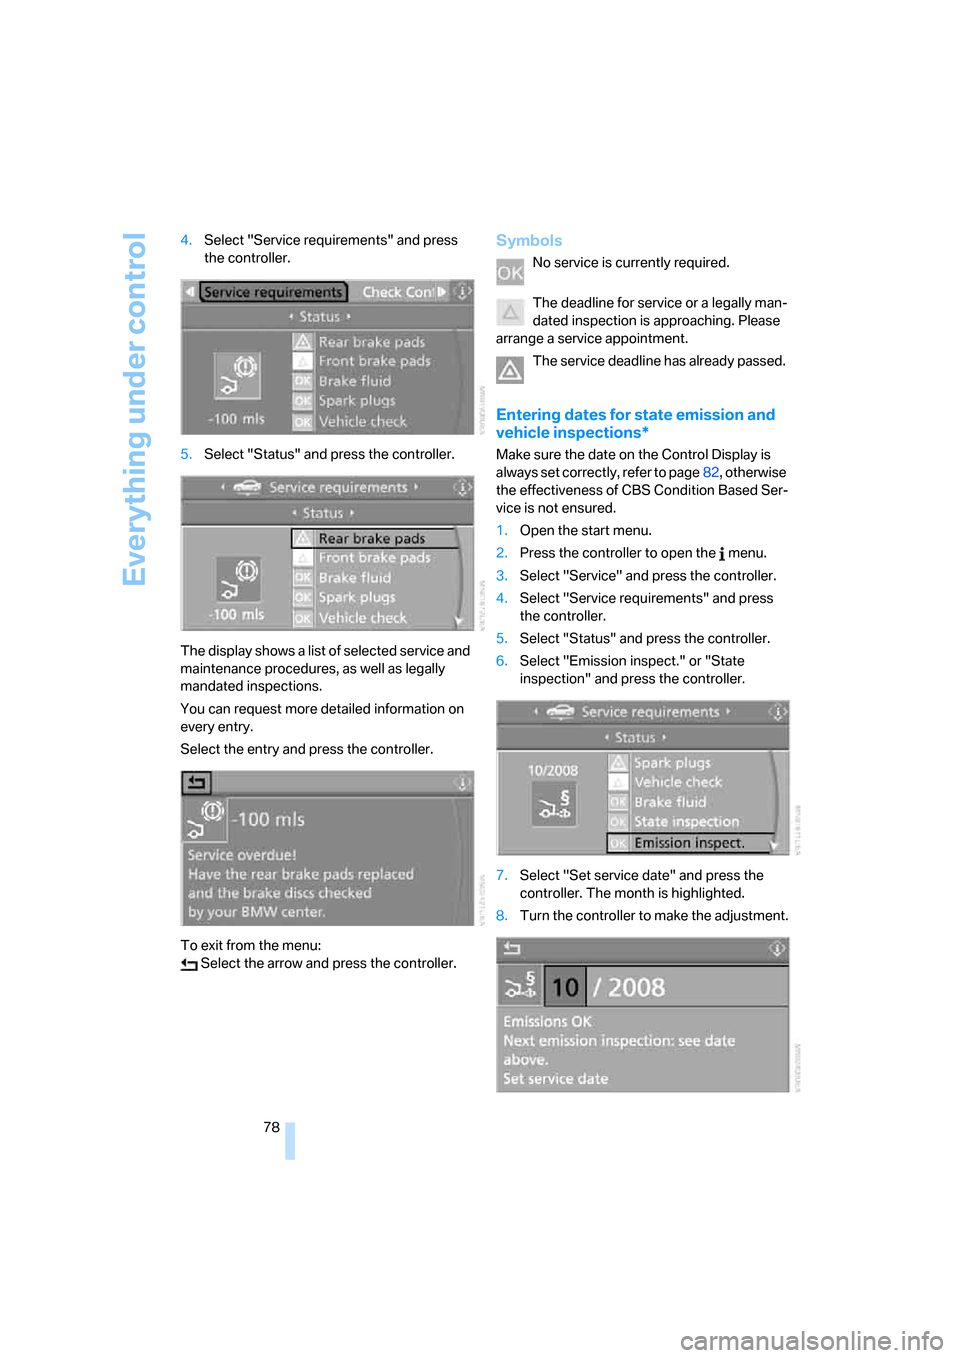
78 4.Select "Service requirements" and press
the controller.
5.Select "Status" and press the controller.
The display shows a list of selected service and
maintenance procedures, as well as legally
mandated inspections.
You can request more detailed information on
every entry.
Select the entry and press the controller.
To exit from the menu:
Select the arrow and press the controller.
Symbols
No service is currently required.
The deadline for service or a legally man-
dated inspection is approaching. Please
arrange a service appointment.
The service deadline has already passed.
Entering dates for state emission and
vehicle inspections*
Make sure the date on the Control Display is
always set correctly, refer to page82, otherwise
the effectiveness of CBS Condition Based Ser-
vice is not ensured.
1.Open the start menu.
2.Press the controller to open the menu.
3.Select "Service" and press the controller.
4.Select "Service requirements" and press
the controller.
5.Select "Status" and press the controller.
6.Select "Emission inspect." or "State
inspection" and press the controller.
7.Select "Set service date" and press the
controller. The month is highlighted.
8.Turn the controller to make the adjustment.
Page 81 of 259
Controls
79Reference
At a glance
Driving tips
Communications
Navigation
Entertainment
Mobility
9.Press the controller to apply the setting.
The year is highlighted.
10.Turn the controller to make the adjustment.
11.Press the controller to apply the setting.
The date entry is stored.
To exit the menu:
Select the arrow and press the controller.
Check Control
The concept
The Check Control monitors functions in the
vehicle and issues a message if there is a mal-
function in the monitored systems. This kind of
Check Control message consists of indicator
and warning lamps in the instrument cluster,
and if necessary an acoustic signal and text
messages at the bottom of the Control Display.
Indicator and warning lamps
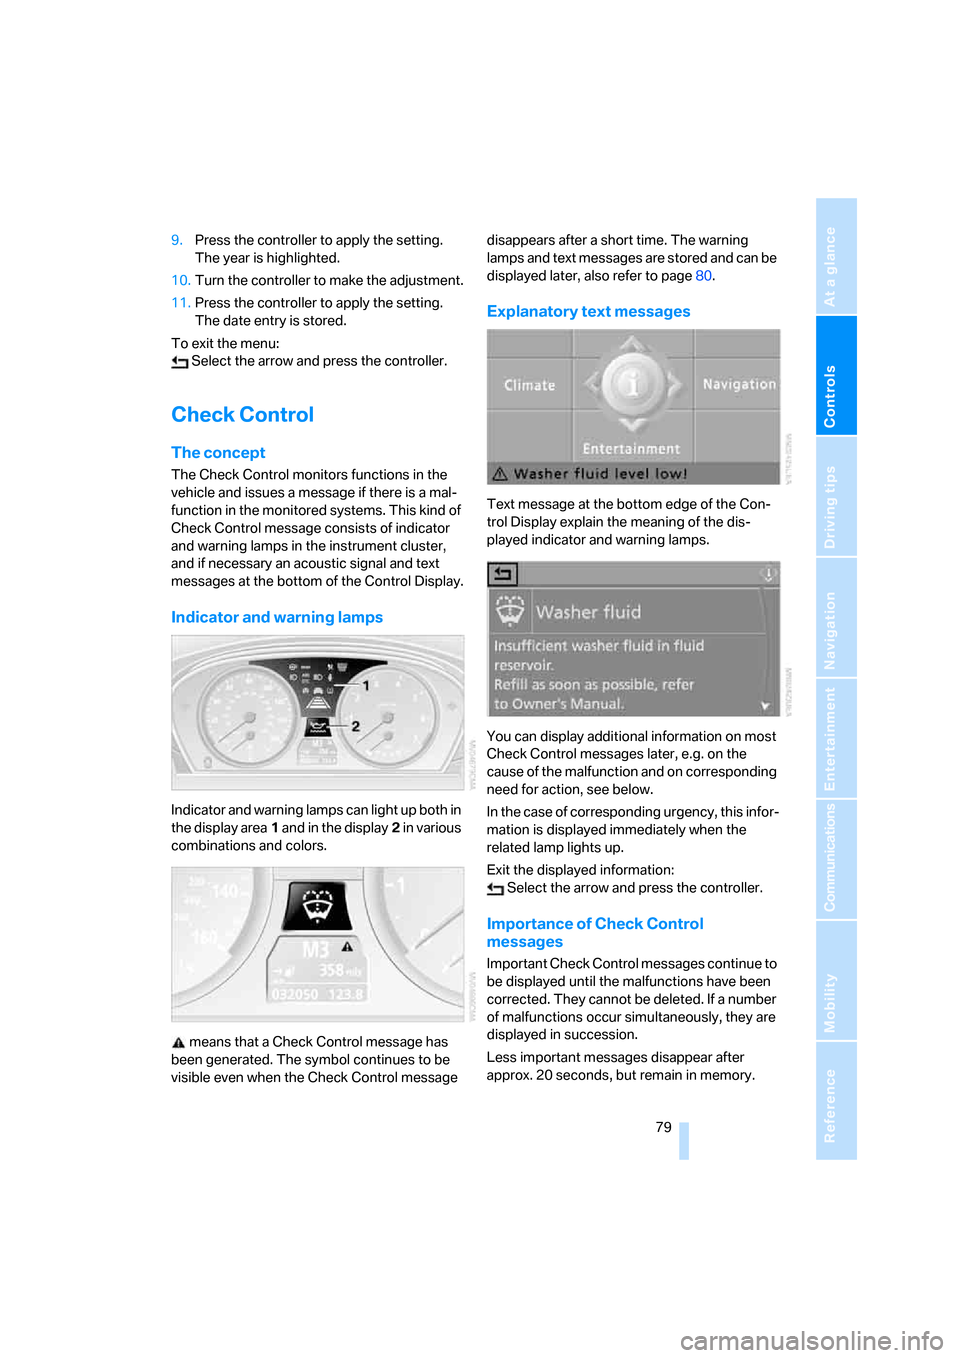
Indicator and warning lamps can light up both in
the display area1 and in the display2 in various
combinations and colors.
means that a Check Control message has
been generated. The symbol continues to be
visible even when the Check Control message disappears after a short time. The warning
lamps and text messages are stored and can be
displayed later, also refer to page80.
Explanatory text messages
Text message at the bottom edge of the Con-
trol Display explain the meaning of the dis-
played indicator and warning lamps.
You can display additional information on most
Check Control messages later, e.g. on the
cause of the malfunction and on corresponding
need for action, see below.
In the case of corresponding urgency, this infor-
mation is displayed immediately when the
related lamp lights up.
Exit the displayed information:
Select the arrow and press the controller.
Importance of Check Control
messages
Important Check Control messages continue to
be displayed until the malfunctions have been
corrected. They cannot be deleted. If a number
of malfunctions occur simultaneously, they are
displayed in succession.
Less important messages disappear after
approx. 20 seconds, but remain in memory.
Page 83 of 259
Controls
81Reference
At a glance
Driving tips
Communications
Navigation
Entertainment
Mobility
The symbols also indicate the status of the ser-
vice requirements display, refer to page77.
Displays after completion of trip
Malfunction reports generated during the trip
are shown consecutively when you switch off
the ignition.
Before the display disappears, you can display
the messages once again. Press the CHECK
button for approx. 2 seconds. If several mes-
sages are present, you can continue to press
the CHECK button to view them in succession.
The display goes out
>automatically after a brief period
>when you press the CHECK button again
for approximately 2 seconds
Speed limit
You can enter a speed and a Check Control
message indicates when you have reached this
speed. This enables you, for example, to
receive warnings if you exceed a speed limit in
an urban area.
You are only warned of reaching this speed a
second time if your vehicle speed falls below it
again by at least 3 mph/5 km/h.
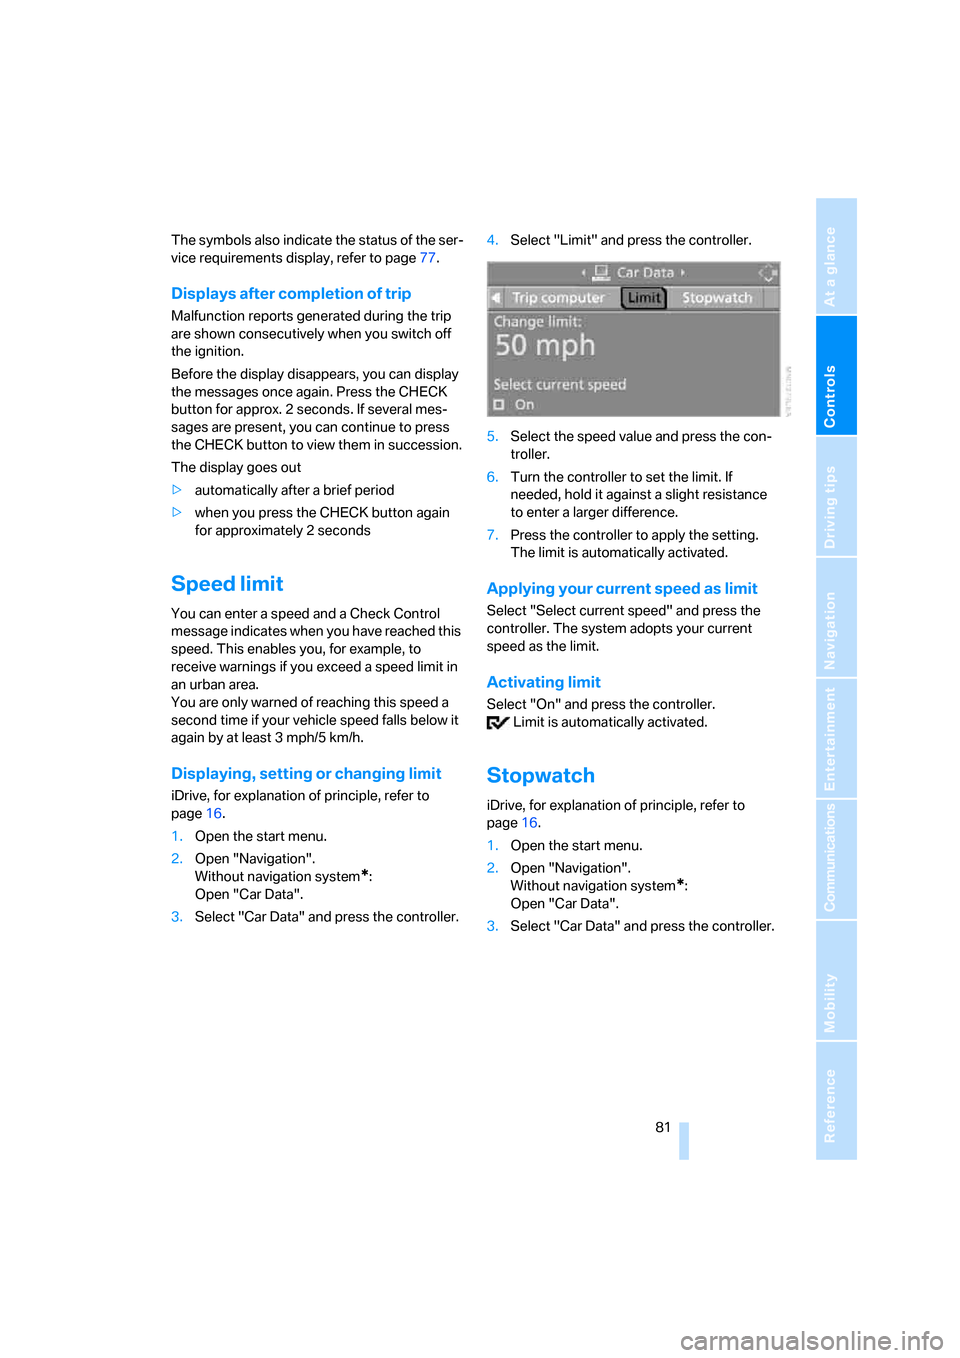
Displaying, setting or changing limit
iDrive, for explanation of principle, refer to
page16.
1.Open the start menu.
2.Open "Navigation".
Without navigation system
*:
Open "Car Data".
3.Select "Car Data" and press the controller.4.Select "Limit" and press the controller.
5.Select the speed value and press the con-
troller.
6.Turn the controller to set the limit. If
needed, hold it against a slight resistance
to enter a larger difference.
7.Press the controller to apply the setting.
The limit is automatically activated.
Applying your current speed as limit
Select "Select current speed" and press the
controller. The system adopts your current
speed as the limit.
Activating limit
Select "On" and press the controller.
Limit is automatically activated.
Stopwatch
iDrive, for explanation of principle, refer to
page16.
1.Open the start menu.
2.Open "Navigation".
Without navigation system
*:
Open "Car Data".
3.Select "Car Data" and press the controller.
Page 85 of 259
Controls
83Reference
At a glance
Driving tips
Communications
Navigation
Entertainment
Mobility
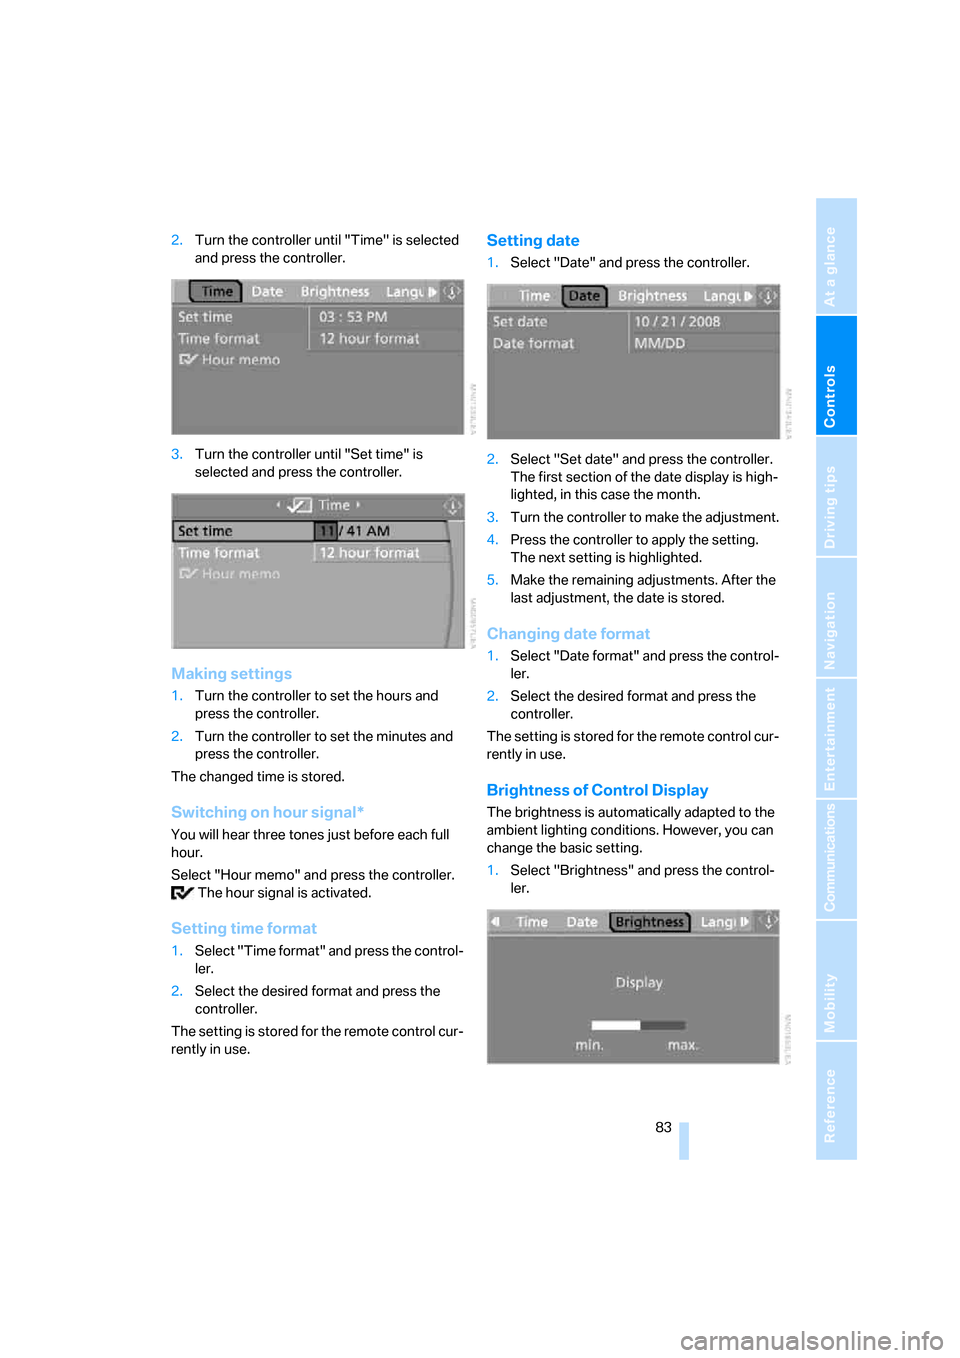
2.Turn the controller until "Time" is selected
and press the controller.
3.Turn the controller until "Set time" is
selected and press the controller.
Making settings
1.Turn the controller to set the hours and
press the controller.
2.Turn the controller to set the minutes and
press the controller.
The changed time is stored.
Switching on hour signal*
You will hear three tones just before each full
hour.
Select "Hour memo" and press the controller.
The hour signal is activated.
Setting time format
1.Select "Time format" and press the control-
ler.
2.Select the desired format and press the
controller.
The setting is stored for the remote control cur-
rently in use.
Setting date
1.Select "Date" and press the controller.
2.Select "Set date" and press the controller.
The first section of the date display is high-
lighted, in this case the month.
3.Turn the controller to make the adjustment.
4.Press the controller to apply the setting.
The next setting is highlighted.
5.Make the remaining adjustments. After the
last adjustment, the date is stored.
Changing date format
1.Select "Date format" and press the control-
ler.
2.Select the desired format and press the
controller.
The setting is stored for the remote control cur-
rently in use.
Brightness of Control Display
The brightness is automatically adapted to the
ambient lighting conditions. However, you can
change the basic setting.
1.Select "Brightness" and press the control-
ler.
Page 87 of 259

Controls
85Reference
At a glance
Driving tips
Communications
Navigation
Entertainment
Mobility
Technology for comfort, convenience and
safety
PDC Park Distance Control*
The concept
The PDC assists you when you are parking.
Acoustic signals and an optical display
* alert
you to the approach of an object from behind
your vehicle. To measure the distance, there
are four ultrasonic sensors in each bumper.
The range of these sensors is approx. 7 ft/2 m.
However, an acoustic warning first sound for
the sensors at the front and at the two rear cor-
ners at approx. 24 in/60 cm, and for the center
rear sensors at approx. 5 ft/1.50 m.
PDC is a parking aid that can indicate
objects when they are approached
slowly, as is usually the case when parking.
Avoid approaching an object at high speed, oth-
erwise the physical circumstances would mean
that the system warning was too late.<
Automatic activation
The system starts to operate automatically
approx. 1 second after you select reverse gear
or move the selector lever into the R position
with the engine running or the ignition switched
on.
Wait this short period before driving.
Manual activation
Press button, the LED lights up.
Manual deactivation
Press the button again; the LED goes out.
After driving approx. 165 ft/50 m or at over
approx. 20 mph/30 km/h, the system is
switched off and the LED goes out. You can
reactivate the system manually as needed.
Signal tones
When nearing an object, the position is corre-
spondingly indicated by an interval tone. Thus,
an object detected to the left rear of the vehicle
will be indicated by a signal tone from the left
rear speaker, etc. As the distance between
vehicle and object decreases, the intervals
between the tones become shorter. If the dis-
tance to the nearest object falls to below
roughly 1 ft/30 cm, then a continuous tone
sounds.
An intermittent tone is interrupted after approx.
3seconds:
>if you remain in front of an object that was
only detected by one of the corner sensors
>if you drive parallel to a wall
Malfunction
The LED in the button flashes and a message
appears on the Control Display. PDC is mal-
functioning. Have the system checked.
To prevent this problem, keep the sensors
clean and free of ice or snow in order to ensure
that they will continue to operate effectively. Do
not spray the sensors with high-pressure clean-
ers for long periods and maintain a distance of
at least 4 in/10 cm to them.
PDC with visual warning*
You can also have the system show distances
to objects on the Control Display. Objects that
are farther away are already shown there before
a signal tone sounds. The setting is stored for
the remote control currently in use.
Page 89 of 259
Controls
87Reference
At a glance
Driving tips
Communications
Navigation
Entertainment
Mobility
driver. Therefore, do not reduce the additional
safety margin further by taking risks.<
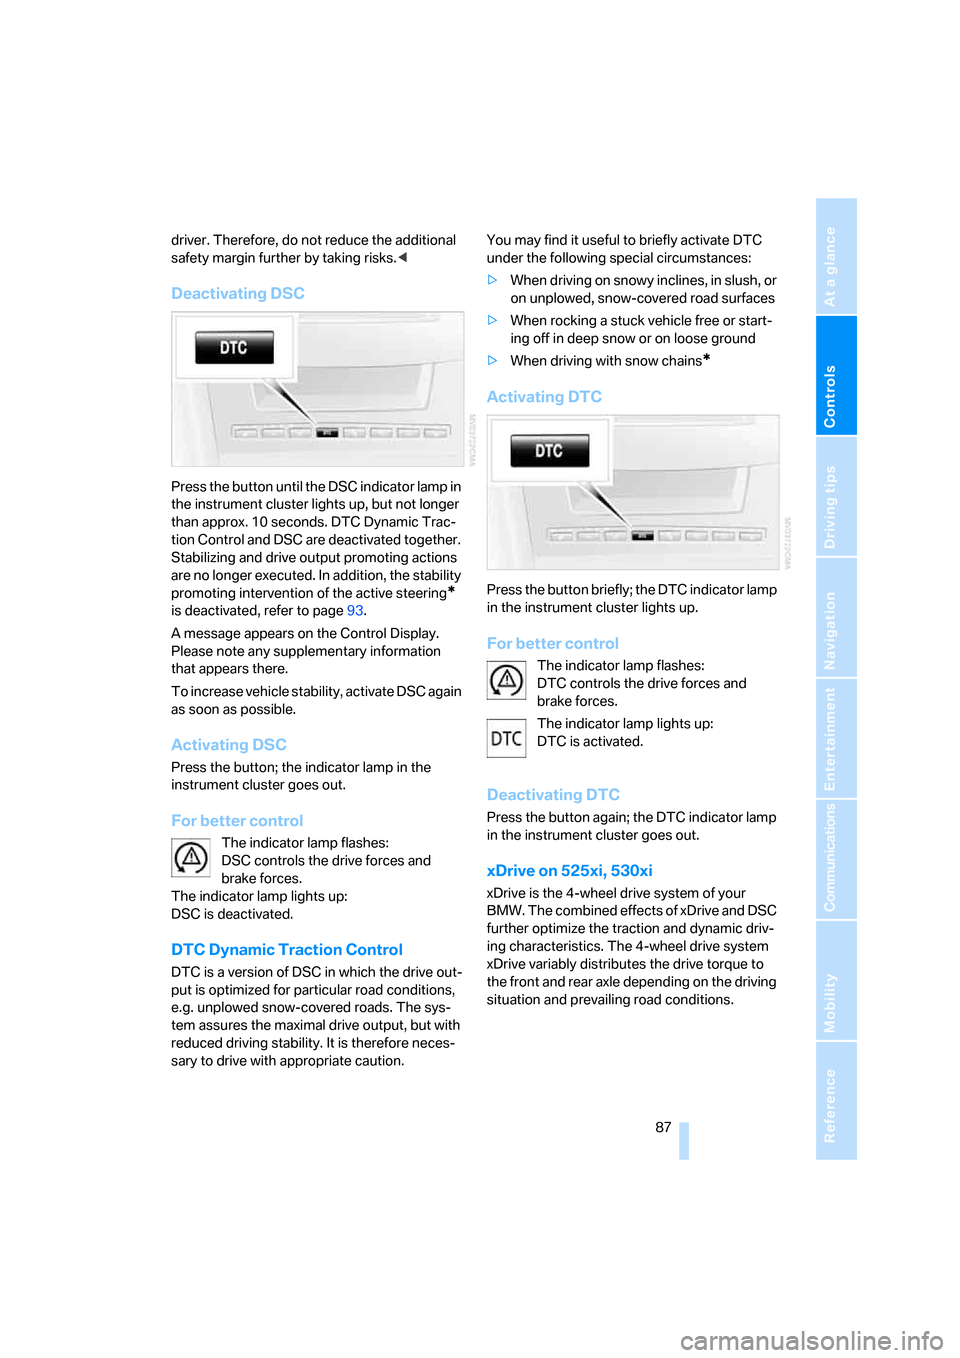
Deactivating DSC
Press the button until the DSC indicator lamp in
the instrument cluster lights up, but not longer
than approx. 10 seconds. DTC Dynamic Trac-
tion Control and DSC are deactivated together.
Stabilizing and drive output promoting actions
are no longer executed. In addition, the stability
promoting intervention of the active steering
*
is deactivated, refer to page93.
A message appears on the Control Display.
Please note any supplementary information
that appears there.
To increase vehicle stability, activate DSC again
as soon as possible.
Activating DSC
Press the button; the indicator lamp in the
instrument cluster goes out.
For better control
The indicator lamp flashes:
DSC controls the drive forces and
brake forces.
The indicator lamp lights up:
DSC is deactivated.
DTC Dynamic Traction Control
DTC is a version of DSC in which the drive out-
put is optimized for particular road conditions,
e.g. unplowed snow-covered roads. The sys-
tem assures the maximal drive output, but with
reduced driving stability. It is therefore neces-
sary to drive with appropriate caution.You may find it useful to briefly activate DTC
under the following special circumstances:
>When driving on snowy inclines, in slush, or
on unplowed, snow-covered road surfaces
>When rocking a stuck vehicle free or start-
ing off in deep snow or on loose ground
>When driving with snow chains
*
Activating DTC
Press the button briefly; the DTC indicator lamp
in the instrument cluster lights up.
For better control
The indicator lamp flashes:
DTC controls the drive forces and
brake forces.
The indicator lamp lights up:
DTC is activated.
Deactivating DTC
Press the button again; the DTC indicator lamp
in the instrument cluster goes out.
xDrive on 525xi, 530xi
xDrive is the 4-wheel drive system of your
BMW. The combined effects of xDrive and DSC
further optimize the traction and dynamic driv-
ing characteristics. The 4-wheel drive system
xDrive variably distributes the drive torque to
the front and rear axle depending on the driving
situation and prevailing road conditions.
Page 91 of 259

Controls
89Reference
At a glance
Driving tips
Communications
Navigation
Entertainment
Mobility
Malfunction
If the HDC display goes out in the HDC mode or
is not shown:
HDC is temporarily not available, as the brake
temperature is too high.
Dynamic Drive*
The concept
Dynamic Drive minimizes body roll and opti-
mizes vehicle stability during cornering and
evasive maneuvers.
Dynamic Drive is based on active stabilizers on
the front and rear axles. Suspension compli-
ance adapts to suit driving conditions, varying
from performance-oriented during cornering to
smooth and comfort-oriented when the vehicle
is proceeding in a straight line. During vehicle
operation, the system continuously runs
through closed-loop control cycles lasting only
fractions of a second.
The system assumes operational status each
time you start the engine.
Malfunction
The warning lamp lights up yellow and
a message is shown on the Control Dis-
play. There is a malfunction in the sys-
tem. Have the system checked as soon as pos-
sible.
If a malfunction occurs, please remember
to adapt your speed accordingly, espe-
cially in curves.
The suspension will be noticeably softer and
the vehicle will display a greater tendency to tilt
during cornering and in crosswinds.
If a message stating that you should stop is
shown on the Control Display, stop at a suitable
location and switch off the engine as soon as
possible. In this case the oil level in the reservoir
may have dropped below the minimum, possi-
bly owing to a leak in the hydraulic system.
Do not continue driving, but instead contact
your BMW center.<
Sports Wagon:
Self-leveling suspension
xDrive: the vehicle is raised somewhat at
the rear after locking. This is normal and is
linked to minor noises.<
Malfunction
The warning lamp for self-leveling sus-
pension lights up yellow and a message
is shown on the Control Display. A mal-
function has occurred in the self-leveling sus-
pension. Stop and check the vehicle. If it is con-
siderably lower at the rear than at the front, and
possibly also on one side – rear left compared to
rear right –, go to the nearest BMW center or a
workshop that works according to BMW repair
procedures with correspondingly trained per-
sonnel. Drive with appropriate caution in the
meantime. The vehicle has reduced ground
clearance and driving comfort may be notice-
ably reduced. Even if the position of the vehicle
is normal, go to the nearest BMW center or a
workshop that works according to BMW repair
procedures with correspondingly trained per-
sonnel.
Flat Tire Monitor FTM
The concept
The Flat Tire Monitor keeps track of the infla-
tion pressures in the tires as you drive. The sys-
tem provides an alert whenever the inflation
pressure drops significantly in relation to the
pressure in another tire.
In the event of a pressure loss, the rolling radius
and therefore the rotation speed of the wheels
change. This change is detected and is
reported as a flat tire.
Functional requirement
In order to assure the reliable reporting of a flat
tire, the system must be initialized for the cor-
rect tire inflation pressure.
Page 92 of 259

Technology for comfort, convenience and safety
90 The initialization must be repeated after
each time the tire inflation pressure is cor-
rected and after every tire or wheel change.<
System limits
The Flat Tire Monitor cannot indicate
sudden severe tire damage caused by
outside factors and does not detect a natural,
even pressure drop in all four tires.<
In the following situations, the system could be
delayed or malfunction:
>System has not been initialized
>Driving on snowy or slippery road surface
>Sporty driving style: slip in the drive wheels,
high lateral acceleration
>Driving with snow chains
*
When you are driving with the compact wheel*
the Flat Tire Monitor is unable to function.
Initializing system
The initialization finishes during driving,
which can be interrupted at any time.
When driving resumes, the initialization is con-
tinued automatically. Do not initialize the sys-
tem when driving with snow chains
* or com-
pact wheel
*.<
iDrive, for explanation of principle, refer to
page16.
1.Press the button.
This opens the start menu.
2.Press the controller to open the menu.
3.Select "Vehicle settings" and press the
controller.
4.Select "FTM" and press the controller.
5.Start the engine, but do not start driving.6.Select "Set tire pressure" and press the
controller.
7.Select "Yes" and press the controller.
8.Start to drive.
The message "Initializing..." is displayed.
The initialization finishes during driving. Then
the message "Status: FTM active" appears on
the Control Display again.
Indication of a flat tire
The warning lamp lights up red. A mes-
sage appears on the Control Display.
In addition, an acoustic signal sounds.
There is a flat tire or extensive inflation pressure
loss.
1.Reduce speed and stop the vehicle care-
fully. Avoid sudden braking and steering
maneuvers.
2.Identify damaged tire.
If identification is not possible, con-
tact a BMW center.<
3.Replace the damaged wheel, refer to
Changing wheels on page215.
Run-flat tires*
1.Cautiously reduce speed to below 50 mph/
80 km/h. Avoid sudden braking and steer-
ing maneuvers. Do not exceed a speed of
50 mph/80 km/h.
If the vehicle is not equipped with run-
flat tires, refer to page201, do not
continue driving. Continuing to drive with a
flat tire could cause severe accidents.<
2.At the next opportunity, check the air pres-
sure in all four tires.