Page 161 of 259
Navigation
Entertainment
Driving tips
159Reference
At a glance
Controls
Communications
Mobility
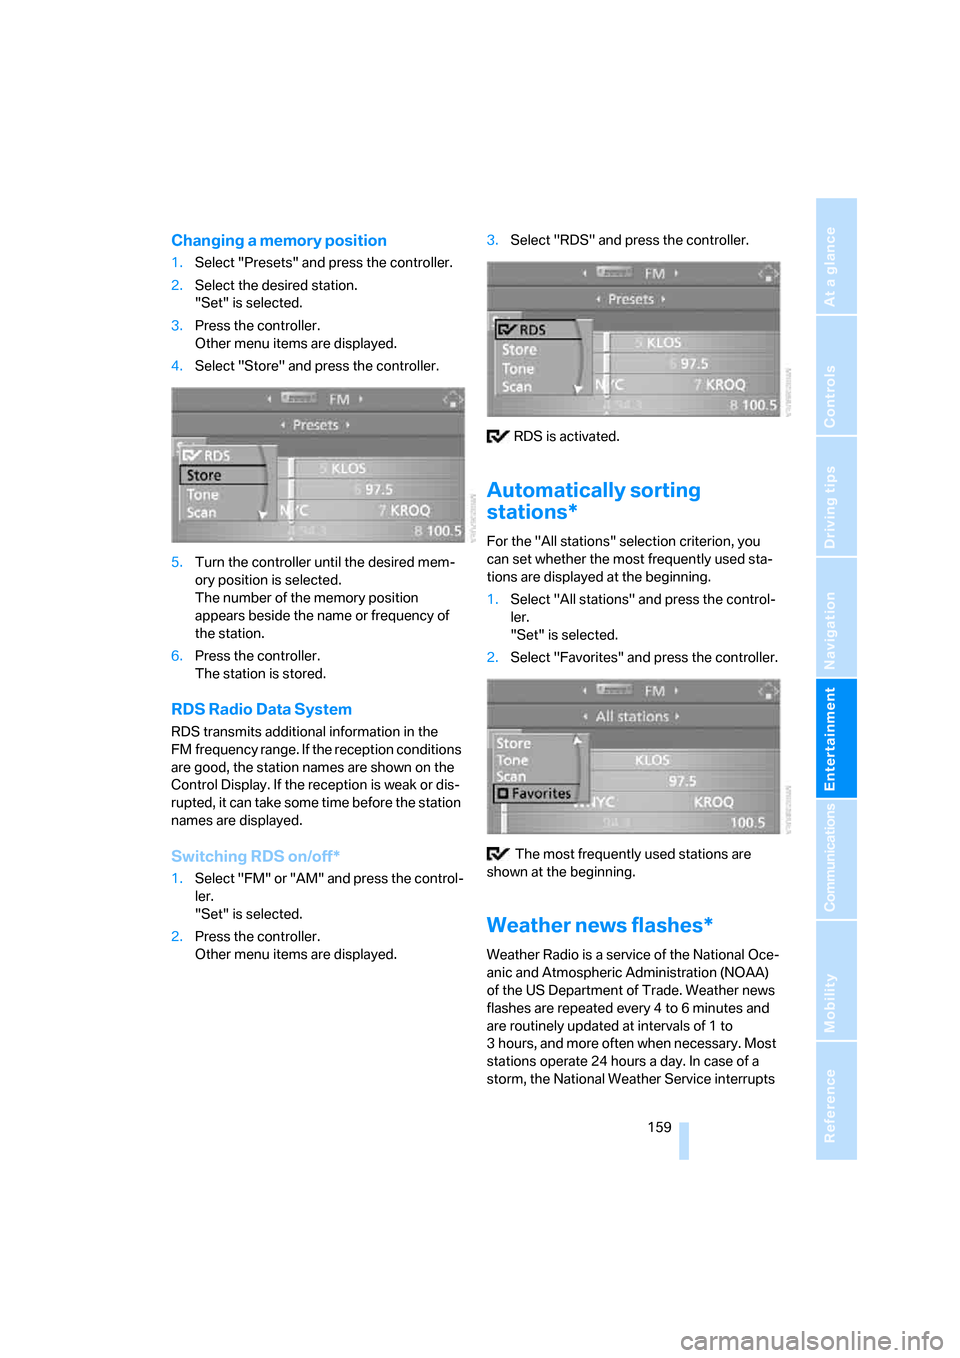
Changing a memory position
1.Select "Presets" and press the controller.
2.Select the desired station.
"Set" is selected.
3.Press the controller.
Other menu items are displayed.
4.Select "Store" and press the controller.
5.Turn the controller until the desired mem-
ory position is selected.
The number of the memory position
appears beside the name or frequency of
the station.
6.Press the controller.
The station is stored.
RDS Radio Data System
RDS transmits additional information in the
FM frequency range. If the reception conditions
are good, the station names are shown on the
Control Display. If the reception is weak or dis-
rupted, it can take some time before the station
names are displayed.
Switching RDS on/off*
1.Select "FM" or "AM" and press the control-
ler.
"Set" is selected.
2.Press the controller.
Other menu items are displayed.3.Select "RDS" and press the controller.
RDS is activated.
Automatically sorting
stations*
For the "All stations" selection criterion, you
can set whether the most frequently used sta-
tions are displayed at the beginning.
1.Select "All stations" and press the control-
ler.
"Set" is selected.
2.Select "Favorites" and press the controller.
The most frequently used stations are
shown at the beginning.
Weather news flashes*
Weather Radio is a service of the National Oce-
anic and Atmospheric Administration (NOAA)
of the US Department of Trade. Weather news
flashes are repeated every 4 to 6 minutes and
are routinely updated at intervals of 1 to
3 hours, and more often when necessary. Most
stations operate 24 hours a day. In case of a
storm, the National Weather Service interrupts
Page 163 of 259
Navigation
Entertainment
Driving tips
161Reference
At a glance
Controls
Communications
Mobility
Updating stations offering digital
reception
If you are on a longer journey and leave the
transmission range of the stations originally set,
you can update the list of stations with the best
reception.
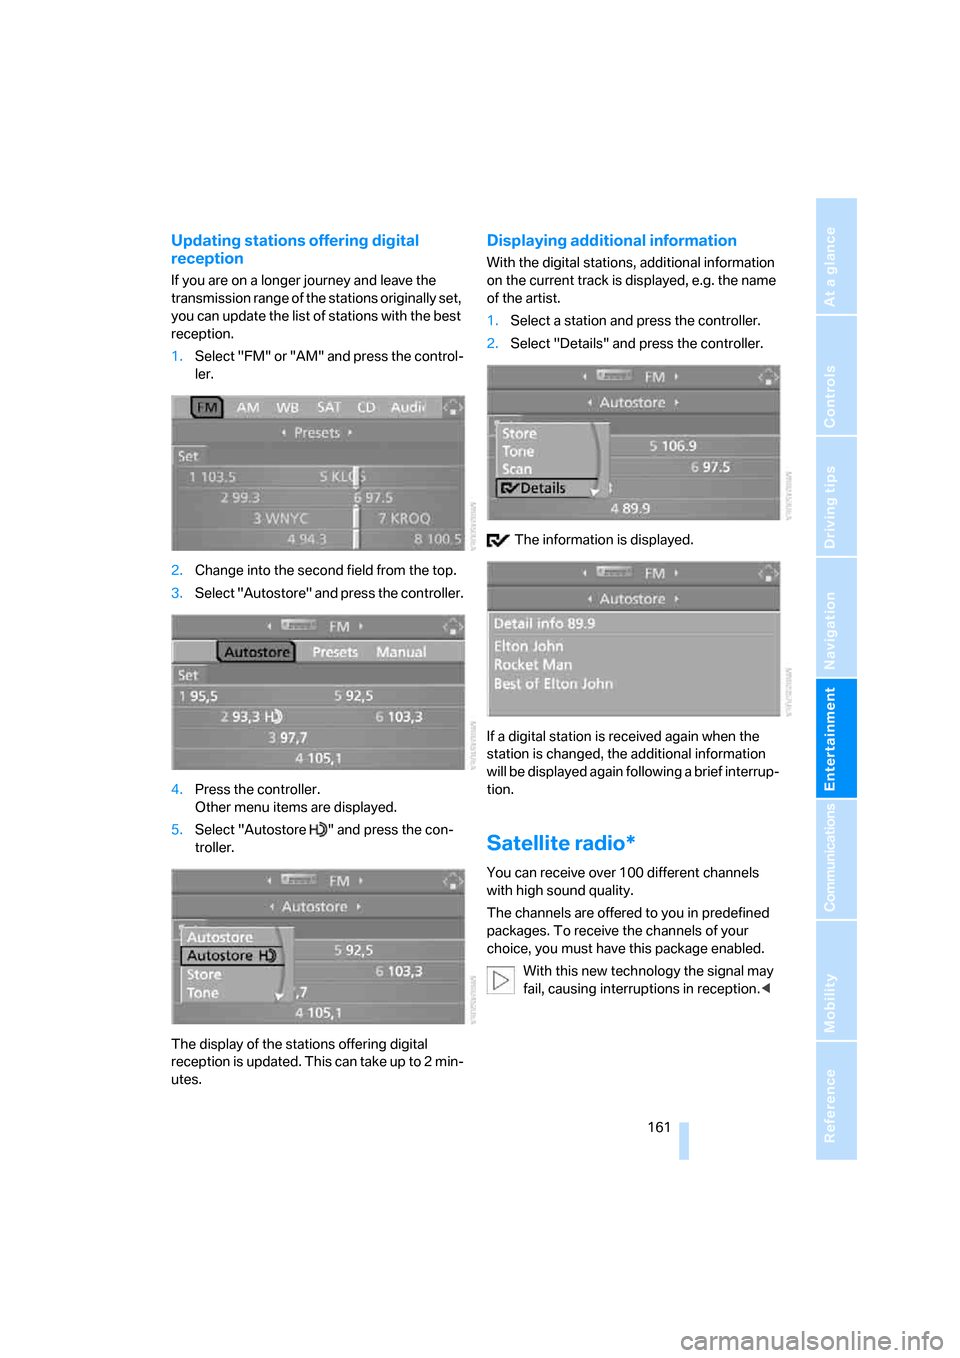
1.Select "FM" or "AM" and press the control-
ler.
2.Change into the second field from the top.
3.Select "Autostore" and press the controller.
4.Press the controller.
Other menu items are displayed.
5.Select "Autostore " and press the con-
troller.
The display of the stations offering digital
reception is updated. This can take up to 2 min-
utes.
Displaying additional information
With the digital stations, additional information
on the current track is displayed, e.g. the name
of the artist.
1.Select a station and press the controller.
2.Select "Details" and press the controller.
The information is displayed.
If a digital station is received again when the
station is changed, the additional information
will be displayed again following a brief interrup-
tion.
Satellite radio*
You can receive over 100 different channels
with high sound quality.
The channels are offered to you in predefined
packages. To receive the channels of your
choice, you must have this package enabled.
With this new technology the signal may
fail, causing interruptions in reception.<
Page 165 of 259
Navigation
Entertainment
Driving tips
163Reference
At a glance
Controls
Communications
Mobility
2.Select a menu item:
>"Presets":
Up to twelve channels you have stored
previously.
>"All channels":
All channels are displayed.
>"Categories":
All channels, sorted by categories, e. g.
news, jazz.
3.Press the controller.
4.If "Categories" has been selected:
Select the desired category and press the
controller.
The channels of this category are displayed.
5. Select a channel marked with this sym-
bol.6.Press the controller.
Other menu items are displayed.
7.Select "Play" and press the controller.
Additional information
The name of the channel and additional infor-
mation on the current track are displayed, e. g.
the name of the artist.
1Artist
2Track
Storing channel
1.Select desired channel.
2.Press the controller.
Other menu items are displayed.
3.Select "Store" and press the controller.
"Presets" is displayed.
Page 167 of 259
Navigation
Entertainment
Driving tips
165Reference
At a glance
Controls
Communications
Mobility
CD player and CD changer
Listening to CDs
Compressed audio files*
CDs with compressed audio files, i.e. MP3, can
be played by the CD player, but not by the CD
changer.
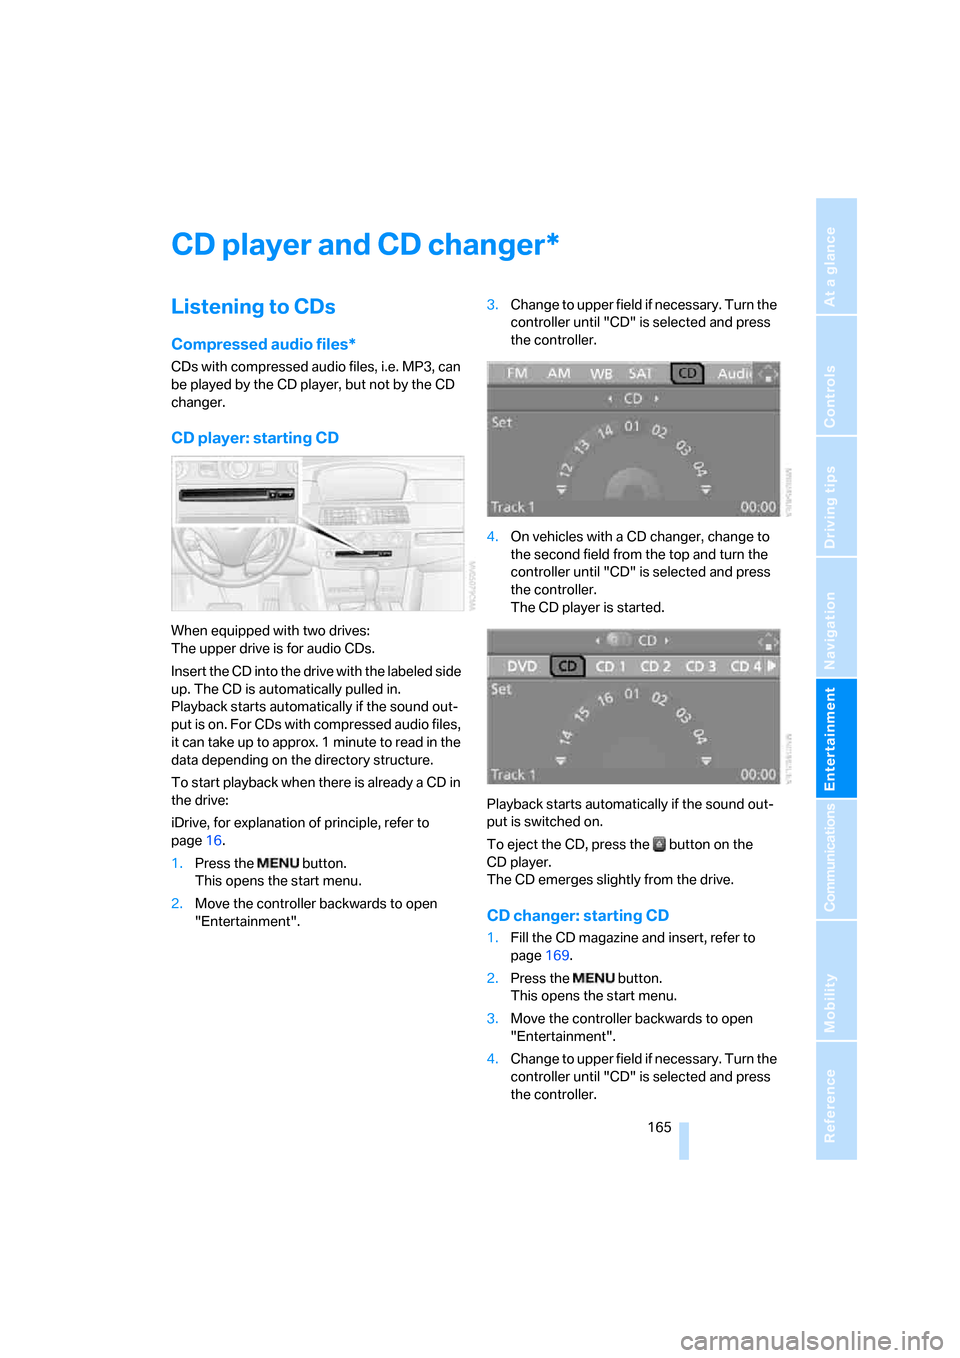
CD player: starting CD
When equipped with two drives:
The upper drive is for audio CDs.
Insert the CD into the drive with the labeled side
up. The CD is automatically pulled in.
Playback starts automatically if the sound out-
put is on. For CDs with compressed audio files,
it can take up to approx. 1 minute to read in the
data depending on the directory structure.
To start playback when there is already a CD in
the drive:
iDrive, for explanation of principle, refer to
page16.
1.Press the button.
This opens the start menu.
2.Move the controller backwards to open
"Entertainment".3.Change to upper field if necessary. Turn the
controller until "CD" is selected and press
the controller.
4.On vehicles with a CD changer, change to
the second field from the top and turn the
controller until "CD" is selected and press
the controller.
The CD player is started.
Playback starts automatically if the sound out-
put is switched on.
To eject the CD, press the button on the
CD player.
The CD emerges slightly from the drive.
CD changer: starting CD
1.Fill the CD magazine and insert, refer to
page169.
2.Press the button.
This opens the start menu.
3.Move the controller backwards to open
"Entertainment".
4.Change to upper field if necessary. Turn the
controller until "CD" is selected and press
the controller.
*
Page 169 of 259
Navigation
Entertainment
Driving tips
167Reference
At a glance
Controls
Communications
Mobility
To exit from the menu:
Select the arrow and press the controller.
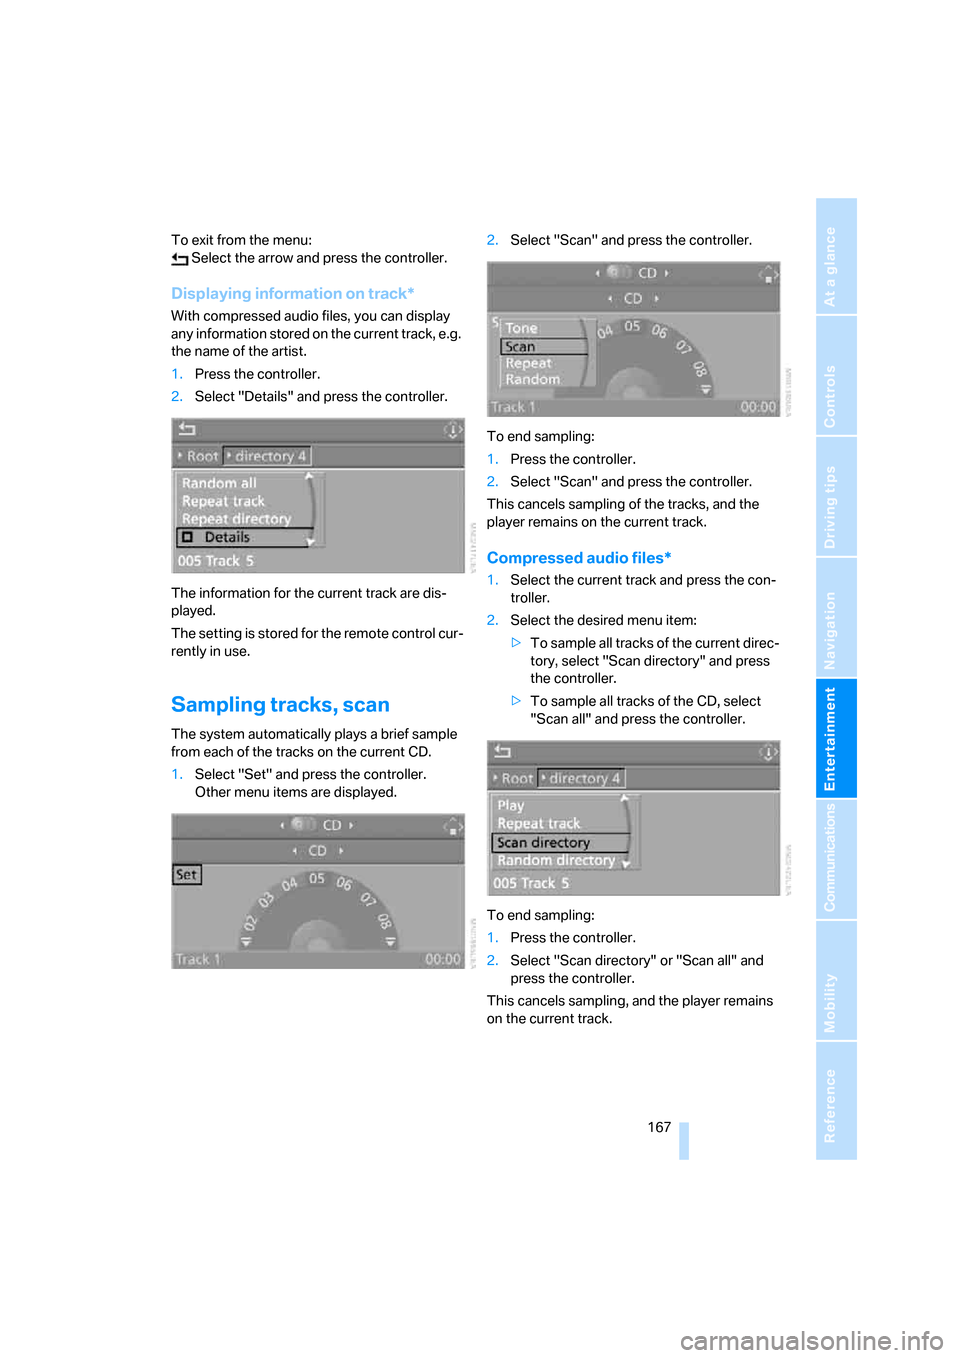
Displaying information on track*
With compressed audio files, you can display
any information stored on the current track, e.g.
the name of the artist.
1.Press the controller.
2.Select "Details" and press the controller.
The information for the current track are dis-
played.
The setting is stored for the remote control cur-
rently in use.
Sampling tracks, scan
The system automatically plays a brief sample
from each of the tracks on the current CD.
1.Select "Set" and press the controller.
Other menu items are displayed.2.Select "Scan" and press the controller.
To end sampling:
1.Press the controller.
2.Select "Scan" and press the controller.
This cancels sampling of the tracks, and the
player remains on the current track.
Compressed audio files*
1.Select the current track and press the con-
troller.
2.Select the desired menu item:
>To sample all tracks of the current direc-
tory, select "Scan directory" and press
the controller.
>To sample all tracks of the CD, select
"Scan all" and press the controller.
To end sampling:
1.Press the controller.
2.Select "Scan directory" or "Scan all" and
press the controller.
This cancels sampling, and the player remains
on the current track.
Page 171 of 259
Navigation
Entertainment
Driving tips
169Reference
At a glance
Controls
Communications
Mobility
Compressed audio files*
1.Select the current track and press the con-
troller.
2.Select the desired menu item:
>To play all tracks of the current directory
in random order, select "Random direc-
tory" and press the controller.
>To play all tracks of the CD in random
order, select "Random all" and press the
controller.
Stop random function:
1.Press the controller.
2.Select "Random directory" or "Random all"
and press the controller.
Fast forward/reverse
Buttons next to CD player:
Press and hold the button for the corre-
sponding direction.
CD magazine
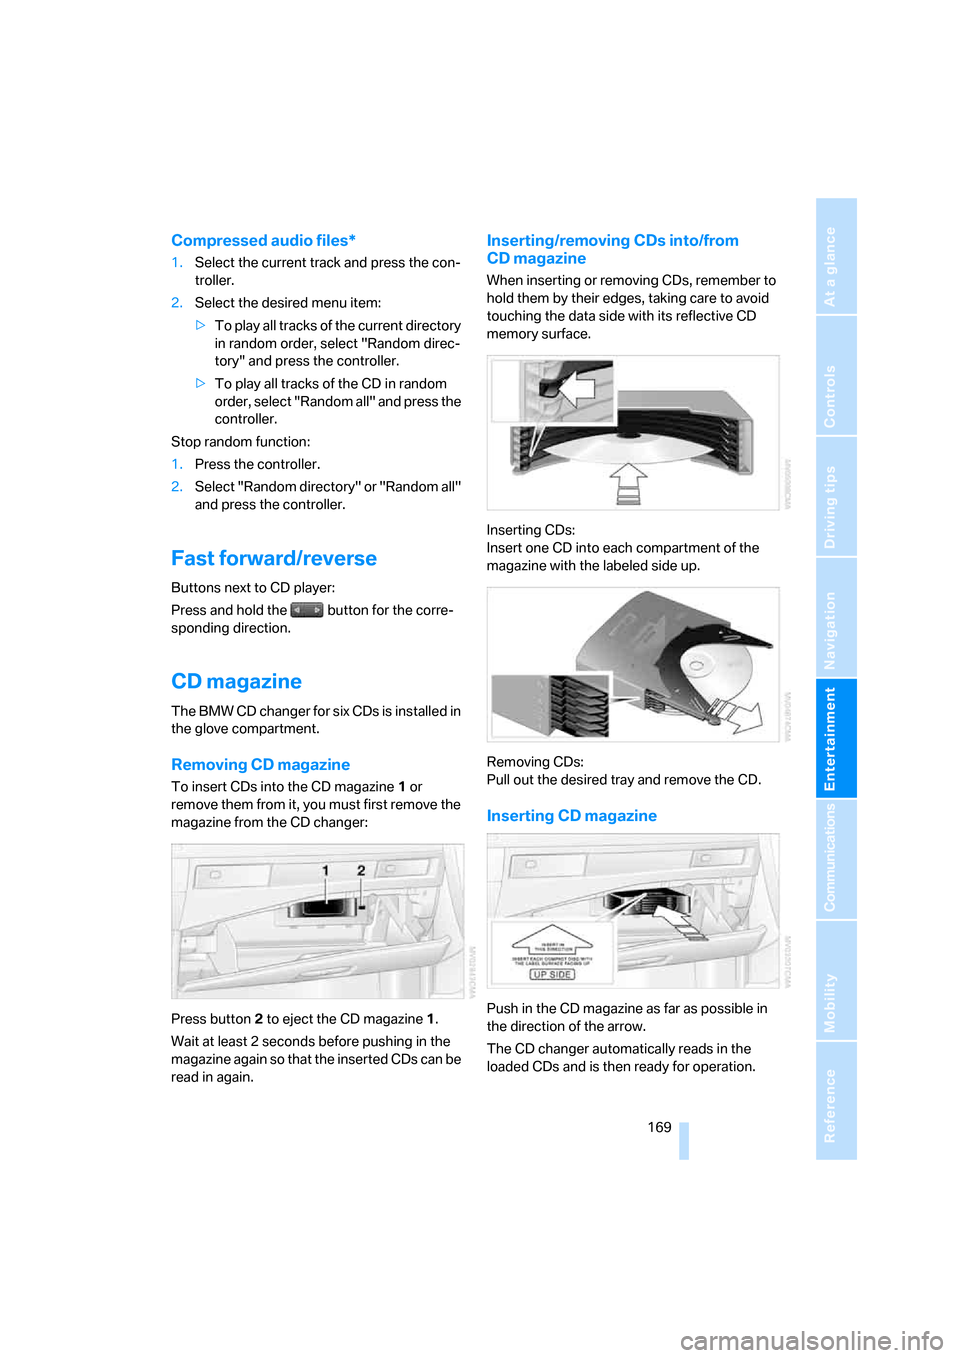
The BMW CD changer for six CDs is installed in
the glove compartment.
Removing CD magazine
To insert CDs into the CD magazine 1 or
remove them from it, you must first remove the
magazine from the CD changer:
Press button2 to eject the CD magazine1.
Wait at least 2 seconds before pushing in the
magazine again so that the inserted CDs can be
read in again.
Inserting/removing CDs into/from
CD magazine
When inserting or removing CDs, remember to
hold them by their edges, taking care to avoid
touching the data side with its reflective CD
memory surface.
Inserting CDs:
Insert one CD into each compartment of the
magazine with the labeled side up.
Removing CDs:
Pull out the desired tray and remove the CD.
Inserting CD magazine
Push in the CD magazine as far as possible in
the direction of the arrow.
The CD changer automatically reads in the
loaded CDs and is then ready for operation.
Page 173 of 259
Navigation
Entertainment
Driving tips
171Reference
At a glance
Controls
Communications
Mobility
External audio device
You can connect an external audio device, e.g.
an MP3 player, and play the sound via the vehi-
cle loudspeakers. The sound can be adjusted
with iDrive.
Connecting
1Power supply for your additional device:
Socket with removable cap
2Connection for audio playback:
Jacks εin/3.5 mm
For audio playback via the vehicle loudspeak-
ers, connect the headphone or Line-Out con-
nection of the device to the connection 2.
Starting audio playback
The audio device must be switched on.
iDrive, for explanation of principle, refer to
page16.
1.Press the button.
This opens the start menu.
2.Move the controller backwards to open
"Entertainment".3.Select "Audio Aux" and press the control-
ler.
4.Adjust volume and sound if necessary.
Page 177 of 259
175
Entertainment
Reference
At a glance
Controls
Driving tips Communications
Navigation
Mobility
Making calls with car phone:
BMW Assist calls
You can use the car phone via the hands-free
system for BMW Assist calls.
When the status information "Communication"
or "BMW Assist" is displayed in "BMW Ser-
vice", only BMW Assist calls are possible.
It may not be possible to establish a telephone
connection using the mobile phone while a con-
nection is being established to BMW Assist or
while a call to BMW Assist is already in
progress. If this happens, you must log off the
mobile phone from the vehicle if you wish to
place a call with the mobile phone.
Commissioning
Logging on mobile phone on vehicle
The following prerequisites must be met:
>The mobile phone is ready to operate.
>The Bluetooth link on the vehicle, refer to
page177, and on the mobile phone is
active.
>Depending on the mobile phone, preset-
tings on the mobile phone are necessary:
e.g. via the menu item Bluetooth activated
or the menu item Connection not with con-
firmation.
>For logging on, specify any desired number
as the Bluetooth passkey, e.g. 1. This Blue-
tooth passkey is no longer required follow-
ing successful logon.
>The ignition is switched on.
Only log on the mobile phone with the
vehicle stopped, otherwise the passen-
gers and other road user can be endangered
due to a lack of attentiveness on the part of the
driver.<
Switching on ignition
1.Insert the remote control as far as possible
into the ignition lock.
2.S w i t c h o n t h e s w i t c h o n i g n i t i o n b y p r e s s i n g
the Start/Stop button without depressing
the brake or clutch pedal.
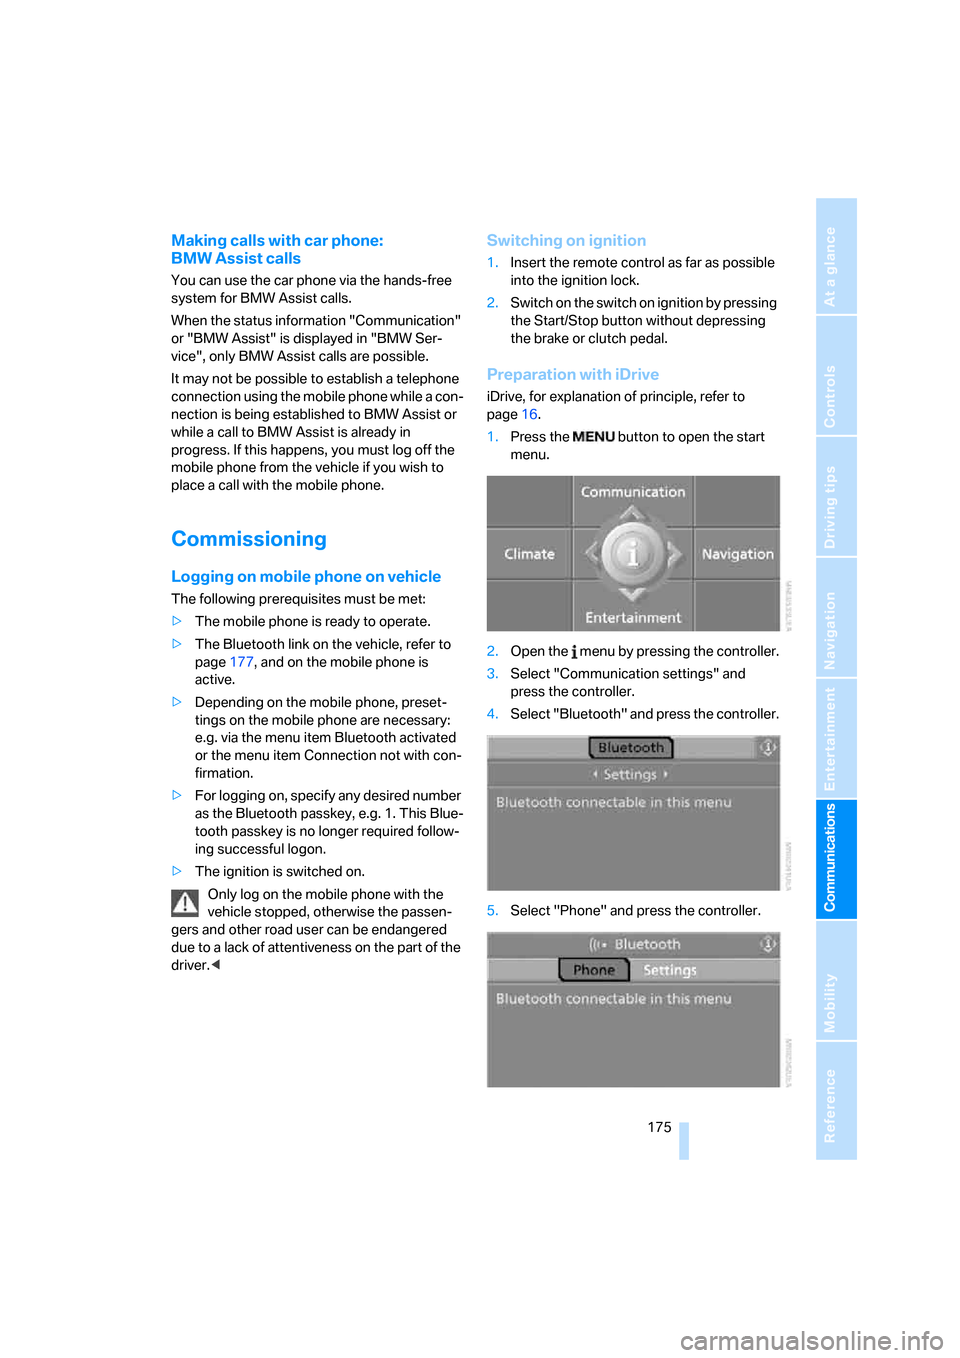
Preparation with iDrive
iDrive, for explanation of principle, refer to
page16.
1.Press the button to open the start
menu.
2.Open the menu by pressing the controller.
3.Select "Communication settings" and
press the controller.
4.Select "Bluetooth" and press the controller.
5.Select "Phone" and press the controller.