2006 BMW 530XI TOURING lights
[x] Cancel search: lightsPage 105 of 259

Controls
103Reference
At a glance
Driving tips
Communications
Navigation
Entertainment
Mobility
High-beam assistant*
The concept
This system automatically switches the high
beams on and off again. A sensor on the front of
the inside rearview mirror controls the process.
The assistant ensures that the high beams are
switched on whenever the traffic situation
allows. This reduces the strain on you while at
the same time providing you with the best pos-
sible visibility. Of course, you can intervene at
any time and switch the high beams on and off
in the accustomed manner.
Activating high-beam assistant
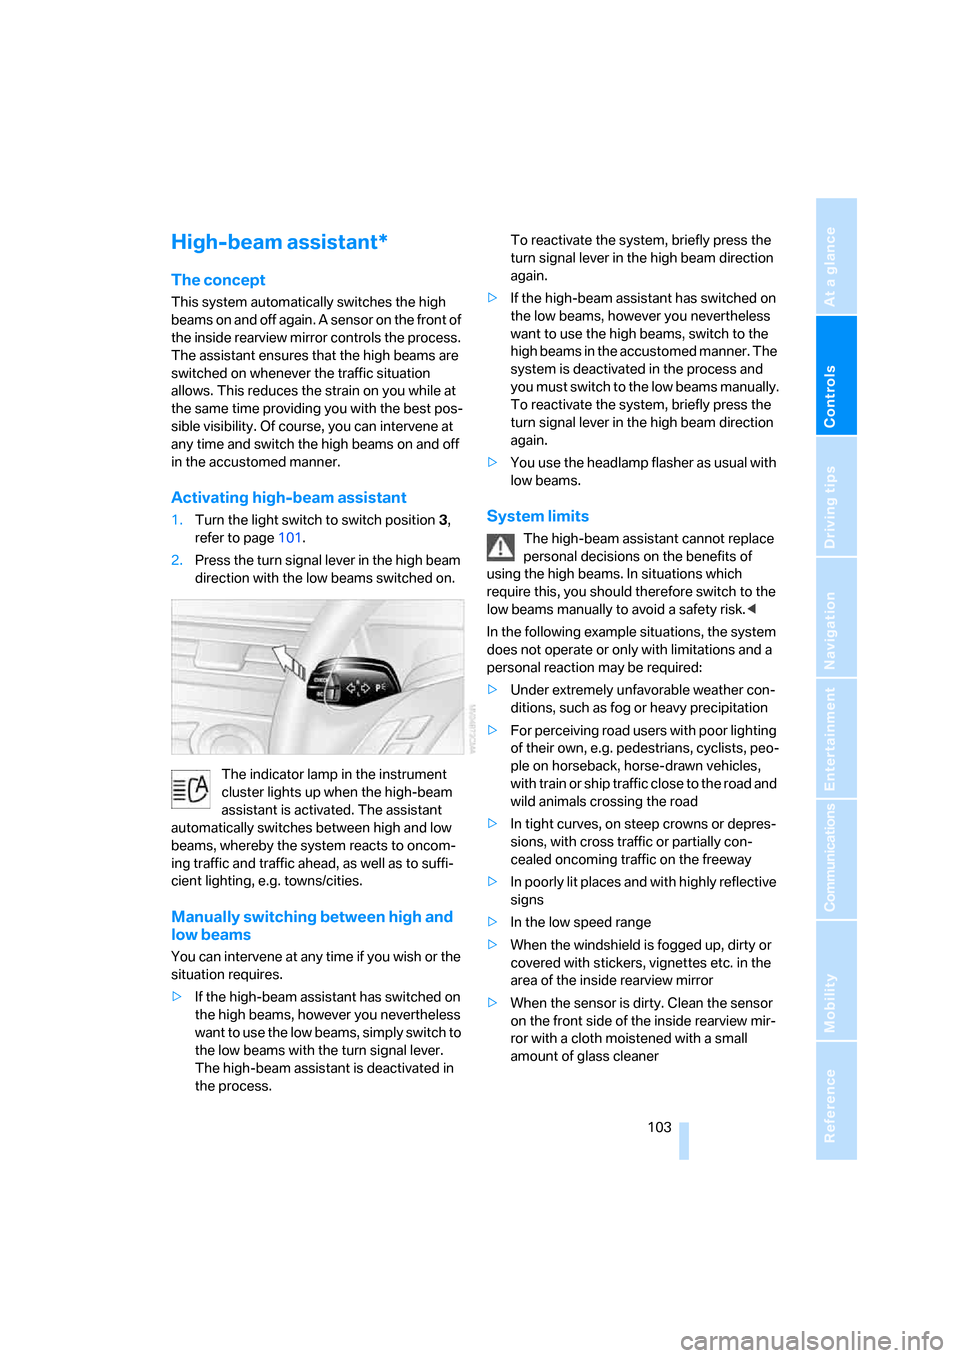
1.Turn the light switch to switch position3,
refer to page101.
2.Press the turn signal lever in the high beam
direction with the low beams switched on.
The indicator lamp in the instrument
cluster lights up when the high-beam
assistant is activated. The assistant
automatically switches between high and low
beams, whereby the system reacts to oncom-
ing traffic and traffic ahead, as well as to suffi-
cient lighting, e.g. towns/cities.
Manually switching between high and
low beams
You can intervene at any time if you wish or the
situation requires.
>If the high-beam assistant has switched on
the high beams, however you nevertheless
want to use the low beams, simply switch to
the low beams with the turn signal lever.
The high-beam assistant is deactivated in
the process. To reactivate the system, briefly press the
turn signal lever in the high beam direction
again.
>If the high-beam assistant has switched on
the low beams, however you nevertheless
want to use the high beams, switch to the
high beams in the accustomed manner. The
system is deactivated in the process and
you must switch to the low beams manually.
To reactivate the system, briefly press the
turn signal lever in the high beam direction
again.
>You use the headlamp flasher as usual with
low beams.
System limits
The high-beam assistant cannot replace
personal decisions on the benefits of
using the high beams. In situations which
require this, you should therefore switch to the
low beams manually to avoid a safety risk.<
In the following example situations, the system
does not operate or only with limitations and a
personal reaction may be required:
>Under extremely unfavorable weather con-
ditions, such as fog or heavy precipitation
>For perceiving road users with poor lighting
of their own, e.g. pedestrians, cyclists, peo-
ple on horseback, horse-drawn vehicles,
with train or ship traffic close to the road and
wild animals crossing the road
>In tight curves, on steep crowns or depres-
sions, with cross traffic or partially con-
cealed oncoming traffic on the freeway
>In poorly lit places and with highly reflective
signs
>In the low speed range
>When the windshield is fogged up, dirty or
covered with stickers, vignettes etc. in the
area of the inside rearview mirror
>When the sensor is dirty. Clean the sensor
on the front side of the inside rearview mir-
ror with a cloth moistened with a small
amount of glass cleaner
Page 106 of 259

Lamps
104
Fog lamps*
The parking lamps or low beams must be
switched on for the fog lamps to operate. The
green indicator lamp in the instrument cluster
lights up whenever the fog lamps are on.
The fog lamps are switched off whenever the
high beams are switched on.
If the automatic headlamp control is acti-
vated, the low beams will come on auto-
matically when you switch on the fog lamps.<
Instrument lighting
You can control the lighting intensity by using
the knurled wheel.
Interior lamps
The interior lamps, footwell lamps, door entry
lighting
and courtesy lamps* are controlled
automatically.
With the courtesy lamps, LED lights are located
in the door handles to illuminate the exterior
area before the doors.
To protect the battery, all lamps in the
vehicle are switched off approx. 15 min-
utes after radio readiness is switched off, refer
to Start/Stop button on page58.<
Switching interior lamps on and off
manually
Press the button.
If you want the interior lamps to remain off con-
tinuously, maintain pressure on the button for
approx. 3 seconds.
Reading lamps
Reading lamps are located in the front and rear
adjacent to the interior lamps. Press the button
briefly to switch the lamps on and off.
Page 110 of 259

Climate
108 body. Therefore, open these vents for maxi-
mum cooling.
AUC Automatic recirculated-air
control/recirculated-air mode
You can respond to pollutants or
unpleasant odors in the immediate
environment by suspending the
supply of outside air. The system then recircu-
lates the air currently within the vehicle. During
AUC operation, a sensor detects pollutants in
the outside air and controls the shut-off auto-
matically.
By pressing the button repeatedly, you can
request three operating modes:
>LED off: outside air flows in continuously.
>Right LED on, AUC mode: the system
detects pollutants in the outside air and
shuts off the supply as needed.
>Left LED on, recirculated-air mode: the
supply of outside air is permanently shut off.
If condensation starts to form on the
inside window surfaces during operation
in the recirculated-air mode, you should switch
it off while also increasing the air volume as
required.
The recirculated-air mode should not be used
over an extended period of time, as the air qual-
ity inside the vehicle deteriorates continu-
ously.<
Residual heat
The heat stored in the engine is
used to heat the passenger com-
partment, e.g. while stopped at a
school to pick up a child.
The function can be switched on when the fol-
lowing conditions are met:
>up to 15 minutes after switching off the
engine
>with engine at operating temperature
>with sufficient battery voltage
>at an outside temperature below 777/
256The LED lights up when the function is
switched on.
From radio readiness the interior temperature,
the air volume and the air distribution can be
set.
Switching off automatic climate control
The air volume, the heater and the
cooling function are all switched
off.
You can restart the automatic cli-
mate control by pressing any of its buttons
except the REST button.
Front ventilation
1Knurled wheels to smoothly open and close
air vents
2Levers to change the air vent direction
Do not drop any foreign objects into the
vent outlets, otherwise these could be
catapulted outwards and lead to injuries.<
Ventilation for cooling
Adjust the vent outlets to direct the flow of cool
air in your direction, for instance, if the interior
has become too warm, etc.
Draft-free ventilation
Set the vent outlets so that the air flows past
you and is not directed straight at you.
Page 112 of 259

Climate
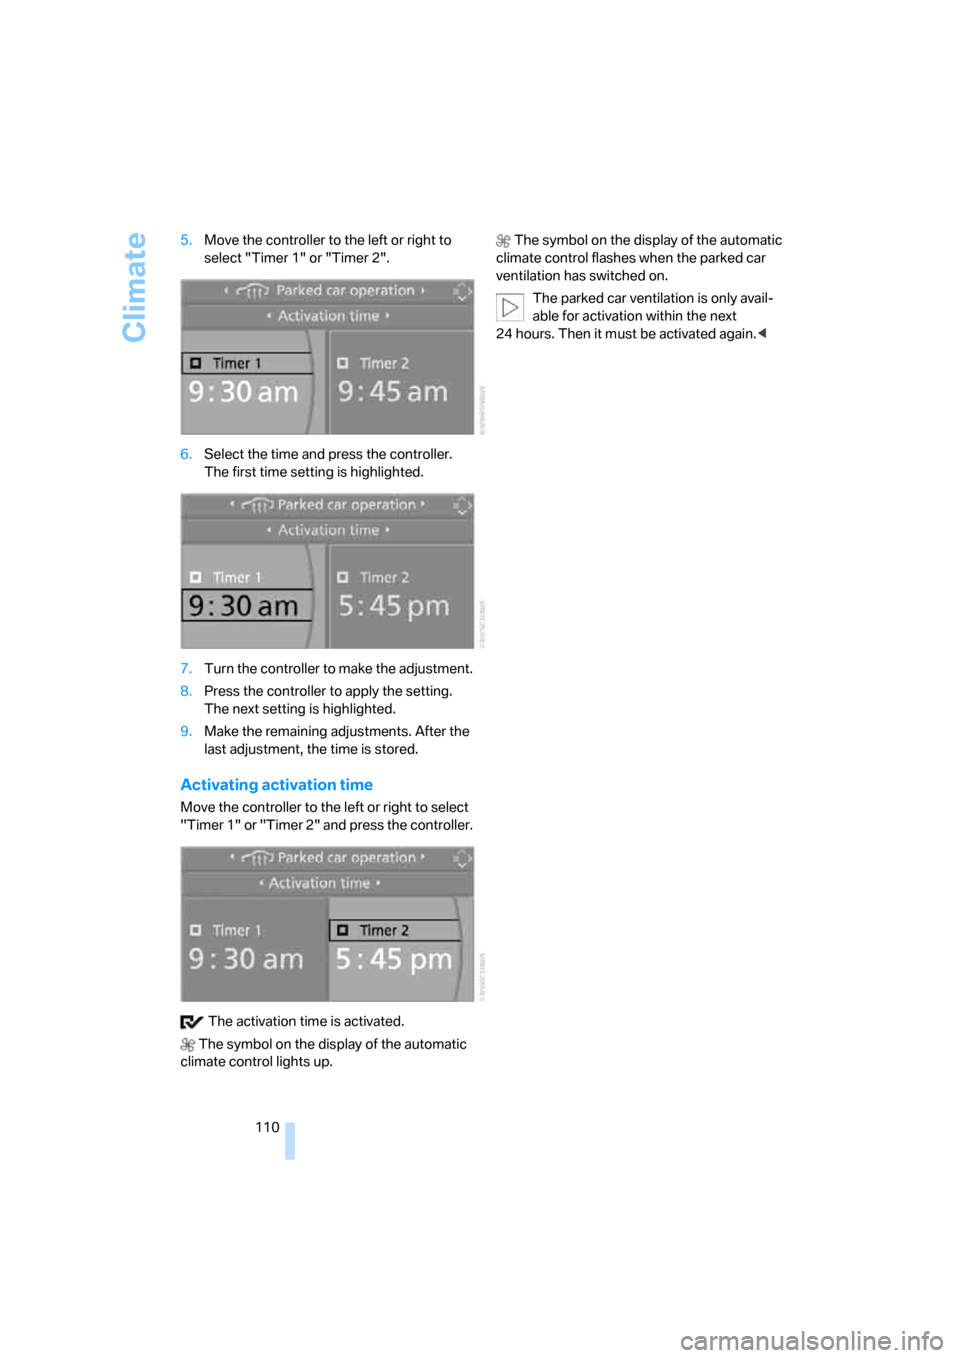
110 5.Move the controller to the left or right to
select "Timer 1" or "Timer 2".
6.Select the time and press the controller.
The first time setting is highlighted.
7.Turn the controller to make the adjustment.
8.Press the controller to apply the setting.
The next setting is highlighted.
9.Make the remaining adjustments. After the
last adjustment, the time is stored.
Activating activation time
Move the controller to the left or right to select
"Timer 1" or "Timer 2" and press the controller.
The activation time is activated.
The symbol on the display of the automatic
climate control lights up. The symbol on the display of the automatic
climate control flashes when the parked car
ventilation has switched on.
The parked car ventilation is only avail-
able for activation within the next
24 hours. Then it must be activated again.<
Page 117 of 259

Controls
115Reference
At a glance
Driving tips
Communications
Navigation
Entertainment
Mobility
Ashtray, front
Opening
Slide back the cover.
Emptying
Push the ashtray toward the front: the ashtray
lifts and can be removed.
Cigarette lighter, front
Press in the lighter with the engine running or
the ignition switched on.
The lighter can be removed as soon as it pops
back out.
Hold or touch the hot cigarette lighter by
the knob only. Holding or touching it in
other areas could result in burns.
Always take along the remote control when you
leave the vehicle, otherwise children could, for
example, use the lighter and burn themselves.<
Ashtray, rear
Emptying
Press the entire cover down. The ashtray rises
and can be removed.
Cigarette lighter, rear
Refer to Cigarette lighter, front.
Connecting electrical devices
Sockets
With the engine running or the ignition switched
on, the cigarette lighter socket can be used as a
power outlet for hand flashlights, car vacuum
cleaners, etc., with power ratings of up to
approx. 200 W at 12 V. Avoid damaging the
socket due to inserting plugs of different
shapes or sizes. The same is true for all power
outlets in the vehicle.
Page 209 of 259

Mobility
207Reference
At a glance
Controls
Driving tips
Communications
Navigation
Entertainment
Your BMW center will be happy to answer
detailed questions on BMW High Perfor-
mance Synthetic Oil or approved synthetic
oils.<
You can also call BMW of North America at
1-800-831-1117 or visit the website at
www.bmwusa.com to obtain this information.
Viscosity grades
Viscosity is a measure of an oil's flow rating and
is specified in SAE grades.
The choice of the right SAE grade is based on
the climatic conditions in the region in which
you normally drive your BMW.
Approved oils belong to the SAE grades
5W-40 and 5W-30.<
These oils can be used for driving at all outside
temperatures.
Coolant
Do not add coolant to the cooling system
when the engine is hot. Escaping coolant
can cause burns.<
Coolant is comprised of water and coolant addi-
tive. Not all commercially available additives are
suitable for your BMW. Ask your BMW center
for suitable additives.
Only use suitable additives, otherwise
engine damage may result. The additives
present a health hazard; observe the instruc-
tions on the containers.<
Comply with the appropriate environ-
mental protection regulations when dis-
posing of coolant additives.<
Checking coolant level
1.The engine must be at ambient tempera-
ture.
2.Turn the cap of the expansion tank counter-
clockwise to allow any accumulated pres-
sure to escape, then continue turning to
open.3.The coolant level is correct when the cool-
ant level is between the MIN and MAX
marks, refer to the diagram adjacent to the
filler neck.
4.If the coolant is low, slowly add coolant up to
the specified level – do not overfill.
5.Turn the cap until there is an audible click.
6.Have the reason for the coolant loss elimi-
nated as soon as possible.
Brake system
Malfunctions
Brake fluid
The warning lamp lights red up in spite
of the handbrake being released; a
message is shown on the Control Dis-
play: stop immediately.
The brake fluid in the reservoir has fallen to
below the minimum level. At the same time, a
considerably longer brake pedal travel may be
noticeable. Have the system thoroughly
checked.
Display of the previously described
malfunction on Canadian models.
When you continue driving, an increased
brake pedal path can be necessary, and
significantly longer braking distances might be
required. Please adapt your driving style
accordingly.<
Page 210 of 259

Under the hood
208
Brake pads
The warning lamp lights red up in spite
of the handbrake being released; a
message is shown on the Control Dis-
play. The brake pads have reached their mini-
mum pad thickness. Have brake pads replaced
immediately.
Display of the previously described
malfunction on Canadian models.
For your own safety: use only brake pads
that BMW has approved for the corre-
sponding vehicle model. As BMW cannot
assess the suitability of other brake pads for
use on your vehicle, we are unable to assume
continued responsibility for the vehicle's oper-
ating safety if non-approved pads are
installed.<
Page 212 of 259

Maintenance
210
Socket for OBD Onboard
Diagnostics interface
Components which are decisive for the
exhaust-gas composition can be checked via
the OBD socket with a device.
This socket is located to the left on the driver's
side, on the underside of the instrument panel
under a cover.
Exhaust-gas values
The warning lamp lights up. The
exhaust-gas values worsen. Have the
vehicle checked as soon as possible.
Display of the previously described
malfunction in Canadian models.
The lamp flashes under certain conditions. This
is a sign of excessive misfiring of the engine. In
this case you should reduce speed and drive to
the nearest BMW center as soon as possible.
Heavy engine misfiring led to serious damage
to the emission-relevant components, espe-
cially the catalytic converter, within a short time.
If the fuel filler cap is not properly tight-
ened, the OBD system can close when
fuel vapor escapes. Then a display light up. If
the cap is then tightened, the display will go out
within a few days.<
Event Data Recorders
Your vehicle may be equipped with one or sev-
eral measuring and diagnosis modules, or with
a device for recording or transmitting certain
vehicle data or information. If you have also
signed a contract of participation for BMW
Assist, certain vehicle data can be transmitted
or recorded to enable corresponding services.
Care
Important information on the care and mainte-
nance of your BMW is contained in the Caring
for your vehicle brochure.