2006 BMW 530XI TOURING display
[x] Cancel search: displayPage 31 of 259

Controls
29Reference
At a glance
Driving tips
Communications
Navigation
Entertainment
Mobility
Remove the adapter from the holder in the
glove compartment and slide the spare key into
the adapter before use.
Personal Profile
The concept
You can set a number of functions of your BMW
individually according to your preferences. Per-
sonal Profile ensures that most of these set-
tings are stored for the remote control currently
in use without you having to do anything. When
the vehicle is unlocked, the corresponding
remote control is detected and the settings
stored for it are called up and carried out.
This means that you will always find your BMW
set to your own personal settings even if
another person with his/her own remote control
and settings has used the vehicle since the last
time you drove it. The individual settings are
stored for a maximum of four remote controls.
Personal Profile settings
Details on the settings are provided on the
specified pages.
>When unlocking with the remote control,
either unlock only the driver's door or the
entire vehicle, refer to page30
>Locking the vehicle after a short time or
after starting off, refer to page32
>Assigning the programmable buttons
* on
the steering wheel, refer to page53>Settings for the display on the Control Dis-
play:
>Brightness of the Control Display, refer
to page83
>Measuring units for consumption, route/
distances, temperature, and pressure,
refer to page84
>Language on Control Display, refer to
page84
>12h/24h mode of the clock, refer to
page83
>Date format, refer to page83
>Showing optical warning for PDC Park Dis-
tance Control
*, refer to page85
>Selection and brightness of display in
Head-Up Display
*, refer to page97
>Display settings of BMW Night Vision
*,
refer to page99
>Air distribution, temperature in the upper
body area and intensity of the automatic air
conditioning system, refer to page106
>Setting voice instructions for destination
guidance in the navigation system
*, refer to
page147
In addition, the following, most recently
selected settings are recalled during unlocking:
>Positions of driver's seat, outside mirrors,
and steering wheel
*, refer to page47
>Audio sources, volume and tone settings,
refer to page153
>Radio, displaying stored stations, refer to
page156
>Telephone, setting volume, refer to
pages178,184
Central locking system
The concept
The central locking system is ready for opera-
tion whenever the driver's door is closed.
The system simultaneously engages and
releases the locks on the following:
>Doors
Page 40 of 259

Opening and closing
38 The luggage compartment lid/tailgate can also
be opened with the system armed with the
button on the remote control, refer to page33.
When the luggage compartment lid/tailgate is
closed, it is locked and monitored again.
Switching off alarm
>Unlock the vehicle using the remote control,
refer to page30.
>Insert the remote control all the way into the
ignition lock.
Indicator lamp displays
>The indicator lamp under the inside rear-
view mirror flashes continuously: the sys-
tem is armed.
>The indicator lamp flashes after locking:
doors, hood, luggage compartment lid/tail-
gate or rear window
is/are not properly
closed. Even if you do not close the alerted
area, the system begins to monitor the
remaining areas, and the indicator lamp
flashes continuously after approx. 10 sec-
onds. However, the interior motion sensor
is not activated.
>The indicator lamp goes out after unlocking:
your vehicle has not been disturbed while
you were away.
>The indicator lamp flashes after unlocking
until the remote control is inserted into the
ignition lock, however for a maximum of
approx. 5 minutes: your vehicle has been
disturbed while you were away.
Tilt alarm sensor
The tilt of the vehicle is monitored. The alarm
system reacts, e.g. in case of an attempted
wheel theft or towing.
Interior motion sensor
In order for the interior motion sensor to func-
tion properly, the windows and glass sunroof
*
must be completely closed.
Avoiding unintentional alarms
The tilt alarm sensor and interior motion sensor
may be switched off at the same time. This pre-
vents unintentional alarms, e.g. in the following
situations:
>In stacking garages
>When transporting on car-carrying trains
>When animals are to remain in the vehicle
Switching off tilt alarm sensor and
interior motion sensor
Press the button on the remote control
again as soon as the vehicle is locked.
The indicator lamp lights up briefly and then
flashes continuously. The tilt alarm sensor and
the interior motion sensor are switched off until
the next time the vehicle is unlocked and subse-
quently locked again.
Comfort access*
Comfort access enables you to access your
vehicle without having to hold the remote con-
trol in your hand. It is sufficient to carry the
remote control with you, e.g. in your jacket
pocket. The vehicle automatically detects the
related remote control in the immediate vicinity
or in the interior.
Comfort access supports the following func-
tions:
>Unlocking/locking vehicle
>Comfort locking
>Opening luggage compartment lid/tailgate
separately
Page 42 of 259

Opening and closing
40 When doing so, do not depress the brake
or clutch pedal, as otherwise the engine
will start immediately.<
Starting engine
You can start the engine or switch on the switch
on ignition if a remote control is located in the
interior of the vehicle. It need not be inserted in
the ignition lock, refer to page58.
If you take the remote control with you when
leaving the vehicle with the engine running, a
warning lamp lights up. In addition, a message
appears on the Control Display. As long as no
remote control is detected in the vehicle, it is
only possible to restart the engine within
approx. 10 seconds after it is switched off.
Switching off engine with automatic
transmission
The engine can only be switched off in the
selector lever position P, refer to page60.
To switch off the engine in the selector lever
position N, the remote control must be inserted
in the ignition lock.
Before driving into a car wash with
automatic transmission
1.Insert remote control into ignition lock.
2.Depress brake pedal.
3.Place selector lever in position N.
4.Switch off the engine.
The vehicle can roll.
Malfunction
The comfort access function may malfunction
due to local radio waves. Then open or close the
vehicle with the buttons on the remote control
or with a key. To start the engine following this,
insert the remote control in the ignition lock.
Replacing battery
The remote control for comfort access contains
a battery which must be replaced if necessary.1.Remove integrated key from remote con-
trol, refer to page28.
2.Remove cover.
3.Lay in new battery with positive side facing
upward.
4.Press cover closed.
Return used battery to a recycling collec-
tion point or to your BMW center.<
Windows
To prevent injuries, exercise care when
closing the windows and keep them in
your field of vision until they are shut.
Always take along the remote control when you
leave the vehicle, otherwise children could, for
example, operate the windows and injure them-
selves.<
Opening, closing
>Press switch to resistance point:
The window continues to open as long as
you keep the switch pressed.
>Press switch beyond resistance point:
The window opens automatically. Pressing
the switch again stops the opening move-
ment.
Page 51 of 259

Controls
49Reference
At a glance
Driving tips
Communications
Navigation
Entertainment
Mobility
With the comfort seat, use the shoulder support
to set the distance to the back of the head.
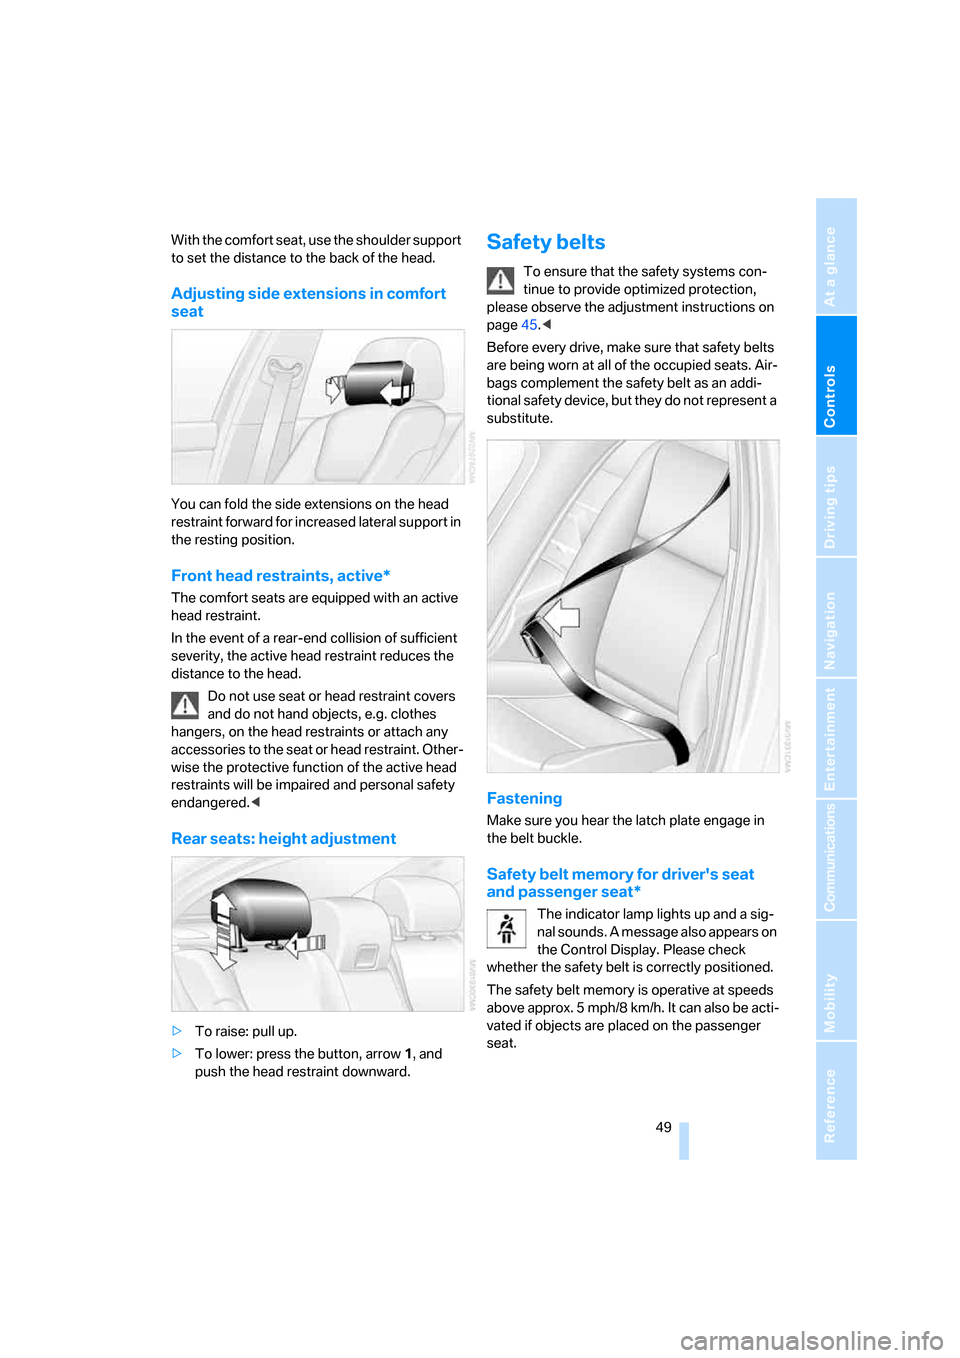
Adjusting side extensions in comfort
seat
You can fold the side extensions on the head
restraint forward for increased lateral support in
the resting position.
Front head restraints, active*
The comfort seats are equipped with an active
head restraint.
In the event of a rear-end collision of sufficient
severity, the active head restraint reduces the
distance to the head.
Do not use seat or head restraint covers
and do not hand objects, e.g. clothes
hangers, on the head restraints or attach any
accessories to the seat or head restraint. Other-
wise the protective function of the active head
restraints will be impaired and personal safety
endangered.<
Rear seats: height adjustment
>To raise: pull up.
>To lower: press the button, arrow1, and
push the head restraint downward.
Safety belts
To ensure that the safety systems con-
tinue to provide optimized protection,
please observe the adjustment instructions on
page45.<
Before every drive, make sure that safety belts
are being worn at all of the occupied seats. Air-
bags complement the safety belt as an addi-
tional safety device, but they do not represent a
substitute.
Fastening
Make sure you hear the latch plate engage in
the belt buckle.
Safety belt memory for driver's seat
and passenger seat*
The indicator lamp lights up and a sig-
nal sounds. A message also appears on
the Control Display. Please check
whether the safety belt is correctly positioned.
The safety belt memory is operative at speeds
above approx. 5 mph/8 km/h. It can also be acti-
vated if objects are placed on the passenger
seat.
Page 55 of 259

Controls
53Reference
At a glance
Driving tips
Communications
Navigation
Entertainment
Mobility
Programmable buttons* on steering
wheel
You can program the buttons individually.
The setting is stored for the remote control cur-
rently in use.
iDrive, for explanation of principle, refer to
page16.
1.Press the button.
This opens the start menu.
2.Press the controller to open the menu.
3.Select "Vehicle settings" and press the
controller.
4.Change to upper field if necessary. Turn the
controller until "Steering wheel buttons" is
selected and press the controller.
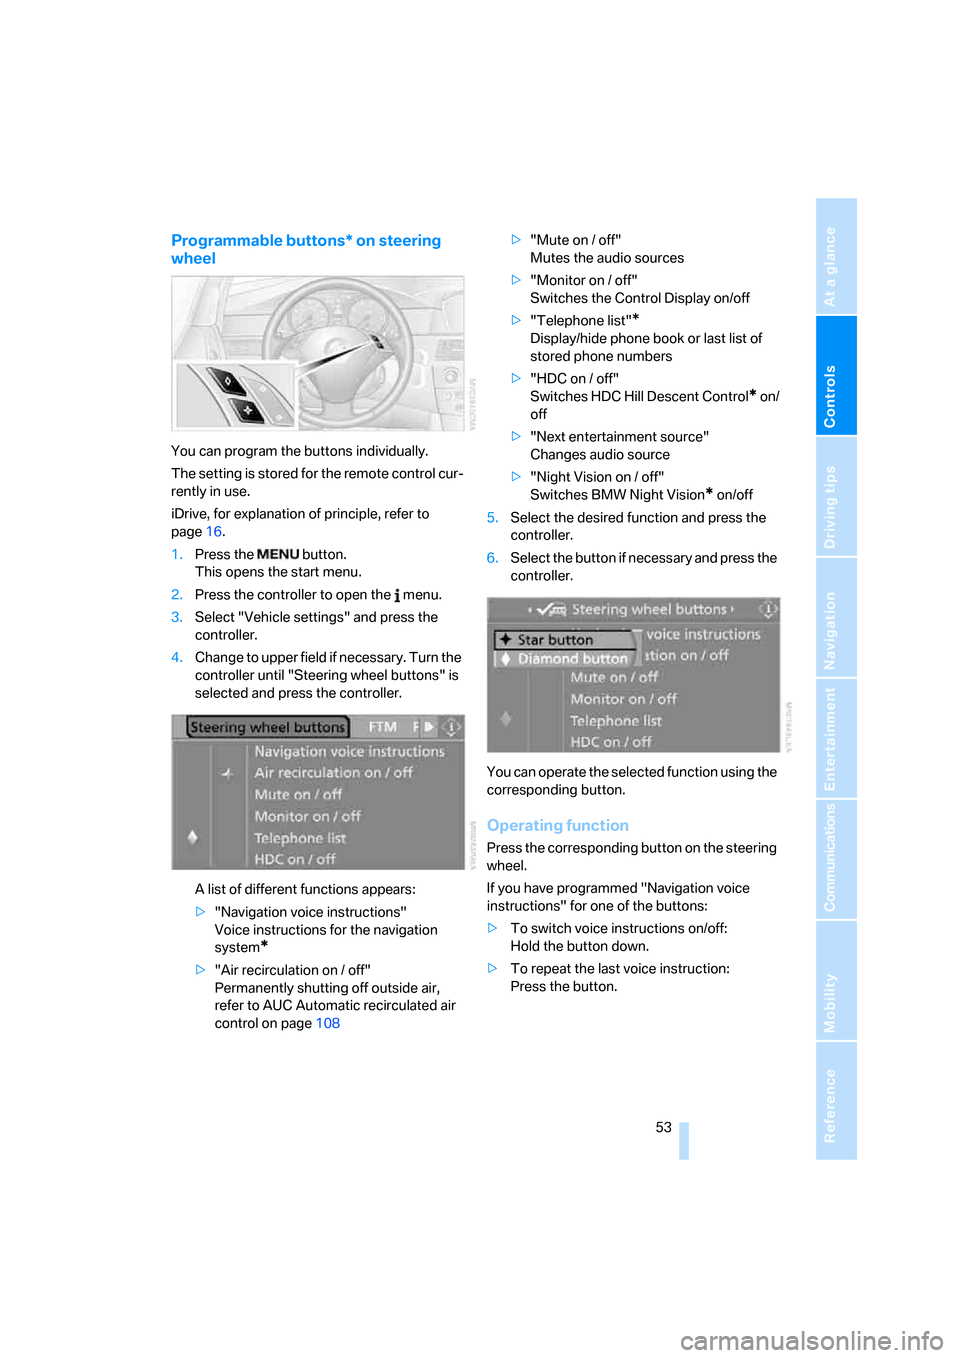
A list of different functions appears:
>"Navigation voice instructions"
Voice instructions for the navigation
system
*
>"Air recirculation on / off"
Permanently shutting off outside air,
refer to AUC Automatic recirculated air
control on page108>"Mute on / off"
Mutes the audio sources
>"Monitor on / off"
Switches the Control Display on/off
>"Telephone list"
*
Display/hide phone book or last list of
stored phone numbers
>"HDC on / off"
Switches HDC Hill Descent Control
* on/
off
>"Next entertainment source"
Changes audio source
>"Night Vision on / off"
Switches BMW Night Vision
* on/off
5.Select the desired function and press the
controller.
6.Select the button if necessary and press the
controller.
You can operate the selected function using the
corresponding button.
Operating function
Press the corresponding button on the steering
wheel.
If you have programmed "Navigation voice
instructions" for one of the buttons:
>To switch voice instructions on/off:
Hold the button down.
>To repeat the last voice instruction:
Press the button.
Page 61 of 259

Controls
59Reference
At a glance
Driving tips
Communications
Navigation
Entertainment
Mobility
Starting engine
Do not run the engine in closed rooms,
otherwise the inhaling of toxic exhaust
gases can cause unconsciousness and death.
The exhaust gases contain carbon monoxide,
an odorless and colorless, but highly toxic gas.
Never leave an unattended vehicle with the
engine running, as such a vehicle represents a
potential safety hazard.
Before leaving the vehicle with the engine run-
ning, set the selector lever to the idling or the
P position and set the handbrake, otherwise the
vehicle can begin to roll.<
When starting the engine, do not press the
accelerator pedal.
Do not allow the engine to warm up by leaving it
running while the vehicle remains stationary.
Instead, begin to drive immediately at a moder-
ate engine speed.
Do not press either the brake or the clutch
pedal as long as you do not want to start
the engine. The engine starts immediately
when you briefly press the Start/Stop button
and press the brake pedal with an automatic
transmission
* or the clutch pedal with a manual
transmission.<
Manual transmission
1.Apply the handbrake.
2.Depress the clutch pedal and select the
idling position.
3.Briefly press Start/Stop button.
The system responds by automatically engag-
ing the starter for a certain period and automat-
ically disengaging it as soon as the engine
starts.
Automatic transmission*
1.Depress brake pedal.
2.Place selector lever in position P or N.
3.Briefly press Start/Stop button.
The system responds by automatically engag-
ing the starter for a certain period and automat-
ically disengaging it as soon as the engine
starts.
SMG Sequential Manual
Transmission*
1.Depress brake pedal.
2.Engage selector lever position N and make
sure that this position is also indicated in
instrument cluster.
3.Briefly press Start/Stop button.
The system responds by automatically engag-
ing the starter for a certain period and automat-
ically disengaging it as soon as the engine
starts.
If the engine fails to start, depress the
brake pedal and press the selector lever
to the right then engage the position N. Watch
the display in the instrument cluster while doing
so.<
Special starting conditions
Depress the accelerator pedal half way when
starting the engine in the following situations:
>The engine fails to start on the first attempt,
e.g. if it is very hot or cold.
>The engine is started at very low tempera-
tures, below approx. + 57/– 156, at high
altitudes, over approx. 3,300 ft/1,000 m.
Avoid frequent starting in quick succes-
sion or repeated starting attempts in
which the engine does not start. Otherwise, the
fuel is not burned or inadequately burned and
there is a danger of overheating and damaging
the catalytic converter.<
Page 63 of 259

Controls
61Reference
At a glance
Driving tips
Communications
Navigation
Entertainment
Mobility
Reverse gear
Select only when the vehicle is stationary.
When pressing the gearshift lever to the left,
overcome some resistance.
SMG Sequential Manual
Transmission*
The concept
The SMG Sequential Manual Transmission is
an automated manual transmission in which an
electrohydraulic system handles the clutching
and gear changes.
The SMG is operated with the selector lever
and two shift paddles on the steering wheel.
It offers you the following functions:
>Optional manual or automatic operation:
Sequential mode or Drive mode
>You have a choice of two driving programs:
Normal or Sport, refer to Dynamic Driving
Control page62
>Automatic downshifting and prevention of
incorrect shifting even in Sequential opera-
tion
>Acceleration assistant, refer to page63.
Selector lever positions
>R: Reverse gear
>N: Neutral
>One-touch functions for Sequential mode:
+: manual upshifting
–: manual downshifting
>D: activate/deactivate the Drive modeThe transmission automatically shifts
into N if the driver's door is opened with
the engine running and neither the pedals, the
shift paddles nor the selector lever are oper-
ated.
This is signaled by an acoustic signal and the
flashing display N in the instrument cluster; a
message appears on the Control Display.<
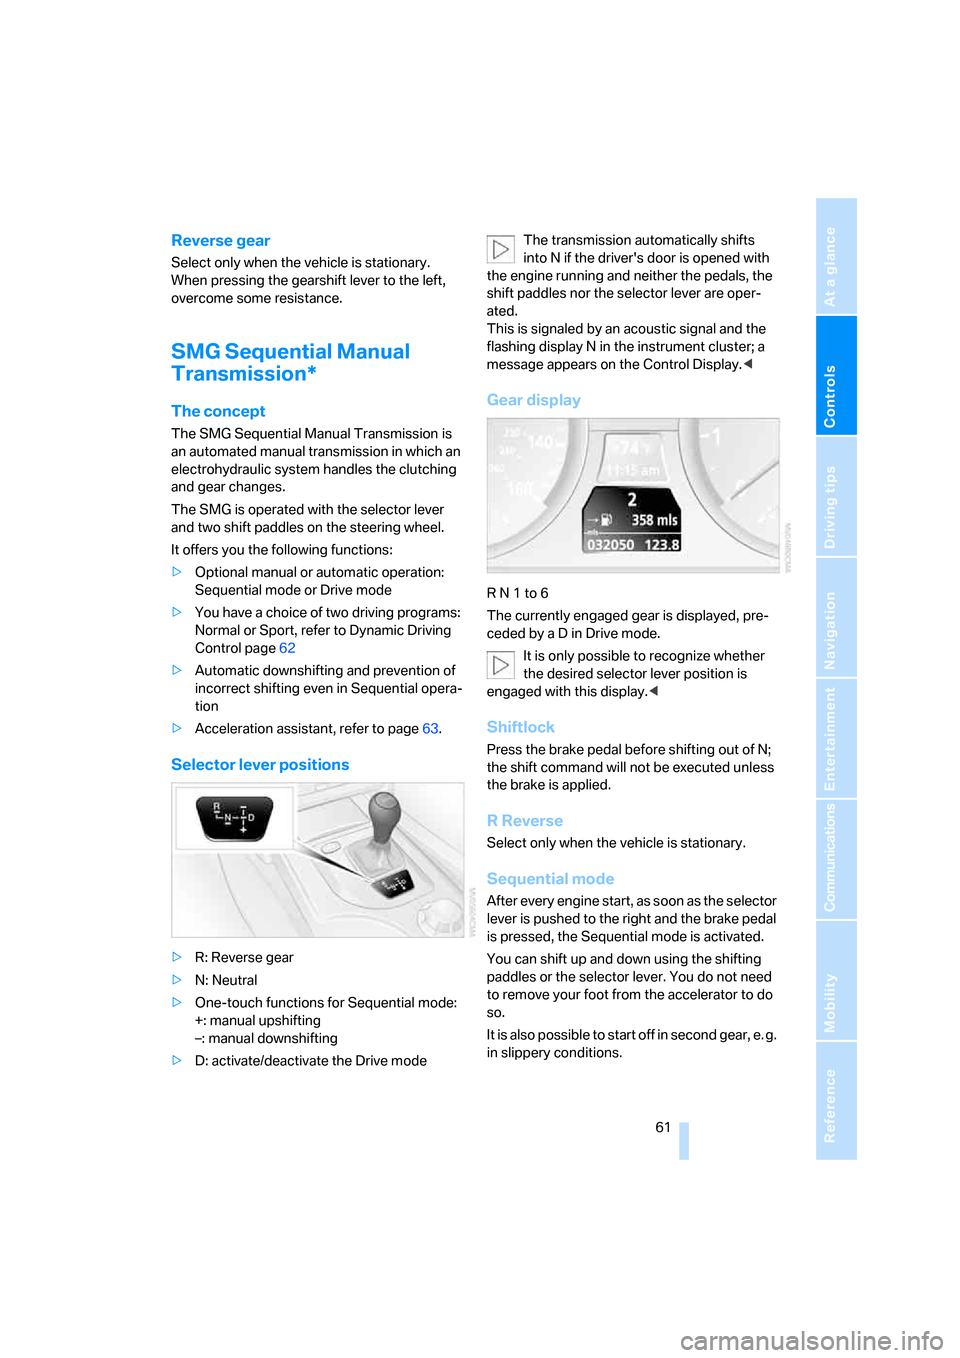
Gear display
R N 1 to 6
The currently engaged gear is displayed, pre-
ceded by a D in Drive mode.
It is only possible to recognize whether
the desired selector lever position is
engaged with this display.<
Shiftlock
Press the brake pedal before shifting out of N;
the shift command will not be executed unless
the brake is applied.
R Reverse
Select only when the vehicle is stationary.
Sequential mode
After every engine start, as soon as the selector
lever is pushed to the right and the brake pedal
is pressed, the Sequential mode is activated.
You can shift up and down using the shifting
paddles or the selector lever. You do not need
to remove your foot from the accelerator to do
so.
It is also possible to start off in second gear, e. g.
in slippery conditions.
Page 64 of 259

Driving
62 In the following situations, SMG thinks for you:
>Upshifts and downshifts are executed only
when they will result in a plausible combina-
tion of engine and vehicle speed; thus, for
example, a downshift that would cause the
engine to overrev will not be executed by
the system.
>When the vehicle is stationary, the trans-
mission automatically downshifts into first
gear.
>Shortly before dropping below a gear-
dependent minimum speed, the transmis-
sion downshifts automatically even without
your intervention.
D Drive mode
In the Drive mode, all forward gears are shifted
automatically.
Shifting from Sequential mode to Drive mode:
press selector lever to the right toward D.
Kick-down: for rapid acceleration, e. g. when
passing, press the accelerator pedal as far
down as it will go. You achieve maximum accel-
eration.
To switch back into the Sequential mode: press
selector lever to the right again toward D or shift
using the shifting paddles or the selector lever.
Start off quickly on slopes. Do not hold
the vehicle on a hill by pressing the accel-
erator, but apply the handbrake instead. Other-
wise overheating can occur in the transmission
region.<
Gear changes
Using selector lever
>To upshift, pull the selector lever back.
>To downshift, push the selector lever for-
ward.
Using shift paddles on steering wheel
>To upshift, pull one of the shift paddles.
>To downshift, press.
Dynamic Driving Control
The Dynamic Driving Control makes it possible
for your BMW to react in an even more perfor-
mance-oriented manner at the push of a button:
>The engine responds more spontaneously
to accelerator pedal movements.
>Gearshifts are faster.
>The engine speed range is used optimally in
the Drive mode.
>Cruise control
*:
The stored speed is reached more quickly
when it is requested.
Activating system
Press the SPORT button.
The LED in the button lights up and SPORT is
displayed in the instrument cluster.
Deactivating system
Press the SPORT button again.
The LED in the button and SPORT in the instru-
ment cluster go out.