2006 BMW 530I SEDAN Active steering
[x] Cancel search: Active steeringPage 94 of 259

Technology for comfort, convenience and safety
92
All wheels are yellow
Flat tire or a major drop in inflation pressure in
several tires. A message appears on the Control
Display.
Gray
The system cannot detect a flat tire.
Reasons for this can be:
>TPM is being reset
>Temporary interference due to systems or
devices which use the same radio fre-
quency
>Malfunction
Resetting system
Reset the system again after each correc-
tion of the tire inflation pressure and after
every tire or wheel change.<
Resetting finishes during driving, which can be
interrupted at any time. When driving resumes,
resetting is continued automatically. Do not
reset the system when driving with a compact
wheel
*.
iDrive, for explanation of principle, refer to
page16.
1.Press the button.
This opens the start menu.
2.Press the controller to open the menu.
3.Select "Vehicle settings" and press the
controller.
4.Select "TPM" and press the controller.
5.Start the engine, but do not start driving.
6.Select "Reset" and press the controller.7.Select "Yes" and press the controller.
8.Start to drive.
The tires are shown in gray and
"Resetting TPM..." is displayed.
After a few minutes of driving, the set tire infla-
tion pressures in the tires are applied as the set
values to be monitored. Resetting finishes dur-
ing driving. The tires are shown in gray on the
Control Display and "Status: TPM active" is dis-
played again.
If a flat tire is detected during resetting
and applying the tire inflation pressures,
all tires are shown in yellow on the Control Dis-
play. The message "Tire low!" is displayed.<
Message with low tire inflation
pressure
The warning lamp lights up yellow. A
message appears on the Control Dis-
play. In addition, an acoustic signal
sounds. There is a flat tire or extensive inflation
pressure loss.
1.Reduce speed and stop the vehicle care-
fully. Avoid sudden braking and steering
maneuvers.
2.Check whether your vehicle is equipped
with standard tires or run-flat tires.
You will recognize run-flat tires by a
circular symbol containing the letters
RSC on the side of the tire, refer to
page201.<
Page 95 of 259

Controls
93Reference
At a glance
Driving tips
Communications
Navigation
Entertainment
Mobility
Standard tires
1.If all four wheels are shown in yellow, iden-
tify the damaged tire on the vehicle.
2.Replace the damaged wheel or wheels,
refer to Changing wheels on page215.
In contrast to a compact wheel, a spare wheel is
equipped with the necessary TPM electronics
and also monitored after mounting and after
resetting the system.
Have the tire replaced by a BMW center or a
workshop informed on handling TPM which
works according to BMW repair procedures
with correspondingly trained personnel.
Run-flat tires*
1.Cautiously reduce speed to below 50 mph/
80 km/h. Avoid sudden braking and steer-
ing maneuvers. Do not exceed a speed of
50 mph/80 km/h.
If the vehicle is not equipped with run-
flat tires, refer to page201, do not
continue driving. Continuing to drive with a
flat tire could cause severe accidents.<
2.In the event of complete tire pressure loss,
0 psi/0 kPa, you can estimate the possible
distance for continued driving on the basis
of the following guide values:
>With a light load:
1 to 2 persons without luggage:
approx. 155 miles/250 km
>With a medium load:
2 persons, luggage compartment or
cargo area full, or 4 persons without
luggage:
approx. 95 miles/150 km
>With a full load:
from 4 persons, luggage compartment
or cargo area full:
approx. 30 miles/50 km
Drive reservedly and do not exceed a
speed of 50 mph/80 km/h. In the event of
pressure loss, vehicle handling changes. This
includes reduced tracking stability in braking,
extended braking distance and altered natural
steering characteristics.
If unusual vibrations or loud noises occur while the vehicle is being driven, this can indicate final
failure of the damaged tire. Reduce speed and
stop at a suitable location as soon as possible,
otherwise pieces of the tire could become
detached and cause an accident. Do not con-
tinue driving, but instead contact your BMW
center.<
Malfunction
The yellow warning light flashes and
then lights up continuously. The tires
are shown in gray on the Control Dis-
play and a message is displayed. No flat tire can
be detected.
A message like this is displayed in the following
situations:
>In case of a malfunction;
have the system checked.
>If a wheels is mounted without TPM elec-
tronics
>If TPM is temporarily interfered with by
other systems or devices which use the
same radio frequency.
Active steering*
The concept
The active steering is a system that actively var-
ies the steering angle of the front wheels in rela-
tion to the steering wheel movements.
When you are driving in the low road speed
range, e. g. in a town or when parking, the steer-
ing angle increases, i.e. the steering becomes
very direct. In the higher speed range, on the
other hand, the steering angle is reduced more
and more. This improves the handling capability
of your BMW over the entire speed range.
In critical situations, the system can make tar-
geted corrections to the steering angle pro-
vided by the driver and thus stabilize the vehicle
before the driver intervenes. This stabilizing
intervention is simultaneously deactivated
when DSC is switched off, refer to page87.
Page 96 of 259

Technology for comfort, convenience and safety
94
Malfunction
The warning lamp lights up yellow and
a message is shown on the Control Dis-
play. The active steering is no longer
operational. At low speeds, greater steering
wheel movements are required, whereas at
higher speeds, the vehicle reacts more sen-
sitively to steering wheel movements. The
stability-promoting intervention can also be
deactivated. Proceed cautiously and drive
defensively. Have the system checked.
Brake force display
Left-hand picture: normal braking.
Right-hand picture: heavy braking.
Airbags
The following airbags are located under the
marked covers:
1Front airbags
2Head airbags
3Side airbags in front and rear
Protective action
To ensure that the safety systems con-
tinue to provide optimized protection,
please observe the adjustment instructions on
page45.<
The front airbags help protect the driver and
front passenger by responding to frontal
impacts in which safety belts alone cannot pro-
vide adequate restraint. When needed, the
head and side airbags help provide protection in
the event of side impact. The relevant side air-
bag supports the side upper body area. The
head air bag supports the head.The airbags are deliberately not triggered in
every impact situation, e. g. less severe acci-
dents or rear-end collisions.
Do not apply adhesive materials to the
cover panels of the airbags, cover them or
modify them in any other way. Do not attempt to
remove the airbag retention system from the
vehicle. Do not modify or tamper with either the
wiring or the individual components in the air-
bag system. This category includes the uphol-
stery in the center of the steering wheel, on the
instrument panel, the doors and the roof pillars
along with the sides of the headliner. Do not
attempt to remove or dismantle the steering
wheel. Do not touch the individual components
immediately after the system has been trig-
gered, because there is a danger of burns.
In the event of malfunctions, deactivation, or
triggering of the airbag restraint system, have
the testing, repair, removal, and disposal of air-
bag generators executed only by a BMW center
Page 104 of 259

Lamps
102 4.Select "Lighting" and press the controller.
5.Select "Pathway lighting" and press the
controller.
6.Turn the controller to select the desired
duration.
7.Press the controller to apply the setting.
Daytime running lamps*
If desired, the light switch can remain in posi-
tion0, 1 or 3.
In position0 and 3 the exterior lighting is auto-
matically switched off after the vehicle is
switched off. In position1 the parking lamps
light up after the ignition is switched off.
Switch on the parking lamps if required as
described under Parking lamps.
Adaptive Head Light*
The concept
Adaptive Head Light is a variable headlamp
control system that enables better illumination
of the road surface. Depending on the steering
angle and other parameters, the light from the
headlamp follows the course of the road.
Activating Adaptive Head Light
In switch position3, the Adaptive Head Light is
active and the automatic headlamp control
is
switched on, refer to page101.
To avoid dazzling oncoming traffic, the Adap-
tive Head Light is not active when driving in
reverse and points toward the passenger side
when the vehicle is stopped.
Malfunction
The LED next to the symbol for automatic head-
lamp control flashes. Adaptive Head Light is
malfunctioning or has failed. Have the system
checked as soon as possible.
High beams/
roadside parking lamps
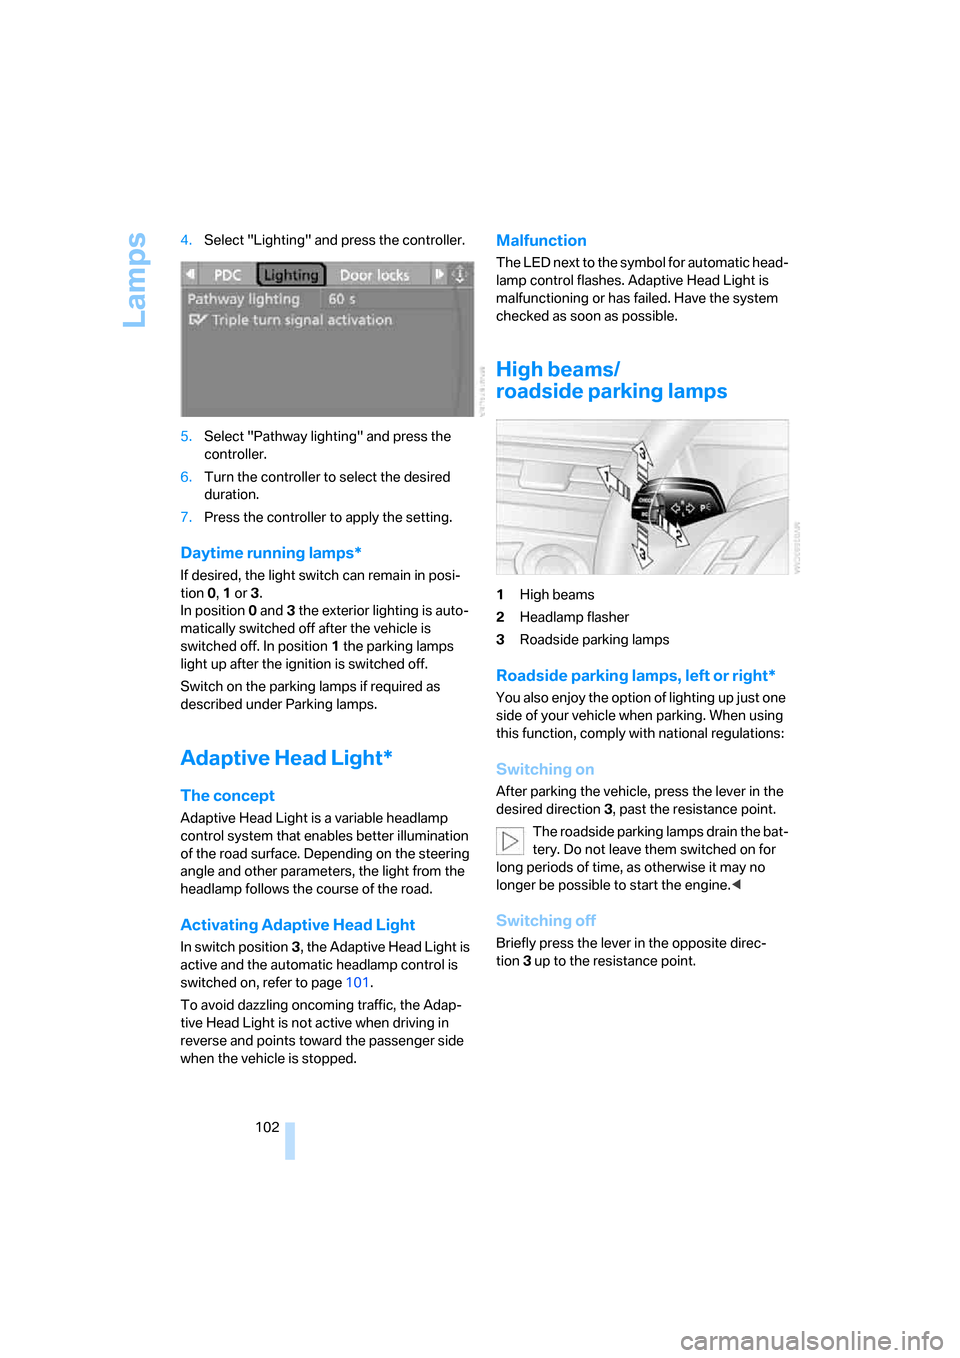
1High beams
2Headlamp flasher
3Roadside parking lamps
Roadside parking lamps, left or right*
You also enjoy the option of lighting up just one
side of your vehicle when parking. When using
this function, comply with national regulations:
Switching on
After parking the vehicle, press the lever in the
desired direction3, past the resistance point.
The roadside parking lamps drain the bat-
tery. Do not leave them switched on for
long periods of time, as otherwise it may no
longer be possible to start the engine.<
Switching off
Briefly press the lever in the opposite direc-
tion 3 up to the resistance point.
Page 127 of 259

Driving tips
125Reference
At a glance
Controls
Communications
Navigation
Entertainment
Mobility
Mobile communications devices in
vehicle
BMW discourages the use of mobile
communications devices, e. g. mobile
phones, inside the vehicle without a direct con-
nection to an outside antenna. Otherwise, the
vehicle electronics and mobile communication
device can influence one another. In addition,
there is no assurance that the radiation which
results from transmission will be dissipated
from the vehicle interior.<
Interior and exterior mirrors,
automatic dimming feature*
This feature is controlled by two photocells in
the inside rearview mirror. One is integrated into
the glass of the mirror, while the other is located
at an offset position on the rear of the mirror
housing.
For trouble-free operation, keep the photocells
clean and do not cover the area between the
interior rearview mirror and the windshield. Do
not attach stickers of any kind to the windshield
in front of the mirror, either.
Hydroplaning
When driving on wet or slushy roads,
reduce road speed. If you do not, a wedge
of water can form between tires and road sur-
face. This phenomenon is referred to as hydro-
planing, and is characterized by a partial or
complete loss of contact between the tires and
the road surface, ultimately undermining your
ability to steer and brake the vehicle.<
The risk of hydroplaning increases as the tread
depth of the tires decreases, refer also to Mini-
mum tire tread on page201.
Driving through water
Do not drive through water on the road if it
is deeper than 1 ft/30 cm, and then only at
walking speed at the most. Otherwise, the vehi-
cle's engine, the electrical systems and the
transmission may be damaged.<
Using handbrake on inclines
On inclines, do not hold the vehicle with
the clutch; use the handbrake. Otherwise
greater clutch wear will result.<
SMG Sequential Manual Transmission
Start off quickly on slopes. Do not hold
the vehicle on a hill by pressing the accel-
erator, but apply the handbrake instead. Other-
wise overheating can occur in the transmission
region.<
Starting assistant
The starting assistant enables you to start off
conveniently on slopes. The parking brake is
not required for this purpose.
1.Hold the vehicle with the footbrake.
2.Release the footbrake and immediately
drive off quickly.
The starting assistant holds the vehicle
for approx. 2 seconds after releasing the
footbrake. Depending on the load, the vehicle
may also roll back slightly during this time.
After releasing the footbrake, immediately start
quickly, otherwise the starting assistant no
longer holds the vehicle after approx. 2 seconds
and it begins to roll back.<
Braking safely
Your BMW is equipped with ABS as a standard
feature. In situations that require it, it is best to
brake with full force. Since the vehicle maintains
steering responsiveness, you can still avoid
possible obstacles with a minimum of steering
effort.
Pulsation of the brake pedal, combined with
sounds from the hydraulic circuits, indicate that
ABS is in its active mode.
Page 180 of 259

Telephoning
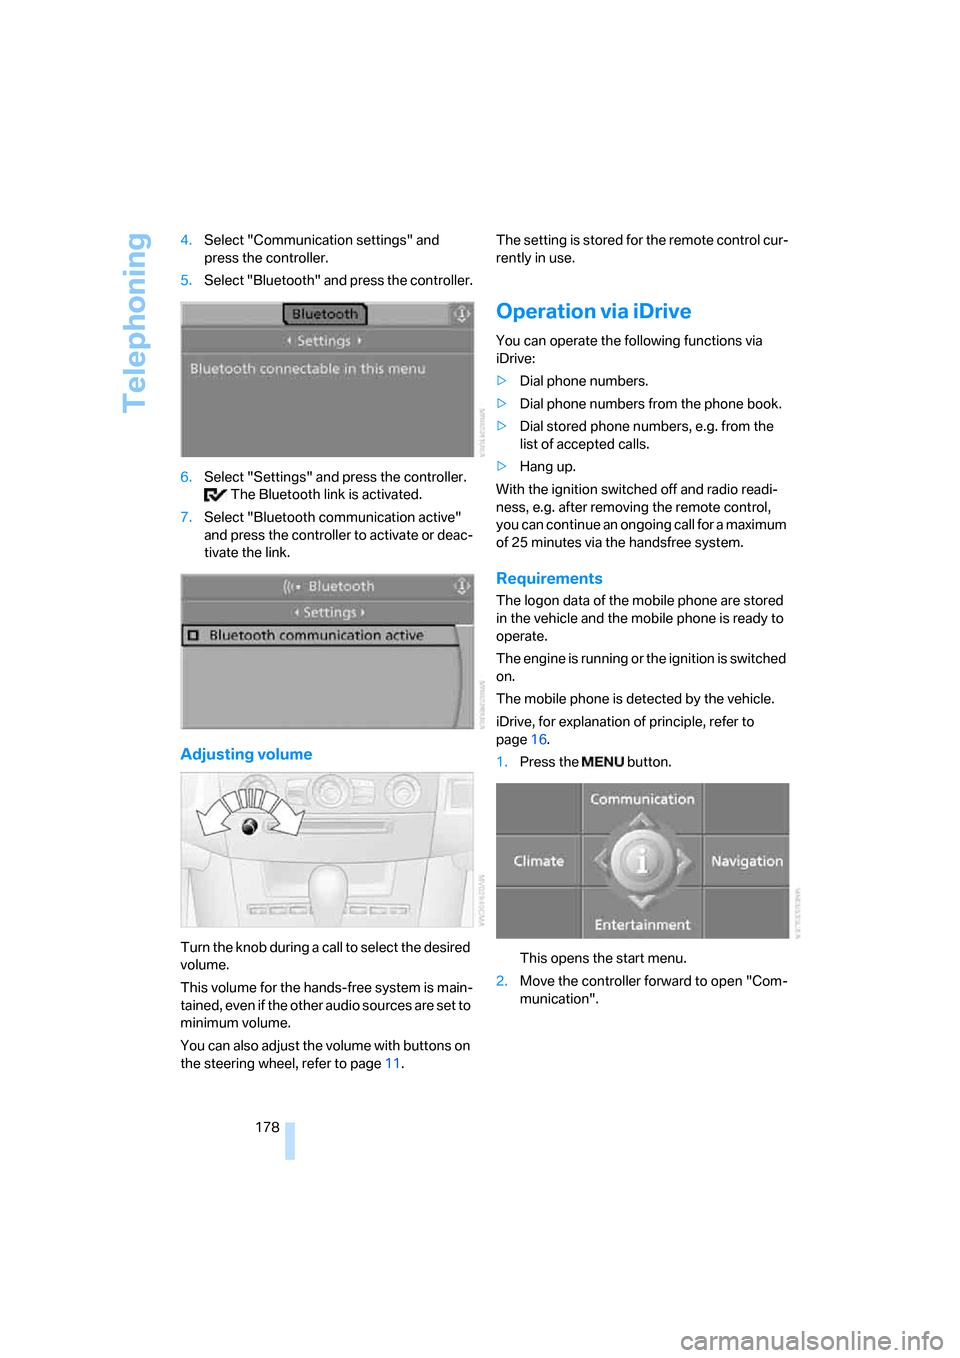
178 4.Select "Communication settings" and
press the controller.
5.Select "Bluetooth" and press the controller.
6.Select "Settings" and press the controller.
The Bluetooth link is activated.
7.Select "Bluetooth communication active"
and press the controller to activate or deac-
tivate the link.
Adjusting volume
Turn the knob during a call to select the desired
volume.
This volume for the hands-free system is main-
tained, even if the other audio sources are set to
minimum volume.
You can also adjust the volume with buttons on
the steering wheel, refer to page11.The setting is stored for the remote control cur-
rently in use.
Operation via iDrive
You can operate the following functions via
iDrive:
>Dial phone numbers.
>Dial phone numbers from the phone book.
>Dial stored phone numbers, e.g. from the
list of accepted calls.
>Hang up.
With the ignition switched off and radio readi-
ness, e.g. after removing the remote control,
you can continue an ongoing call for a maximum
of 25 minutes via the handsfree system.
Requirements
The logon data of the mobile phone are stored
in the vehicle and the mobile phone is ready to
operate.
The engine is running or the ignition is switched
on.
The mobile phone is detected by the vehicle.
iDrive, for explanation of principle, refer to
page16.
1.Press the button.
This opens the start menu.
2.Move the controller forward to open "Com-
munication".
Page 224 of 259

Giving and receiving assistance
222 Sedan:
It is located in the toolkit in the luggage com-
partment lid, refer to page211.
Sports Wagon:
It is located in the toolkit behind the left side
panel in the cargo area, refer to page211.
Use only the tow fitting provided with the
vehicle and screw it all the way in. Use the
tow fitting for towing only on roads. Avoid lateral
loading of the tow fitting, e.g. do not lift the vehi-
cle by the tow fitting. Otherwise damage to the
tow fitting and the vehicle can occur.<
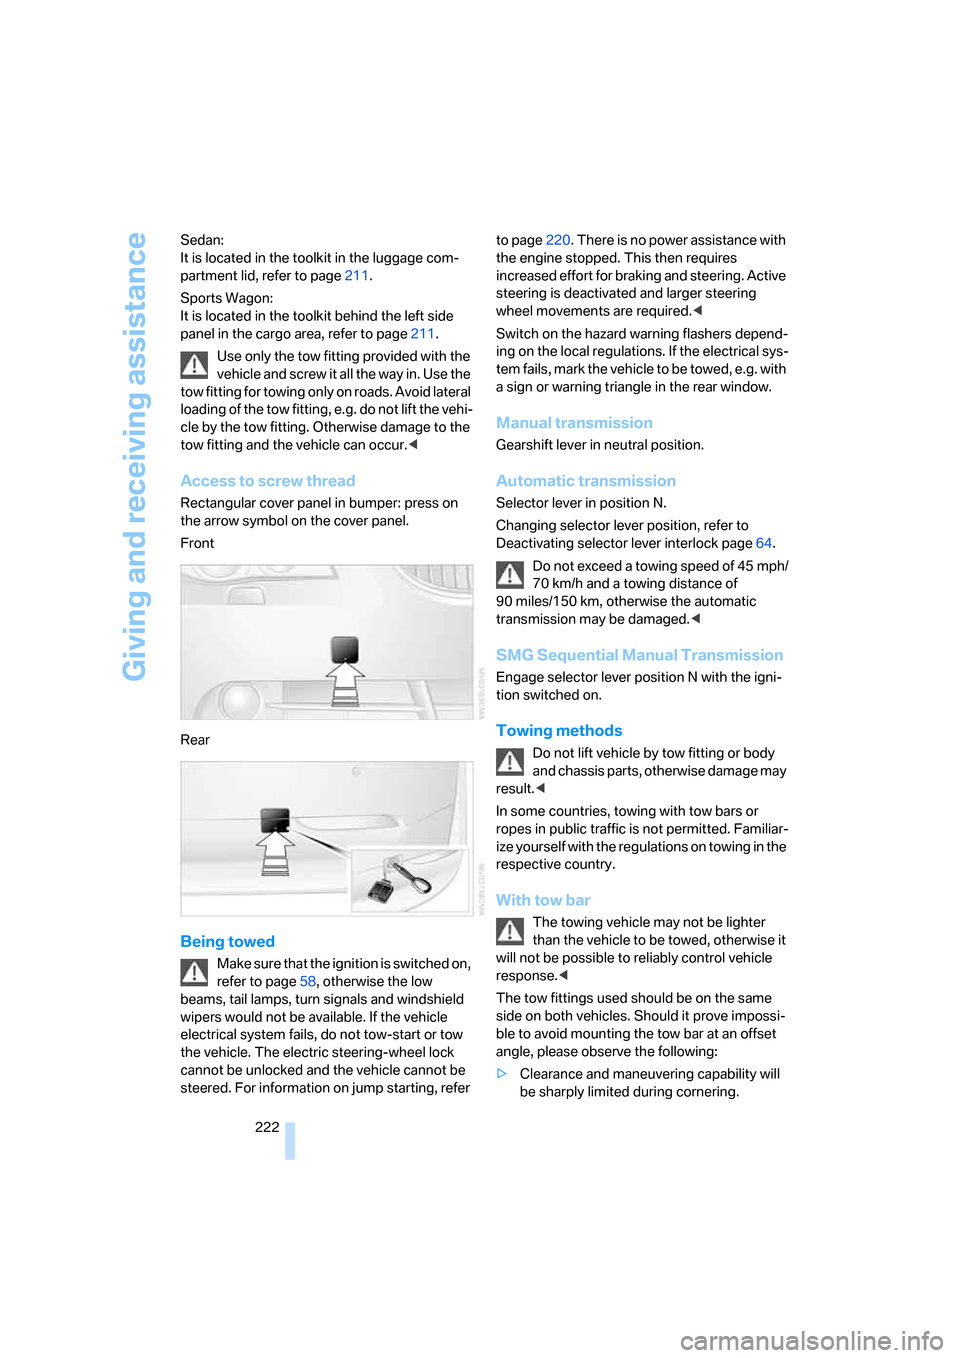
Access to screw thread
Rectangular cover panel in bumper: press on
the arrow symbol on the cover panel.
Front
Rear
Being towed
Make sure that the ignition is switched on,
refer to page58, otherwise the low
beams, tail lamps, turn signals and windshield
wipers would not be available. If the vehicle
electrical system fails, do not tow-start or tow
the vehicle. The electric steering-wheel lock
cannot be unlocked and the vehicle cannot be
steered. For information on jump starting, refer to page220. There is no power assistance with
the engine stopped. This then requires
increased effort for braking and steering. Active
steering is deactivated and larger steering
wheel movements are required.<
Switch on the hazard warning flashers depend-
ing on the local regulations. If the electrical sys-
tem fails, mark the vehicle to be towed, e.g. with
a sign or warning triangle in the rear window.
Manual transmission
Gearshift lever in neutral position.
Automatic transmission
Selector lever in position N.
Changing selector lever position, refer to
Deactivating selector lever interlock page64.
Do not exceed a towing speed of 45 mph/
70 km/h and a towing distance of
90 miles/150 km, otherwise the automatic
transmission may be damaged.<
SMG Sequential Manual Transmission
Engage selector lever position N with the igni-
tion switched on.
Towing methods
Do not lift vehicle by tow fitting or body
and chassis parts, otherwise damage may
result.<
In some countries, towing with tow bars or
ropes in public traffic is not permitted. Familiar-
ize yourself with the regulations on towing in the
respective country.
With tow bar
The towing vehicle may not be lighter
than the vehicle to be towed, otherwise it
will not be possible to reliably control vehicle
response.<
The tow fittings used should be on the same
side on both vehicles. Should it prove impossi-
ble to avoid mounting the tow bar at an offset
angle, please observe the following:
>Clearance and maneuvering capability will
be sharply limited during cornering.
Page 238 of 259

Everything from A to Z
236
Everything from A to Z
Index
"..." Identifies Control Display
texts used to select
individual functions, and
indicates where to find them
in the text.
A
ABS Antilock Brake
System86
ACC, refer to Active cruise
control67
Acceleration assistant for
SMG Sequential Manual
Transmission63
Accessories6
Acoustic signal, refer to Check
Control79
Activated-charcoal filter109
"Activation time" for parked-
car ventilation109
Active cruise control67
– indicator lamp70
– radar sensor71
– selecting distance69
– warning lamps71
Active head restraints,
front49
Active seat51
Active seat ventilation51
Active steering93
– warning lamp94
Adapter for spare key28
Adaptive brake lamps, refer to
Brake force display94
Adaptive Head Light102
"Add digits" for mobile
phone180
"Address book" for navigation
system140Address for navigation
– deleting141
– entering133,136
– selecting141
– storing140
– storing current position140
"Add to address book"140
"Add to destination list"136
Adjusting active backrest
width47
Adjusting confirmation signals
for locking and unlocking31
Adjusting the tone during
audio operation, refer to
Tone control153
Adjusting thigh support46
Adjustment in audio mode
– front-to-rear154
– right/left balance154
"After door opened"48
"After unlocking"48
Airbags94
– sitting safely45
– warning lamp96
Air circulation, refer to Air
recirculation108
Air distribution
– automatic106
– manual107
Airing, refer to Ventilation108
Air recirculation
– AUC Automatic recircu-
lated-air control108
– recirculated-air mode108
"Air recirculation on / off"53
Air vent outlets of automatic
climate control105
Air vents105
– refer to Ventilation108
Air volume107
AKI, refer to Fuel quality195Alarm system37
– avoiding unintentional
alarms38
– interior motion sensor38
– switching off alarm38
– switching off tilt alarm
sensor and interior motion
sensor38
– tilt alarm sensor38
"All channels"163
"All doors"30
All-season tires, refer to
Winter tires202
"All stations", calling up with
radio156,159
All-wheel drive, refer to
xDrive87
Alterations, technical, refer to
For your own safety5
Altering stretch of road148
"AM", reception
range152,156
Antenna for mobile phone174
Antifreeze
– coolant207
– washer fluid66
Antilock Brake System
ABS86
Anti-theft alarm system, refer
to Alarm system37
Anti-theft system, refer to
Central locking system29
Approved axle loads, refer to
Weights229
Approved engine oils206
Approved gross vehicle
weight, refer to Weights229
Armrest, refer to Center
armrest, rear116
Around the center console14
Around the steering wheel10