2006 BMW 530I ECU
[x] Cancel search: ECUPage 121 of 248
Things to remember when driving
120
Securing cargo
>Use the luggage net*, luggage straps, or
securing straps to hold down small and
lightweight luggage and cargo.
>Heavy-duty cargo straps
* for securing
larger and heavier objects are available at
your BMW center. Four lashing eyes
mounted in the luggage compartment or
cargo area are used to secure these heavy-
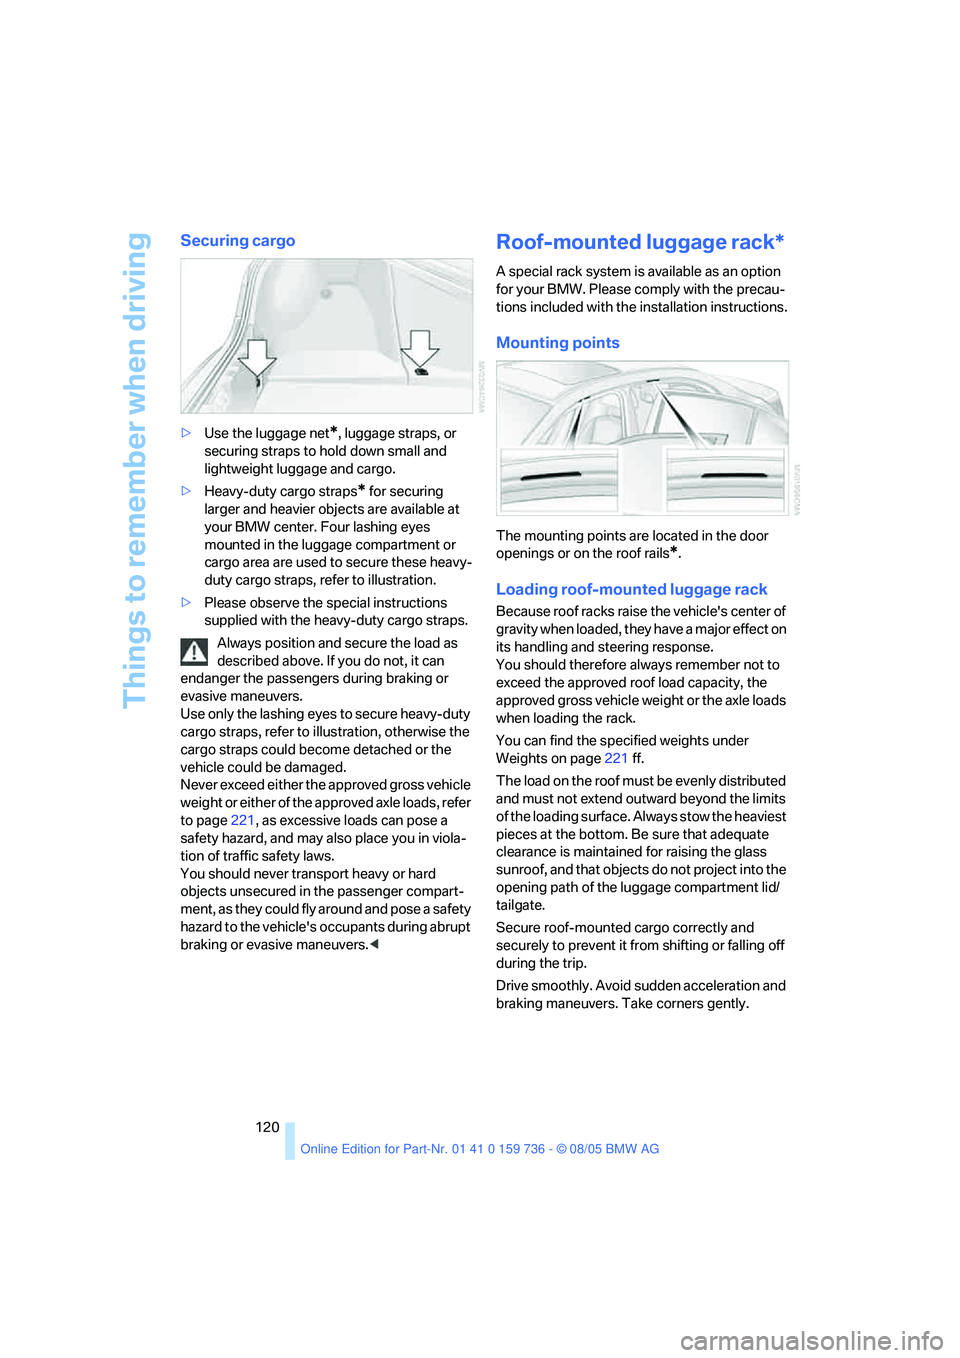
duty cargo straps, refer to illustration.
>Please observe the special instructions
supplied with the heavy-duty cargo straps.
Always position and secure the load as
described above. If you do not, it can
endanger the passengers during braking or
evasive maneuvers.
Use only the lashing eyes to secure heavy-duty
cargo straps, refer to illustration, otherwise the
cargo straps could become detached or the
vehicle could be damaged.
Never exceed either the approved gross vehicle
weight or either of the approved axle loads, refer
to page221, as excessive loads can pose a
safety hazard, and may also place you in viola-
tion of traffic safety laws.
You should never transport heavy or hard
objects unsecured in the passenger compart-
ment, as they could fly around and pose a safety
hazard to the vehicle's occupants during abrupt
braking or evasive maneuvers.<
Roof-mounted luggage rack*
A special rack system is available as an option
for your BMW. Please comply with the precau-
tions included with the installation instructions.
Mounting points
The mounting points are located in the door
openings or on the roof rails
*.
Loading roof-mounted luggage rack
Because roof racks raise the vehicle's center of
gravity when loaded, they have a major effect on
its handling and steering response.
You should therefore always remember not to
exceed the approved roof load capacity, the
approved gross vehicle weight or the axle loads
when loading the rack.
You can find the specified weights under
Weights on page221 ff.
The load on the roof must be evenly distributed
and must not extend outward beyond the limits
of the loading surface. Always stow the heaviest
pieces at the bottom. Be sure that adequate
clearance is maintained for raising the glass
sunroof, and that objects do not project into the
opening path of the luggage compartment lid/
tailgate.
Secure roof-mounted cargo correctly and
securely to prevent it from shifting or falling off
during the trip.
Drive smoothly. Avoid sudden acceleration and
braking maneuvers. Take corners gently.
Page 169 of 248
Telephoning
168
Preparation with mobile phone
6.Additional operations must be carried out
on the mobile phone and differ depending
on the model, refer to the operating instruc-
tions of your mobile phone, e.g. find, con-
nect or link under Bluetooth device.
Logging on
Depending on your mobile phone, you will first
be requested consecutively via the display of
your mobile phone or the Control Display to
enter the Bluetooth passkey you specified.
Display on the Control Display if the Bluetooth
passkey can be entered with iDrive:
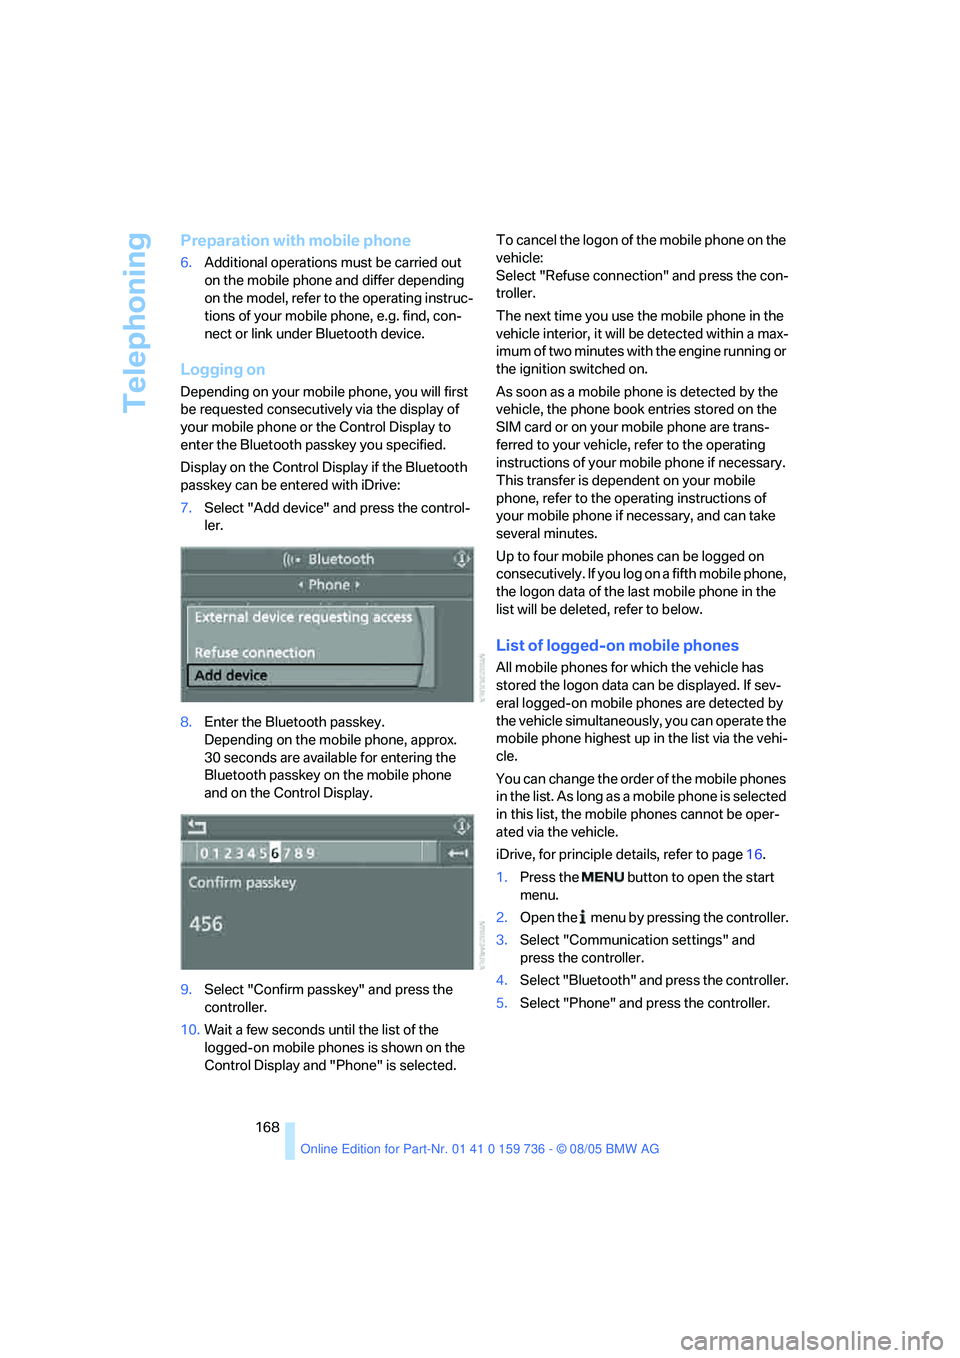
7.Select "Add device" and press the control-
ler.
8.Enter the Bluetooth passkey.
Depending on the mobile phone, approx.
30 seconds are available for entering the
Bluetooth passkey on the mobile phone
and on the Control Display.
9.Select "Confirm passkey" and press the
controller.
10.Wait a few seconds until the list of the
logged-on mobile phones is shown on the
Control Display and "Phone" is selected.To cancel the logon of the mobile phone on the
vehicle:
Select "Refuse connection" and press the con-
troller.
The next time you use the mobile phone in the
vehicle interior, it will be detected within a max-
imum of two minutes with the engine running or
the ignition switched on.
As soon as a mobile phone is detected by the
vehicle, the phone book entries stored on the
SIM card or on your mobile phone are trans-
ferred to your vehicle, refer to the operating
instructions of your mobile phone if necessary.
This transfer is dependent on your mobile
phone, refer to the operating instructions of
your mobile phone if necessary, and can take
several minutes.
Up to four mobile phones can be logged on
consecutively. If you log on a fifth mobile phone,
the logon data of the last mobile phone in the
list will be deleted, refer to below.
List of logged-on mobile phones
All mobile phones for which the vehicle has
stored the logon data can be displayed. If sev-
eral logged-on mobile phones are detected by
the vehicle simultaneously, you can operate the
mobile phone highest up in the list via the vehi-
cle.
You can change the order of the mobile phones
in the list. As long as a mobile phone is selected
in this list, the mobile phones cannot be oper-
ated via the vehicle.
iDrive, for principle details, refer to page16.
1.Press the button to open the start
menu.
2.Open the menu by pressing the controller.
3.Select "Communication settings" and
press the controller.
4.Select "Bluetooth" and press the controller.
5.Select "Phone" and press the controller.
Page 197 of 248
Under the hood
196
Under the hood
Never attempt to perform any service or
repair operations on your vehicle without
the required professional technical training.
If you do not know what repair procedures to
follow, have work on your vehicle done only by
your BMW center or a workshop that works
according to BMW repair procedures with cor-
respondingly trained personnel. If this work is
not carried out properly, there is a danger of
subsequent damage and related safety haz-
ards.<
Hood
Releasing
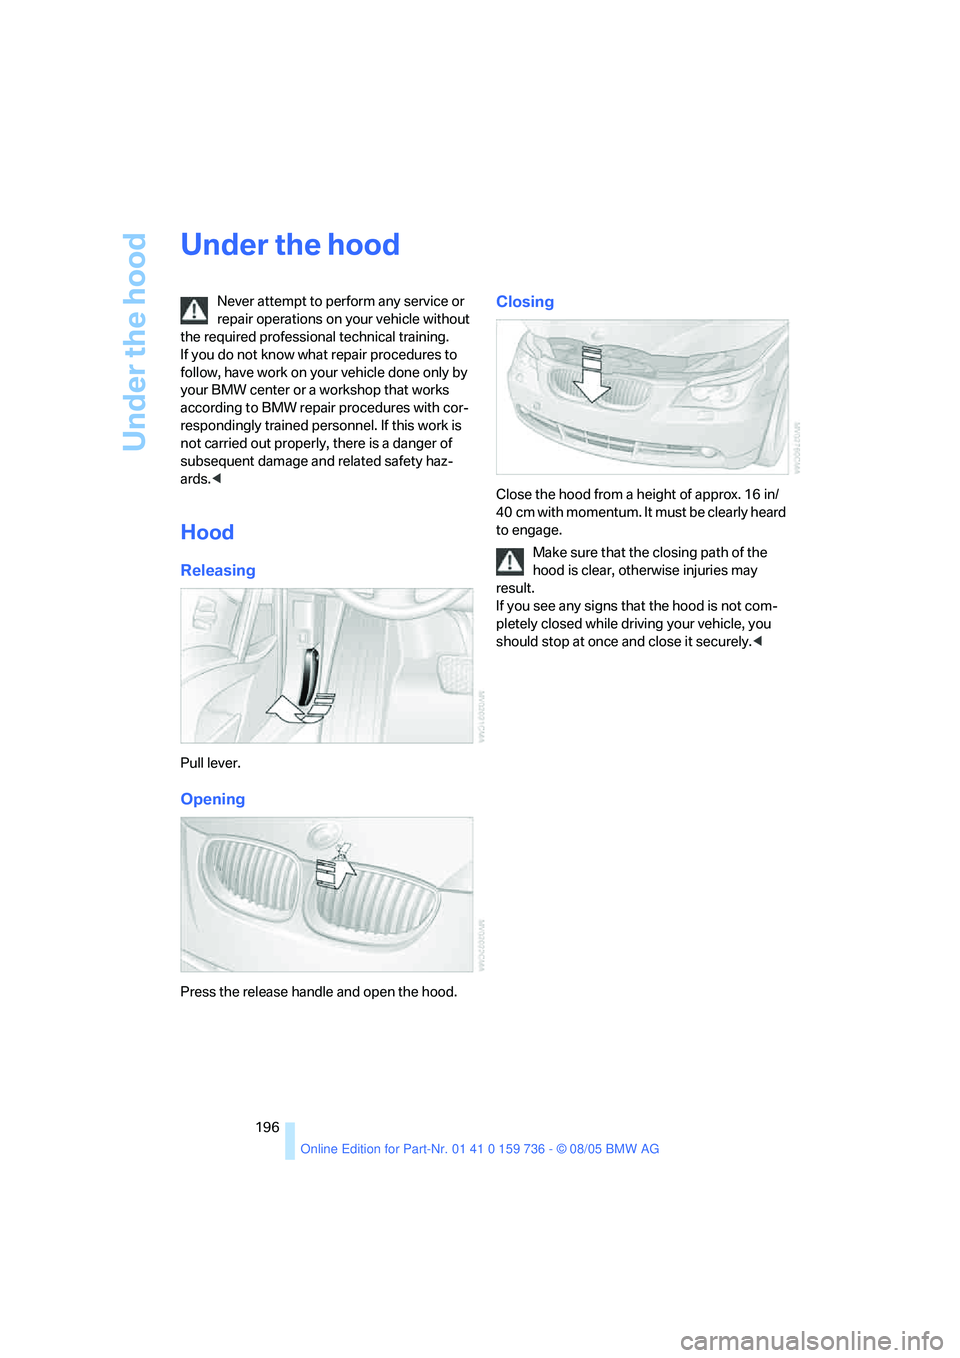
Pull lever.
Opening
Press the release handle and open the hood.
Closing
Close the hood from a height of approx. 16 in/
40 cm with momentum. It must be clearly heard
to engage.
Make sure that the closing path of the
hood is clear, otherwise injuries may
result.
If you see any signs that the hood is not com-
pletely closed while driving your vehicle, you
should stop at once and close it securely.<
Page 209 of 248
Replacing components
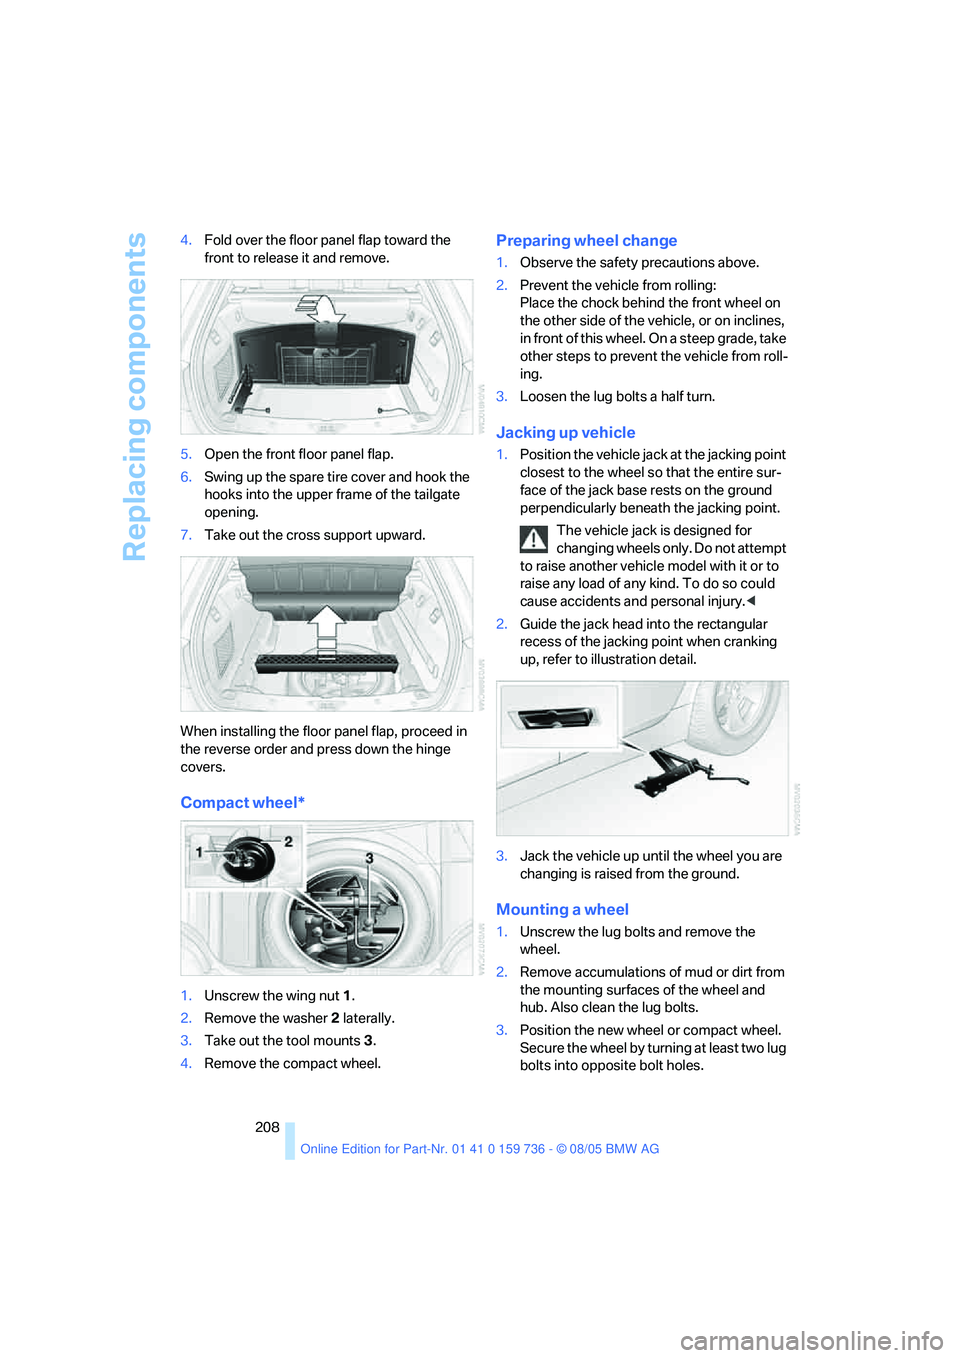
208 4.Fold over the floor panel flap toward the
front to release it and remove.
5.Open the front floor panel flap.
6.Swing up the spare tire cover and hook the
hooks into the upper frame of the tailgate
opening.
7.Take out the cross support upward.
When installing the floor panel flap, proceed in
the reverse order and press down the hinge
covers.
Compact wheel*
1.Unscrew the wing nut 1.
2.Remove the washer 2 laterally.
3.Take out the tool mounts 3.
4.Remove the compact wheel.
Preparing wheel change
1.Observe the safety precautions above.
2.Prevent the vehicle from rolling:
Place the chock behind the front wheel on
the other side of the vehicle, or on inclines,
in front of this wheel. On a steep grade, take
other steps to prevent the vehicle from roll-
ing.
3.Loosen the lug bolts a half turn.
Jacking up vehicle
1.Position the vehicle jack at the jacking point
closest to the wheel so that the entire sur-
face of the jack base rests on the ground
perpendicularly beneath the jacking point.
The vehicle jack is designed for
changing wheels only. Do not attempt
to raise another vehicle model with it or to
raise any load of any kind. To do so could
cause accidents and personal injury.<
2.Guide the jack head into the rectangular
recess of the jacking point when cranking
up, refer to illustration detail.
3.Jack the vehicle up until the wheel you are
changing is raised from the ground.
Mounting a wheel
1.Unscrew the lug bolts and remove the
wheel.
2.Remove accumulations of mud or dirt from
the mounting surfaces of the wheel and
hub. Also clean the lug bolts.
3.Position the new wheel or compact wheel.
Secure the wheel by turning at least two lug
bolts into opposite bolt holes.
Page 210 of 248
Mobility
209Reference
At a glance
Controls
Driving tips
Communications
Navigation
Entertainment
When you mount wheels other than Genu-
ine BMW light-alloy wheels, different lug
bolts may also be required.
4.Screw in the remaining lug bolts. Tighten all
the bolts securely in a diagonal pattern.
5.Lower the vehicle and remove the jack from
beneath the vehicle.
After mounting
1.Tighten the lug bolts in a diagonal pattern.
To ensure safety, always have the
lug bolts checked with a calibrated
torque wrench as soon as possible to
ensure that they are tightened to the speci-
fied torque. The tightening torque is
88.5 lb ft/120 Nm.<
2.When stowing the wheel and tools in the
vehicle, execute these steps in the reverse
order.
3.Check and correct the tire inflation pressure
at the earliest opportunity.
Protect valve stems and valve stem
seal caps against dirt and contamina-
tion. Dirt in valve stems is a frequent source
of gradual air loss.<
4.Initialize the Flat Tire Monitor, refer to
page88.
5.Replace the damaged tire as soon as possi-
ble and have the new wheel/tire balanced.
Driving with compact wheel
Drive reservedly and do not exceed a speed of
50 mph/80 km/h.
The driving characteristics change, for example
reduced track stability on braking, extended
braking distance, and altered self-steering
characteristics in the limit range. In conjunction
with winter tires, these characteristics are more
pronounced.
Only one compact wheel may be
mounted. You should re-equip with
wheels and tires of the original size as quickly as
possible.<
Vehicle battery
Battery care
The battery is 100 % maintenance-free, i.e., the
electrolyte will last for the life of the battery
when the vehicle is operated in a temperate cli-
mate. Your BMW center will be glad to advise in
all matters concerning the battery.
Charging battery
Only charge the battery in the vehicle via the
terminals in the engine compartment with the
engine off. Connections, refer to Jump starting
on page212.
Disposal
Have old batteries disposed of by your
BMW center or hand them in to a recy-
cling center. Maintain the battery in an upright
position for transport and storage. Always
restrain the battery to prevent it from tipping
over during transport.<
Power failure
After a temporary power loss, the functioning of
some equipment may be limited and require
reinitialization. Individual settings are also lost
and must be updated:
>Seat, mirror and steering wheel memory
The positions must be stored again, refer to
page45.
>Time and Date
The values must be updated, refer to
page80.
>Radio
Stations must be stored again if necessary,
refer to page150.
>Navigation system
Wait until the system starts, refer to
page141.
Page 230 of 248
Reference 229
At a glance
Controls
Driving tips
Communications
Navigation
Entertainment
Mobility
"BMW Service"181
"BMW Service settings"180
BMW website4
Bottle holder, refer to Cup
holders107
Brake Assistant, refer to DBC
Dynamic Brake Control84
Brake fluid199
– warning lamp199
Brake force display89
Brake lamps
– brake force display89
– replacing bulbs205
Brake pads200
– breaking-in116
Brake rotors118
Brakes
– ABS Antilock Brake
System84
– brake fluid199
– brake force display89
– brake pads200
– breaking-in116
– handbrake58
– warning lamps13
Brake system116,199
– brake fluid level199
– brake pads116,200
– breaking-in116
– disc brakes118
– warning lamp199
Braking
– CBC Cornering Brake
Control84
– DBC Dynamic Brake
Control84
– electronic brake-force
distribution84
– refer to Braking safely117
Braking safely117
Breakdown assistance181
Breakdown services, refer to
Roadside Assistance212
Breaking-in the clutch116
Breaking-in the
differential116
Break-in period116
"Brightness"81Brightness of Control
Display81
Button for starting engine56
Buttons on steering wheel11
C
California laws
– Event Data Recorders202
California Proposition 65
Warning5
"Call"172
Call
– accepting171
– displaying accepted173
– ending171
– in absence173
– starting171
Calling
– from phone book172
– from Top 8 list173
– redialing173
– refer to telephone owner's
manual
Can holder, refer to Cup
holders107
Capacities222
Capacity
– of cargo area221
– of luggage
compartment221
Car battery, refer to Vehicle
battery209
Car care, refer to Caring for
your vehicle brochure
Car-care products, refer to
Caring for your vehicle
brochure
"Car data"74
Care202
– refer to Caring for your
vehicle brochure
Cargo
– refer to Loading118
– securing120
– securing with ski bag110Cargo area
– capacity221
– emergency operation, refer
to Opening manually35
– increasing111
– opening/closing, refer to
Tailgate35
– opening from inside35
– opening from outside35
– opening with remote
control31
Cargo area cover, Sports
Wagon111
Caring for artificial leather,
refer to Caring for your
vehicle brochure
Caring for leather, refer to
Caring for your vehicle
brochure
Caring for light-alloy wheels,
refer to Caring for your
vehicle brochure
Caring for plastic, refer to
Caring for your vehicle
brochure
Caring for the carpet, refer to
Caring for your vehicle
brochure
Caring for the vehicle finish,
refer to Caring for your
vehicle brochure
Car key, refer to Keys/remote
control
28
Car phone166
– installation location, refer to
Center armrest106
– refer to Mobile phone166
– refer to separate Owner's
Manual
Car radio, refer to Radio148
Car wash118
– also refer to Caring for your
vehicle brochure
– with comfort access39
Catalytic converter, refer to
Hot exhaust system116
"Categories"154
CBC Cornering Brake
Control84
Page 235 of 248
Everything from A to Z
234 Grills, refer to Ventilation101
Grills of the automatic climate
control98
Gross vehicle weight, refer to
Weights221
H
Halogen lamps204
Handbrake58
– indicator lamp13,58
Hand lamp, refer to
Rechargeable flashlight106
Hands-free system, refer to
Microphone14
Hazard warning flashers15
HD, refer to High Definition
Radio152
"HDC"86
HDC Hill Descent Control86
"HDC on"86
"HDC on / off"51
Head airbags90
Headlamp control,
automatic94
Headlamp flasher62
Headlamps94
– care, refer to Caring for your
vehicle brochure
– cleaning, refer to Wiper
system63
– replacing bulbs204
Head Light, refer to Adaptive
Head Light95
Head restraints46
– front head restraints,
active47
– sitting safely43
"Head-Up Display"92,93
Head-Up Display92
Heated
– mirrors49
– rear window100
– seats48
– steering wheel50Heating98
– exterior mirrors49
– interior98
– rear window100
– residual heat101
– seats48
– steering wheel50
Heating with engine switched
off, refer to Residual
heat101
Heavy cargo, refer to Securing
cargo120
Height, refer to
Dimensions219
Height adjustment
– seats44
– steering wheel50
High-beam assistant95
High beams95
– headlamp flasher
95
– indicator lamp13
– replacing bulbs204
High Definition Radio152
Highs, refer to Tone
control145
High water, refer to Driving
through water117
Hill Descent Control HDC86
Hills118
Holder for cups107
"Home address" in
navigation134
Homepage4
Hood196
Horn10
Hot exhaust system116
"Hour memo"81
"House number" for desti-
nation entry128
Hydraulic brake assistant,
refer to DBC Dynamic Brake
Control84
Hydroplaning117
I
IBOC, refer to High Definition
Radio152
Ice, refer to Outside temper-
ature warning72
ID3 tag, refer to Information on
track159
iDrive16
– assistance window20
– automatic climate control
with expanded scope99
– changing date and time80
– changing language82
– changing menu page19
– changing settings80
– changing units of measure
and display type81
– confirming selection or
entry19
– controller16
– controls16
– displays, menus17
– selecting menu item19
– setting brightness81
– start menu17
– status information20
– symbols18
Ignition56
– switched off56
– switched on56
Ignition key, refer to Keys/
remote control28
Ignition key position 1, refer to
Radio readiness56
Ignition key position 2, refer to
Ignition on56
Ignition lock56
– starting engine with comfort
access38
Independent ventilation, refer
to Parked car ventilation102
Page 236 of 248
Reference 235
At a glance
Controls
Driving tips
Communications
Navigation
Entertainment
Mobility
Indicator/warning lamps
– active steering89
– airbags91
– brake fluid199
– brake pads200
– DSC13,85
– DTC13,85
– Flat Tire Monitor88
– fog lamps13
– safety belt warning47
Indicator and warning
lamps13
Individual air distribution100
Individually programmable
buttons on steering
wheel51
Individual settings, refer to
Personal Profile29
Inflation pressure, refer to Tire
inflation pressure188
Inflation pressure monitoring,
refer to Flat Tire Monitor87
Information
– on another location130
– on country130
– on current position130
– on destination location130
"Information" for
navigation131
"Information on
destination"132
"Initializing..."88
Initializing
– Flat Tire Monitor88
– radio, refer to Storing
stations150
– refer to Power failure209
– refer to Setting time and
date80
– seat, mirror and steering
wheel memory45
"Input map"130
Installation location
– CD changer161
– mobile phone106
– navigation drive124
Instructions for navigation
system, refer to Voice
instructions139Instrument cluster12
Instrument illumination, refer
to Instrument lighting97
Instrument lighting97
Instrument panel, refer to
Cockpit10
Instrument panel, refer to
Instrument cluster12
Integrated key28
Integrated universal remote
control
104
Interesting destination for
navigation130
"Interim time"80
Interior lamps97
– switching on with remote
control31
Interior motion sensor37
– switching off37
Interior rearview mirror50
– automatic dimming
feature117
Interlock on automatic
transmission61
Intermittent mode of the
wipers63
J
Jacking points208
Joystick, refer to iDrive16
Jumpering, refer to Jump
starting212
Jump starting212
K
Keyless-Go, refer to Comfort
access37
Keyless opening and closing,
refer to Comfort access37
Key Memory, refer to Personal
Profile29
"Keypad"174
Keys28
– key-related settings, refer to
Personal Profile29Kick-down
– automatic transmission with
Steptronic61
– SMG Sequential Manual
Gearbox60
Knock control187
L
Lamps, refer to Parking lamps/
low beams94
Lamps and bulbs203
"Languages"82
"Languages" for
navigation139
Lashing eyes, refer to
Securing cargo120
Last destinations, refer to
Destination list131
"Last seat pos."46
LATCH child-restraint fixing
system54
Length, refer to
Dimensions219
License plate lamp, replacing
bulbs206
Light-emitting diodes
LEDs206
Lighter108
Lighter socket108
"Lighting"63,94
Lighting
– instruments97
– of the vehicle, refer to
Lamps94
– refer to High-beam
assistant95
Light switch94
"Limit"79
Loading
– securing cargo120
– stowing cargo119
– vehicle118
"Lock after driving off"33
Lock buttons in the doors,
refer to Locking33