2006 BMW 525XI TOURING change time
[x] Cancel search: change timePage 138 of 259
Destination entry
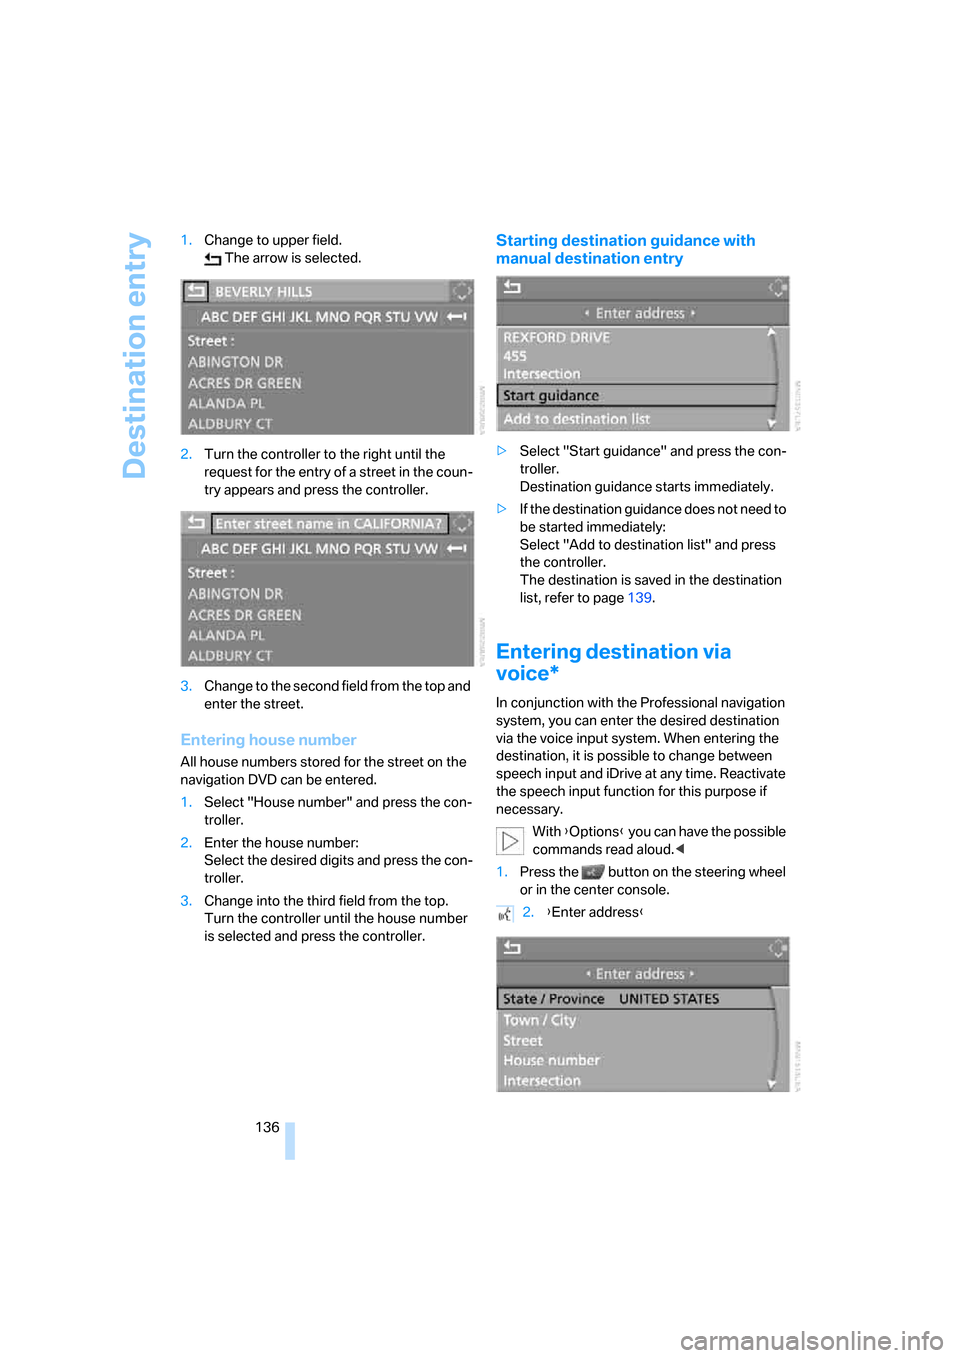
136 1.Change to upper field.
The arrow is selected.
2.Turn the controller to the right until the
request for the entry of a street in the coun-
try appears and press the controller.
3.Change to the second field from the top and
enter the street.
Entering house number
All house numbers stored for the street on the
navigation DVD can be entered.
1.Select "House number" and press the con-
troller.
2.Enter the house number:
Select the desired digits and press the con-
troller.
3.Change into the third field from the top.
Turn the controller until the house number
is selected and press the controller.
Starting destination guidance with
manual destination entry
>Select "Start guidance" and press the con-
troller.
Destination guidance starts immediately.
>If the destination guidance does not need to
be started immediately:
Select "Add to destination list" and press
the controller.
The destination is saved in the destination
list, refer to page139.
Entering destination via
voice*
In conjunction with the Professional navigation
system, you can enter the desired destination
via the voice input system. When entering the
destination, it is possible to change between
speech input and iDrive at any time. Reactivate
the speech input function for this purpose if
necessary.
With {Options} you can have the possible
commands read aloud.<
1.Press the button on the steering wheel
or in the center console.
2.{Enter address}
Page 145 of 259
Navigation
Driving tips
143Reference
At a glance
Controls
Communications
Entertainment
Mobility
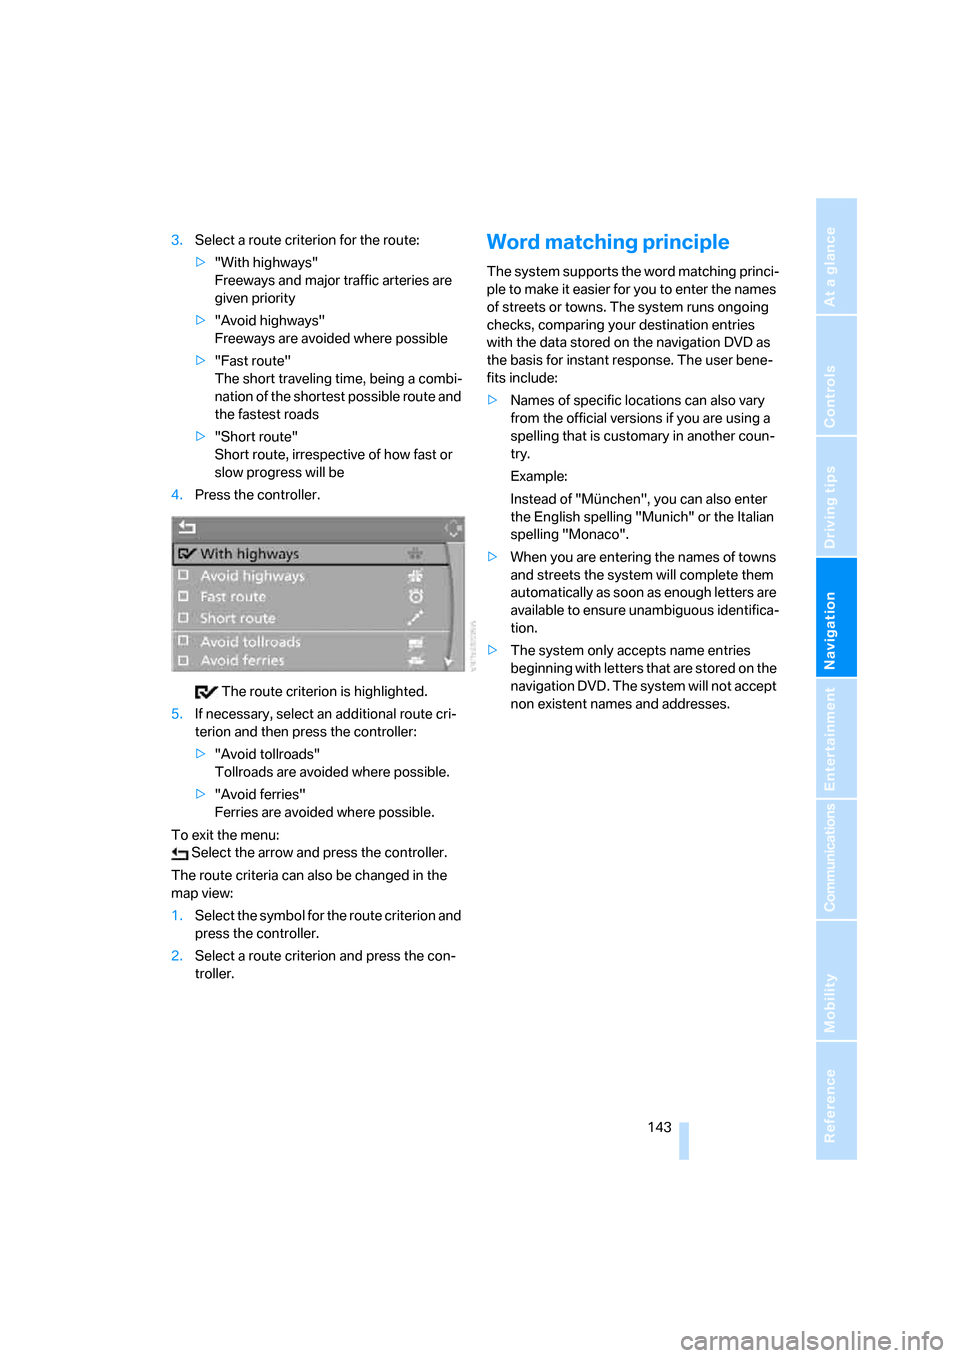
3.Select a route criterion for the route:
>"With highways"
Freeways and major traffic arteries are
given priority
>"Avoid highways"
Freeways are avoided where possible
>"Fast route"
The short traveling time, being a combi-
nation of the shortest possible route and
the fastest roads
>"Short route"
Short route, irrespective of how fast or
slow progress will be
4.Press the controller.
The route criterion is highlighted.
5.If necessary, select an additional route cri-
terion and then press the controller:
>"Avoid tollroads"
Tollroads are avoided where possible.
>"Avoid ferries"
Ferries are avoided where possible.
To exit the menu:
Select the arrow and press the controller.
The route criteria can also be changed in the
map view:
1.Select the symbol for the route criterion and
press the controller.
2.Select a route criterion and press the con-
troller.Word matching principle
The system supports the word matching princi-
ple to make it easier for you to enter the names
of streets or towns. The system runs ongoing
checks, comparing your destination entries
with the data stored on the navigation DVD as
the basis for instant response. The user bene-
fits include:
>Names of specific locations can also vary
from the official versions if you are using a
spelling that is customary in another coun-
try.
Example:
Instead of "München", you can also enter
the English spelling "Munich" or the Italian
spelling "Monaco".
>When you are entering the names of towns
and streets the system will complete them
automatically as soon as enough letters are
available to ensure unambiguous identifica-
tion.
>The system only accepts name entries
beginning with letters that are stored on the
navigation DVD. The system will not accept
non existent names and addresses.
Page 146 of 259
Destination guidance
144
Destination guidance
Starting destination
guidance
iDrive, for explanation of principle, refer to
page16.
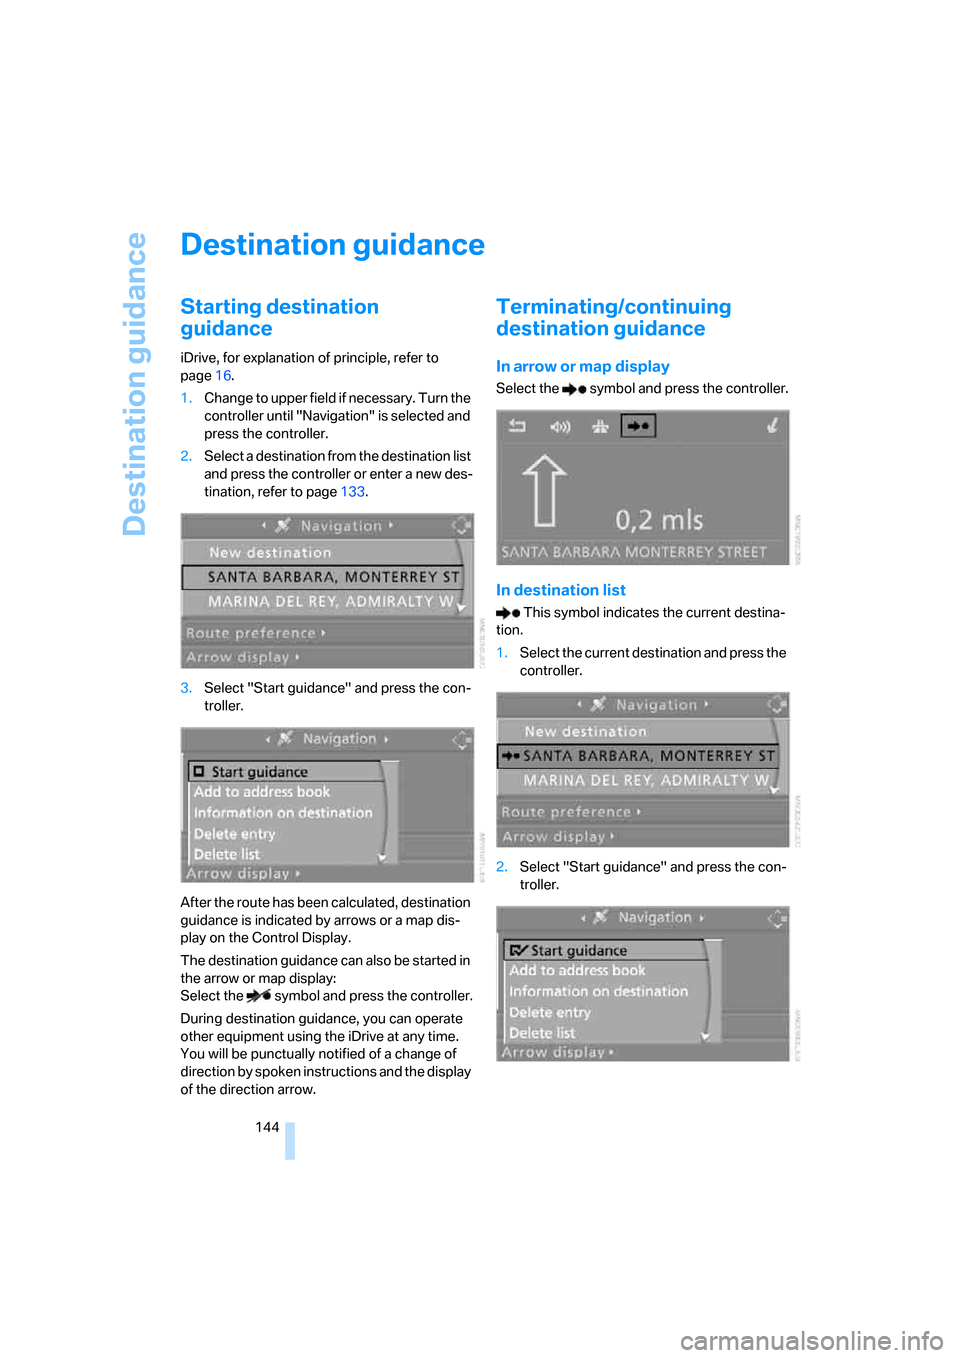
1.Change to upper field if necessary. Turn the
controller until "Navigation" is selected and
press the controller.
2.Select a destination from the destination list
and press the controller or enter a new des-
tination, refer to page133.
3.Select "Start guidance" and press the con-
troller.
After the route has been calculated, destination
guidance is indicated by arrows or a map dis-
play on the Control Display.
The destination guidance can also be started in
the arrow or map display:
Select the symbol and press the controller.
During destination guidance, you can operate
other equipment using the iDrive at any time.
You will be punctually notified of a change of
direction by spoken instructions and the display
of the direction arrow.
Terminating/continuing
destination guidance
In arrow or map display
Select the symbol and press the controller.
In destination list
This symbol indicates the current destina-
tion.
1.Select the current destination and press the
controller.
2.Select "Start guidance" and press the con-
troller.
Page 147 of 259
Navigation
Driving tips
145Reference
At a glance
Controls
Communications
Entertainment
Mobility
When you park the vehicle before reaching the
entered destination, the following the question
is displayed before beginning the next trip:
"Continue guidance to destination?".
The destination guidance starts automatically
after a short time.
To start the destination guidance:
Select "Yes" and press the controller.
Route display
You have the option of displaying various views
of the route during destination guidance.
From another menu, you can switch
directly to the screen last displayed,
refer to Comfort opening of menu items on
page18.<
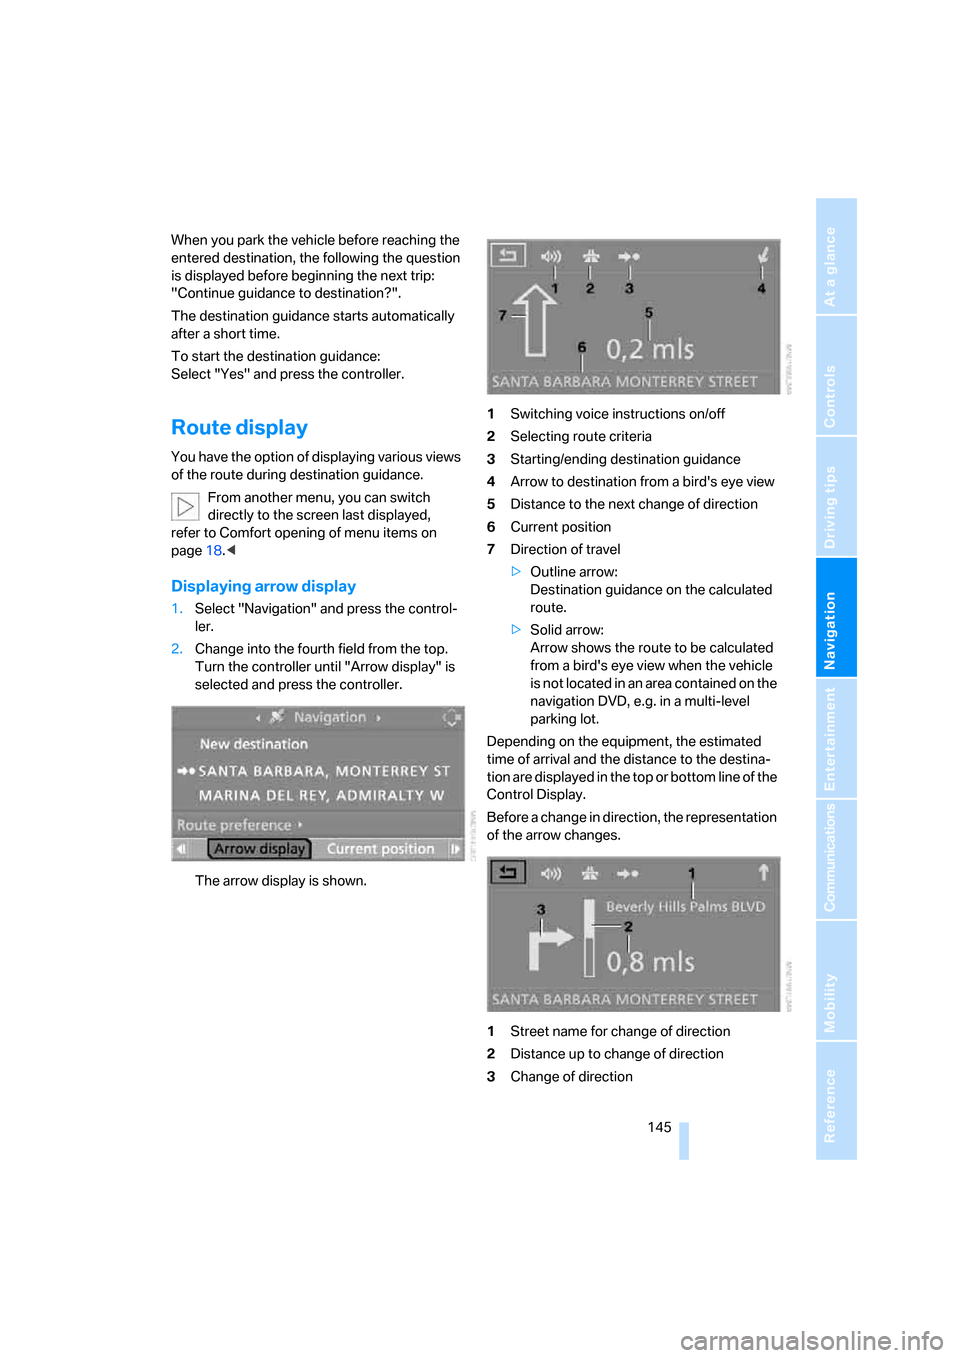
Displaying arrow display
1.Select "Navigation" and press the control-
ler.
2.Change into the fourth field from the top.
Turn the controller until "Arrow display" is
selected and press the controller.
The arrow display is shown.1Switching voice instructions on/off
2Selecting route criteria
3Starting/ending destination guidance
4Arrow to destination from a bird's eye view
5Distance to the next change of direction
6Current position
7Direction of travel
>Outline arrow:
Destination guidance on the calculated
route.
>Solid arrow:
Arrow shows the route to be calculated
from a bird's eye view when the vehicle
is not located in an area contained on the
navigation DVD, e.g. in a multi-level
parking lot.
Depending on the equipment, the estimated
time of arrival and the distance to the destina-
tion are displayed in the top or bottom line of the
Control Display.
Before a change in direction, the representation
of the arrow changes.
1Street name for change of direction
2Distance up to change of direction
3Change of direction
Page 148 of 259
Destination guidance
146 To exit the menu:
Select the arrow and press the controller.
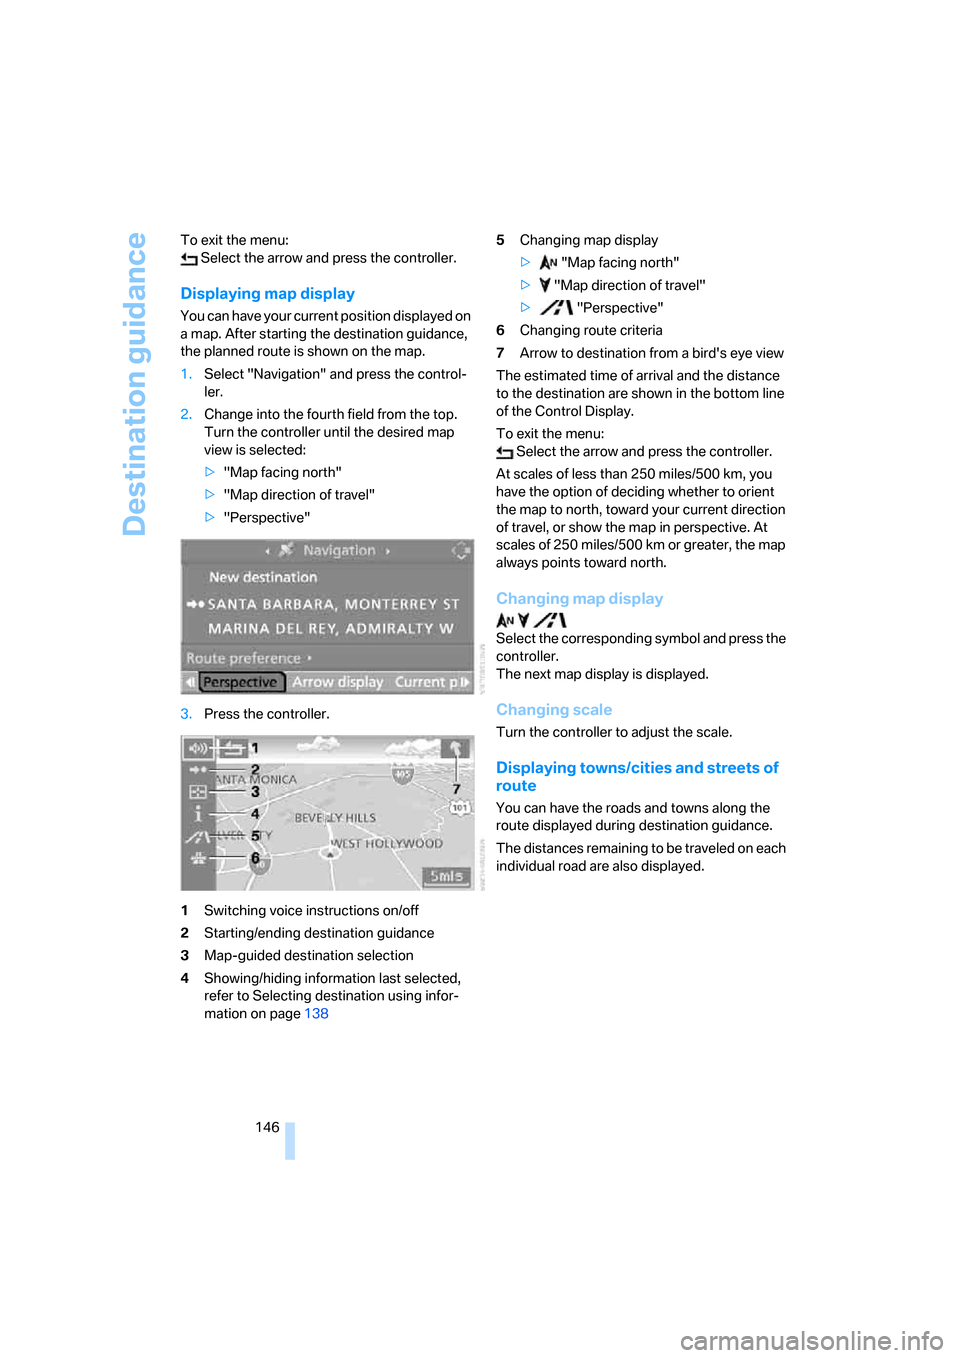
Displaying map display
You can have your current position displayed on
a map. After starting the destination guidance,
the planned route is shown on the map.
1.Select "Navigation" and press the control-
ler.
2.Change into the fourth field from the top.
Turn the controller until the desired map
view is selected:
>"Map facing north"
>"Map direction of travel"
>"Perspective"
3.Press the controller.
1Switching voice instructions on/off
2Starting/ending destination guidance
3Map-guided destination selection
4Showing/hiding information last selected,
refer to Selecting destination using infor-
mation on page1385Changing map display
> "Map facing north"
> "Map direction of travel"
> "Perspective"
6Changing route criteria
7Arrow to destination from a bird's eye view
The estimated time of arrival and the distance
to the destination are shown in the bottom line
of the Control Display.
To exit the menu:
Select the arrow and press the controller.
At scales of less than 250 miles/500 km, you
have the option of deciding whether to orient
the map to north, toward your current direction
of travel, or show the map in perspective. At
scales of 250 miles/500 km or greater, the map
always points toward north.
Changing map display
Select the corresponding symbol and press the
controller.
The next map display is displayed.
Changing scale
Turn the controller to adjust the scale.
Displaying towns/cities and streets of
route
You can have the roads and towns along the
route displayed during destination guidance.
The distances remaining to be traveled on each
individual road are also displayed.
Page 149 of 259

Navigation
Driving tips
147Reference
At a glance
Controls
Communications
Entertainment
Mobility
1.Select "Navigation" and press the control-
ler.
2.Change into the third field from the top.
Turn the controller until "Route list" is
selected and press the controller.
To exit the menu:
Select the arrow and press the controller.
Destination guidance
through voice instructions
Switching voice instructions on/off
Voice instructions can be switched on or off
during the destination guidance in the arrow or
map view:
Select the symbol and press the controller.
To switch the voice instructions on and off at
any time:
1.Open the start menu.
2.Press the controller to open the menu.
3.Turn the controller until "Display settings"
is selected and press the controller.4.Change to upper field if necessary. Turn the
controller until "Languages" is selected and
press the controller.
5.Select "Navigation voice instructions on"
and press the controller.
The voice instructions are switched on.
The setting is stored for the remote control cur-
rently in use
*.
Repeating and canceling voice
instructions
With the programmable buttons on the steering
wheel you can also make the following settings,
refer to page53:
>Repeat the voice instruction:
Press button.
>Switch voice instructions on/off:
Hold the button down.
Setting volume of voice instructions
The volume can only be adjusted while a voice
instruction is being output.
Page 160 of 259
Radio
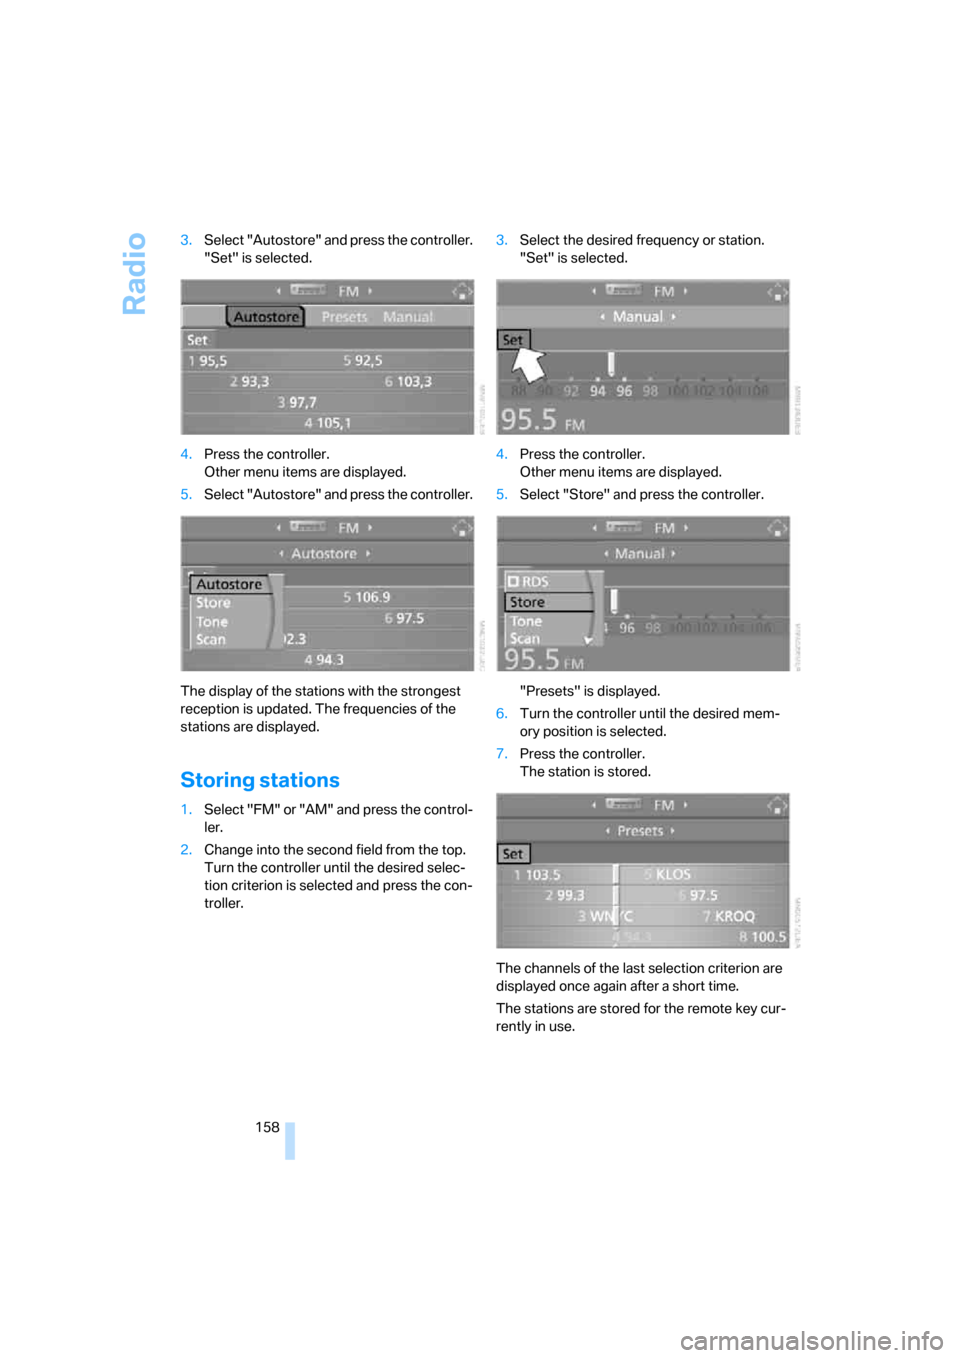
158 3.Select "Autostore" and press the controller.
"Set" is selected.
4.Press the controller.
Other menu items are displayed.
5.Select "Autostore" and press the controller.
The display of the stations with the strongest
reception is updated. The frequencies of the
stations are displayed.
Storing stations
1.Select "FM" or "AM" and press the control-
ler.
2.Change into the second field from the top.
Turn the controller until the desired selec-
tion criterion is selected and press the con-
troller.3.Select the desired frequency or station.
"Set" is selected.
4.Press the controller.
Other menu items are displayed.
5.Select "Store" and press the controller.
"Presets" is displayed.
6.Turn the controller until the desired mem-
ory position is selected.
7.Press the controller.
The station is stored.
The channels of the last selection criterion are
displayed once again after a short time.
The stations are stored for the remote key cur-
rently in use.
Page 178 of 259

Telephoning
176
Preparation with mobile phone
6.Additional operations must be carried out
on the mobile phone and differ depending
on the model, refer to the operating instruc-
tions of your mobile phone, e.g. find, con-
nect or link under Bluetooth device.
Logging on
Depending on your mobile phone, you will first
be requested consecutively via the display of
your mobile phone or the Control Display to
enter the Bluetooth passkey you specified.
Display on the Control Display if the Bluetooth
passkey can be entered with iDrive:
7.Select "Add device" and press the control-
ler.
8.Enter the Bluetooth passkey.
Depending on the mobile phone, approx.
30 seconds are available for entering the
Bluetooth passkey on the mobile phone
and on the Control Display.
9.Select "Confirm passkey" and press the
controller.
10.Wait a few seconds until the list of the
logged-on mobile phones is shown on the
Control Display and "Phone" is selected.To cancel the logon of the mobile phone on the
vehicle:
Select "Refuse connection" and press the con-
troller.
The next time you use the mobile phone in the
vehicle interior, it will be detected within a max-
imum of 2 minutes with the engine running or
the ignition switched on.
As soon as a mobile phone is detected by the
vehicle, the phone book entries stored on the
SIM card or on your mobile phone are trans-
ferred to your vehicle, refer to the operating
instructions of your mobile phone if necessary.
This transfer is dependent on your mobile
phone, refer to the operating instructions of
your mobile phone if necessary, and can take
several minutes.
Up to four mobile phones can be logged on
consecutively. If you log on a fifth mobile phone,
the logon data of the last mobile phone in the
list will be deleted, refer to below.
List of logged-on mobile phones
All mobile phones for which the vehicle has
stored the logon data can be displayed. If sev-
eral logged-on mobile phones are detected by
the vehicle simultaneously, you can operate the
mobile phone highest up in the list via the vehi-
cle.
You can change the order of the mobile phones
in the list. As long as a mobile phone is selected
in this list, the mobile phones cannot be oper-
ated via the vehicle.
iDrive, for explanation of principle, refer to
page16.
1.Press the button to open the start
menu.
2.Open the menu by pressing the controller.
3.Select "Communication settings" and
press the controller.
4.Select "Bluetooth" and press the controller.
5.Select "Phone" and press the controller.