2006 BMW 525XI audio
[x] Cancel search: audioPage 16 of 248

At a glance
15Reference
Controls
Driving tips
Communications
Navigation
Entertainment
Mobility
1Microphone for handsfree mode
for telephone
*
and for voice command system*22
2Reading lamps97
3Initiating
an emergency call211
4Interior lamps97
5Glass sunroof, electric
*40
Panorama glass sunroof
*41
6Passenger airbag status lamp91
7Control Display16
Displays for menu navigation
8Hazard warning flashers
9Central locking system32
10Automatic climate control98
11Changing
>radio station144
>track144
12Ejecting
>navigation DVD
*124
>audio CD14413Drive for navigation DVDs
*124
14Drive for audio CDs144
15Switching Entertainment sound output on/
off and adjusting volume144
17Controller16
Turn, press or move horizontally in four
directions
18Activating voice command system
*22
19Opening start menu on Control Display17
20Dynamic Driving Control
*60 Temperature setting, left/right99
Automatic air distribution and
volume99
Cooling function100
AUC Automatic recirculated-air
control101
Maximum cooling100
Residual heat mode101
Switching off automatic climate
control101
Air volume100
Defrosting windows and removing
condensation100
Rear window defroster98
16
Heated seats*48
Active seat ventilation
*49
Active backrest width
adjustment
*45
Active seat
*49
PDC Park Distance Control
*83
DTC Dynamic Traction Control85
Page 30 of 248

Controls
29Reference
At a glance
Driving tips
Communications
Navigation
Entertainment
Mobility
Remove the adapter from the holder in the
glove compartment and slide the spare key into
the adapter.
Personal Profile
The concept
You can set a number of functions of your BMW
individually according to your preferences.
Personal Profile ensures that most of these set-
tings are stored for the remote control currently
in use without you having to do anything. When
the vehicle is unlocked, the corresponding
remote control is detected and the settings
stored for it are called up and carried out.
This means you will also find your personal set-
tings when your BMW has meanwhile been
drive by another person with his/her own
remote control and settings. The individual set-
tings are stored for a maximum of four remote
controls.
Personal Profile settings
>When unlocking with the remote control,
either unlock only the driver's door or the
entire vehicle, refer to page30
>Locking the vehicle after a short time or
after starting off, refer to page32
>Assigning the programmable buttons
* on
the steering wheel, refer to page51>Settings for the display on the Control Dis-
play:
>Brightness of the Control Display, refer
to page81
>Measuring units for consumption, route/
distances, temperature, and pressure,
refer to page81
>Language on Control Display, refer to
page82
>12h/24h mode of the clock, refer to
page81
>Date format, refer to page81
>Showing optical warning for PDC Park Dis-
tance Control
*, refer to page83
>Selection and brightness of display in
Head-Up Display
*, refer to page92
>Air distribution, temperature in the upper
body area and intensity of the automatic air
conditioning system, refer to page99
>Setting voice instructions for destination
guidance in the navigation system
*, refer to
page139
In addition, the following, most recently
selected settings are recalled during unlocking:
>Positions of driver's seat, outside mirrors,
and steering wheel
*, refer to page45
>Audio sources, setting volume and tone,
refer to page145
>Radio, displaying memorized stations, refer
to page148
>Telephone, setting volume, refer to
pages170,176
Central locking system
The concept
The central locking system is ready for opera-
tion whenever the driver's door is closed. The
system simultaneously engages and releases
the locks on the following:
>Doors
>Luggage compartment lid/tailgate
>Fuel filler door
Page 52 of 248
Controls
51Reference
At a glance
Driving tips
Communications
Navigation
Entertainment
Mobility
Programmable buttons* on steering
wheel
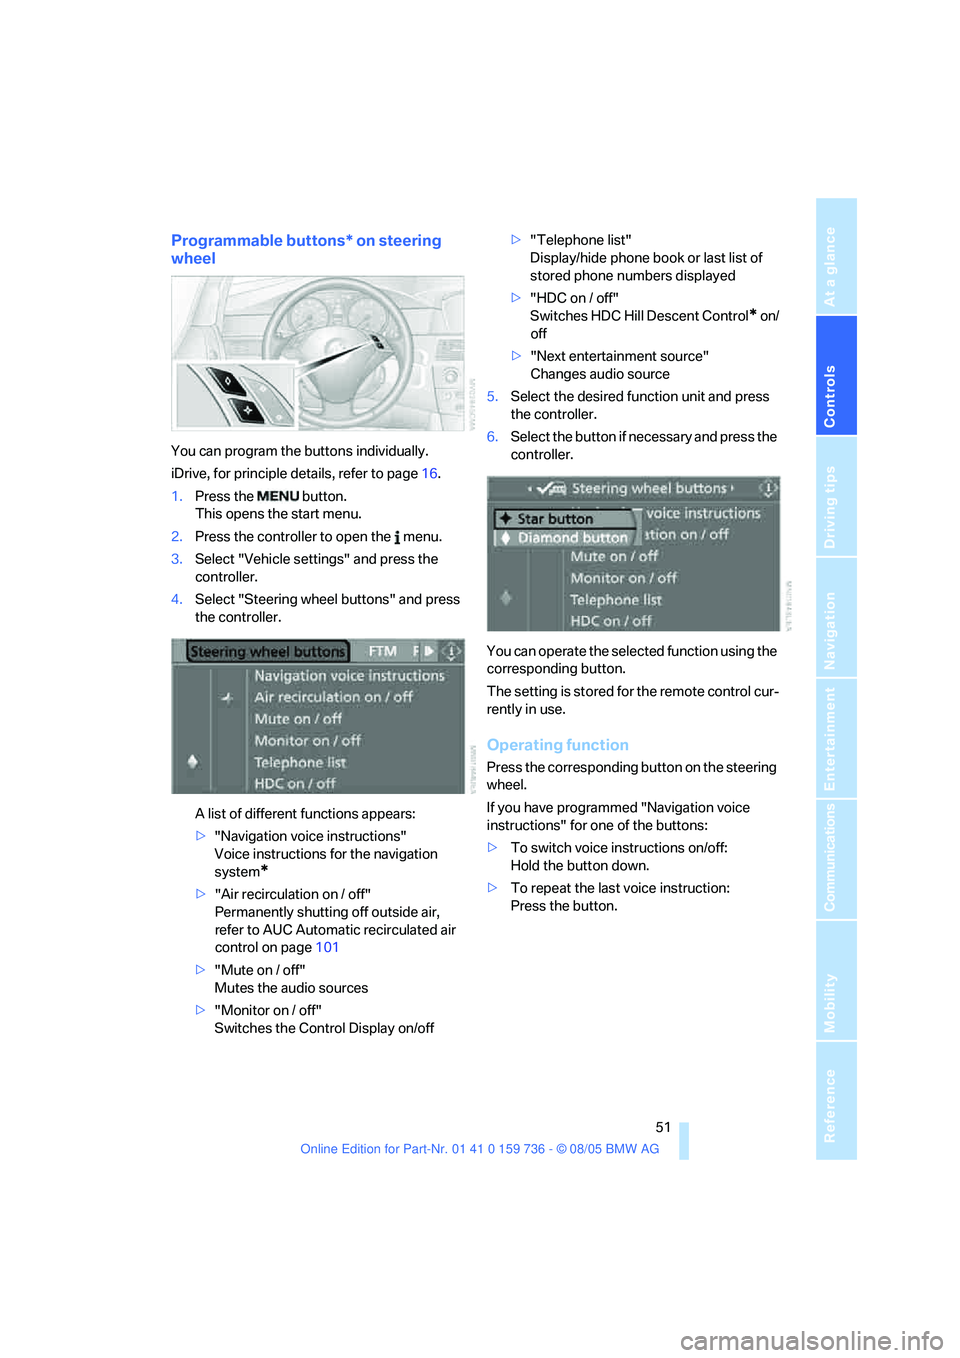
You can program the buttons individually.
iDrive, for principle details, refer to page16.
1.Press the button.
This opens the start menu.
2.Press the controller to open the menu.
3.Select "Vehicle settings" and press the
controller.
4.Select "Steering wheel buttons" and press
the controller.
A list of different functions appears:
>"Navigation voice instructions"
Voice instructions for the navigation
system
*
>"Air recirculation on / off"
Permanently shutting off outside air,
refer to AUC Automatic recirculated air
control on page101
>"Mute on / off"
Mutes the audio sources
>"Monitor on / off"
Switches the Control Display on/off>"Telephone list"
Display/hide phone book or last list of
stored phone numbers displayed
>"HDC on / off"
Switches HDC Hill Descent Control
* on/
off
>"Next entertainment source"
Changes audio source
5.Select the desired function unit and press
the controller.
6.Select the button if necessary and press the
controller.
You can operate the selected function using the
corresponding button.
The setting is stored for the remote control cur-
rently in use.
Operating function
Press the corresponding button on the steering
wheel.
If you have programmed "Navigation voice
instructions" for one of the buttons:
>To switch voice instructions on/off:
Hold the button down.
>To repeat the last voice instruction:
Press the button.
Page 141 of 248
Destination guidance
140
Setting volume of voice instructions
The volume can only be adjusted while a voice
instruction is being output.
1.Repeat the last voice instruction, if neces-
sary.
2.Turn the button during the voice instruction
to select the desired volume.
This volume is independent of the volume of the
audio sources.
The setting is stored for the remote control cur-
rently in use.
Bypassing route sections
During destination guidance, you can revise the
navigation system's route recommendations to
avoid particular stretches of road. Enter the
number of miles/kilometers that you want to
travel before returning to the original route.
1.Select "Navigation" and press the control-
ler.
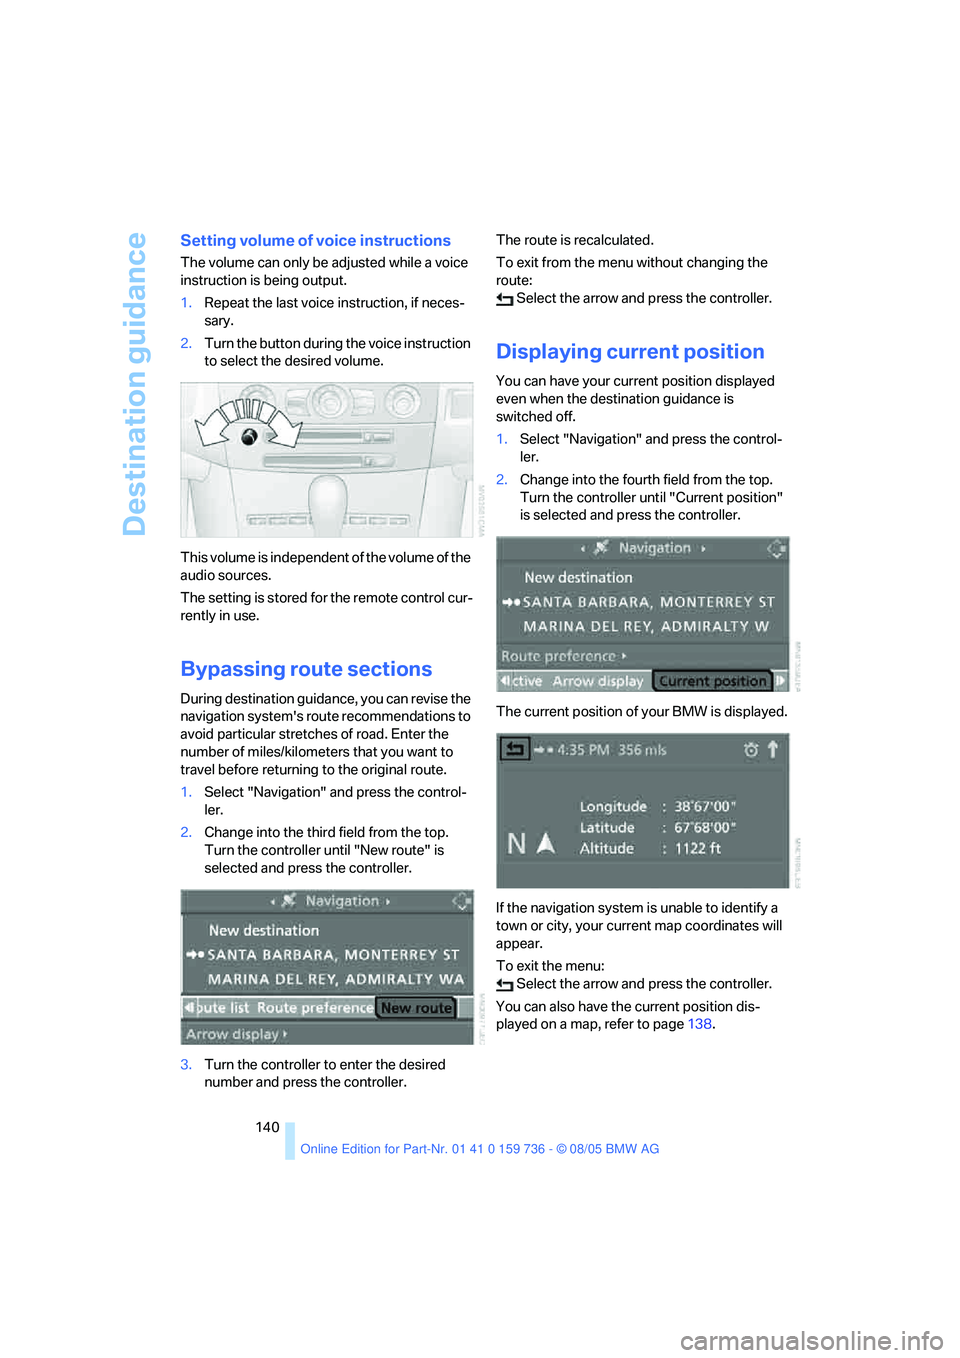
2.Change into the third field from the top.
Turn the controller until "New route" is
selected and press the controller.
3.Turn the controller to enter the desired
number and press the controller.The route is recalculated.
To exit from the menu without changing the
route:
Select the arrow and press the controller.
Displaying current position
You can have your current position displayed
even when the destination guidance is
switched off.
1.Select "Navigation" and press the control-
ler.
2.Change into the fourth field from the top.
Turn the controller until "Current position"
is selected and press the controller.
The current position of your BMW is displayed.
If the navigation system is unable to identify a
town or city, your current map coordinates will
appear.
To exit the menu:
Select the arrow and press the controller.
You can also have the current position dis-
played on a map, refer to page138.
Page 145 of 248

On/off and tone
144
On/off and tone
The following audio sources have shared
controls and setting options:
>Professional radio
* or
Business radio
>CD player
>CD changer
*
Controls
The audio sources can be operated using:
>Buttons in the area of the CD player
>iDrive
>Buttons on steering wheel, refer to page11
Buttons in area of CD player
The layout of the buttons can vary depending
on your vehicle's equipment.
Equipment with a single drive:
Equipment with two drives:1Entertainment sound output on/off, volume
>Press: switch on/off.
When you switch on, the last set radio
station or CD track is played.
>Turn: adjust volume.
2Drive for audio CDs
3 Eject CD
4 Station scan/track search
>Change radio station.
>Select track for CD player and
CD changer.
5Drive for navigation DVDs
Operation via iDrive
iDrive, for principle details, refer to page16.
1.Press the button.
This opens the start menu.
2.Move the controller backwards to open
"Entertainment".
You have the following choices:
>"FM" and "AM": radio reception
>"WB": Weather Band station
>"SAT": satellite radio
>"CD": CD player or CD changer
>"Set": depending on the audio source,
other adjustments can be made, e.g. with
the radio: update station with strongest
reception, save station, tone control,
sample stations.
Page 146 of 248
Navigation
Entertainment
Driving tips
145Reference
At a glance
Controls
Communications
Mobility
From another menu, you can switch
directly to the screen last displayed,
refer to Comfort opening of menu items on
page18.<
The selected audio source is stored for the
remote control currently in use.
Switching on/off
In order to switch the Entertainment sound
output on and off:
Press knob1 next to the CD player.
This symbol on the Control Display indi-
cates that sound output is switched off.
For equipment with an individual drive, the
sound output is available for approx. 20 minutes
with the ignition switched off.
Switch on the sound output again for this pur-
pose.
Adjusting volume
Turn knob1 next to the CD player until the
desired volume is set.
You can also adjust the volume with buttons on
the steering wheel, refer to page11.
The setting is stored for the remote control cur-
rently in use.
Tone control
You can alter various tone settings, e. g. treble
and bass, or the speed-dependent volume
increase.
The tone settings are set for all audio sources at
once.
The settings are stored for the remote key cur-
rently in use.
Changing tone settings
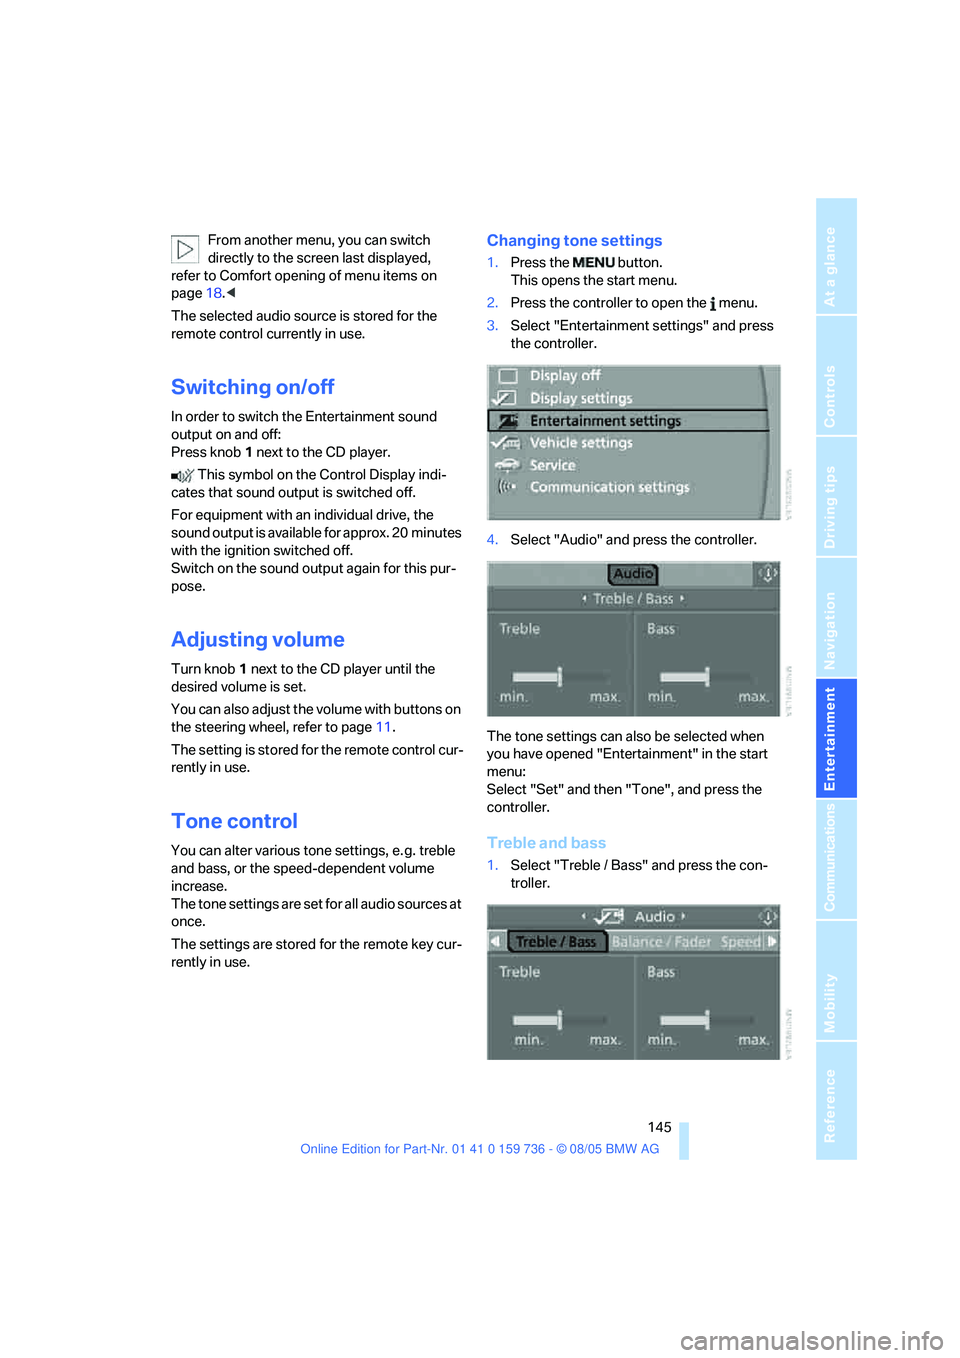
1.Press the button.
This opens the start menu.
2.Press the controller to open the menu.
3.Select "Entertainment settings" and press
the controller.
4.Select "Audio" and press the controller.
The tone settings can also be selected when
you have opened "Entertainment" in the start
menu:
Select "Set" and then "Tone", and press the
controller.
Treble and bass
1.Select "Treble / Bass" and press the con-
troller.
Page 148 of 248
Navigation
Entertainment
Driving tips
147Reference
At a glance
Controls
Communications
Mobility
Equalizer*
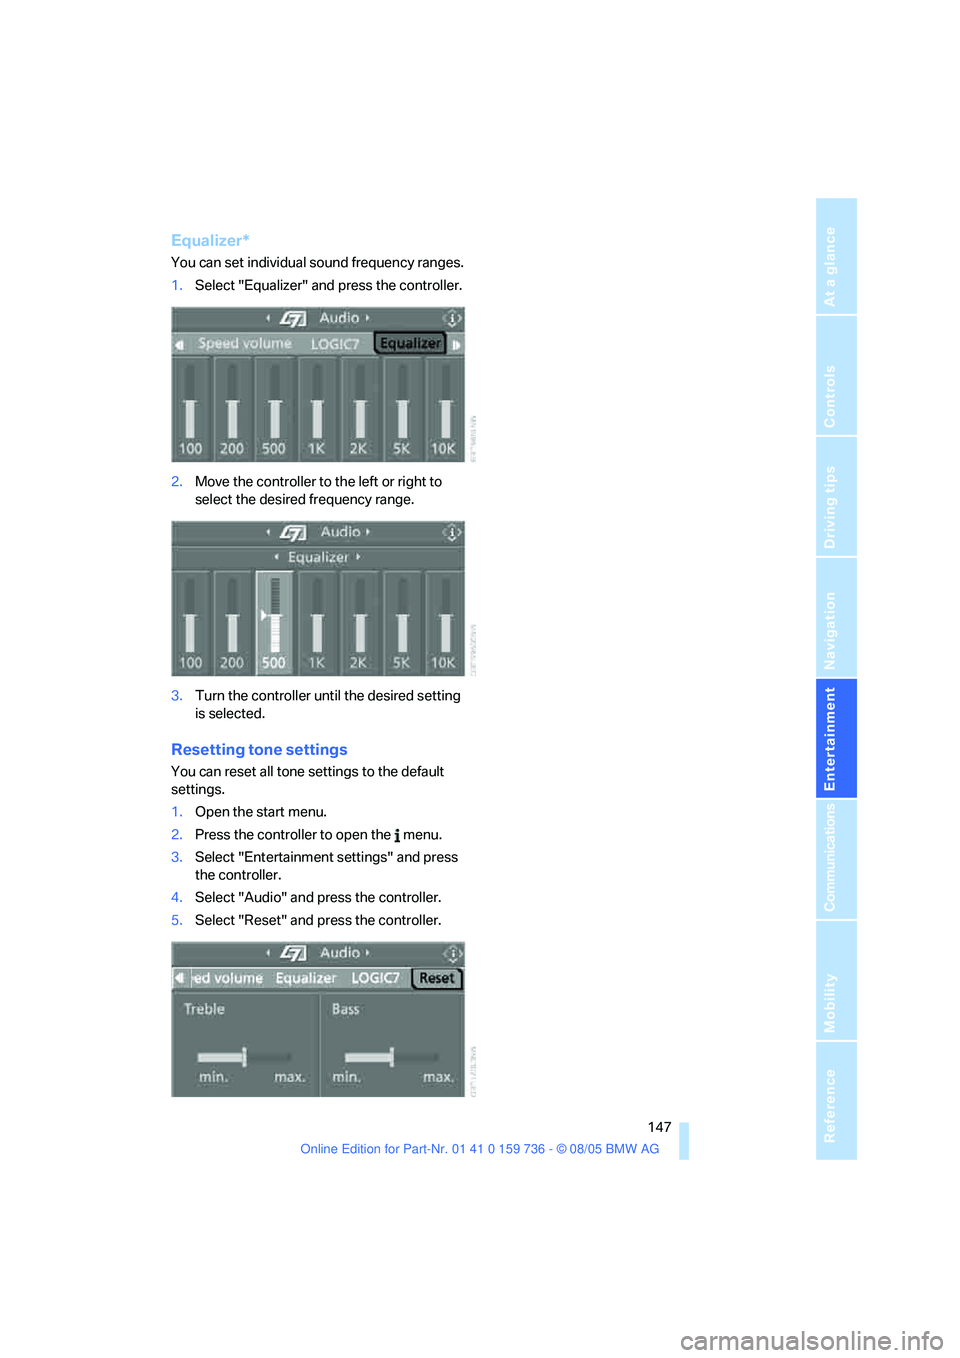
You can set individual sound frequency ranges.
1.Select "Equalizer" and press the controller.
2.Move the controller to the left or right to
select the desired frequency range.
3.Turn the controller until the desired setting
is selected.
Resetting tone settings
You can reset all tone settings to the default
settings.
1.Open the start menu.
2.Press the controller to open the menu.
3.Select "Entertainment settings" and press
the controller.
4.Select "Audio" and press the controller.
5.Select "Reset" and press the controller.
Page 158 of 248
Navigation
Entertainment
Driving tips
157Reference
At a glance
Controls
Communications
Mobility
CD player and CD changer
Listening to CDs
Compressed audio files*
CDs with compressed audio files, i.e. MP3, can
be played by the CD player.
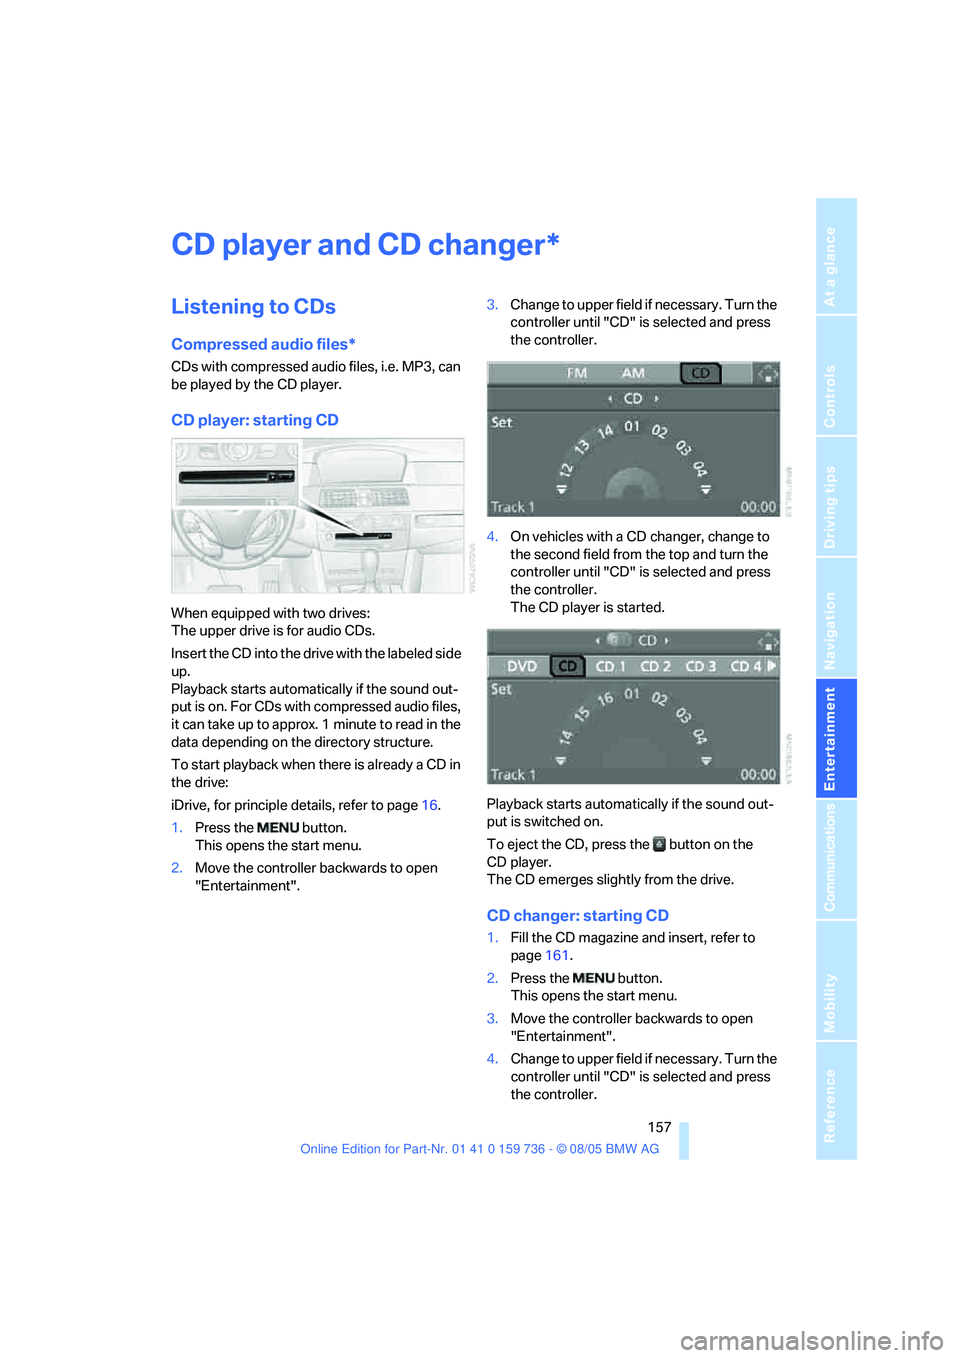
CD player: starting CD
When equipped with two drives:
The upper drive is for audio CDs.
Insert the CD into the drive with the labeled side
up.
Playback starts automatically if the sound out-
put is on. For CDs with compressed audio files,
it can take up to approx. 1 minute to read in the
data depending on the directory structure.
To start playback when there is already a CD in
the drive:
iDrive, for principle details, refer to page16.
1.Press the button.
This opens the start menu.
2.Move the controller backwards to open
"Entertainment".3.Change to upper field if necessary. Turn the
controller until "CD" is selected and press
the controller.
4.On vehicles with a CD changer, change to
the second field from the top and turn the
controller until "CD" is selected and press
the controller.
The CD player is started.
Playback starts automatically if the sound out-
put is switched on.
To eject the CD, press the button on the
CD player.
The CD emerges slightly from the drive.
CD changer: starting CD
1.Fill the CD magazine and insert, refer to
page161.
2.Press the button.
This opens the start menu.
3.Move the controller backwards to open
"Entertainment".
4.Change to upper field if necessary. Turn the
controller until "CD" is selected and press
the controller.
*