2006 BMW 525I SEDAN change time
[x] Cancel search: change timePage 21 of 259

At a glance
19Reference
Controls
Driving tips
Communications
Navigation
Entertainment
Mobility
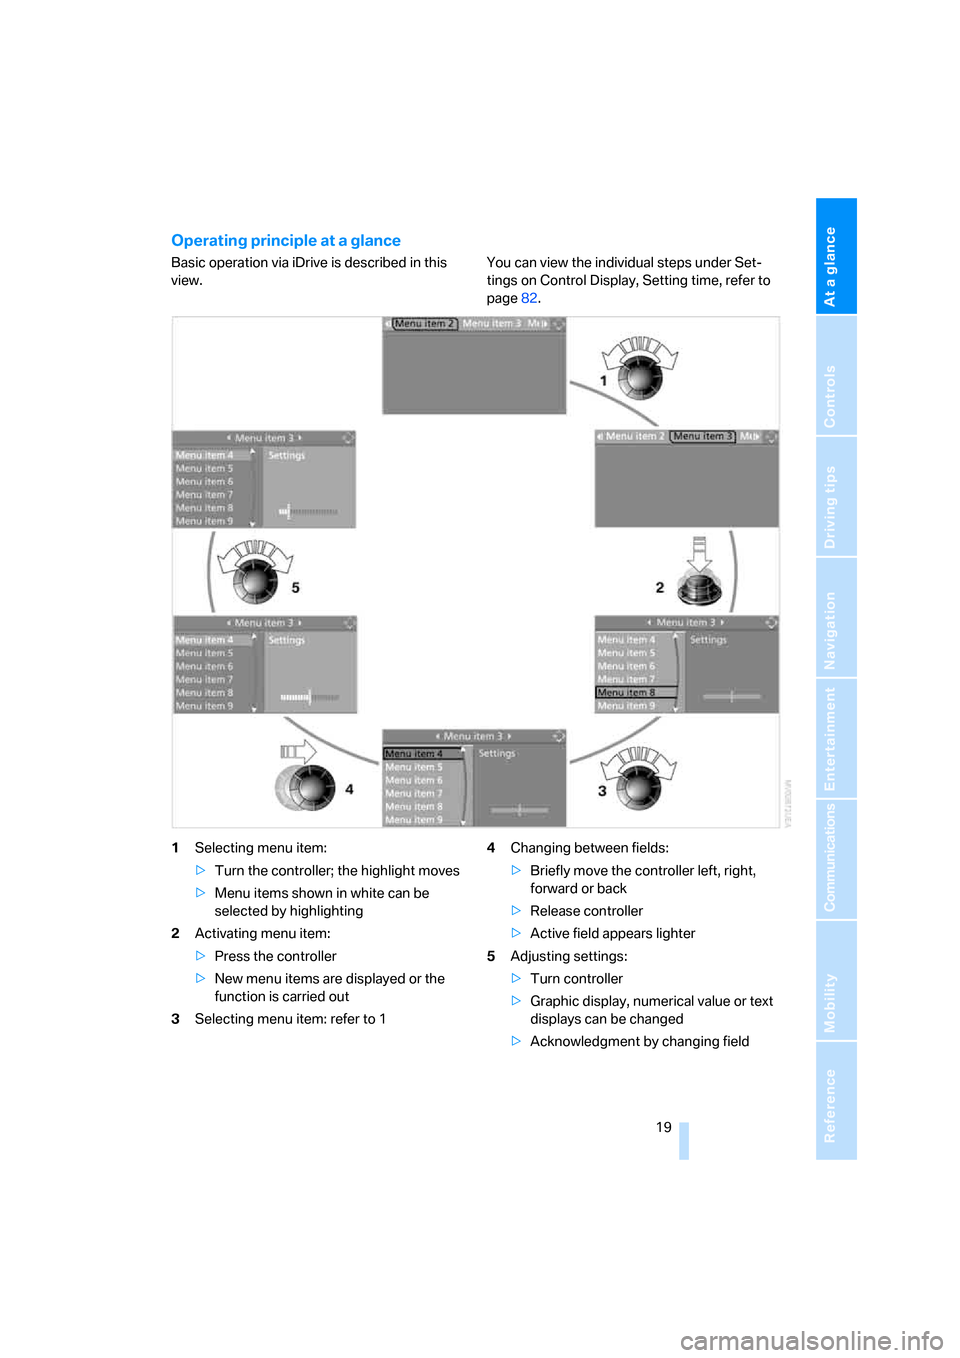
Operating principle at a glance
Basic operation via iDrive is described in this
view.You can view the individual steps under Set-
tings on Control Display, Setting time, refer to
page82.
1Selecting menu item:
>Turn the controller; the highlight moves
>Menu items shown in white can be
selected by highlighting
2Activating menu item:
>Press the controller
>New menu items are displayed or the
function is carried out
3Selecting menu item: refer to 14Changing between fields:
>Briefly move the controller left, right,
forward or back
>Release controller
>Active field appears lighter
5Adjusting settings:
>Turn controller
>Graphic display, numerical value or text
displays can be changed
>Acknowledgment by changing field
Page 22 of 259

iDrive
20
Status information
1Display for:
>Entertainment:
Radio, CD
>Telephone
* in "Communication":
Name of linked mobile phone, network
search or no network
>"BMW Assist"
*:
Existing voice connection with a service
from BMW Assist
2Entertainment sound output off
3Display for:
> New entries present in "Missed calls"
*
> Roaming active
4 Telephoning
* possible if the mobile
phone is logged-on in the vehicle
Mobile phone network with strong
reception, display dependent on mobile
phone
5Time
Other displays:
The status information is temporarily hidden
when there are Check Control instructions or
inputs via the voice command system
*.
Assistance window*
Additional information can be displayed in the
assistance window:
>The computer or the trip computer
*
>The arrow or map view with a navigation
system
*
>The current position
Selecting display
1.Move the controller to the right to change to
the assistance window and press the con-
troller.
2.Select a menu item.
3.Press the controller.
Page 34 of 259

Opening and closing
32
For US owners only
The transmitter and receiver units comply with
part 15 of the FCC/Federal Communication
Commission regulations. Operation is gov-
erned by the following:
FCC ID:
LX8766S
LX8766E
LX8CAS
LX8CAS2
Compliance statement:
This device complies with part 15 of the FCC
Rules. Operation is subject to the following two
conditions:
>This device must not cause harmful inter-
ference, and
>this device must accept any interference
received, including interference that may
cause undesired operation.
Any unauthorized modifications or
changes to these devices could void the
user's authority to operate this equipment.<
Using door lock
When unlocking
1.Turning the key once unlocks the driver's
door and the fuel filler door.
2.Turning the key a second time unlocks the
remaining doors and the luggage compart-
ment lid/tailgate.
Convenience operation
You also have the option of operating the win-
dows and the glass sunroof
* from the driver's
door lock.
Turn and hold the key in the positions for
unlocking or locking.
Watch during the closing process to be
sure that no one is injured. Releasing the
key stops the operation.<
Manual operation
In the event of an electrical malfunction, you can
turn a key all the way to the right or left in the
door lock to lock or unlock the driver's door.
Opening and closing: from
inside
This button serves to unlock or lock doors and
the luggage compartment lid or tailgate and
rear window with the front doors closed, but
does not activate the anti-theft system. The fuel
filler door remains unlocked.
You can also set the situations in which the
vehicle is locked.
iDrive, for explanation of principle, refer to
page16.
1.Press the button.
This opens the start menu.
2.Press the controller to open the menu.
3.Select "Vehicle settings" and press the
controller.
4.Select "Door locks" and press the control-
ler.
Page 39 of 259

Controls
37Reference
At a glance
Driving tips
Communications
Navigation
Entertainment
Mobility
>Press the button in the driver's foot-
well.
>Press the button on the remote control
for approx. 1 second.
During opening, the tailgate pivots back
and up. Ensure that adequate clearance is
available before opening.<
To interrupt opening:
>Press the button on the outside of the tail-
gate.
>Press and hold the button on the remote
control.
>Press the button on the inside of the tail-
gate.
Automatic roll-up cover
When the tailgate or rear window is opened, the
roll-up cover is raised, and when the tailgate
and rear window is closed, it is lowered.
Make sure that the closing area of the roll-
up cover is clear of obstructions, as other-
wise the payload or the roll-up cover may be
damaged.<
Details on the roll-up cover are provided on
page117.
Closing tailgate
Make sure that the closing path of the tail-
gate is clear, otherwise injuries may
result.
To interrupt closing:
>Press the button on the inside of the tail-
gate.
>Press the button on the outside of the tail-
gate.
Closing is not canceled when you put the
vehicle into motion.<
Alarm system
The concept
The vehicle alarm system responds:
>When a door, the hood or the luggage com-
partment lid/tailgate or rear window is
opened
>To movements in the vehicle: Interior
motion sensor, refer to page38
>To changes in the vehicle's tilt if someone
attempts to steal the wheels or tow the
vehicle
>To interruptions in battery voltage
Unauthorized operations are briefly signaled by
the alarm system:
>with an acoustic alarm
>by switching on
the hazard warning flashers
>by flashing the high beams
Arming and disarming alarm system
When you lock or unlock the vehicle, either with
the remote control or at the door lock, the alarm
system is armed or disarmed at the same time.
Page 52 of 259

Adjustments
50
Releasing
1.Grasp the belt firmly.
2.Press the red button in the buckle.
3.Guide the belt into its reel.
The shoulder strap's anchorage point will be
correct for adult seat occupants of every build if
the seat is correctly adjusted, refer to page46.
The two rear safety belt buckles integrated into
the rear seat are for passengers sitting on the
left and right. The belt buckle embossed with
the word CENTER is intended exclusively for
use by passengers riding in the center position.
Damage to safety belts
In the event of loads caused by accidents
or other damage: replace the belt system
including the safety belt tensioner and any child
restraint systems, and have the belt anchor
points checked. Only have this work carried out
at a BMW center or at a workshop that works
according to BMW repair procedures with cor-
respondingly trained personnel. Otherwise cor-
rect operation of this safety equipment is not
guaranteed.<
Heated seats*
Front
The temperature setting progresses one step
through its control sequence each time you
press the button. The maximum temperature is
supplied when three LEDs are lit.
To switch off: press the button longer.
Temperature distribution
The heat output can be distributed variously in
the seat cushion and the backrest.
iDrive, for explanation of principle, refer to
page16.
1.Open the start menu.
2.Move the controller to the left to open "Cli-
mate".
3.Select "Seat heater distribution" and press
the controller.
4.Move the controller to the left or right to
select "Driver" or "Passenger".
5.Turn the controller. The adjustment is
applied; the field can be changed.
Rear
Operation as for front seat heating; two temper-
ature settings.
Page 76 of 259

Everything under control
74
Everything under control
Odometer, outside
temperature display, clock
1Time, outside temperature and data
2Odometer and trip odometer
3Press button:
>with ignition switched on, trip odometer
is reset
>briefly display the time, outside temper-
ature and odometer with the ignition
switched off
From radio readiness the outside temperature
and the time are displayed.
Date retrieval:
Press CHECK button on turn signal lever, refer
to page80.
Time and date setting, refer to page82.
You can set the unit of measure 7 or 6 on the
Control Display, refer to Units of measure on
page84.
Outside temperature warning
If the display drops to +377/+36, a signal
sounds and a warning lamp lights up. A mes-
sage appears on the Control Display. There is
an increased danger of ice.
Even at temperatures above +377/
+36 ice can form. Therefore, drive care-
fully, e.g. on bridges and sections of road in the
shade, otherwise there is an increased accident
risk.<
Tachometer
The white-striped advance warning field,
arrow1, changes depending on the engine
temperature. With increasing engine tempera-
ture the advance warning field becomes corre-
spondingly smaller. Avoid allowing the engine
speed to rise as far as the orange warning sec-
tor whenever possible.
Be sure to avoid engine speeds in the red warn-
ing field, arrow2. In this range, the fuel supply is
interrupted to protect the engine.
Coolant temperature
Should the coolant, and with it the engine
become too hot, a warning lamp lights up. In
addition, a message appears on the Control
Display.
Checking coolant level, refer to page207.
Page 79 of 259

Controls
77Reference
At a glance
Driving tips
Communications
Navigation
Entertainment
Mobility
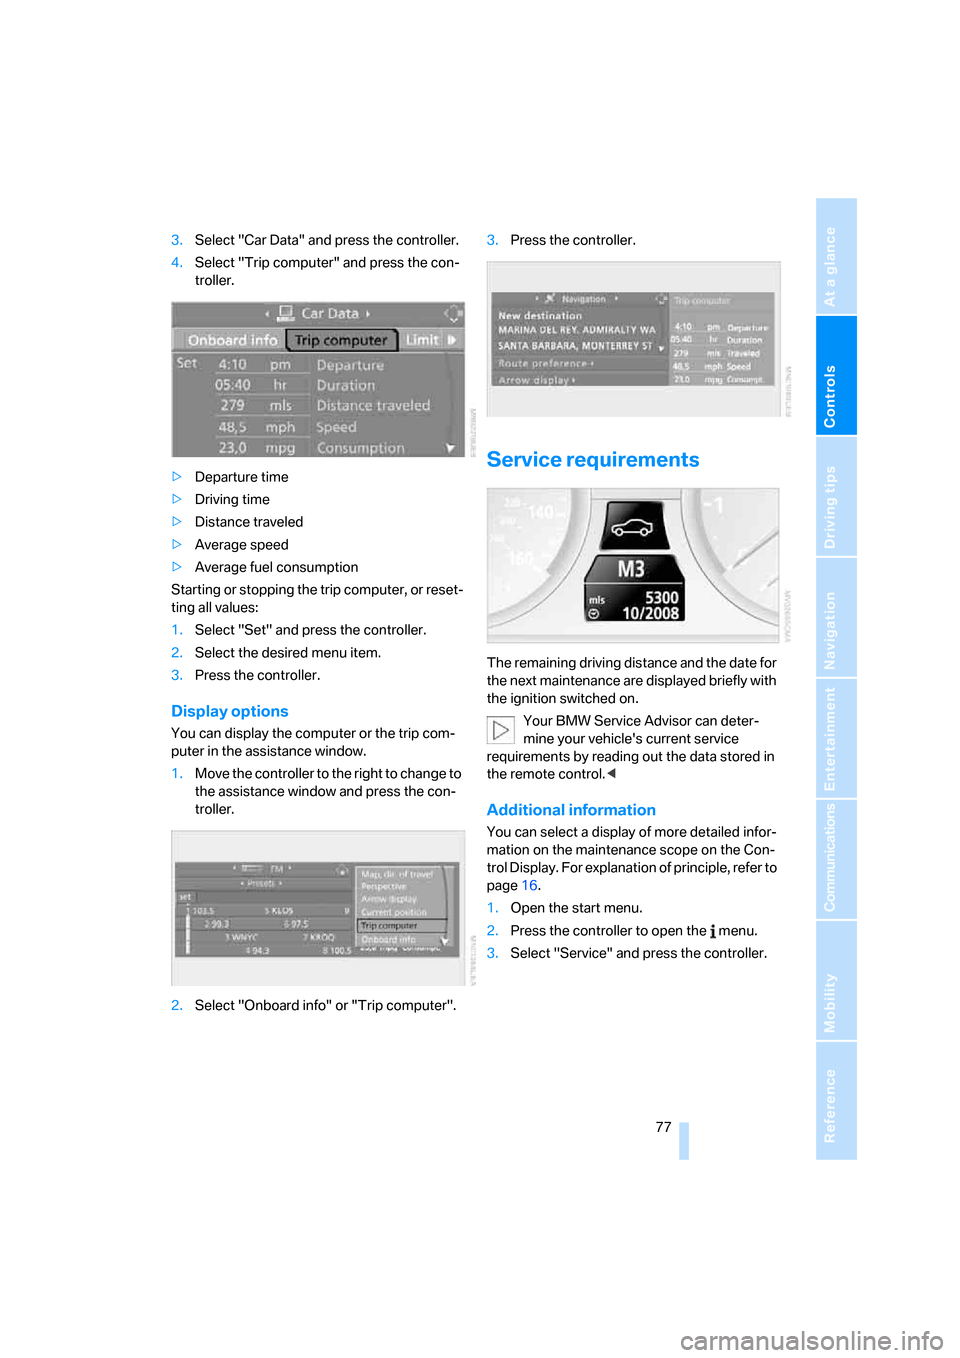
3.Select "Car Data" and press the controller.
4.Select "Trip computer" and press the con-
troller.
>Departure time
>Driving time
>Distance traveled
>Average speed
>Average fuel consumption
Starting or stopping the trip computer, or reset-
ting all values:
1.Select "Set" and press the controller.
2.Select the desired menu item.
3.Press the controller.
Display options
You can display the computer or the trip com-
puter in the assistance window.
1.Move the controller to the right to change to
the assistance window and press the con-
troller.
2.Select "Onboard info" or "Trip computer".3.Press the controller.
Service requirements
The remaining driving distance and the date for
the next maintenance are displayed briefly with
the ignition switched on.
Your BMW Service Advisor can deter-
mine your vehicle's current service
requirements by reading out the data stored in
the remote control.<
Additional information
You can select a display of more detailed infor-
mation on the maintenance scope on the Con-
trol Display. For explanation of principle, refer to
page16.
1.Open the start menu.
2.Press the controller to open the menu.
3.Select "Service" and press the controller.
Page 84 of 259

Everything under control
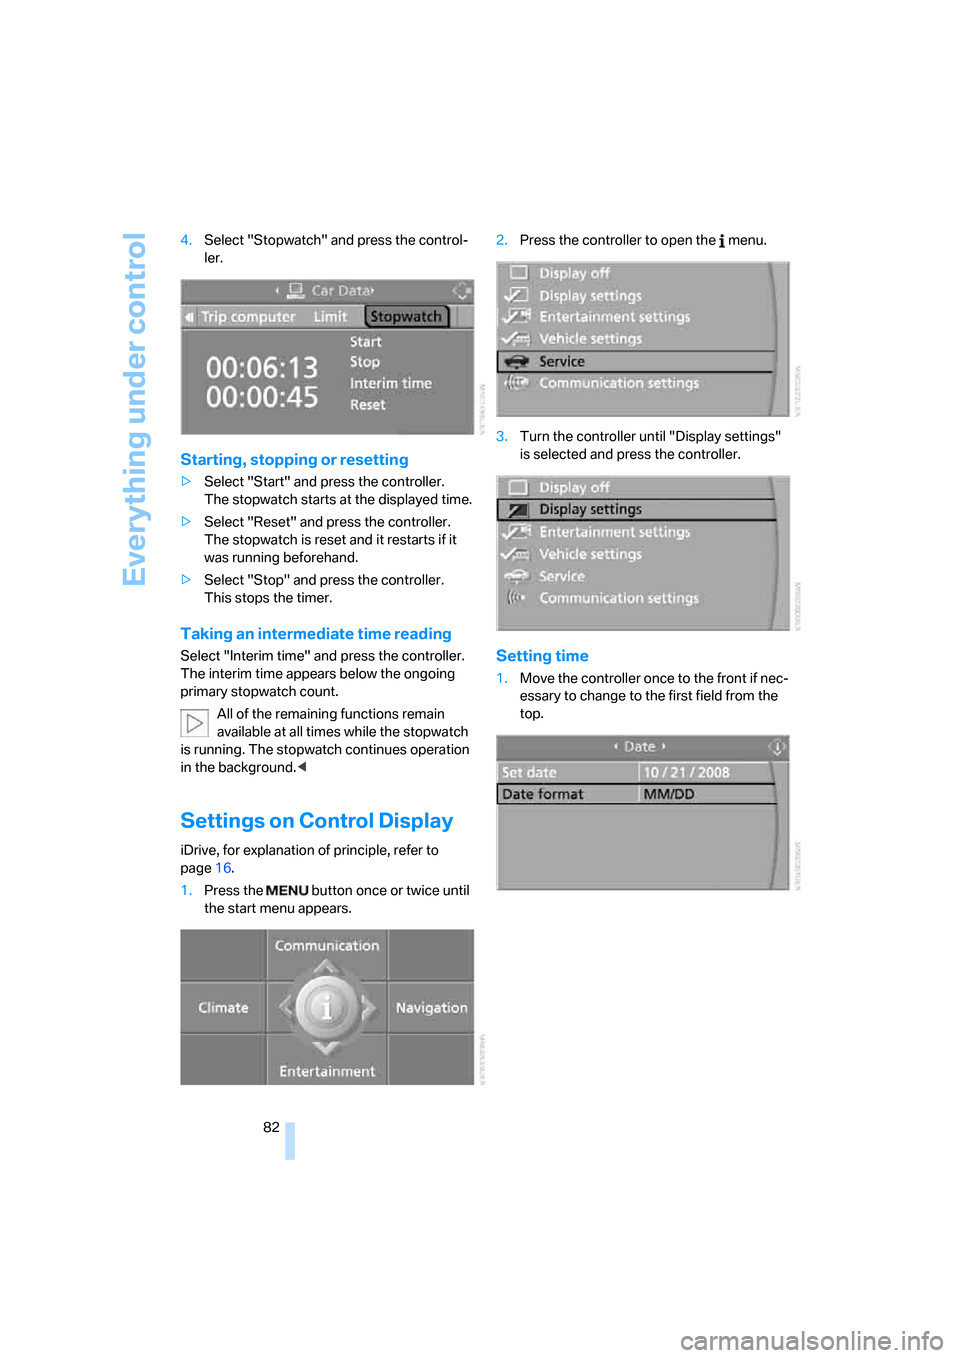
82 4.Select "Stopwatch" and press the control-
ler.
Starting, stopping or resetting
>Select "Start" and press the controller.
The stopwatch starts at the displayed time.
>Select "Reset" and press the controller.
The stopwatch is reset and it restarts if it
was running beforehand.
>Select "Stop" and press the controller.
This stops the timer.
Taking an intermediate time reading
Select "Interim time" and press the controller.
The interim time appears below the ongoing
primary stopwatch count.
All of the remaining functions remain
available at all times while the stopwatch
is running. The stopwatch continues operation
in the background.<
Settings on Control Display
iDrive, for explanation of principle, refer to
page16.
1.Press the button once or twice until
the start menu appears.2.Press the controller to open the menu.
3.Turn the controller until "Display settings"
is selected and press the controller.
Setting time
1.Move the controller once to the front if nec-
essary to change to the first field from the
top.