Page 127 of 259

Driving tips
125Reference
At a glance
Controls
Communications
Navigation
Entertainment
Mobility
Mobile communications devices in
vehicle
BMW discourages the use of mobile
communications devices, e. g. mobile
phones, inside the vehicle without a direct con-
nection to an outside antenna. Otherwise, the
vehicle electronics and mobile communication
device can influence one another. In addition,
there is no assurance that the radiation which
results from transmission will be dissipated
from the vehicle interior.<
Interior and exterior mirrors,
automatic dimming feature*
This feature is controlled by two photocells in
the inside rearview mirror. One is integrated into
the glass of the mirror, while the other is located
at an offset position on the rear of the mirror
housing.
For trouble-free operation, keep the photocells
clean and do not cover the area between the
interior rearview mirror and the windshield. Do
not attach stickers of any kind to the windshield
in front of the mirror, either.
Hydroplaning
When driving on wet or slushy roads,
reduce road speed. If you do not, a wedge
of water can form between tires and road sur-
face. This phenomenon is referred to as hydro-
planing, and is characterized by a partial or
complete loss of contact between the tires and
the road surface, ultimately undermining your
ability to steer and brake the vehicle.<
The risk of hydroplaning increases as the tread
depth of the tires decreases, refer also to Mini-
mum tire tread on page201.
Driving through water
Do not drive through water on the road if it
is deeper than 1 ft/30 cm, and then only at
walking speed at the most. Otherwise, the vehi-
cle's engine, the electrical systems and the
transmission may be damaged.<
Using handbrake on inclines
On inclines, do not hold the vehicle with
the clutch; use the handbrake. Otherwise
greater clutch wear will result.<
SMG Sequential Manual Transmission
Start off quickly on slopes. Do not hold
the vehicle on a hill by pressing the accel-
erator, but apply the handbrake instead. Other-
wise overheating can occur in the transmission
region.<
Starting assistant
The starting assistant enables you to start off
conveniently on slopes. The parking brake is
not required for this purpose.
1.Hold the vehicle with the footbrake.
2.Release the footbrake and immediately
drive off quickly.
The starting assistant holds the vehicle
for approx. 2 seconds after releasing the
footbrake. Depending on the load, the vehicle
may also roll back slightly during this time.
After releasing the footbrake, immediately start
quickly, otherwise the starting assistant no
longer holds the vehicle after approx. 2 seconds
and it begins to roll back.<
Braking safely
Your BMW is equipped with ABS as a standard
feature. In situations that require it, it is best to
brake with full force. Since the vehicle maintains
steering responsiveness, you can still avoid
possible obstacles with a minimum of steering
effort.
Pulsation of the brake pedal, combined with
sounds from the hydraulic circuits, indicate that
ABS is in its active mode.
Page 129 of 259
Driving tips
127Reference
At a glance
Controls
Communications
Navigation
Entertainment
Mobility
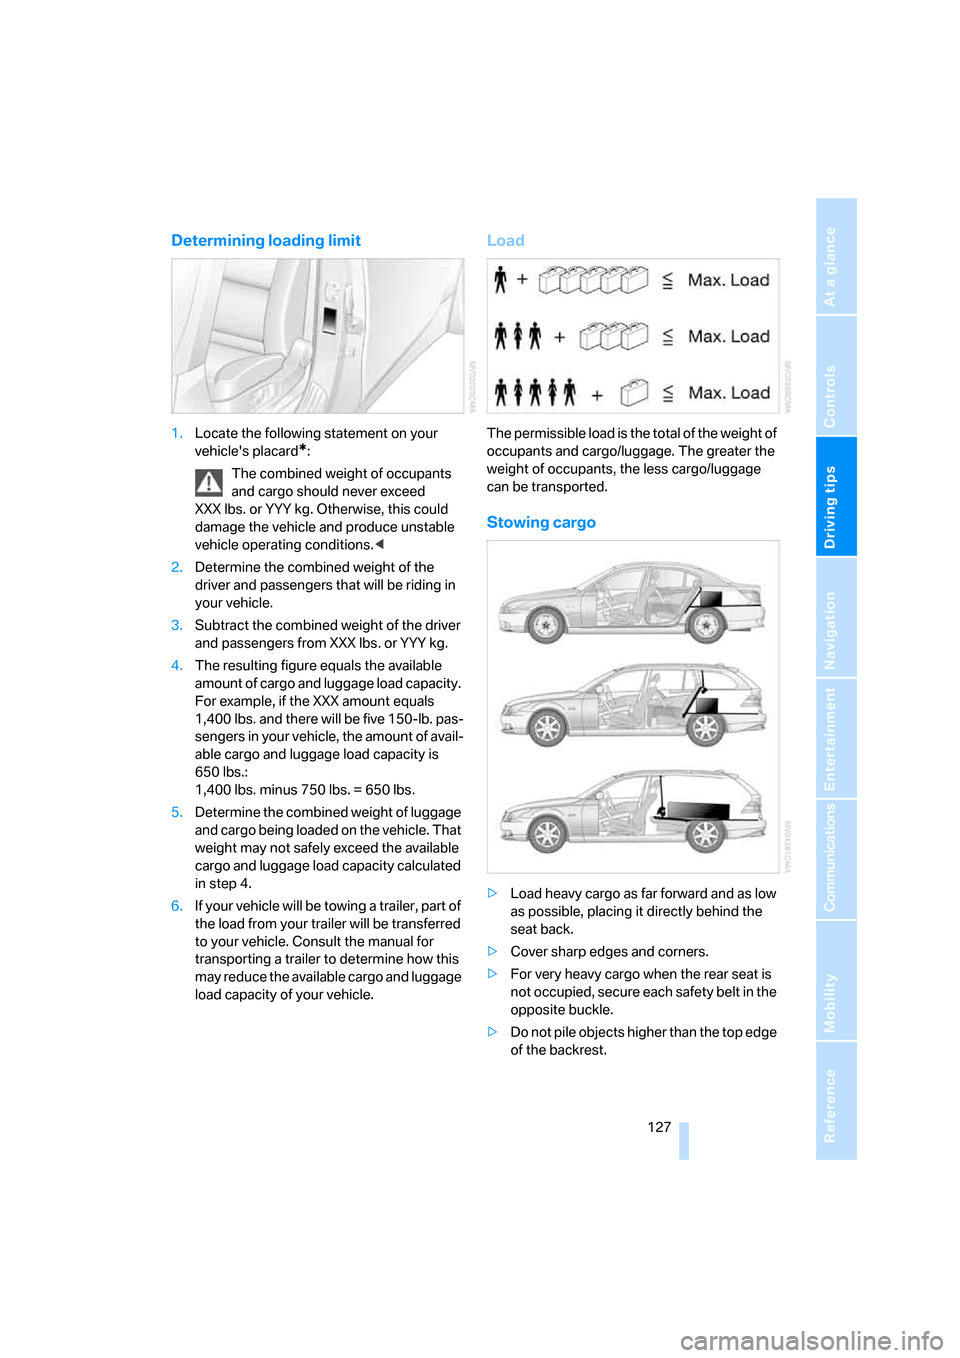
Determining loading limit
1.Locate the following statement on your
vehicle's placard
*:
The combined weight of occupants
and cargo should never exceed
XXX lbs. or YYY kg. Otherwise, this could
damage the vehicle and produce unstable
vehicle operating conditions.<
2.Determine the combined weight of the
driver and passengers that will be riding in
your vehicle.
3.Subtract the combined weight of the driver
and passengers from XXX lbs. or YYY kg.
4.The resulting figure equals the available
amount of cargo and luggage load capacity.
For example, if the XXX amount equals
1,400 lbs. and there will be five 150-lb. pas-
sengers in your vehicle, the amount of avail-
able cargo and luggage load capacity is
650 lbs.:
1,400 lbs. minus 750 lbs. = 650 lbs.
5.Determine the combined weight of luggage
and cargo being loaded on the vehicle. That
weight may not safely exceed the available
cargo and luggage load capacity calculated
in step 4.
6.If your vehicle will be towing a trailer, part of
the load from your trailer will be transferred
to your vehicle. Consult the manual for
transporting a trailer to determine how this
may reduce the available cargo and luggage
load capacity of your vehicle.
Load
The permissible load is the total of the weight of
occupants and cargo/luggage. The greater the
weight of occupants, the less cargo/luggage
can be transported.
Stowing cargo
>Load heavy cargo as far forward and as low
as possible, placing it directly behind the
seat back.
>Cover sharp edges and corners.
>For very heavy cargo when the rear seat is
not occupied, secure each safety belt in the
opposite buckle.
>Do not pile objects higher than the top edge
of the backrest.
Page 131 of 259
Driving tips
129Reference
At a glance
Controls
Communications
Navigation
Entertainment
Mobility
Page 133 of 259
Navigation
This chapter describes how you can
enter destinations and specify your route
so that your navigation system guides you
reliably to your destination.
Navigation
Page 134 of 259
Starting navigation system
132
Starting navigation system
Your navigation system can use satellites to
ascertain the precise position of your vehicle
and guide you reliably to any destination you
enter.
Navigation DVD
The navigation system requires a special navi-
gation DVD. The latest version is available at
your BMW center.
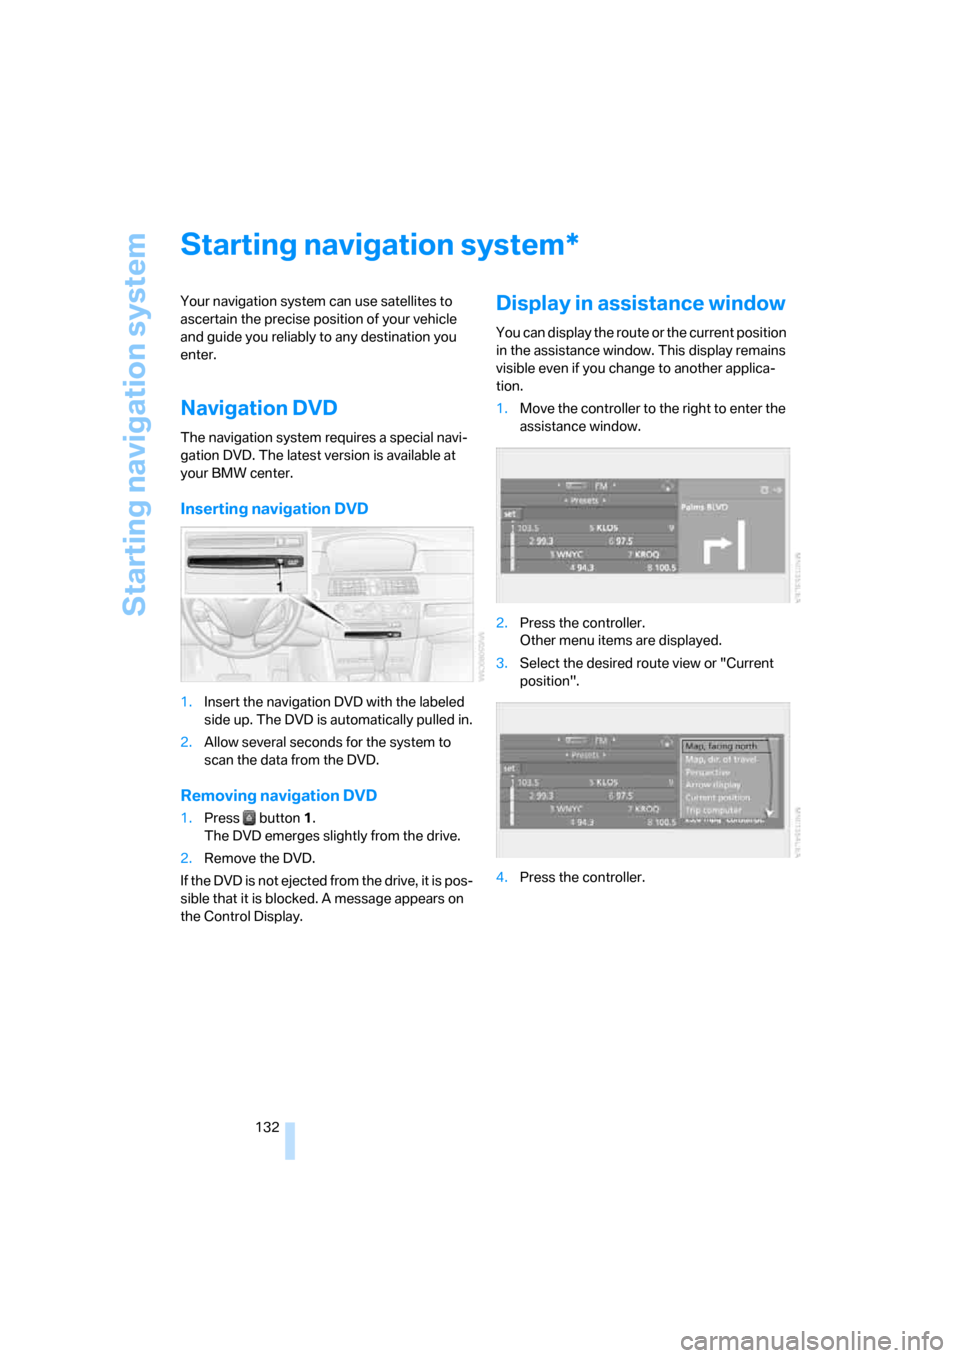
Inserting navigation DVD
1.Insert the navigation DVD with the labeled
side up. The DVD is automatically pulled in.
2.Allow several seconds for the system to
scan the data from the DVD.
Removing navigation DVD
1.Press button 1.
The DVD emerges slightly from the drive.
2.Remove the DVD.
If the DVD is not ejected from the drive, it is pos-
sible that it is blocked. A message appears on
the Control Display.
Display in assistance window
You can display the route or the current position
in the assistance window. This display remains
visible even if you change to another applica-
tion.
1.Move the controller to the right to enter the
assistance window.
2.Press the controller.
Other menu items are displayed.
3.Select the desired route view or "Current
position".
4.Press the controller.
*
Page 135 of 259
Navigation
Driving tips
133Reference
At a glance
Controls
Communications
Entertainment
Mobility
Destination entry
In entering your destination you can select from
among the following options:
>Entering a destination manually, see below
>Entering destination via voice*, refer to
page136
>Selecting destination using information,
refer to page138
>Selecting destination from a list, refer to
Destination list, page139
>Selecting destination from address book,
refer to page140
>Selecting home address, refer to page142
After selecting your destination you can pro-
ceed to start the destination guidance, refer to
page144.
Operating navigation system
Enter data only when the vehicle is sta-
tionary, and always give priority to the
applicable traffic regulations in the event of any
contradiction between traffic and road condi-
tions and the instructions issued by the naviga-
tion system. If you do not observe this precau-
tion, you may be in violation of the law, and can
endanger vehicle occupants and other road
users.<
iDrive, for explanation of principle, refer to
page16.
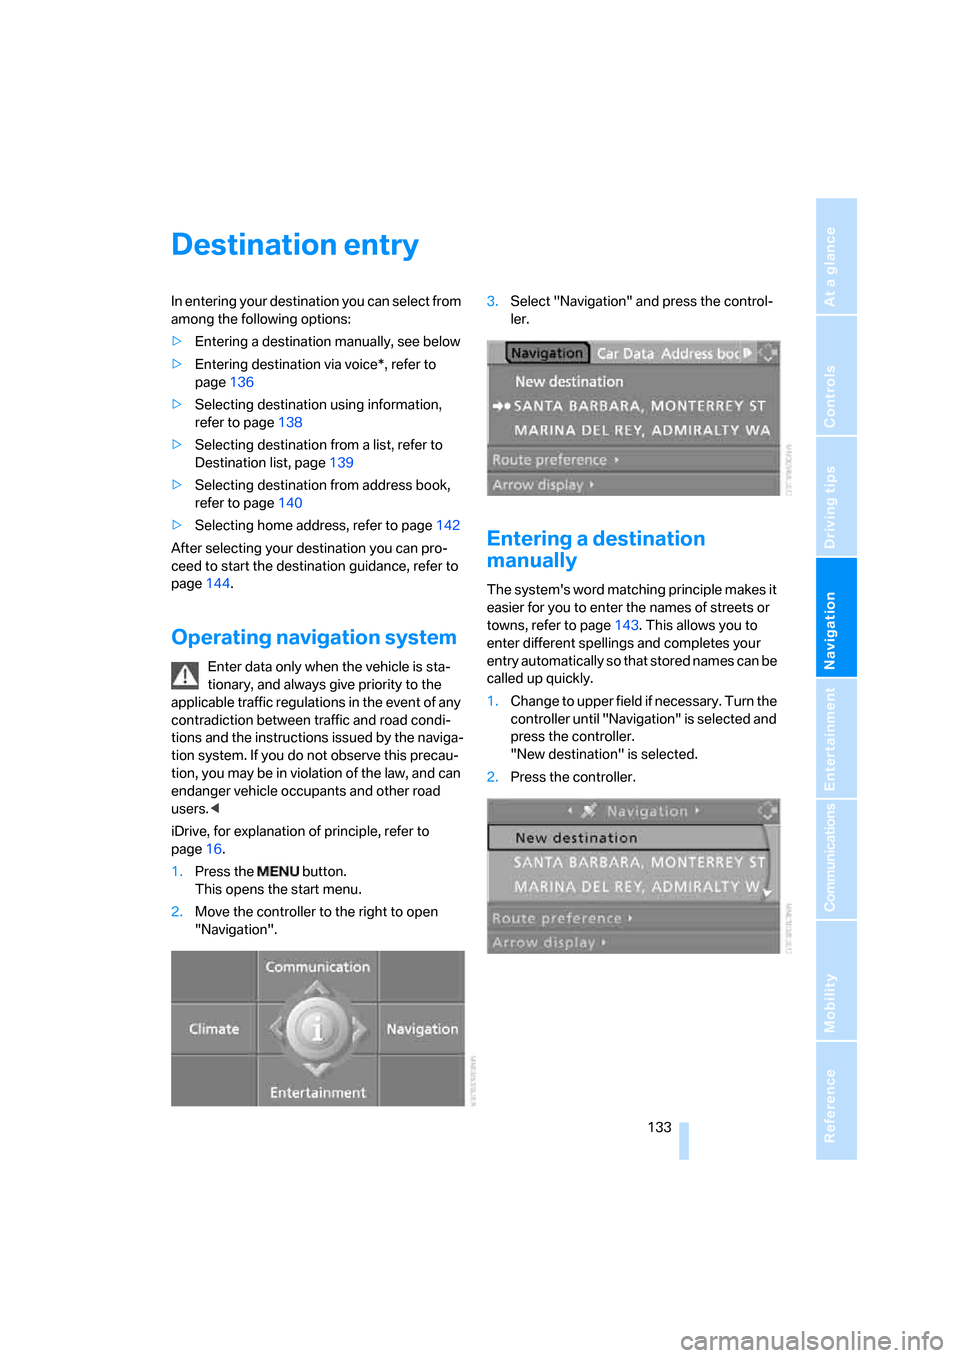
1.Press the button.
This opens the start menu.
2.Move the controller to the right to open
"Navigation".3.Select "Navigation" and press the control-
ler.
Entering a destination
manually
The system's word matching principle makes it
easier for you to enter the names of streets or
towns, refer to page143. This allows you to
enter different spellings and completes your
entry automatically so that stored names can be
called up quickly.
1.Change to upper field if necessary. Turn the
controller until "Navigation" is selected and
press the controller.
"New destination" is selected.
2.Press the controller.
Page 137 of 259
Navigation
Driving tips
135Reference
At a glance
Controls
Communications
Entertainment
Mobility
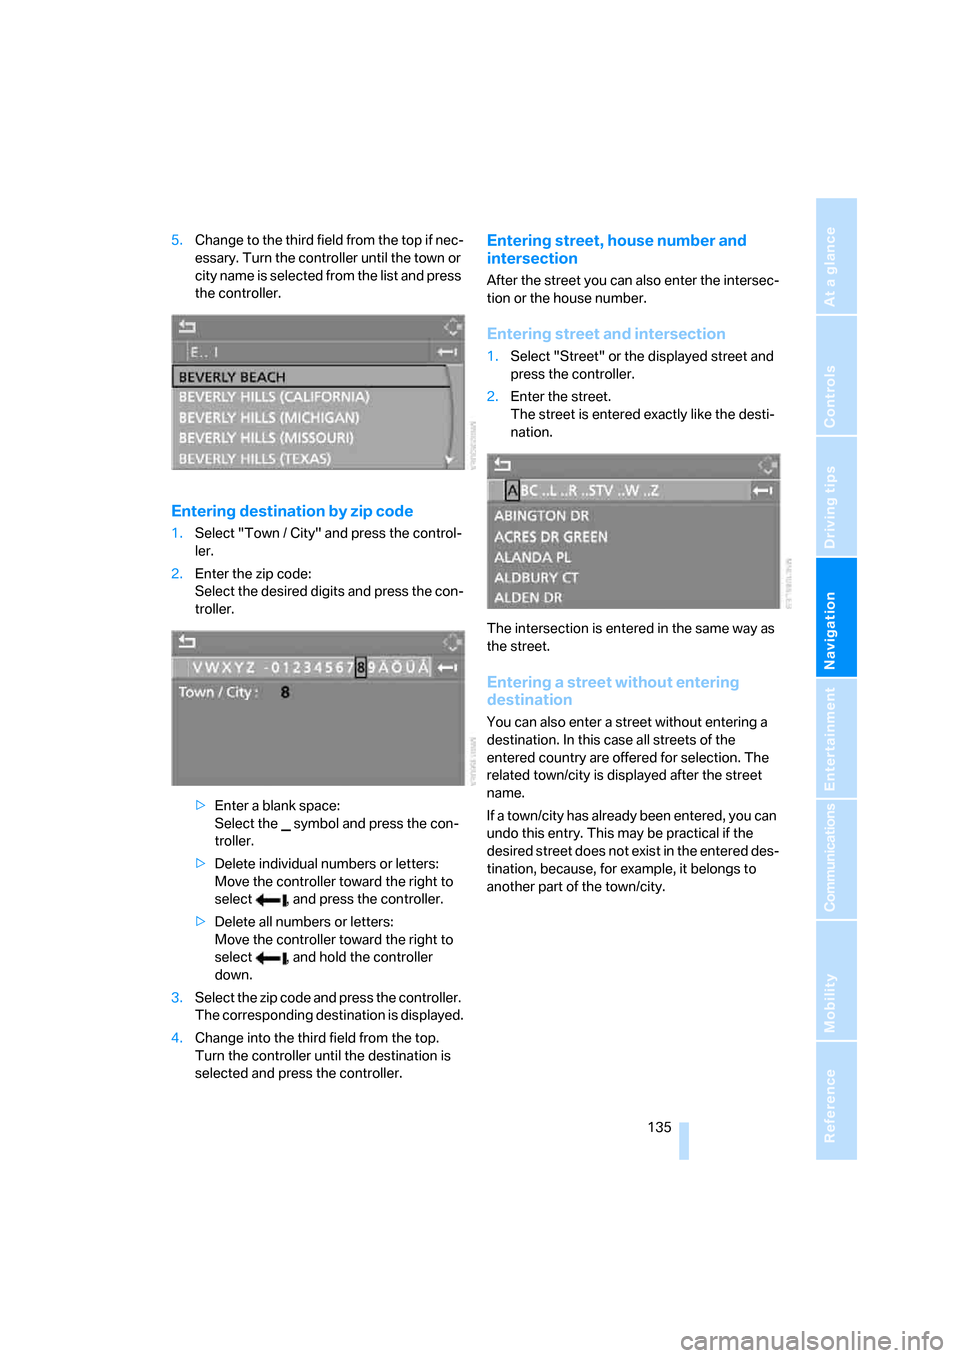
5.Change to the third field from the top if nec-
essary. Turn the controller until the town or
city name is selected from the list and press
the controller.
Entering destination by zip code
1.Select "Town / City" and press the control-
ler.
2.Enter the zip code:
Select the desired digits and press the con-
troller.
>Enter a blank space:
Select the symbol and press the con-
troller.
>Delete individual numbers or letters:
Move the controller toward the right to
select , and press the controller.
>Delete all numbers or letters:
Move the controller toward the right to
select , and hold the controller
down.
3.Select the zip code and press the controller.
The corresponding destination is displayed.
4.Change into the third field from the top.
Turn the controller until the destination is
selected and press the controller.
Entering street, house number and
intersection
After the street you can also enter the intersec-
tion or the house number.
Entering street and intersection
1.Select "Street" or the displayed street and
press the controller.
2.Enter the street.
The street is entered exactly like the desti-
nation.
The intersection is entered in the same way as
the street.
Entering a street without entering
destination
You can also enter a street without entering a
destination. In this case all streets of the
entered country are offered for selection. The
related town/city is displayed after the street
name.
If a town/city has already been entered, you can
undo this entry. This may be practical if the
desired street does not exist in the entered des-
tination, because, for example, it belongs to
another part of the town/city.
Page 138 of 259
Destination entry
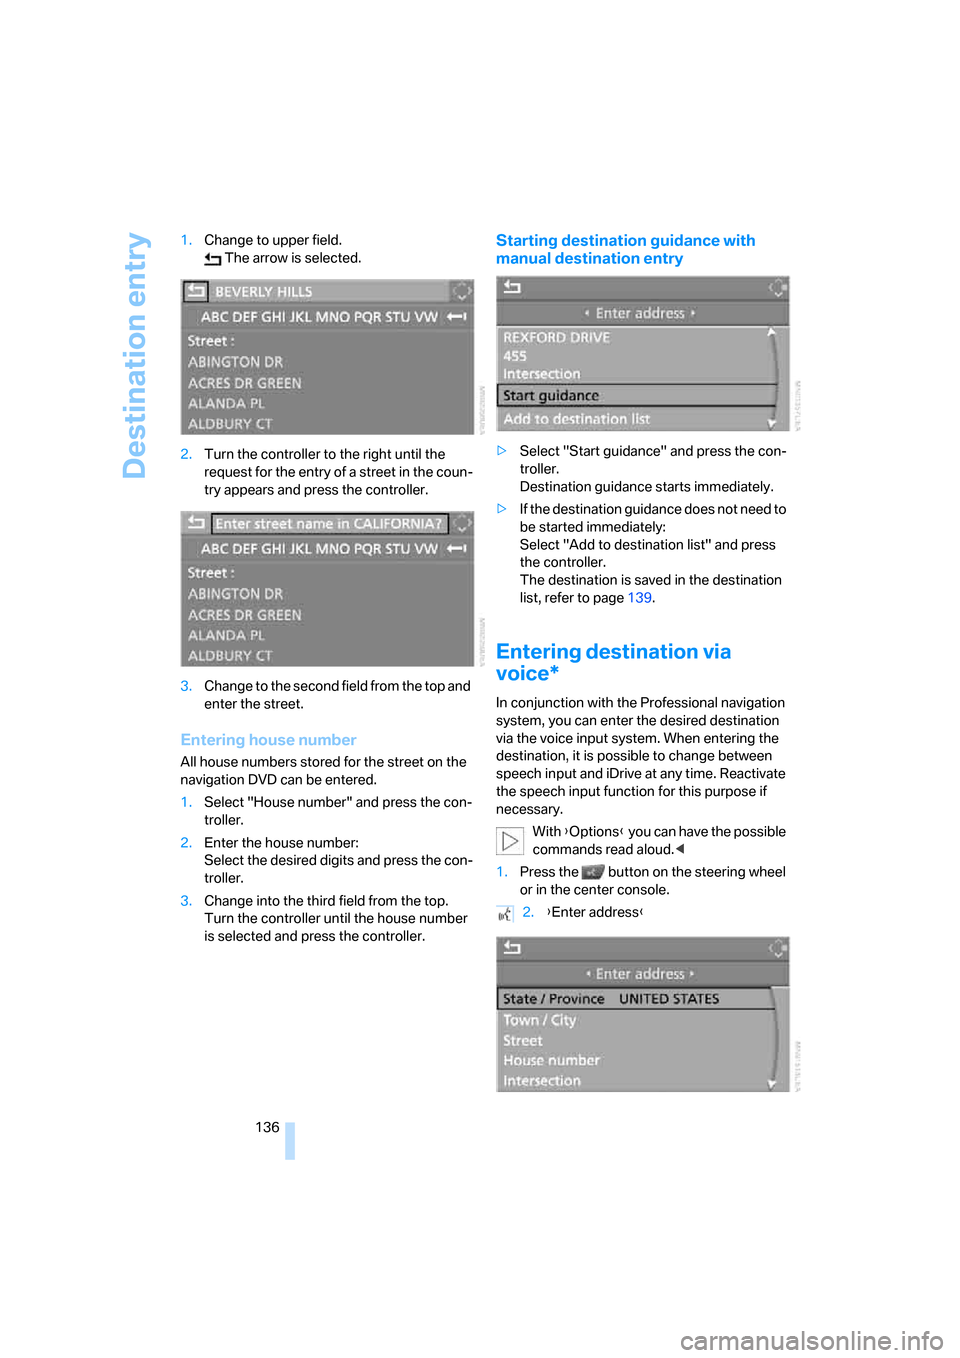
136 1.Change to upper field.
The arrow is selected.
2.Turn the controller to the right until the
request for the entry of a street in the coun-
try appears and press the controller.
3.Change to the second field from the top and
enter the street.
Entering house number
All house numbers stored for the street on the
navigation DVD can be entered.
1.Select "House number" and press the con-
troller.
2.Enter the house number:
Select the desired digits and press the con-
troller.
3.Change into the third field from the top.
Turn the controller until the house number
is selected and press the controller.
Starting destination guidance with
manual destination entry
>Select "Start guidance" and press the con-
troller.
Destination guidance starts immediately.
>If the destination guidance does not need to
be started immediately:
Select "Add to destination list" and press
the controller.
The destination is saved in the destination
list, refer to page139.
Entering destination via
voice*
In conjunction with the Professional navigation
system, you can enter the desired destination
via the voice input system. When entering the
destination, it is possible to change between
speech input and iDrive at any time. Reactivate
the speech input function for this purpose if
necessary.
With {Options} you can have the possible
commands read aloud.<
1.Press the button on the steering wheel
or in the center console.
2.{Enter address}