2006 BMW 525I change time
[x] Cancel search: change timePage 137 of 248
Destination guidance
136
Destination guidance
Starting destination
guidance
iDrive, for principle details, refer to page16.
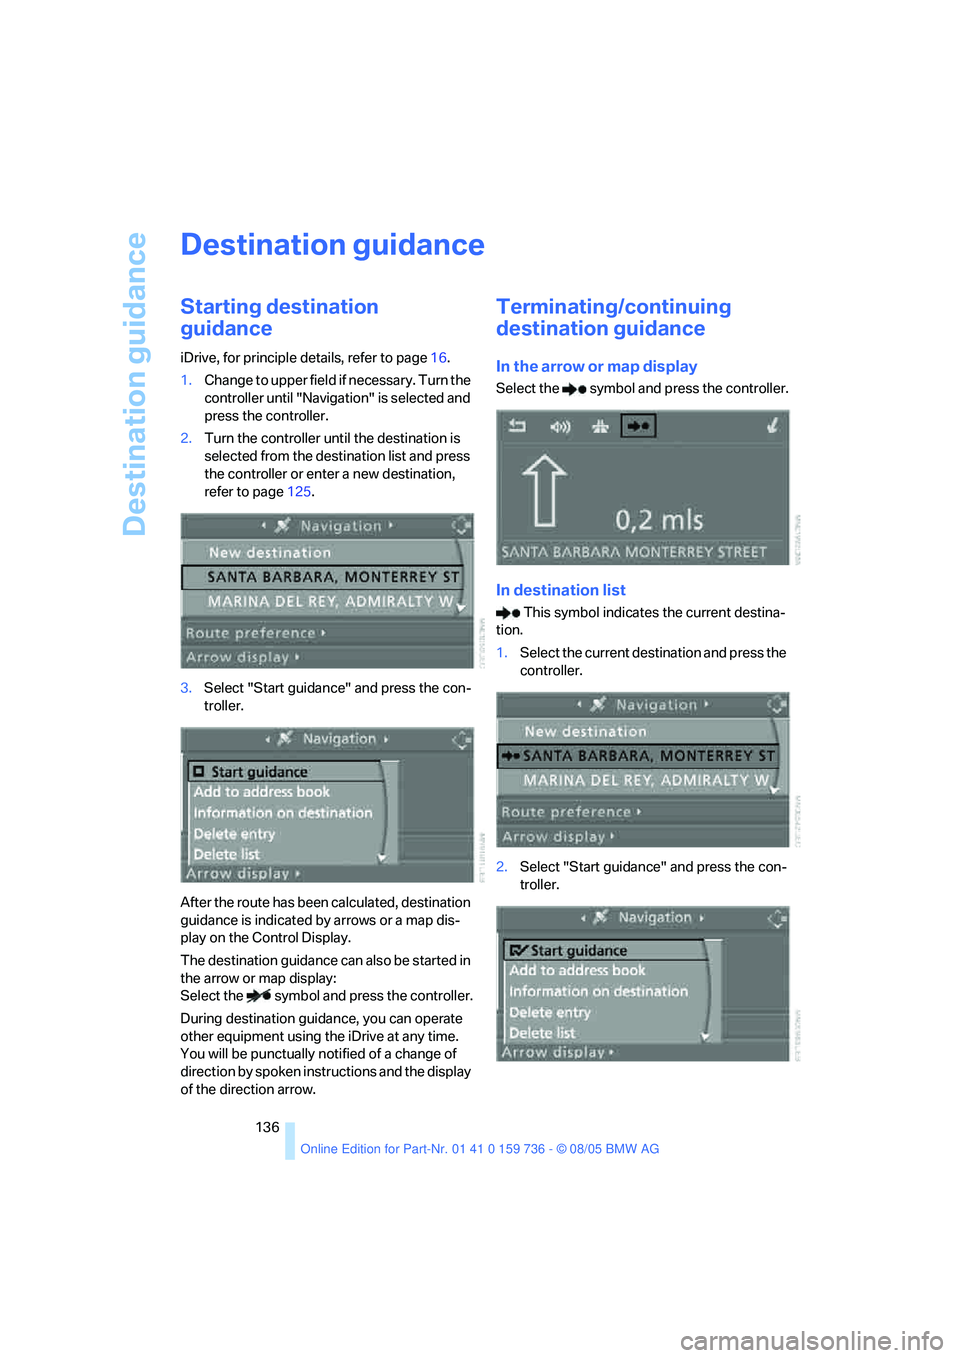
1.Change to upper field if necessary. Turn the
controller until "Navigation" is selected and
press the controller.
2.Turn the controller until the destination is
selected from the destination list and press
the controller or enter a new destination,
refer to page125.
3.Select "Start guidance" and press the con-
troller.
After the route has been calculated, destination
guidance is indicated by arrows or a map dis-
play on the Control Display.
The destination guidance can also be started in
the arrow or map display:
Select the symbol and press the controller.
During destination guidance, you can operate
other equipment using the iDrive at any time.
You will be punctually notified of a change of
direction by spoken instructions and the display
of the direction arrow.
Terminating/continuing
destination guidance
In the arrow or map display
Select the symbol and press the controller.
In destination list
This symbol indicates the current destina-
tion.
1.Select the current destination and press the
controller.
2.Select "Start guidance" and press the con-
troller.
Page 138 of 248
Navigation
Driving tips
137Reference
At a glance
Controls
Communications
Entertainment
Mobility
When you park the vehicle before reaching the
entered destination, the following the question
is displayed before beginning the next trip:
"Continue guidance to destination?".
The destination guidance starts automatically
after a short time.
To start the destination guidance:
Select "Yes" and press the controller.
Route display
You have the option of displaying various views
of the route during destination guidance.
From another menu, you can switch
directly to the screen last displayed,
refer to Comfort opening of menu items on
page18.<
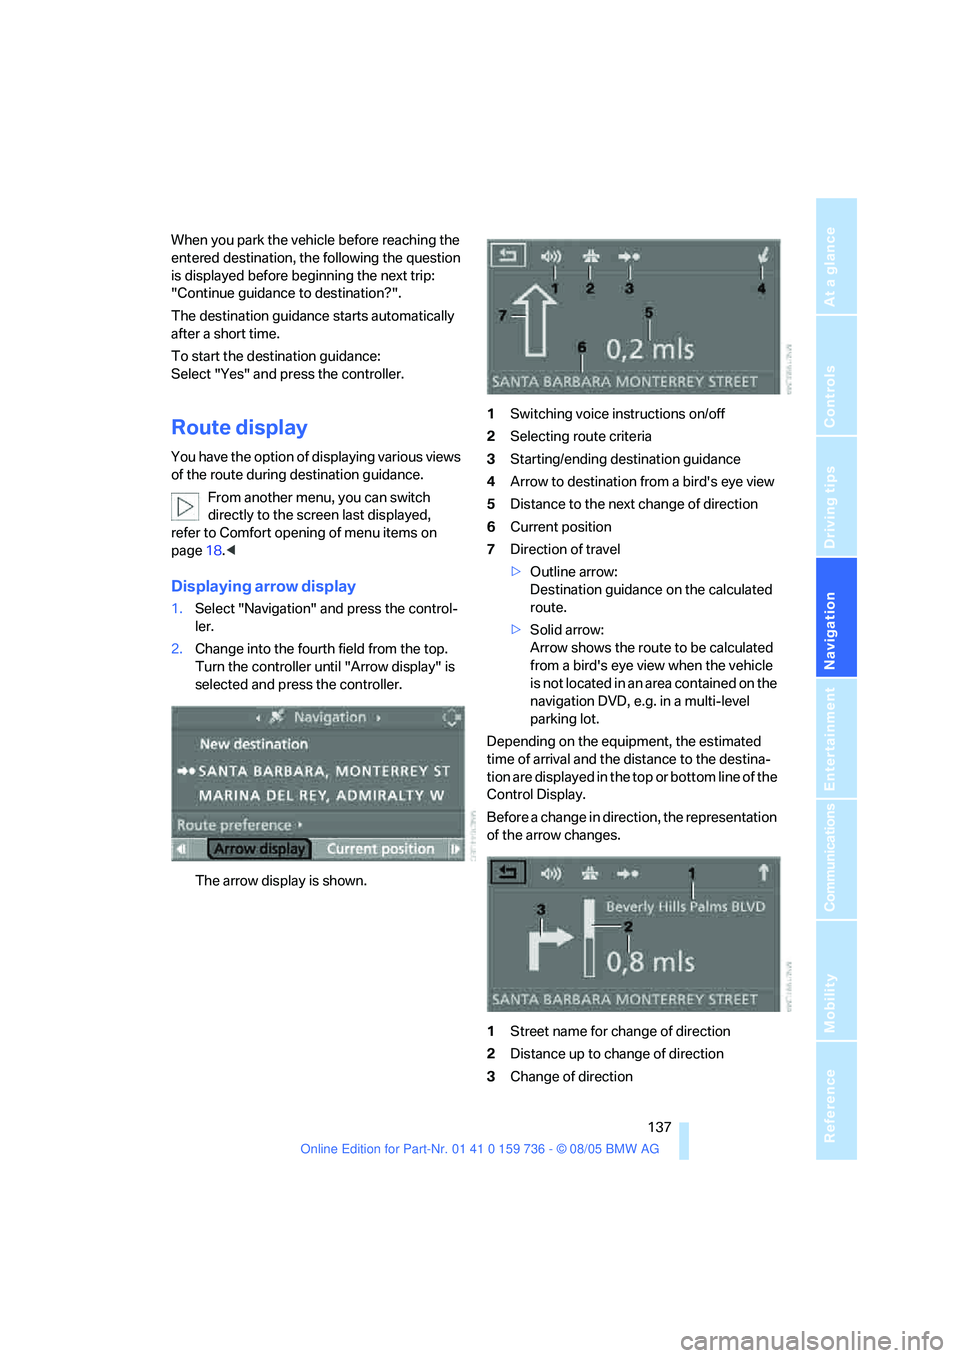
Displaying arrow display
1.Select "Navigation" and press the control-
ler.
2.Change into the fourth field from the top.
Turn the controller until "Arrow display" is
selected and press the controller.
The arrow display is shown.1Switching voice instructions on/off
2Selecting route criteria
3Starting/ending destination guidance
4Arrow to destination from a bird's eye view
5Distance to the next change of direction
6Current position
7Direction of travel
>Outline arrow:
Destination guidance on the calculated
route.
>Solid arrow:
Arrow shows the route to be calculated
from a bird's eye view when the vehicle
is not located in an area contained on the
navigation DVD, e.g. in a multi-level
parking lot.
Depending on the equipment, the estimated
time of arrival and the distance to the destina-
tion are displayed in the top or bottom line of the
Control Display.
Before a change in direction, the representation
of the arrow changes.
1Street name for change of direction
2Distance up to change of direction
3Change of direction
Page 139 of 248
Destination guidance
138 To exit the menu:
Select the arrow and press the controller.
Displaying map display
You can have your current position displayed on
a map. After starting the destination guidance,
the planned route is shown on the map.
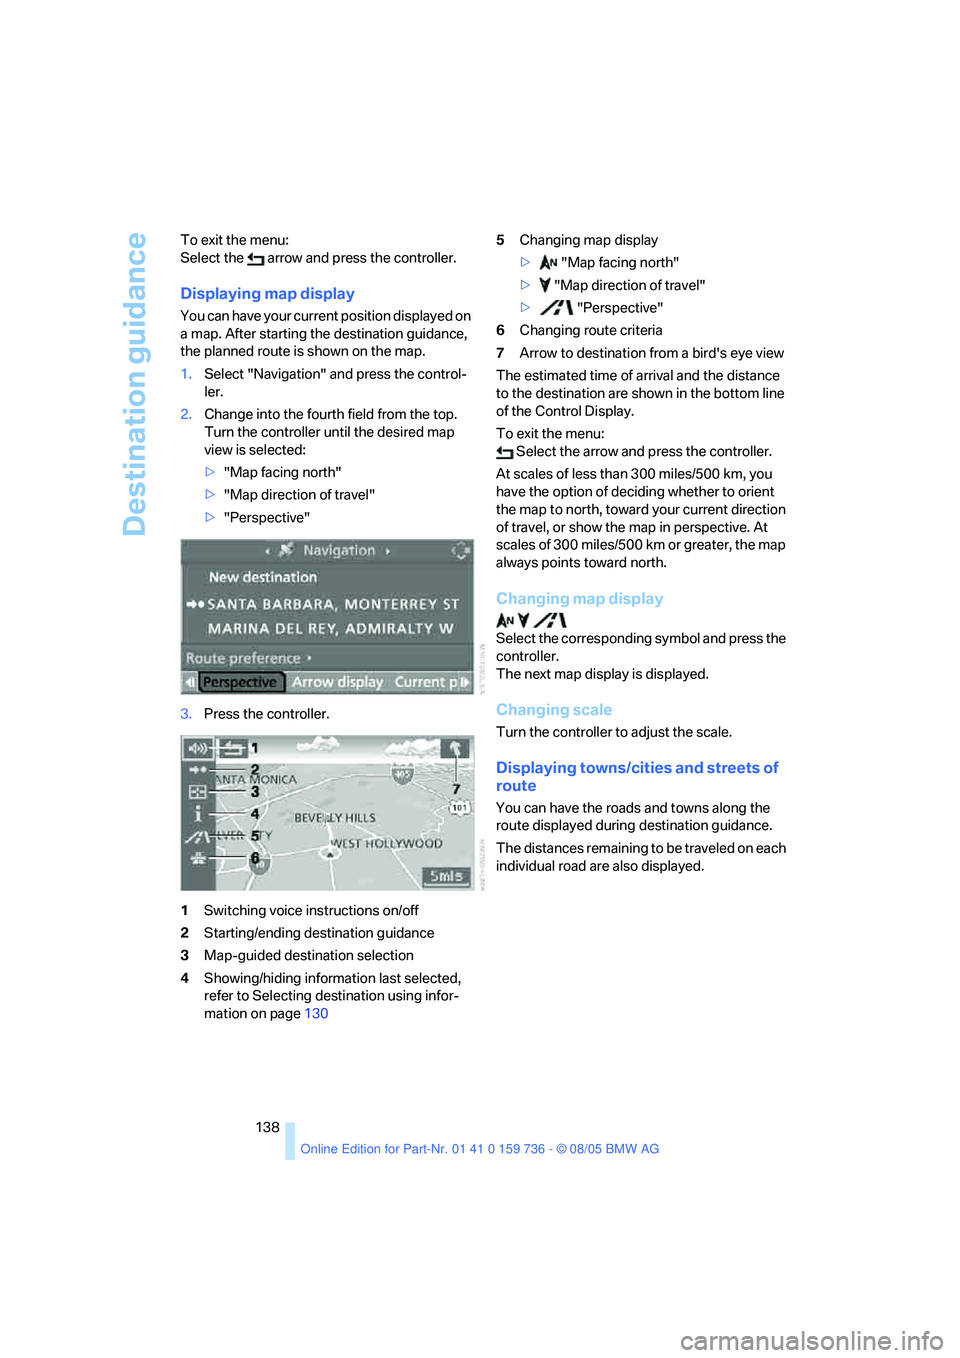
1.Select "Navigation" and press the control-
ler.
2.Change into the fourth field from the top.
Turn the controller until the desired map
view is selected:
>"Map facing north"
>"Map direction of travel"
>"Perspective"
3.Press the controller.
1Switching voice instructions on/off
2Starting/ending destination guidance
3Map-guided destination selection
4Showing/hiding information last selected,
refer to Selecting destination using infor-
mation on page1305Changing map display
> "Map facing north"
> "Map direction of travel"
> "Perspective"
6Changing route criteria
7Arrow to destination from a bird's eye view
The estimated time of arrival and the distance
to the destination are shown in the bottom line
of the Control Display.
To exit the menu:
Select the arrow and press the controller.
At scales of less than 300 miles/500 km, you
have the option of deciding whether to orient
the map to north, toward your current direction
of travel, or show the map in perspective. At
scales of 300 miles/500 km or greater, the map
always points toward north.
Changing map display
Select the corresponding symbol and press the
controller.
The next map display is displayed.
Changing scale
Turn the controller to adjust the scale.
Displaying towns/cities and streets of
route
You can have the roads and towns along the
route displayed during destination guidance.
The distances remaining to be traveled on each
individual road are also displayed.
Page 140 of 248
Navigation
Driving tips
139Reference
At a glance
Controls
Communications
Entertainment
Mobility
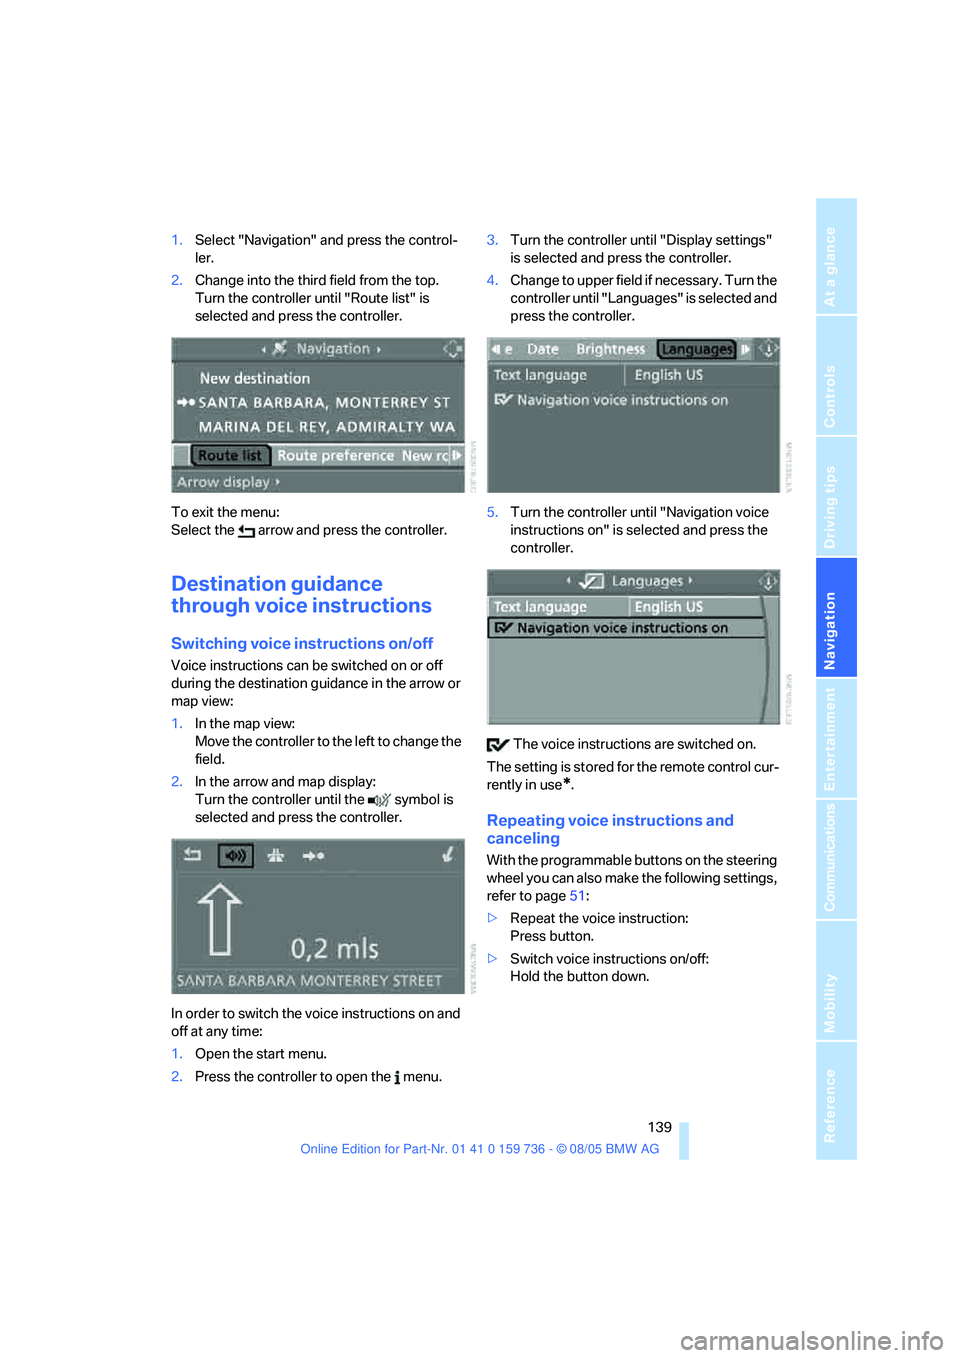
1.Select "Navigation" and press the control-
ler.
2.Change into the third field from the top.
Turn the controller until "Route list" is
selected and press the controller.
To exit the menu:
Select the arrow and press the controller.
Destination guidance
through voice instructions
Switching voice instructions on/off
Voice instructions can be switched on or off
during the destination guidance in the arrow or
map view:
1.In the map view:
Move the controller to the left to change the
field.
2.In the arrow and map display:
Turn the controller until the symbol is
selected and press the controller.
In order to switch the voice instructions on and
off at any time:
1.Open the start menu.
2.Press the controller to open the menu.3.Turn the controller until "Display settings"
is selected and press the controller.
4.Change to upper field if necessary. Turn the
controller until "Languages" is selected and
press the controller.
5.Turn the controller until "Navigation voice
instructions on" is selected and press the
controller.
The voice instructions are switched on.
The setting is stored for the remote control cur-
rently in use
*.
Repeating voice instructions and
canceling
With the programmable buttons on the steering
wheel you can also make the following settings,
refer to page51:
>Repeat the voice instruction:
Press button.
>Switch voice instructions on/off:
Hold the button down.
Page 151 of 248
Radio
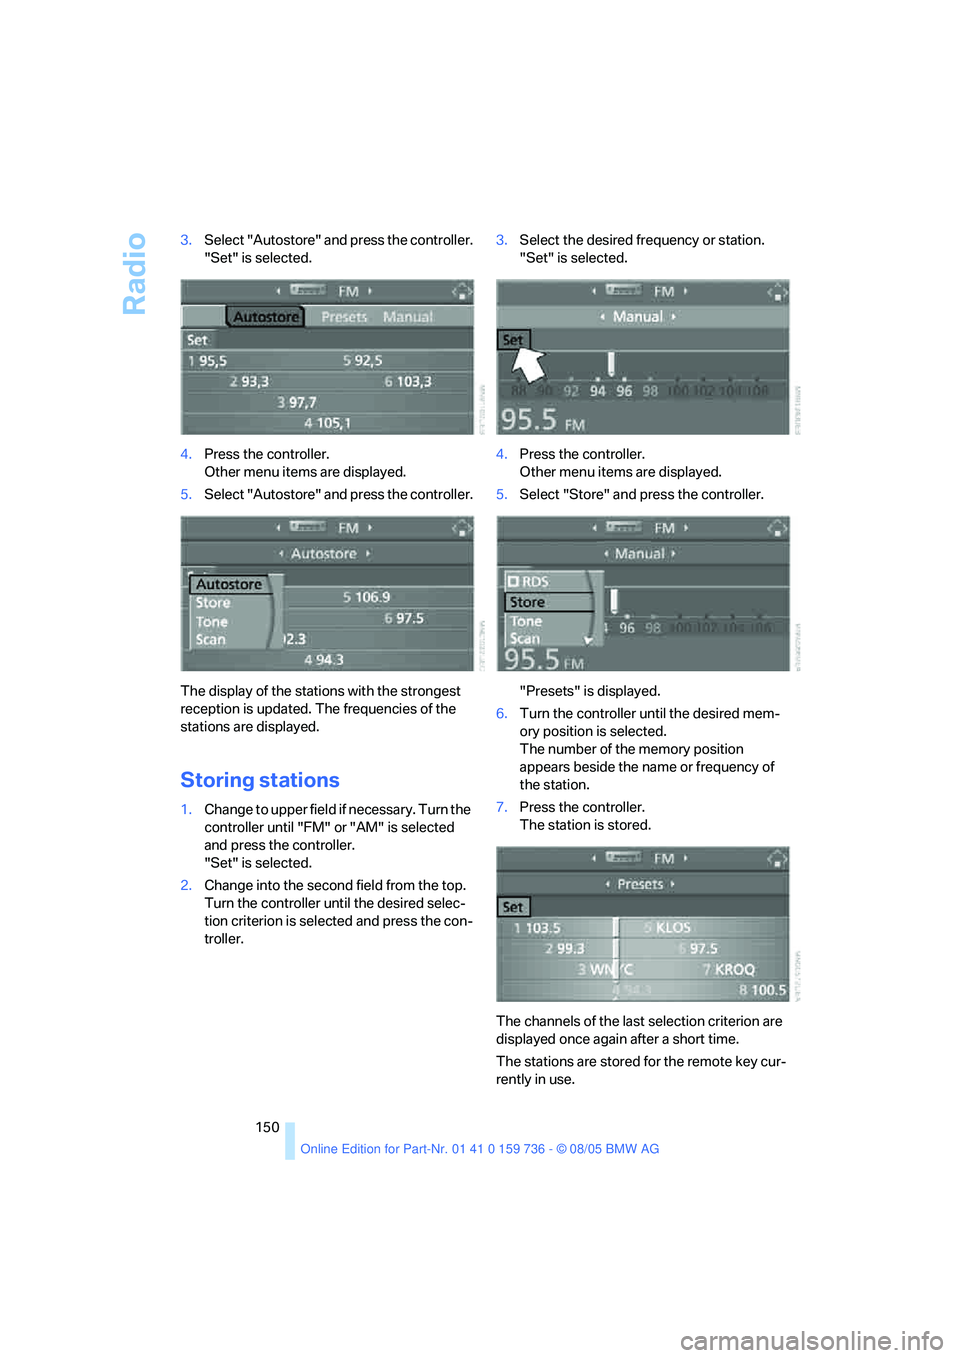
150 3.Select "Autostore" and press the controller.
"Set" is selected.
4.Press the controller.
Other menu items are displayed.
5.Select "Autostore" and press the controller.
The display of the stations with the strongest
reception is updated. The frequencies of the
stations are displayed.
Storing stations
1.Change to upper field if necessary. Turn the
controller until "FM" or "AM" is selected
and press the controller.
"Set" is selected.
2.Change into the second field from the top.
Turn the controller until the desired selec-
tion criterion is selected and press the con-
troller.3.Select the desired frequency or station.
"Set" is selected.
4.Press the controller.
Other menu items are displayed.
5.Select "Store" and press the controller.
"Presets" is displayed.
6.Turn the controller until the desired mem-
ory position is selected.
The number of the memory position
appears beside the name or frequency of
the station.
7.Press the controller.
The station is stored.
The channels of the last selection criterion are
displayed once again after a short time.
The stations are stored for the remote key cur-
rently in use.
Page 169 of 248
Telephoning
168
Preparation with mobile phone
6.Additional operations must be carried out
on the mobile phone and differ depending
on the model, refer to the operating instruc-
tions of your mobile phone, e.g. find, con-
nect or link under Bluetooth device.
Logging on
Depending on your mobile phone, you will first
be requested consecutively via the display of
your mobile phone or the Control Display to
enter the Bluetooth passkey you specified.
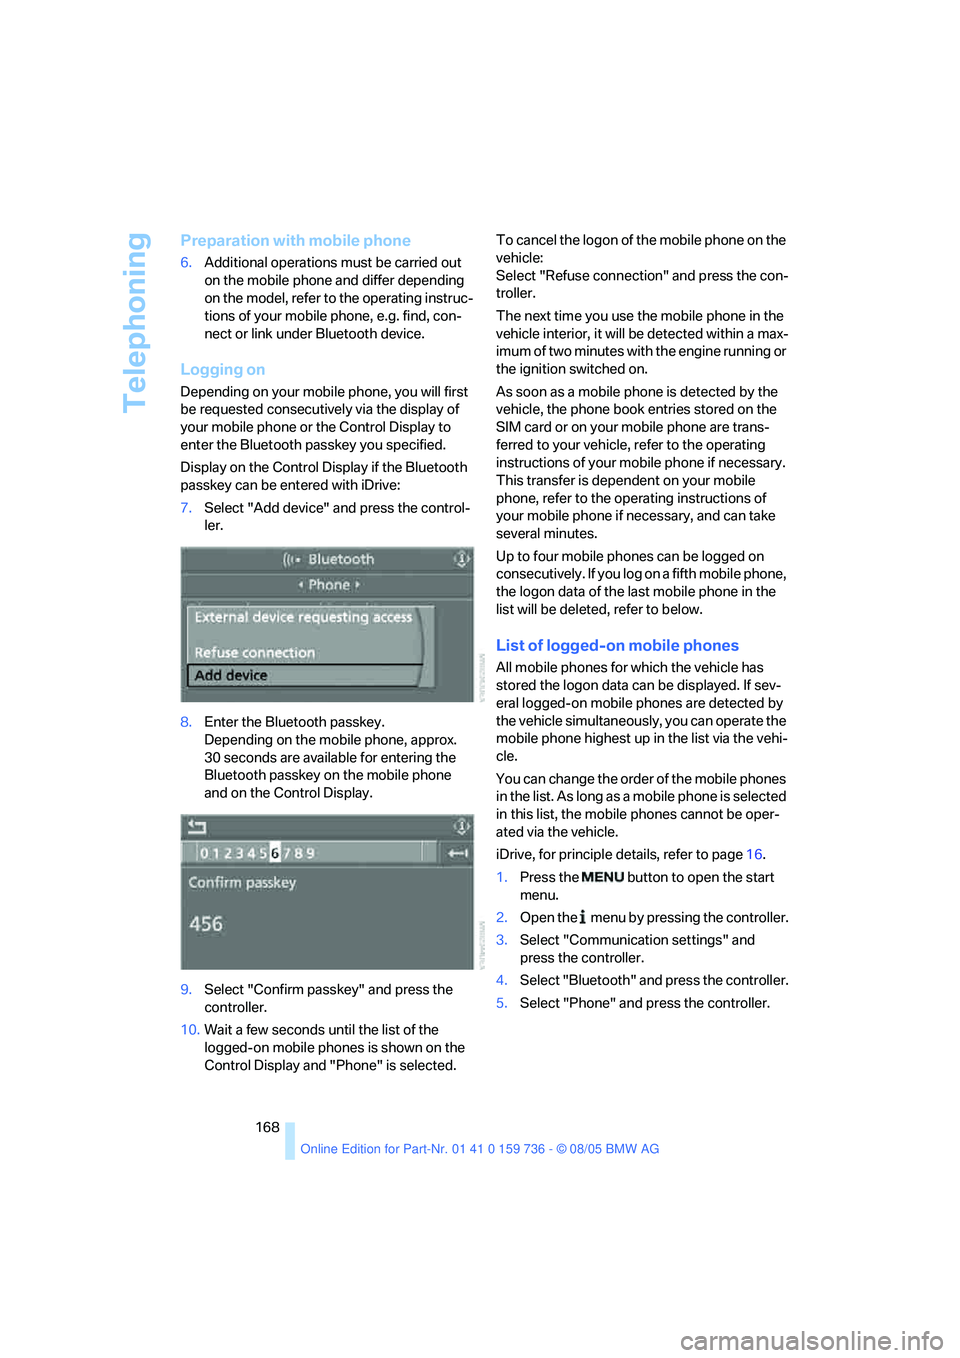
Display on the Control Display if the Bluetooth
passkey can be entered with iDrive:
7.Select "Add device" and press the control-
ler.
8.Enter the Bluetooth passkey.
Depending on the mobile phone, approx.
30 seconds are available for entering the
Bluetooth passkey on the mobile phone
and on the Control Display.
9.Select "Confirm passkey" and press the
controller.
10.Wait a few seconds until the list of the
logged-on mobile phones is shown on the
Control Display and "Phone" is selected.To cancel the logon of the mobile phone on the
vehicle:
Select "Refuse connection" and press the con-
troller.
The next time you use the mobile phone in the
vehicle interior, it will be detected within a max-
imum of two minutes with the engine running or
the ignition switched on.
As soon as a mobile phone is detected by the
vehicle, the phone book entries stored on the
SIM card or on your mobile phone are trans-
ferred to your vehicle, refer to the operating
instructions of your mobile phone if necessary.
This transfer is dependent on your mobile
phone, refer to the operating instructions of
your mobile phone if necessary, and can take
several minutes.
Up to four mobile phones can be logged on
consecutively. If you log on a fifth mobile phone,
the logon data of the last mobile phone in the
list will be deleted, refer to below.
List of logged-on mobile phones
All mobile phones for which the vehicle has
stored the logon data can be displayed. If sev-
eral logged-on mobile phones are detected by
the vehicle simultaneously, you can operate the
mobile phone highest up in the list via the vehi-
cle.
You can change the order of the mobile phones
in the list. As long as a mobile phone is selected
in this list, the mobile phones cannot be oper-
ated via the vehicle.
iDrive, for principle details, refer to page16.
1.Press the button to open the start
menu.
2.Open the menu by pressing the controller.
3.Select "Communication settings" and
press the controller.
4.Select "Bluetooth" and press the controller.
5.Select "Phone" and press the controller.
Page 210 of 248
Mobility
209Reference
At a glance
Controls
Driving tips
Communications
Navigation
Entertainment
When you mount wheels other than Genu-
ine BMW light-alloy wheels, different lug
bolts may also be required.
4.Screw in the remaining lug bolts. Tighten all
the bolts securely in a diagonal pattern.
5.Lower the vehicle and remove the jack from
beneath the vehicle.
After mounting
1.Tighten the lug bolts in a diagonal pattern.
To ensure safety, always have the
lug bolts checked with a calibrated
torque wrench as soon as possible to
ensure that they are tightened to the speci-
fied torque. The tightening torque is
88.5 lb ft/120 Nm.<
2.When stowing the wheel and tools in the
vehicle, execute these steps in the reverse
order.
3.Check and correct the tire inflation pressure
at the earliest opportunity.
Protect valve stems and valve stem
seal caps against dirt and contamina-
tion. Dirt in valve stems is a frequent source
of gradual air loss.<
4.Initialize the Flat Tire Monitor, refer to
page88.
5.Replace the damaged tire as soon as possi-
ble and have the new wheel/tire balanced.
Driving with compact wheel
Drive reservedly and do not exceed a speed of
50 mph/80 km/h.
The driving characteristics change, for example
reduced track stability on braking, extended
braking distance, and altered self-steering
characteristics in the limit range. In conjunction
with winter tires, these characteristics are more
pronounced.
Only one compact wheel may be
mounted. You should re-equip with
wheels and tires of the original size as quickly as
possible.<
Vehicle battery
Battery care
The battery is 100 % maintenance-free, i.e., the
electrolyte will last for the life of the battery
when the vehicle is operated in a temperate cli-
mate. Your BMW center will be glad to advise in
all matters concerning the battery.
Charging battery
Only charge the battery in the vehicle via the
terminals in the engine compartment with the
engine off. Connections, refer to Jump starting
on page212.
Disposal
Have old batteries disposed of by your
BMW center or hand them in to a recy-
cling center. Maintain the battery in an upright
position for transport and storage. Always
restrain the battery to prevent it from tipping
over during transport.<
Power failure
After a temporary power loss, the functioning of
some equipment may be limited and require
reinitialization. Individual settings are also lost
and must be updated:
>Seat, mirror and steering wheel memory
The positions must be stored again, refer to
page45.
>Time and Date
The values must be updated, refer to
page80.
>Radio
Stations must be stored again if necessary,
refer to page150.
>Navigation system
Wait until the system starts, refer to
page141.
Page 231 of 248
Everything from A to Z
230 CBS Condition Based
Service201
"CD"144,157
CD changer157
– controls144
– fast forward/reverse161
– installation location161
– playing a track159
– random order160
– repeating a track160
– selecting a CD157
– selecting a track158
– switching on/off144
– tone control145
– volume145
CD player157
– controls144
– fast forward/reverse161
– playing a track159
– random order160
– repeating a track160
– selecting a track158
– switching on/off144
– tone control145
– volume145
Center armrest
– front106
– rear109
Center brake lamp206
Center console14
"Central locking"30
Central locking system29
– comfort access37
– from inside vehicle32
Changes, technical
– refer to For your own
safety5
– refer to Parts and
accessories6
Changing settings on Control
Display80
Changing the language on the
Control Display82
Changing units of measure on
Control Display81
Changing wheels194,207
CHECK button78
Check Control77"Check Control
messages"78
Check Gas Cap187
Checking the air pressure,
refer to Tire inflation
pressure188
Child-restraint fixing system
LATCH
54
Child restraints52
Child-restraint systems52
Child-safety lock55
Child seats52
Chime, refer to Check
Control77
Chock207
Chrome parts, care, refer to
Caring for your vehicle
brochure
Cigarette lighter108
Cleaning, refer to Caring for
your vehicle brochure
"Climate"48,99
Clock72
– 12h/24h mode81
– setting time and date80
Closing
– from inside32
– from outside30
Closing fuel filler cap187
Clothes hooks107
Cockpit10
Cold start, refer to Starting
engine57
"Comfort", active backrest
width adjustment45
Comfort access37
– observe in car wash39
– replacing battery39
Comfort area, refer to All
about the center console14
Comfort operation
– windows with comfort
access38
– with comfort access38
Comfort seat44
"Communication"170,181
"Communication
settings"180Compact Disc
– refer to CD changer157
– refer to CD player157
Compact wheel
– inflation pressure189
– wheel change208
Compartment for remote
control, refer to Ignition
lock56
Compartments, refer to
Storage compartments107
Compressed audio files157
Computer73
– displays on Control
Display74
– hour signal81
"Concert hall", refer to Tone
control146
Condition Based Service
CBS201
"Confirmation"
31
Connecting car vacuum
cleaner, refer to Connecting
electrical devices108
Consumption, refer to
Average consumption73
Consumption indicator,
Energy Control73
Consumption statistics, refer
to Average fuel
consumption73
"Continue guidance to
destination?"137
Control Center, refer to
iDrive16
Control Display, refer to
iDrive16
– setting brightness81
Controller, refer to iDrive16
Controls, refer to Cockpit10
Convenience operation
– glass sunroof30
– windows30
Convenience start, refer to
Starting engine57
Coolant199
– checking level199
– temperature72
Cooling, maximum100