2006 BMW 525I turn signal
[x] Cancel search: turn signalPage 79 of 248
Everything under control
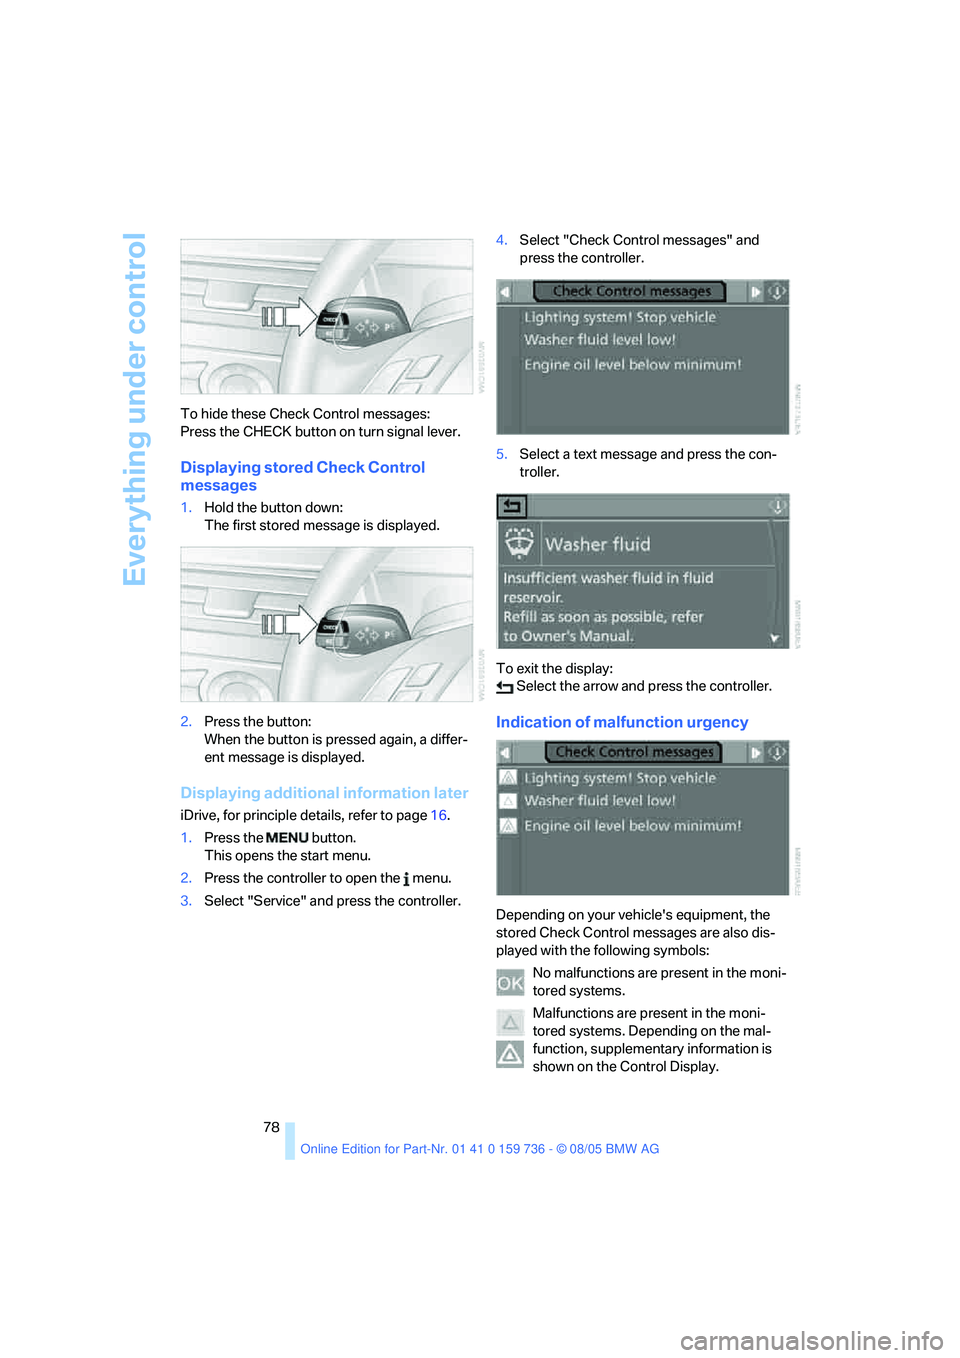
78 To hide these Check Control messages:
Press the CHECK button on turn signal lever.
Displaying stored Check Control
messages
1.Hold the button down:
The first stored message is displayed.
2.Press the button:
When the button is pressed again, a differ-
ent message is displayed.
Displaying additional information later
iDrive, for principle details, refer to page16.
1.Press the button.
This opens the start menu.
2.Press the controller to open the menu.
3.Select "Service" and press the controller.4.Select "Check Control messages" and
press the controller.
5.Select a text message and press the con-
troller.
To exit the display:
Select the arrow and press the controller.
Indication of malfunction urgency
Depending on your vehicle's equipment, the
stored Check Control messages are also dis-
played with the following symbols:
No malfunctions are present in the moni-
tored systems.
Malfunctions are present in the moni-
tored systems. Depending on the mal-
function, supplementary information is
shown on the Control Display.
Page 82 of 248
Controls
81Reference
At a glance
Driving tips
Communications
Navigation
Entertainment
Mobility
Switching on hour signal*
You will hear three tones just before each full
hour.
Select "Hour memo" and press the controller.
The hour signal is activated.
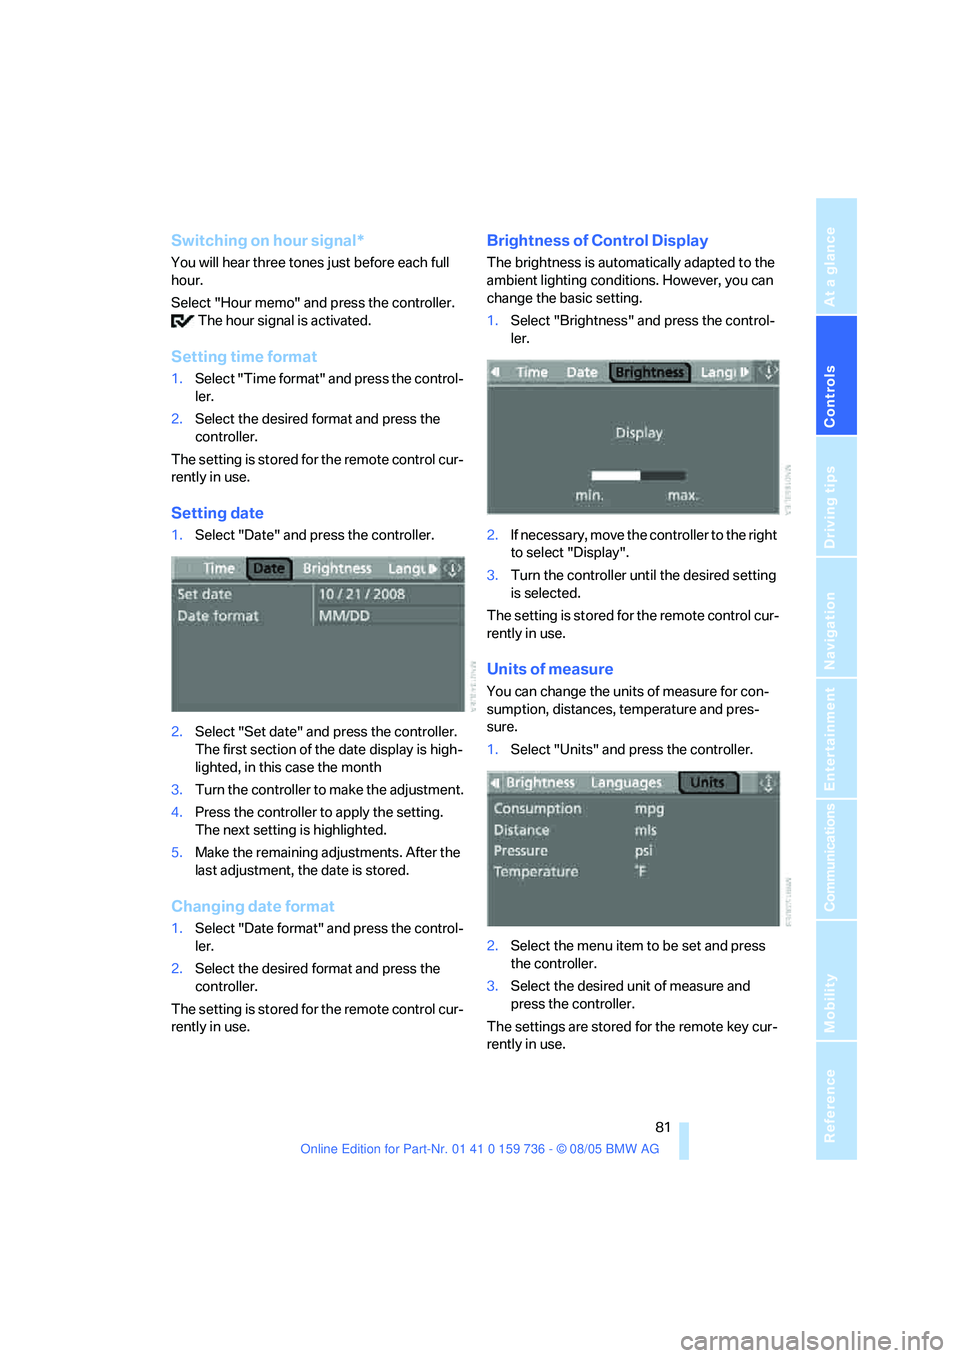
Setting time format
1.Select "Time format" and press the control-
ler.
2.Select the desired format and press the
controller.
The setting is stored for the remote control cur-
rently in use.
Setting date
1.Select "Date" and press the controller.
2.Select "Set date" and press the controller.
The first section of the date display is high-
lighted, in this case the month
3.Turn the controller to make the adjustment.
4.Press the controller to apply the setting.
The next setting is highlighted.
5.Make the remaining adjustments. After the
last adjustment, the date is stored.
Changing date format
1.Select "Date format" and press the control-
ler.
2.Select the desired format and press the
controller.
The setting is stored for the remote control cur-
rently in use.
Brightness of Control Display
The brightness is automatically adapted to the
ambient lighting conditions. However, you can
change the basic setting.
1.Select "Brightness" and press the control-
ler.
2.If necessary, move the controller to the right
to select "Display".
3.Turn the controller until the desired setting
is selected.
The setting is stored for the remote control cur-
rently in use.
Units of measure
You can change the units of measure for con-
sumption, distances, temperature and pres-
sure.
1.Select "Units" and press the controller.
2.Select the menu item to be set and press
the controller.
3.Select the desired unit of measure and
press the controller.
The settings are stored for the remote key cur-
rently in use.
Page 97 of 248
Lamps
96
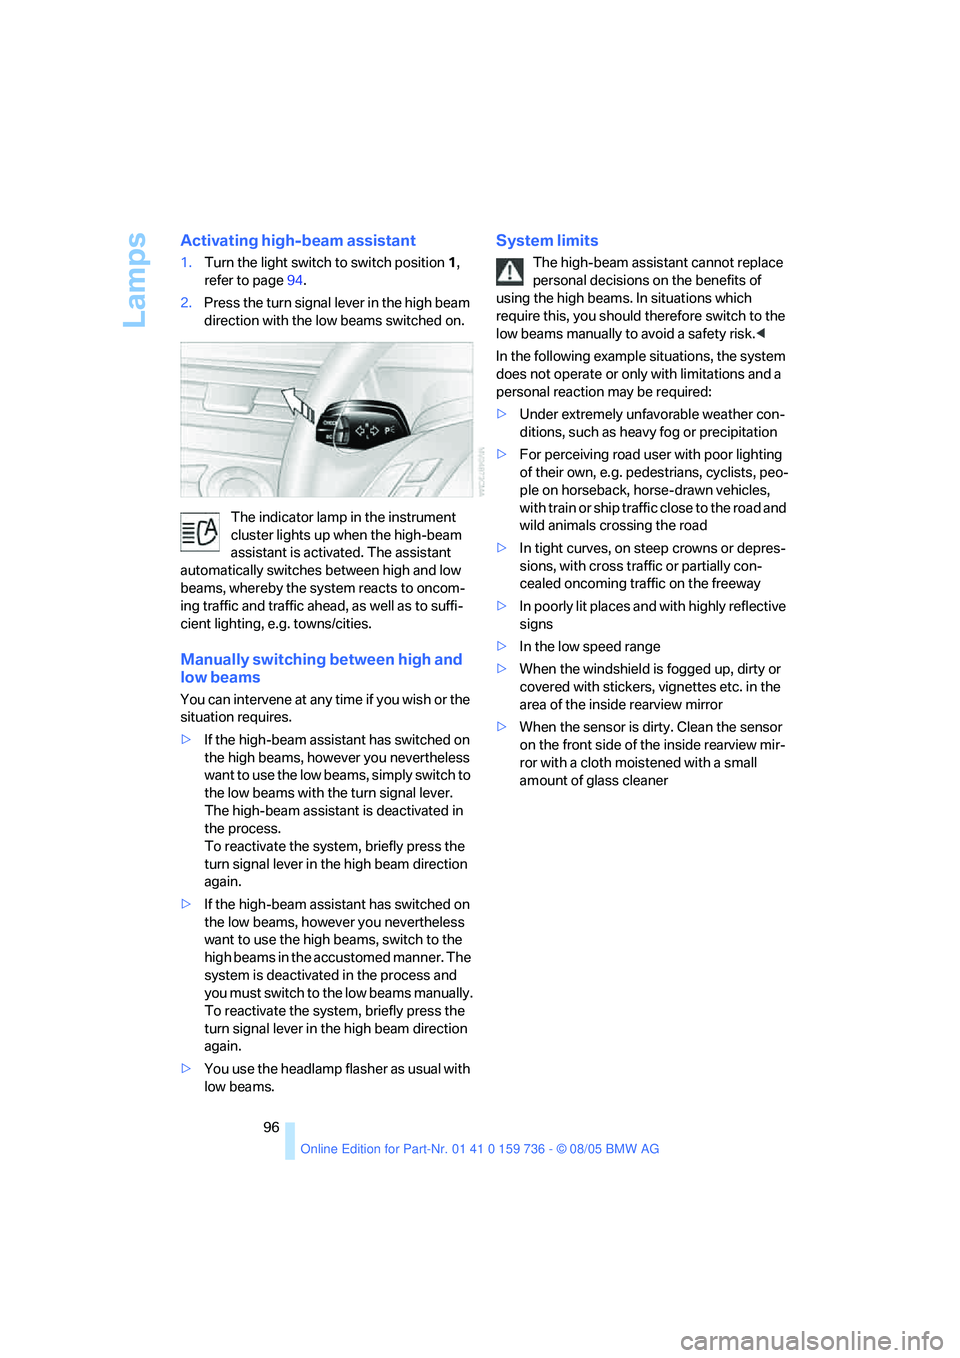
Activating high-beam assistant
1.Turn the light switch to switch position1,
refer to page94.
2.Press the turn signal lever in the high beam
direction with the low beams switched on.
The indicator lamp in the instrument
cluster lights up when the high-beam
assistant is activated. The assistant
automatically switches between high and low
beams, whereby the system reacts to oncom-
ing traffic and traffic ahead, as well as to suffi-
cient lighting, e.g. towns/cities.
Manually switching between high and
low beams
You can intervene at any time if you wish or the
situation requires.
>If the high-beam assistant has switched on
the high beams, however you nevertheless
want to use the low beams, simply switch to
the low beams with the turn signal lever.
The high-beam assistant is deactivated in
the process.
To reactivate the system, briefly press the
turn signal lever in the high beam direction
again.
>If the high-beam assistant has switched on
the low beams, however you nevertheless
want to use the high beams, switch to the
high beams in the accustomed manner. The
system is deactivated in the process and
you must switch to the low beams manually.
To reactivate the system, briefly press the
turn signal lever in the high beam direction
again.
>You use the headlamp flasher as usual with
low beams.
System limits
The high-beam assistant cannot replace
personal decisions on the benefits of
using the high beams. In situations which
require this, you should therefore switch to the
low beams manually to avoid a safety risk.<
In the following example situations, the system
does not operate or only with limitations and a
personal reaction may be required:
>Under extremely unfavorable weather con-
ditions, such as heavy fog or precipitation
>For perceiving road user with poor lighting
of their own, e.g. pedestrians, cyclists, peo-
ple on horseback, horse-drawn vehicles,
with train or ship traffic close to the road and
wild animals crossing the road
>In tight curves, on steep crowns or depres-
sions, with cross traffic or partially con-
cealed oncoming traffic on the freeway
>In poorly lit places and with highly reflective
signs
>In the low speed range
>When the windshield is fogged up, dirty or
covered with stickers, vignettes etc. in the
area of the inside rearview mirror
>When the sensor is dirty. Clean the sensor
on the front side of the inside rearview mir-
ror with a cloth moistened with a small
amount of glass cleaner
Page 142 of 248
Navigation
Driving tips
141Reference
At a glance
Controls
Communications
Entertainment
Mobility
What to do if …
What to do if …
>a navigation DVD is inserted, but an instruc-
tion to insert the DVD appears on the Con-
trol Display?
The navigation DVD may not be the correct
DVD for the navigation system. This infor-
mation is indicated on the DVD label.
>you request the current position of your
vehicle, but do not receive a precise dis-
play?
The system is unable to receive enough
GPS signals at your current position due to
obstructions, your current position is not
yet available on your navigation DVD, or the
system is in the process of calculating your
current position. As a rule, reception is
guaranteed when you are in the open.
>the destination guidance does not accept a
destination?
The data of the destination is not stored on
the navigation DVD that is loaded. Select a
destination that is as close as possible to
the original.
>the destination guidance does not accept
an address without the street name?
On the navigation DVD, no downtown area
can be determined for the city or town
entered. Enter any street, or a destination
such as the railway station in the selected
town, and then start the destination guid-
ance.
>you want to enter a destination for the des-
tination guidance, but it is not possible to
select the letters for your desired entry?
The data of the destination is not stored on
the navigation DVD that is loaded. In this
case, the system will not offer you any let-
ters to choose from. Select a destination
that is as close as possible to the original.>the system stops furnishing directions on
which way to turn as you approach intersec-
tions?
You are driving in an area that has not yet
been completely recorded on the naviga-
tion DVD. Instead of an arrow indicating a
turn, you will see an arrow which indicates
the general direction of your planned route.
Or you have left the recommended route
and the system requires a few seconds to
calculate a new recommended route.
>the navigation system does not react to
entries?
If the battery was disconnected, it takes
about 10 minutes before the system is once
again operational.
Page 149 of 248
Radio
148
Radio
Your radio provides reception the FM and AM
wavebands.
Listening to radio
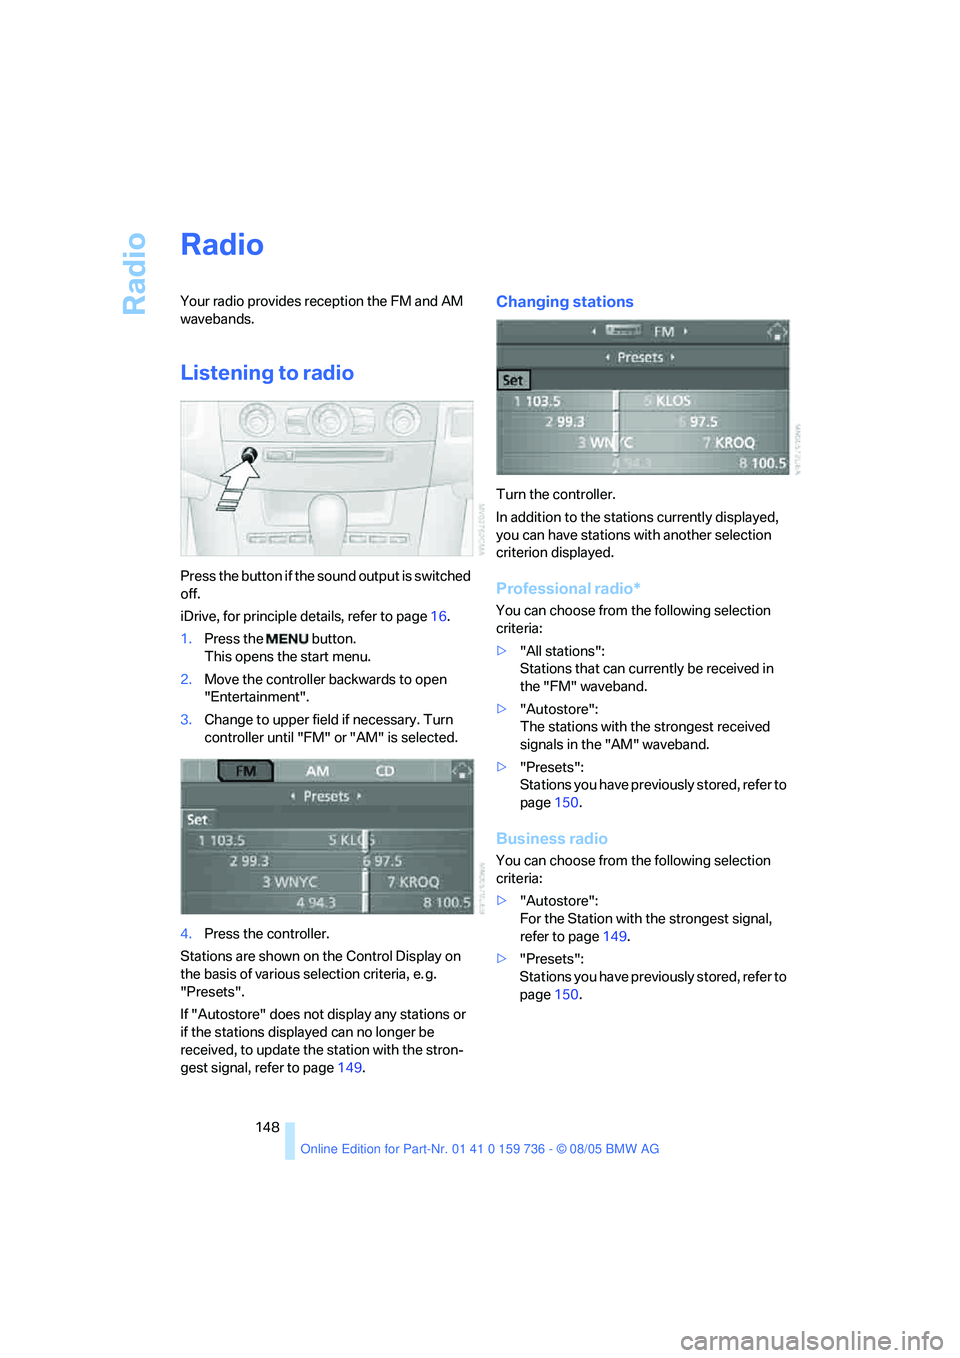
Press the button if the sound output is switched
off.
iDrive, for principle details, refer to page16.
1.Press the button.
This opens the start menu.
2.Move the controller backwards to open
"Entertainment".
3.Change to upper field if necessary. Turn
controller until "FM" or "AM" is selected.
4.Press the controller.
Stations are shown on the Control Display on
the basis of various selection criteria, e. g.
"Presets".
If "Autostore" does not display any stations or
if the stations displayed can no longer be
received, to update the station with the stron-
gest signal, refer to page149.
Changing stations
Turn the controller.
In addition to the stations currently displayed,
you can have stations with another selection
criterion displayed.
Professional radio*
You can choose from the following selection
criteria:
>"All stations":
Stations that can currently be received in
the "FM" waveband.
>"Autostore":
The stations with the strongest received
signals in the "AM" waveband.
>"Presets":
Stations you have previously stored, refer to
page150.
Business radio
You can choose from the following selection
criteria:
>"Autostore":
For the Station with the strongest signal,
refer to page149.
>"Presets":
Stations you have previously stored, refer to
page150.
Page 206 of 248
Mobility
205Reference
At a glance
Controls
Driving tips
Communications
Navigation
Entertainment
system, there is a danger of fatal injuries when
work is carried out improperly.<
Parking and roadside parking lamps
In the event of a malfunction, please go to your
BMW center or a workshop that works accord-
ing to BMW repair procedures with correspond-
ingly trained personnel.
Turn signals, front
Bulb 21 watts, PY 21 W
1.Turn the bulb holder to the left and remove.
2.Apply gentle pressure to the bulb while
turning it to the left for removal and replace-
ment.
Side-mounted turn signals
Bulb 5 watts, W 5 W
1.Press back against the front edge of the
light with the tip of your finger, then pivot it
out.
2.Turn the bulb holder to the left and remove.
3.Remove the bulb for replacement.
Side marker lamps, front and rear
To replace, please go to your BMW center or a
workshop that works according to BMW repair procedures with correspondingly trained per-
sonnel.
Tail lamps
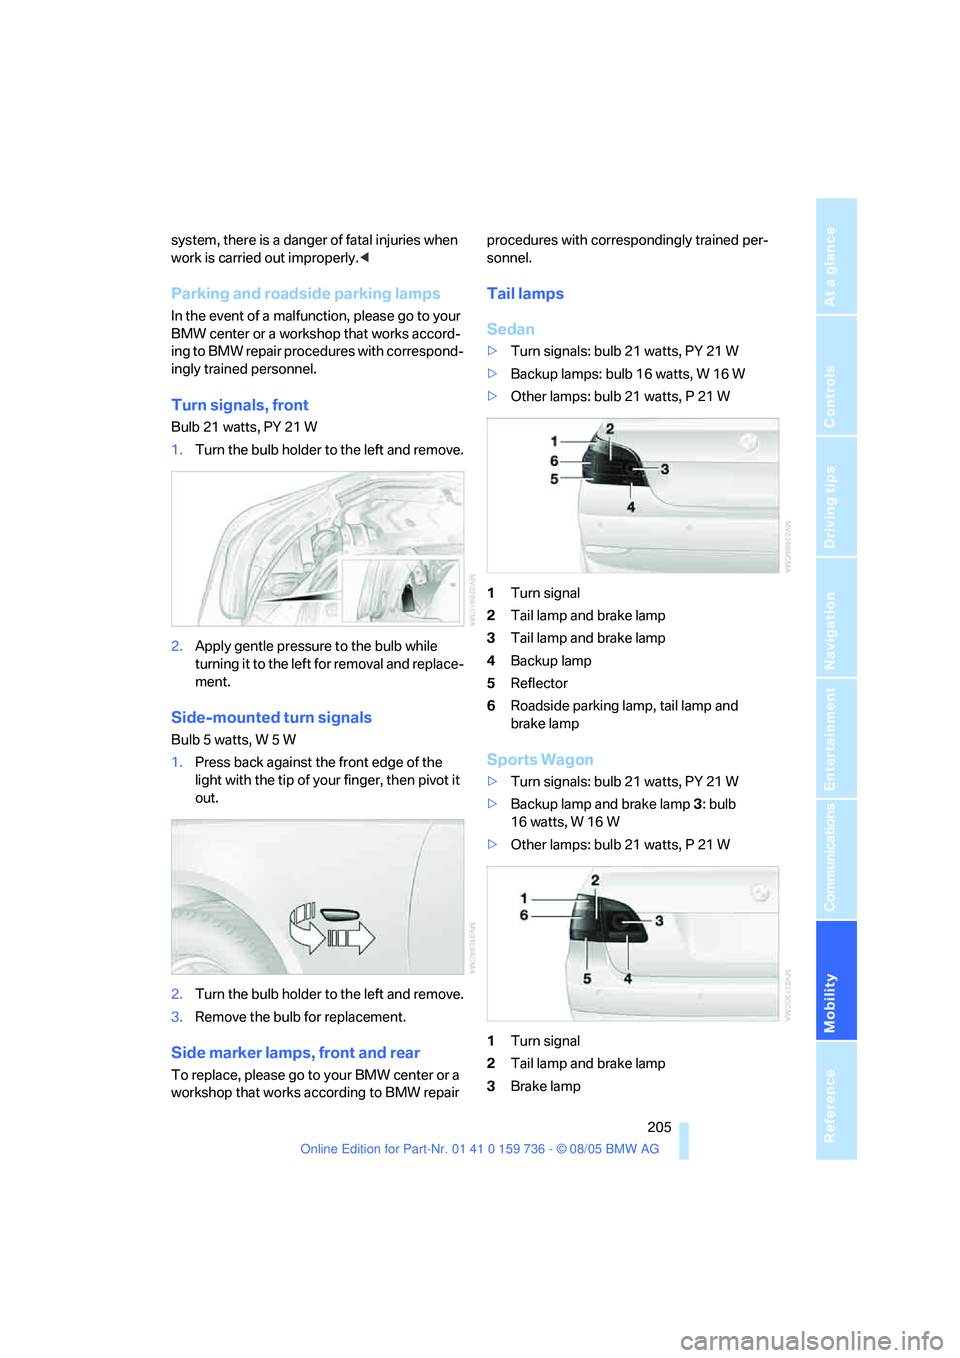
Sedan
>Turn signals: bulb 21 watts, PY 21 W
>Backup lamps: bulb 16 watts, W 16 W
>Other lamps: bulb 21 watts, P 21 W
1Turn signal
2Tail lamp and brake lamp
3Tail lamp and brake lamp
4Backup lamp
5Reflector
6Roadside parking lamp, tail lamp and
brake lamp
Sports Wagon
>Turn signals: bulb 21 watts, PY 21 W
>Backup lamp and brake lamp 3: bulb
16 watts, W 16 W
>Other lamps: bulb 21 watts, P 21 W
1Turn signal
2Tail lamp and brake lamp
3Brake lamp
Page 215 of 248
Giving and receiving assistance
214 Sedan:
It is located in the toolkit in the luggage com-
partment lid, refer to page203.
Sports Wagon:
It is located in the toolkit behind the left side
panel in the cargo area, refer to page203.
Use only the tow fitting provided with the
vehicle and screw it all the way in. Use the
tow fitting for towing only on roads. Avoid lateral
loading of the tow fitting, e.g. do not lift the vehi-
cle by the tow fitting. Otherwise damage to the
tow fitting and the vehicle can occur.<
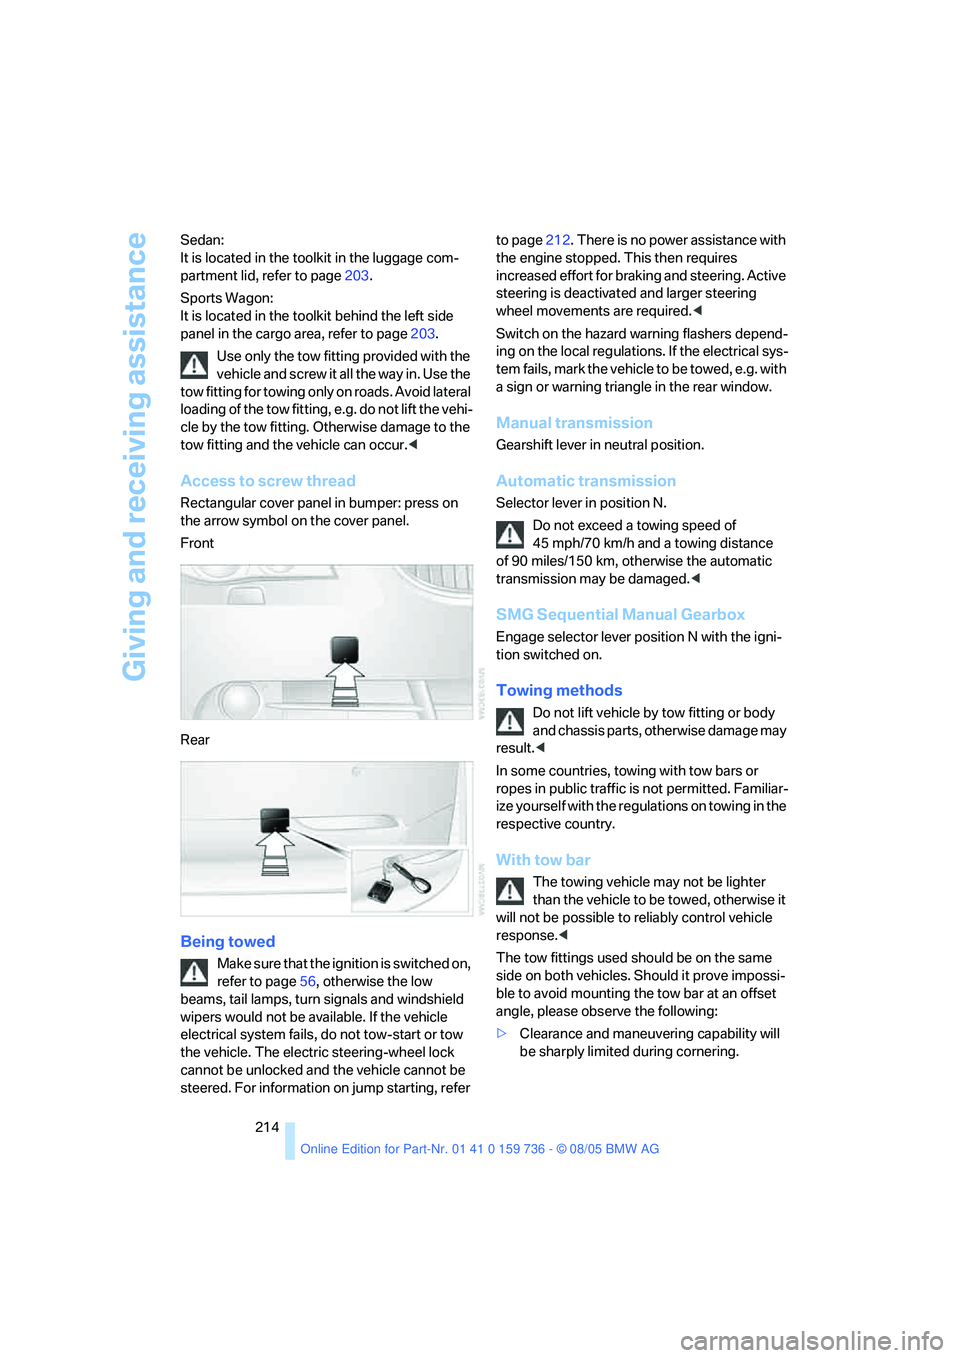
Access to screw thread
Rectangular cover panel in bumper: press on
the arrow symbol on the cover panel.
Front
Rear
Being towed
Make sure that the ignition is switched on,
refer to page56, otherwise the low
beams, tail lamps, turn signals and windshield
wipers would not be available. If the vehicle
electrical system fails, do not tow-start or tow
the vehicle. The electric steering-wheel lock
cannot be unlocked and the vehicle cannot be
steered. For information on jump starting, refer to page212. There is no power assistance with
the engine stopped. This then requires
increased effort for braking and steering. Active
steering is deactivated and larger steering
wheel movements are required.<
Switch on the hazard warning flashers depend-
ing on the local regulations. If the electrical sys-
tem fails, mark the vehicle to be towed, e.g. with
a sign or warning triangle in the rear window.
Manual transmission
Gearshift lever in neutral position.
Automatic transmission
Selector lever in position N.
Do not exceed a towing speed of
45 mph/70 km/h and a towing distance
of 90 miles/150 km, otherwise the automatic
transmission may be damaged.<
SMG Sequential Manual Gearbox
Engage selector lever position N with the igni-
tion switched on.
Towing methods
Do not lift vehicle by tow fitting or body
and chassis parts, otherwise damage may
result.<
In some countries, towing with tow bars or
ropes in public traffic is not permitted. Familiar-
ize yourself with the regulations on towing in the
respective country.
With tow bar
The towing vehicle may not be lighter
than the vehicle to be towed, otherwise it
will not be possible to reliably control vehicle
response.<
The tow fittings used should be on the same
side on both vehicles. Should it prove impossi-
ble to avoid mounting the tow bar at an offset
angle, please observe the following:
>Clearance and maneuvering capability will
be sharply limited during cornering.
Page 232 of 248
Reference 231
At a glance
Controls
Driving tips
Communications
Navigation
Entertainment
Mobility
Cornering Brake Control
CBC84
Country of destination for
navigation126
Courtesy lamps97
Cradle for telephone or mobile
phone106
Cruise control64,65
– active cruise control65
Cruising range73
Cup holders107
Curb weight, refer to
Weights221
Current fuel consumption73
"Current position"140
Current position
– displaying140
– entering133
– storing133
"Customer
Relations"181,183
Cylinders, refer to Engine
data218
D
Dashboard, refer to
Cockpit10
Data218
– capacities222
– dimensions219
– engine218
– technical data218
– weights221
"Date"81
Date72
– display format81
– retrieval72
– setting81
"Date format"81
Daytime driving lamps94
DBC Dynamic Brake
Control84
"Deactivated"46
Deactivating selector lever
interlock62
Decommissioning the vehicle,
refer to Caring for your
vehicle brochureDefect
– fuel filler door186
– glass sunroof41
– luggage compartment lid34
– tailgate35
Defrosting windows100
Defrosting windows and
removing condensation100
Defrost position, refer to
Defrosting windows100
"Delete address book" for
navigation134
"Delete all numbers" on the
mobile phone173
"Delete data" for
navigation134
"Delete" for mobile
phone173
Destination address
– deleting133
– entering125,128
Destination for navigation
– destination list131
– entry125
– selecting from address
book133
– selecting using
information130
– storing132
Destination guidance136
– bypassing route
sections140
– canceling voice
instructions51
– changing specified
route134
– displaying routes
137
– distance and arrival136
– interrupting136
– starting136
– terminating/continuing136
– voice instructions139
– volume of voice
instructions140
Destination list for
navigation131
Destinations recently driven
to131"Details" in audio mode159
"Dial" for mobile phone171
"Dial number"171
"Diamond button"51
Diamond button51
Digital clock72
Digital radio, refer to High
Definition Radio152
Dimensions219
Directional indicators, refer to
Turn signals62
Direction announcements,
refer to Voice
instructions139
Direction instructions, refer to
Voice instructions139
Directory for navigation, refer
to Address book132
Displacement, refer to Engine
data218
"Display"81
Display, refer to iDrive16
Display lighting, refer to
Instrument lighting97
"Display off"21
Displays, refer to Instrument
cluster12
"Display settings"80
Displays on the windshield,
refer to Head-Up Display92
Disposal
– battery of remote control
with comfort access39
– vehicle battery209
Distance, refer to
Computer74
Distance cruise control, refer
to Active cruise control65
"Distance to dest."74
Distance to destination, refer
to Computer74
Distance warning, refer to
PDC Park Distance
Control83
Divided rear seat back, refer to
Through-loading
system109
Door entry lighting97