2006 BMW 525I start stop button
[x] Cancel search: start stop buttonPage 80 of 248
Controls
79Reference
At a glance
Driving tips
Communications
Navigation
Entertainment
Mobility
The symbols also indicate the status of the ser-
vice requirements display, refer to page75.
Displays after completion of trip
Malfunction reports generated during the trip
are shown consecutively when you switch off
the ignition.
Before the display disappears, you can display
the messages once again. Press the CHECK
button for approx. 2 seconds. If several mes-
sages are present, you can continue to press
the CHECK button to view them in succession.
The display goes out
>automatically after a brief period
>when you press the CHECK button again
for approximately 2 seconds
Speed limit
You can enter a speed and a Check Control
message indicates when you have reached this
speed. This enables you, for example, to
receive warnings if you exceed a speed limit in
an urban area.
You are only warned of reaching this speed a
second time if your vehicle speed falls below it
again by at least 3 mph/5 km/h.
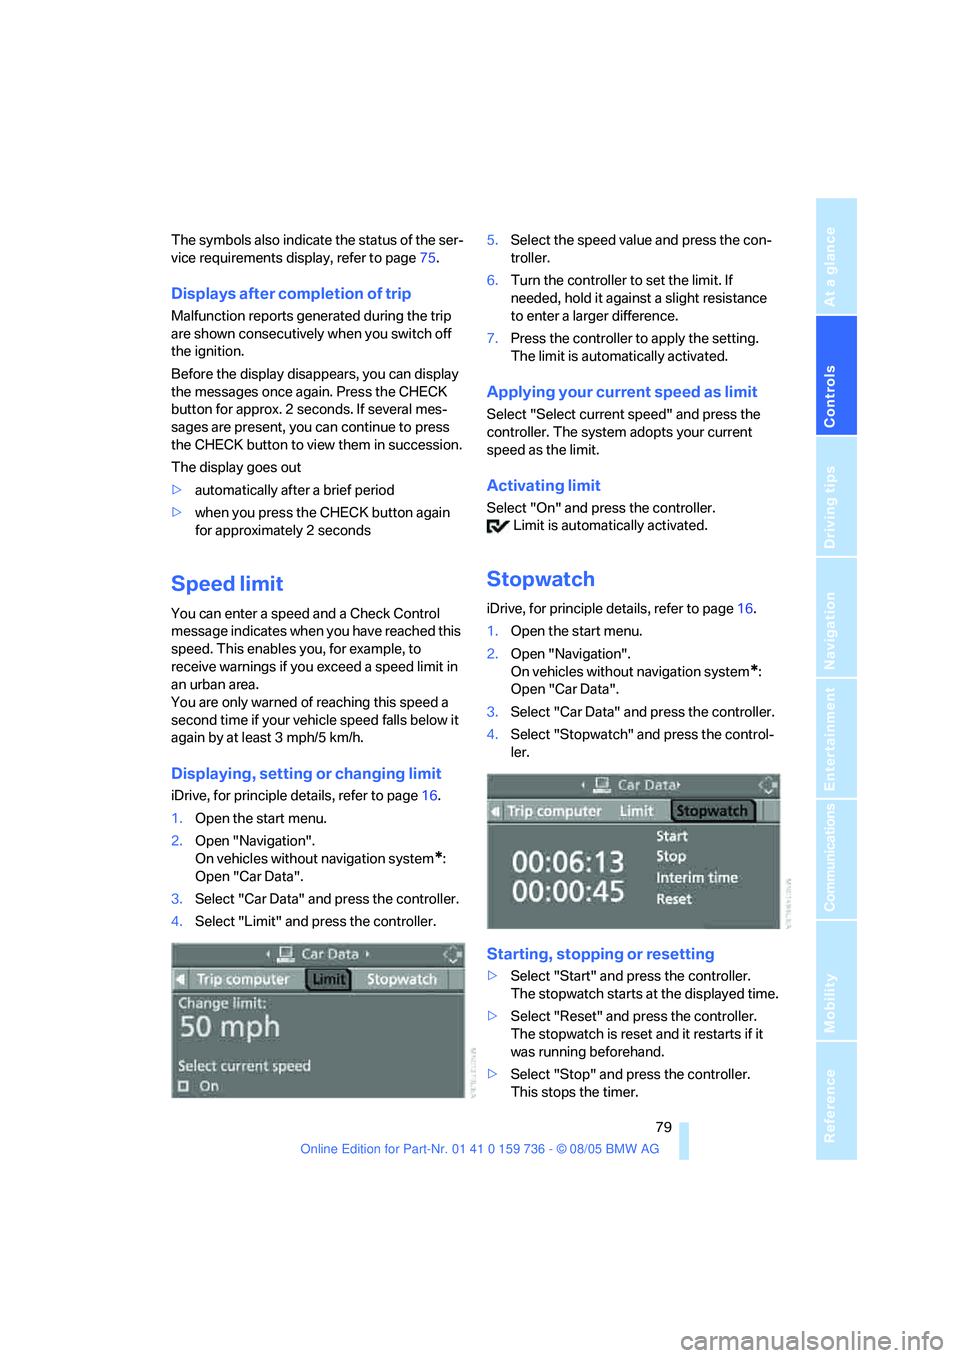
Displaying, setting or changing limit
iDrive, for principle details, refer to page16.
1.Open the start menu.
2.Open "Navigation".
On vehicles without navigation system
*:
Open "Car Data".
3.Select "Car Data" and press the controller.
4.Select "Limit" and press the controller.5.Select the speed value and press the con-
troller.
6.Turn the controller to set the limit. If
needed, hold it against a slight resistance
to enter a larger difference.
7.Press the controller to apply the setting.
The limit is automatically activated.
Applying your current speed as limit
Select "Select current speed" and press the
controller. The system adopts your current
speed as the limit.
Activating limit
Select "On" and press the controller.
Limit is automatically activated.
Stopwatch
iDrive, for principle details, refer to page16.
1.Open the start menu.
2.Open "Navigation".
On vehicles without navigation system
*:
Open "Car Data".
3.Select "Car Data" and press the controller.
4.Select "Stopwatch" and press the control-
ler.
Starting, stopping or resetting
>Select "Start" and press the controller.
The stopwatch starts at the displayed time.
>Select "Reset" and press the controller.
The stopwatch is reset and it restarts if it
was running beforehand.
>Select "Stop" and press the controller.
This stops the timer.
Page 81 of 248
Everything under control
80
Taking an intermediate time reading
Select "Interim time" and press the controller.
The interim time appears below the ongoing
primary stopwatch count.
All of the remaining functions remain
available at all times while the stopwatch
is running. The stopwatch continues operation
in the background.<
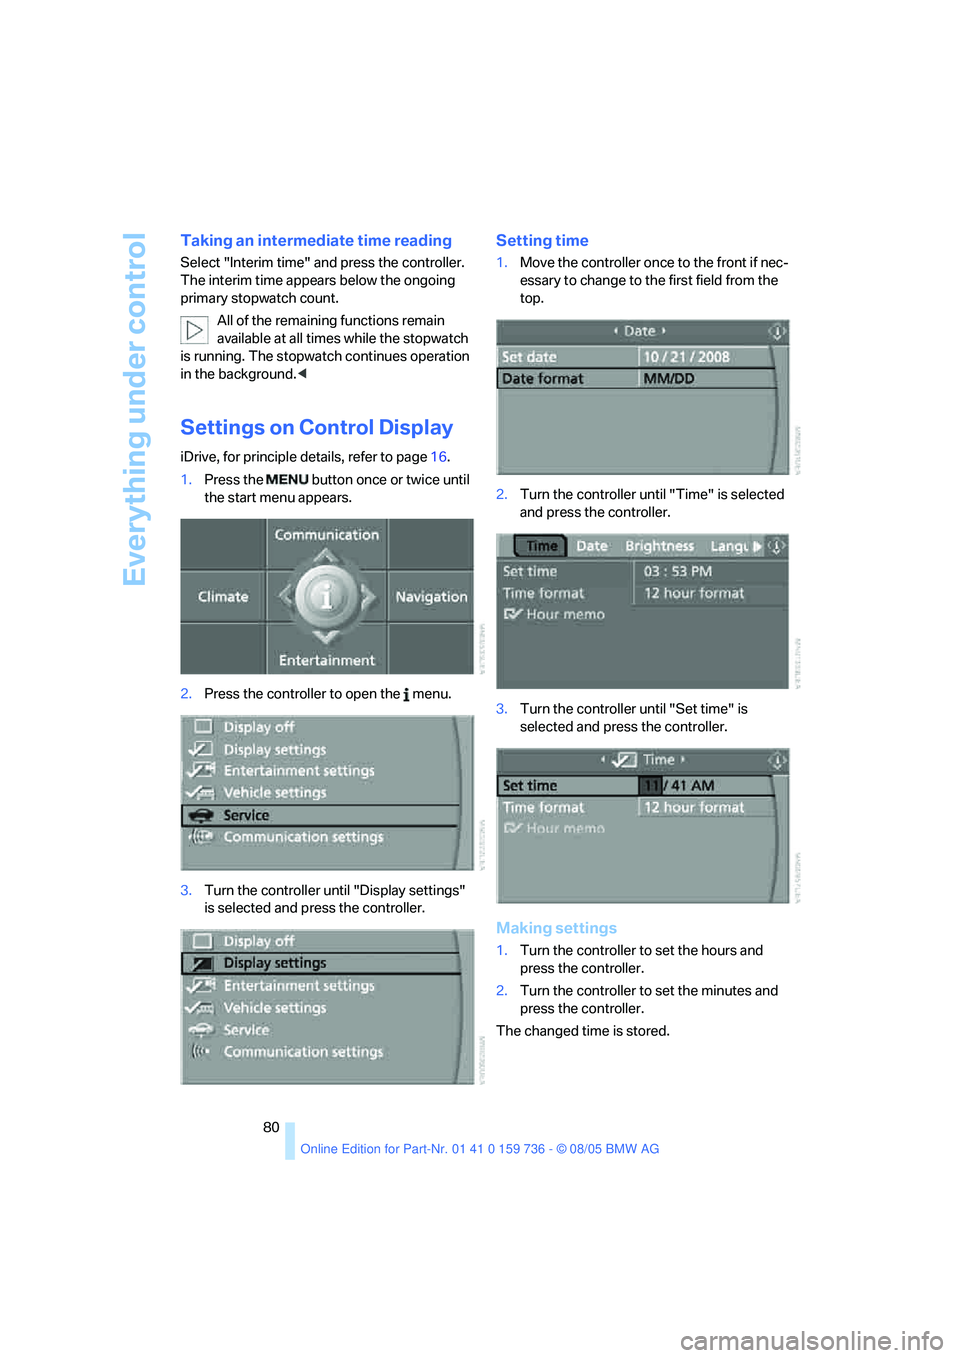
Settings on Control Display
iDrive, for principle details, refer to page16.
1.Press the button once or twice until
the start menu appears.
2.Press the controller to open the menu.
3.Turn the controller until "Display settings"
is selected and press the controller.
Setting time
1.Move the controller once to the front if nec-
essary to change to the first field from the
top.
2.Turn the controller until "Time" is selected
and press the controller.
3.Turn the controller until "Set time" is
selected and press the controller.
Making settings
1.Turn the controller to set the hours and
press the controller.
2.Turn the controller to set the minutes and
press the controller.
The changed time is stored.
Page 84 of 248

Controls
83Reference
At a glance
Driving tips
Communications
Navigation
Entertainment
Mobility
Technology for comfort, convenience and
safety
PDC Park Distance Control*
The concept
The PDC assists you when you are parking.
Acoustic signals and an optical display
* alert
you to the approach of an object from behind
your vehicle. To measure the distance, there
are four ultrasonic sensors in each bumper.
The range of these sensors is approx. 7 ft/2 m.
However, an acoustic warning first sound for
the sensors at the front and at the two rear cor-
ners at approx. 24 in/60 cm, and for the center
rear sensors at approx. 5 ft/1,50 m.
PDC is a parking aid that can indicate
objects when they are approached
slowly, as is usually the case when parking.
Avoid approaching an object at high speed,
otherwise the physical circumstances would
mean that the system warning was too late.<
Automatically activating
The system starts to operate automatically
approx. 1 second after you select reverse gear
or move the selector lever into the R position
with the engine running or the ignition switched
on.
Wait this short period before driving.
Manual activation
Press button, the LED lights up.
Manual deactivation
Press the button again; the LED goes out.
After driving approx. 165 ft/50 m or at over
approx. 20 mph/30 km/h, the system is
switched off and the LED goes out. You can
reactivate the system manually as needed.
Signal tones
When nearing an object, the position is corre-
spondingly indicated by an interval tone. Thus,
an object detected to the left rear of the vehicle
will be indicated by a signal tone from the left
rear speaker, etc. As the distance between
vehicle and object decreases, the intervals
between the tones become shorter. If the dis-
tance to the nearest object falls to below
roughly 1 ft/30 cm, then a continuous tone
sounds.
An intermittent tone is interrupted after approx.
3seconds:
>if you stop before an object that was only
detected by one of the corner sensors
>if you drive parallel to a wall
Malfunction
The LED in the button flashes and a message
appears on the Control Display. PDC is mal-
functioning. Have the system checked.
To prevent this problem, keep the sensors
clean and free of ice or snow in order to ensure
that they will continue to operate effectively. Do
not spray the sensors with high-pressure clean-
ers for long periods and maintain a distance of
at least 4 in/10 cm to them.
PDC with visual warning*
You can also have the system show distances
to objects on the Control Display. Objects that
are farther away are already shown there before
a signal tone sounds.
Page 89 of 248
Technology for comfort, convenience and safety
88
System limits
The Flat Tire Monitor cannot indicate
sudden severe tire damage caused by
outside factors and does not detect a natural,
even pressure drop in all four tires.<
In the following situations, the system could be
delayed or malfunction:
>System has not been initialized
>Driving on snowy or slippery road surface
>Sporty driving style: slip in the drive wheels,
high lateral acceleration
>Driving with snow chains
*
When you are driving with the compact wheel*
the Flat Tire Monitor is unable to function.
Initializing system
The initialization finishes during driving,
which can be interrupted at any time.
When driving resumes, the initialization is con-
tinued automatically. When driving with snow
chains
* or with the compact wheel*, do not
initialize the system.<
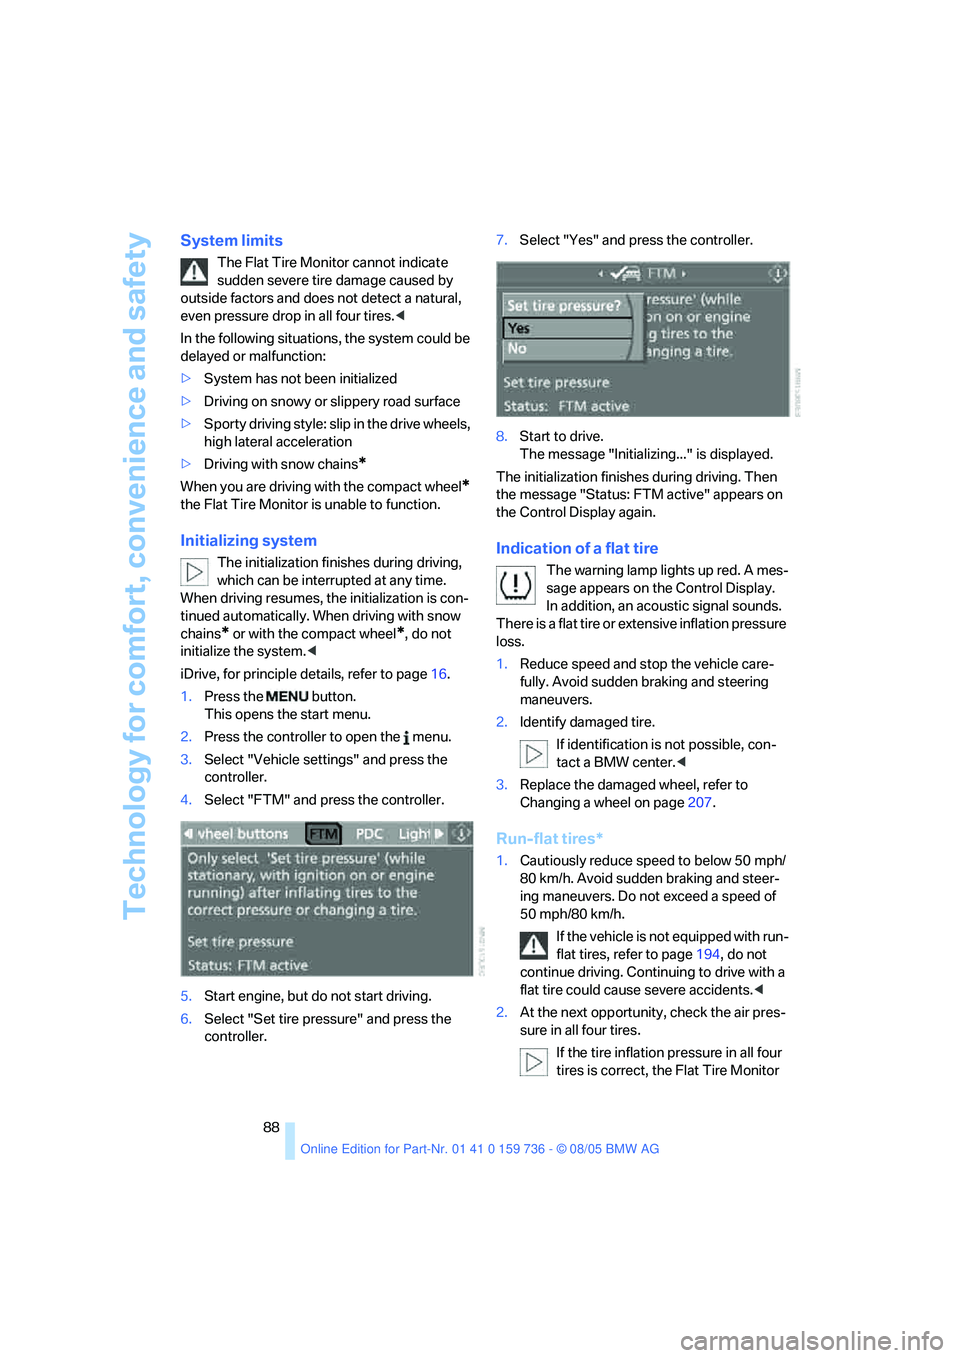
iDrive, for principle details, refer to page16.
1.Press the button.
This opens the start menu.
2.Press the controller to open the menu.
3.Select "Vehicle settings" and press the
controller.
4.Select "FTM" and press the controller.
5.Start engine, but do not start driving.
6.Select "Set tire pressure" and press the
controller.7.Select "Yes" and press the controller.
8.Start to drive.
The message "Initializing..." is displayed.
The initialization finishes during driving. Then
the message "Status: FTM active" appears on
the Control Display again.
Indication of a flat tire
The warning lamp lights up red. A mes-
sage appears on the Control Display.
In addition, an acoustic signal sounds.
There is a flat tire or extensive inflation pressure
loss.
1.Reduce speed and stop the vehicle care-
fully. Avoid sudden braking and steering
maneuvers.
2.Identify damaged tire.
If identification is not possible, con-
tact a BMW center.<
3.Replace the damaged wheel, refer to
Changing a wheel on page207.
Run-flat tires*
1.Cautiously reduce speed to below 50 mph/
80 km/h. Avoid sudden braking and steer-
ing maneuvers. Do not exceed a speed of
50 mph/80 km/h.
If the vehicle is not equipped with run-
flat tires, refer to page194, do not
continue driving. Continuing to drive with a
flat tire could cause severe accidents.<
2.At the next opportunity, check the air pres-
sure in all four tires.
If the tire inflation pressure in all four
tires is correct, the Flat Tire Monitor
Page 98 of 248
Controls
97Reference
At a glance
Driving tips
Communications
Navigation
Entertainment
Mobility
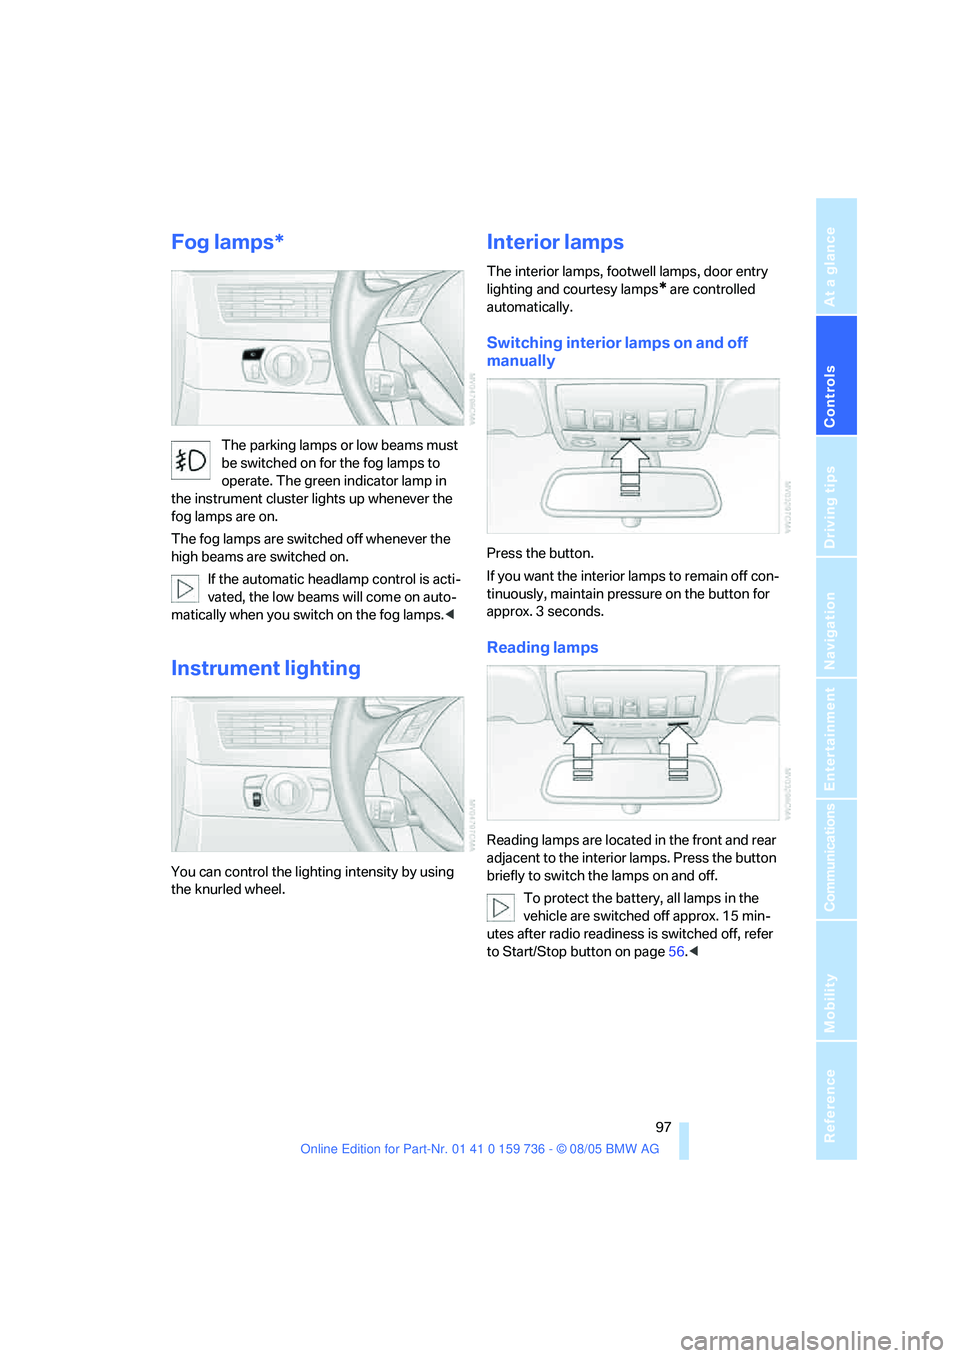
Fog lamps*
The parking lamps or low beams must
be switched on for the fog lamps to
operate. The green indicator lamp in
the instrument cluster lights up whenever the
fog lamps are on.
The fog lamps are switched off whenever the
high beams are switched on.
If the automatic headlamp control is acti-
vated, the low beams will come on auto-
matically when you switch on the fog lamps.<
Instrument lighting
You can control the lighting intensity by using
the knurled wheel.
Interior lamps
The interior lamps, footwell lamps, door entry
lighting
and courtesy lamps* are controlled
automatically.
Switching interior lamps on and off
manually
Press the button.
If you want the interior lamps to remain off con-
tinuously, maintain pressure on the button for
approx. 3 seconds.
Reading lamps
Reading lamps are located in the front and rear
adjacent to the interior lamps. Press the button
briefly to switch the lamps on and off.
To protect the battery, all lamps in the
vehicle are switched off approx. 15 min-
utes after radio readiness is switched off, refer
to Start/Stop button on page56.<
Page 102 of 248
Controls
101Reference
At a glance
Driving tips
Communications
Navigation
Entertainment
Mobility
body. Therefore, open these vents for maxi-
mum cooling.
AUC Automatic recirculated-air
control/recirculated-air mode
You can respond to pollutants or
unpleasant odors in the immediate
environment by suspending the
supply of outside air. The system then recircu-
lates the air currently within the vehicle. During
AUC operation, a sensor detects pollutants in
the outside air and controls the shut-off auto-
matically.
By pressing the button repeatedly, you can
request three operating modes:
>LED off: outside air flows in continuously.
>Right LED on, AUC mode: the system
detects pollutants in the outside air and
shuts off the supply as needed.
>Left LED on, recirculated-air mode: the
supply of outside air is permanently shut off.
If condensation starts to form on the
inside window surfaces during operation
in the recirculated-air mode, you should switch
it off while also increasing the air volume as
required.
The recirculated-air mode should not be used
over an extended period of time, as the air qual-
ity inside the vehicle deteriorates continu-
ously.<
Residual heat
The heat stored in the engine is
used to heat the passenger com-
partment, e.g. while stopped at a
school to pick up a child.
The function can be switched on when the fol-
lowing conditions are met:
>up to 15 minutes after switching off the
engine
>with engine at operating temperature
>with sufficient battery voltage
>at an outside temperature below 777/
256The LED lights up when the function is
switched on.
From radio readiness the interior temperature,
the air volume and the air distribution can be
set.
Switching off automatic climate control
The air volume, the heater and the
cooling function are all switched
off.
You can restart the automatic
climate control by pressing any of its buttons
except the REST button.
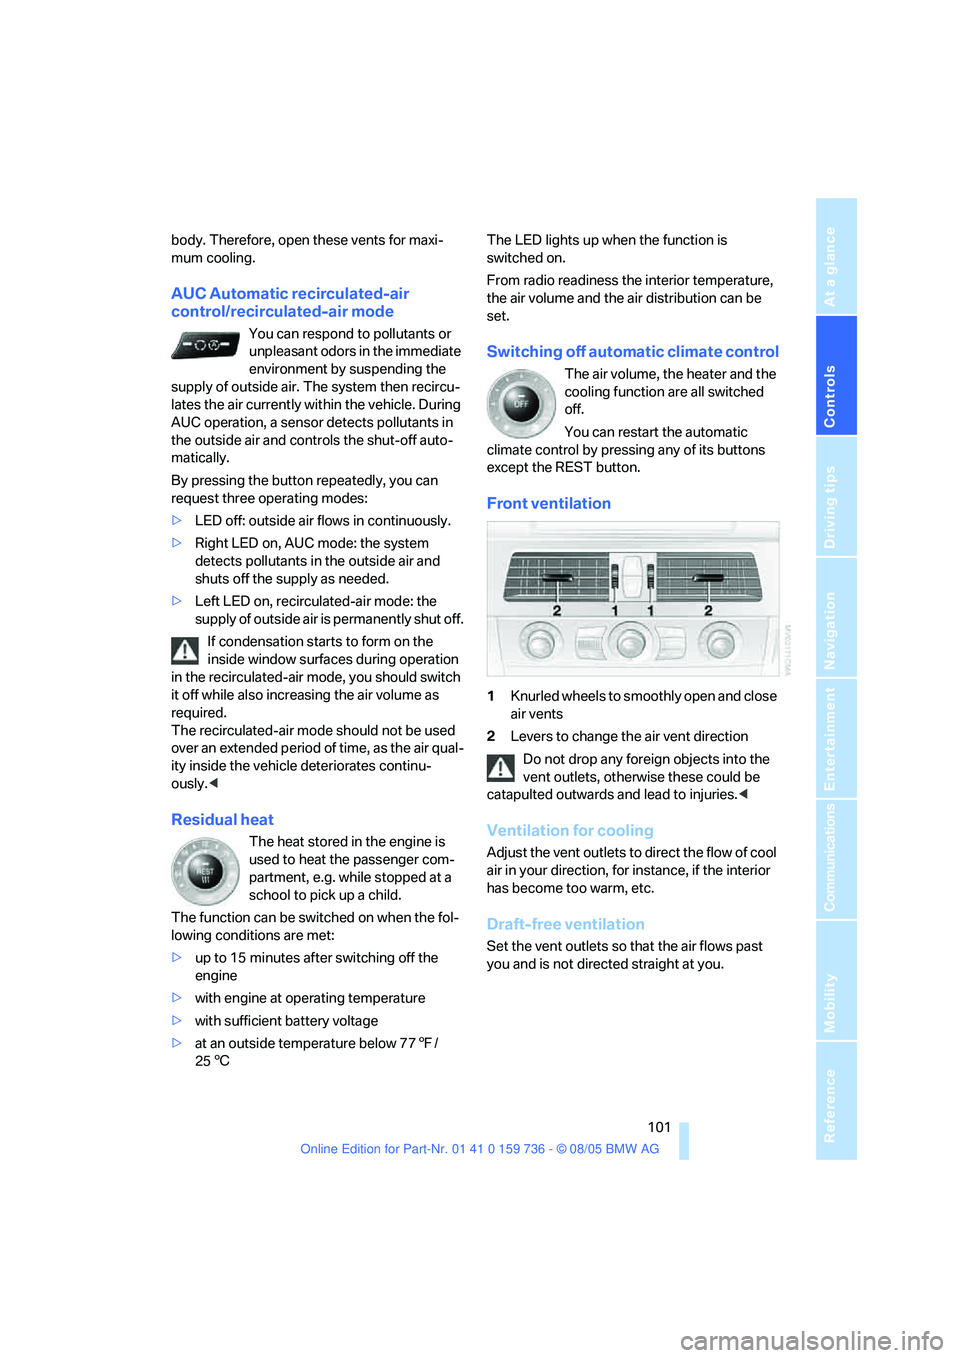
Front ventilation
1Knurled wheels to smoothly open and close
air vents
2Levers to change the air vent direction
Do not drop any foreign objects into the
vent outlets, otherwise these could be
catapulted outwards and lead to injuries.<
Ventilation for cooling
Adjust the vent outlets to direct the flow of cool
air in your direction, for instance, if the interior
has become too warm, etc.
Draft-free ventilation
Set the vent outlets so that the air flows past
you and is not directed straight at you.
Page 150 of 248
Navigation
Entertainment
Driving tips
149Reference
At a glance
Controls
Communications
Mobility
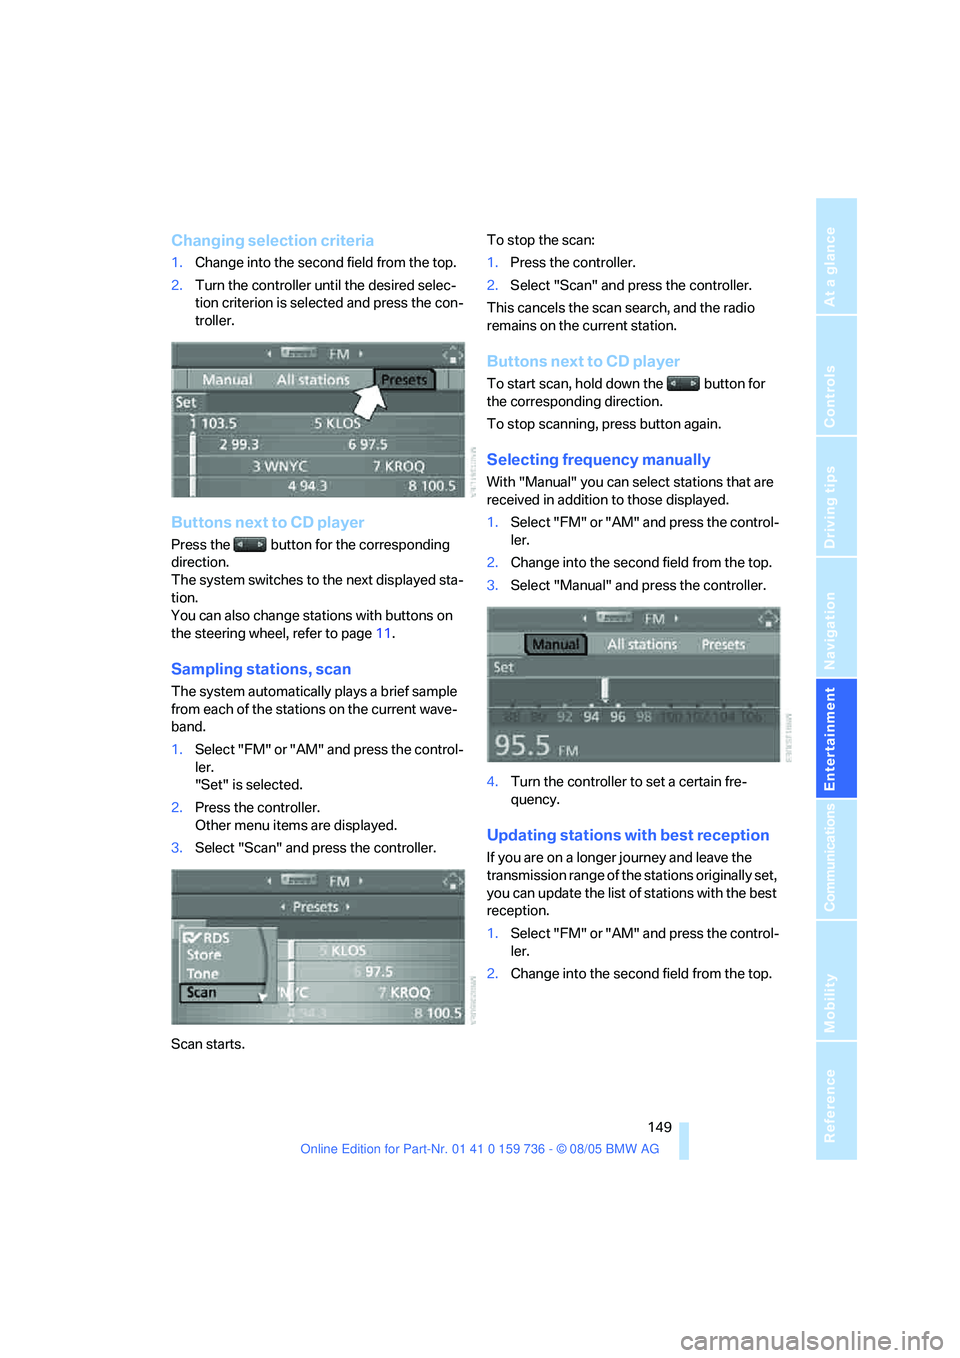
Changing selection criteria
1.Change into the second field from the top.
2.Turn the controller until the desired selec-
tion criterion is selected and press the con-
troller.
Buttons next to CD player
Press the button for the corresponding
direction.
The system switches to the next displayed sta-
tion.
You can also change stations with buttons on
the steering wheel, refer to page11.
Sampling stations, scan
The system automatically plays a brief sample
from each of the stations on the current wave-
band.
1.Select "FM" or "AM" and press the control-
ler.
"Set" is selected.
2.Press the controller.
Other menu items are displayed.
3.Select "Scan" and press the controller.
Scan starts.To stop the scan:
1.Press the controller.
2.Select "Scan" and press the controller.
This cancels the scan search, and the radio
remains on the current station.
Buttons next to CD player
To start scan, hold down the button for
the corresponding direction.
To stop scanning, press button again.
Selecting frequency manually
With "Manual" you can select stations that are
received in addition to those displayed.
1.Select "FM" or "AM" and press the control-
ler.
2.Change into the second field from the top.
3.Select "Manual" and press the controller.
4.Turn the controller to set a certain fre-
quency.
Updating stations with best reception
If you are on a longer journey and leave the
transmission range of the stations originally set,
you can update the list of stations with the best
reception.
1.Select "FM" or "AM" and press the control-
ler.
2.Change into the second field from the top.
Page 168 of 248
167
Entertainment
Reference
At a glance
Controls
Driving tips Communications
Navigation
Mobility
Making calls with car phone:
BMW Assist calls
You can use the car phone via the hands-free
system for BMW Assist calls.
When the status information "Communication"
or "BMW Assist" is displayed in "BMW Ser-
vice", only BMW Assist calls are possible.
It may not be possible to establish a telephone
connection using the mobile phone while a con-
nection is being established to BMW Assist or
while a call to BMW Assist is already in
progress. If this happens, you must log off the
mobile phone from the vehicle if you wish to
place a call with the mobile phone.
Commissioning
Logging on mobile phone on vehicle
The following prerequisites must be met:
>The mobile phone is ready to operate.
>The Bluetooth link on the vehicle, refer to
page169, and on the mobile phone is
active.
>Depending on the mobile phone, preset-
tings on the mobile phone are necessary:
e.g. via the menu item Bluetooth activated
or the menu item Connection not with con-
firmation.
>For logging on, specify any desired number
as the Bluetooth passkey, e.g. 1. This Blue-
tooth passkey is no longer required follow-
ing successful logon.
>The ignition is switched on.
Only log on the mobile phone with the
vehicle stopped, otherwise the passen-
gers and other road user can be endangered
due to a lack of attentiveness on the part of the
driver.<
Switching on ignition
1.Insert the remote control as far as possible
into the ignition lock.
2.S w i t c h o n t h e s w i t c h o n i g n i t i o n b y p r e s s i n g
the Start/Stop button without depressing
the brake or clutch pedal.
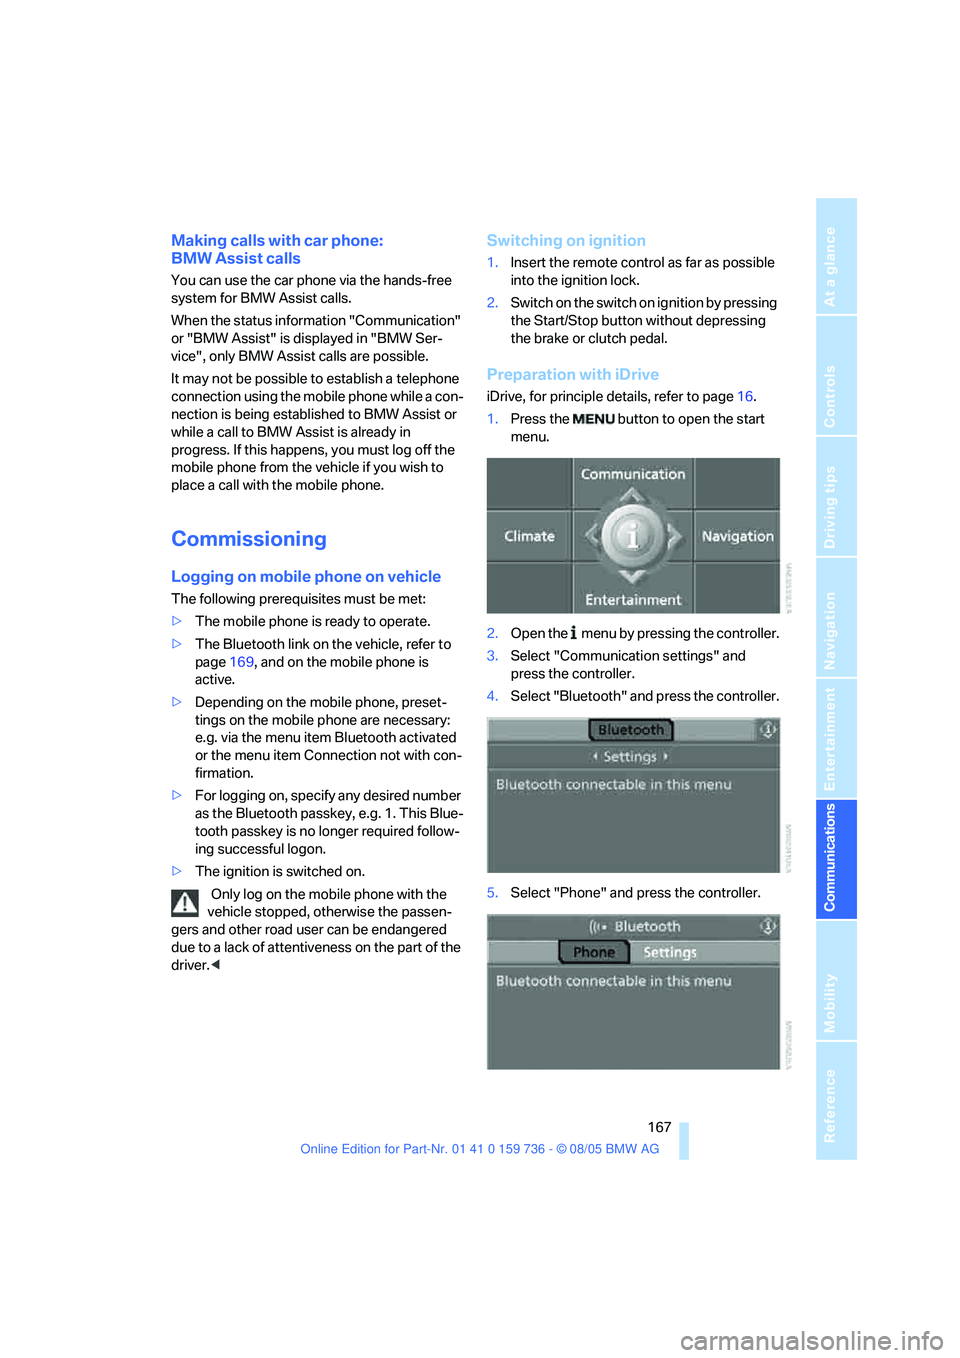
Preparation with iDrive
iDrive, for principle details, refer to page16.
1.Press the button to open the start
menu.
2.Open the menu by pressing the controller.
3.Select "Communication settings" and
press the controller.
4.Select "Bluetooth" and press the controller.
5.Select "Phone" and press the controller.