2006 BMW 525I climate control
[x] Cancel search: climate controlPage 102 of 248
Controls
101Reference
At a glance
Driving tips
Communications
Navigation
Entertainment
Mobility
body. Therefore, open these vents for maxi-
mum cooling.
AUC Automatic recirculated-air
control/recirculated-air mode
You can respond to pollutants or
unpleasant odors in the immediate
environment by suspending the
supply of outside air. The system then recircu-
lates the air currently within the vehicle. During
AUC operation, a sensor detects pollutants in
the outside air and controls the shut-off auto-
matically.
By pressing the button repeatedly, you can
request three operating modes:
>LED off: outside air flows in continuously.
>Right LED on, AUC mode: the system
detects pollutants in the outside air and
shuts off the supply as needed.
>Left LED on, recirculated-air mode: the
supply of outside air is permanently shut off.
If condensation starts to form on the
inside window surfaces during operation
in the recirculated-air mode, you should switch
it off while also increasing the air volume as
required.
The recirculated-air mode should not be used
over an extended period of time, as the air qual-
ity inside the vehicle deteriorates continu-
ously.<
Residual heat
The heat stored in the engine is
used to heat the passenger com-
partment, e.g. while stopped at a
school to pick up a child.
The function can be switched on when the fol-
lowing conditions are met:
>up to 15 minutes after switching off the
engine
>with engine at operating temperature
>with sufficient battery voltage
>at an outside temperature below 777/
256The LED lights up when the function is
switched on.
From radio readiness the interior temperature,
the air volume and the air distribution can be
set.
Switching off automatic climate control
The air volume, the heater and the
cooling function are all switched
off.
You can restart the automatic
climate control by pressing any of its buttons
except the REST button.
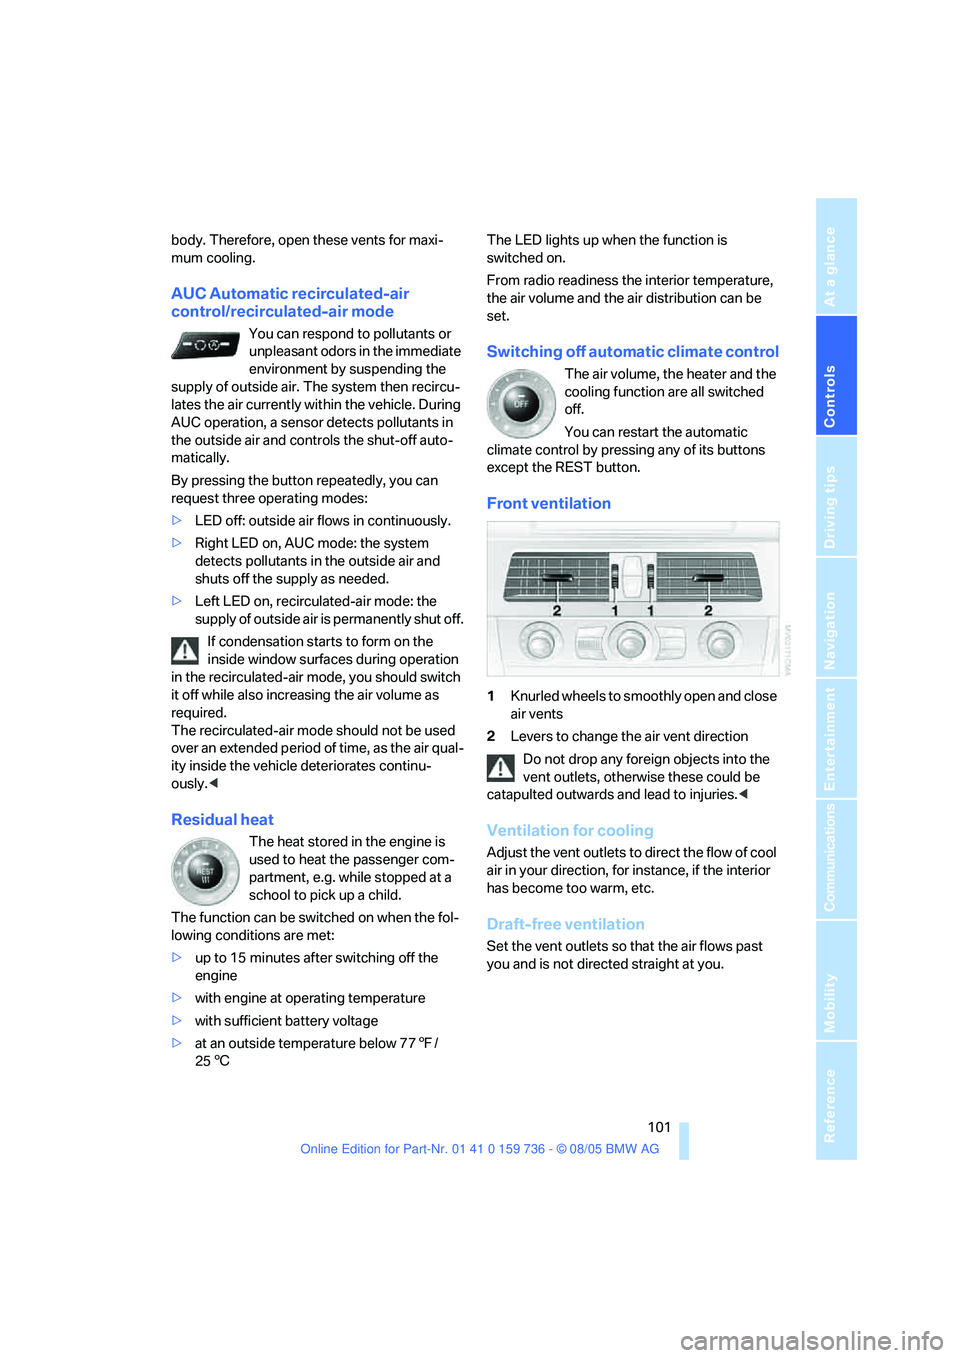
Front ventilation
1Knurled wheels to smoothly open and close
air vents
2Levers to change the air vent direction
Do not drop any foreign objects into the
vent outlets, otherwise these could be
catapulted outwards and lead to injuries.<
Ventilation for cooling
Adjust the vent outlets to direct the flow of cool
air in your direction, for instance, if the interior
has become too warm, etc.
Draft-free ventilation
Set the vent outlets so that the air flows past
you and is not directed straight at you.
Page 103 of 248
Climate
102
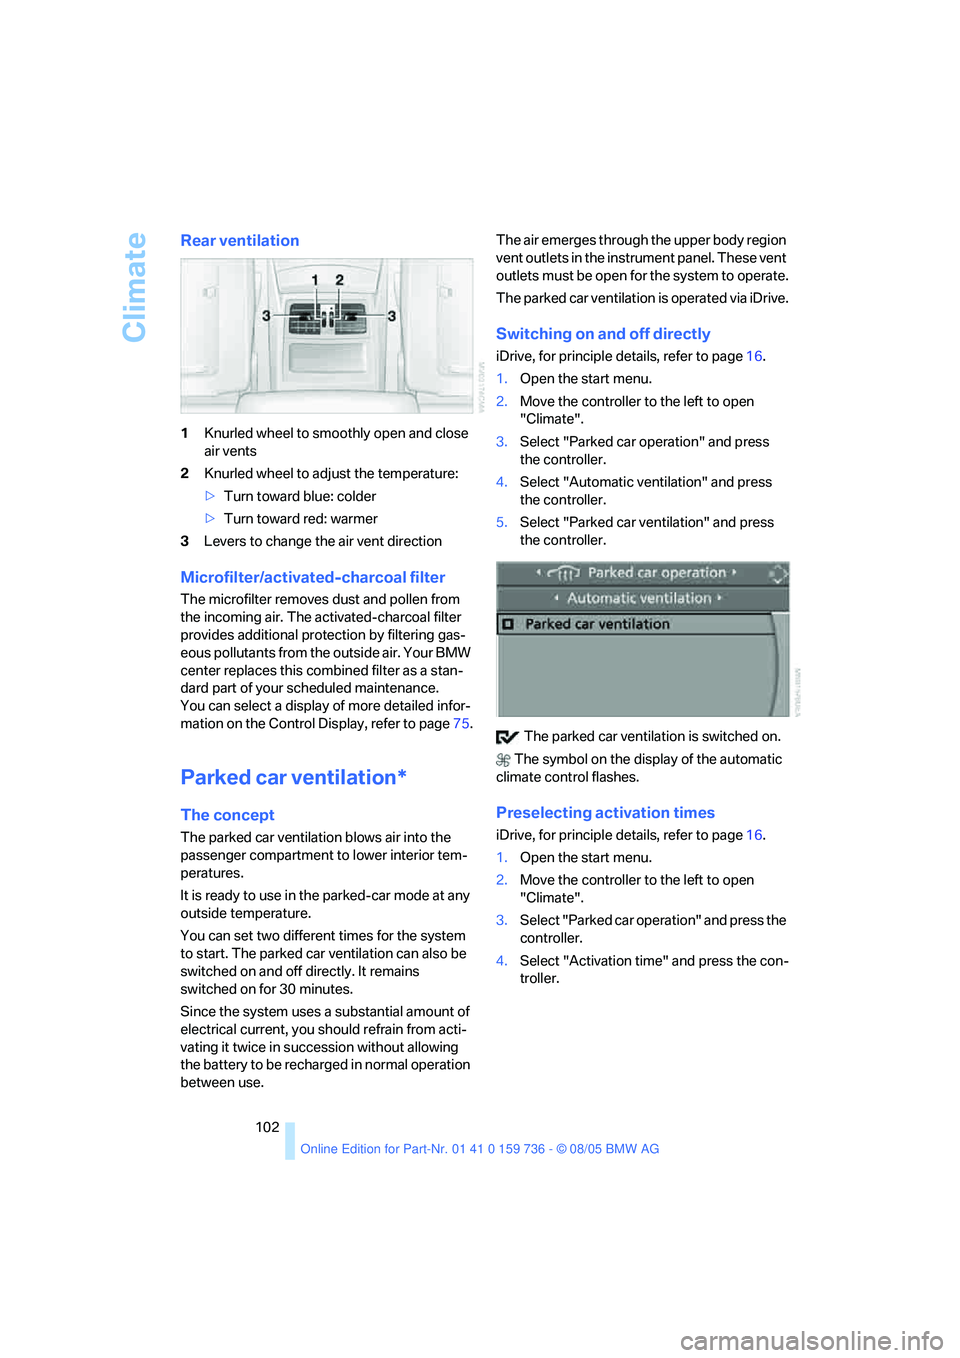
Rear ventilation
1Knurled wheel to smoothly open and close
air vents
2Knurled wheel to adjust the temperature:
>Turn toward blue: colder
>Turn toward red: warmer
3Levers to change the air vent direction
Microfilter/activated-charcoal filter
The microfilter removes dust and pollen from
the incoming air. The activated-charcoal filter
provides additional protection by filtering gas-
eous pollutants from the outside air. Your BMW
center replaces this combined filter as a stan-
dard part of your scheduled maintenance.
You can select a display of more detailed infor-
mation on the Control Display, refer to page75.
Parked car ventilation*
The concept
The parked car ventilation blows air into the
passenger compartment to lower interior tem-
peratures.
It is ready to use in the parked-car mode at any
outside temperature.
You can set two different times for the system
to start. The parked car ventilation can also be
switched on and off directly. It remains
switched on for 30 minutes.
Since the system uses a substantial amount of
electrical current, you should refrain from acti-
vating it twice in succession without allowing
the battery to be recharged in normal operation
between use.The air emerges through the upper body region
vent outlets in the instrument panel. These vent
outlets must be open for the system to operate.
The parked car ventilation is operated via iDrive.
Switching on and off directly
iDrive, for principle details, refer to page16.
1.Open the start menu.
2.Move the controller to the left to open
"Climate".
3.Select "Parked car operation" and press
the controller.
4.Select "Automatic ventilation" and press
the controller.
5.Select "Parked car ventilation" and press
the controller.
The parked car ventilation is switched on.
The symbol on the display of the automatic
climate control flashes.
Preselecting activation times
iDrive, for principle details, refer to page16.
1.Open the start menu.
2.Move the controller to the left to open
"Climate".
3.Select "Parked car operation" and press the
controller.
4.Select "Activation time" and press the con-
troller.
Page 104 of 248
Controls
103Reference
At a glance
Driving tips
Communications
Navigation
Entertainment
Mobility
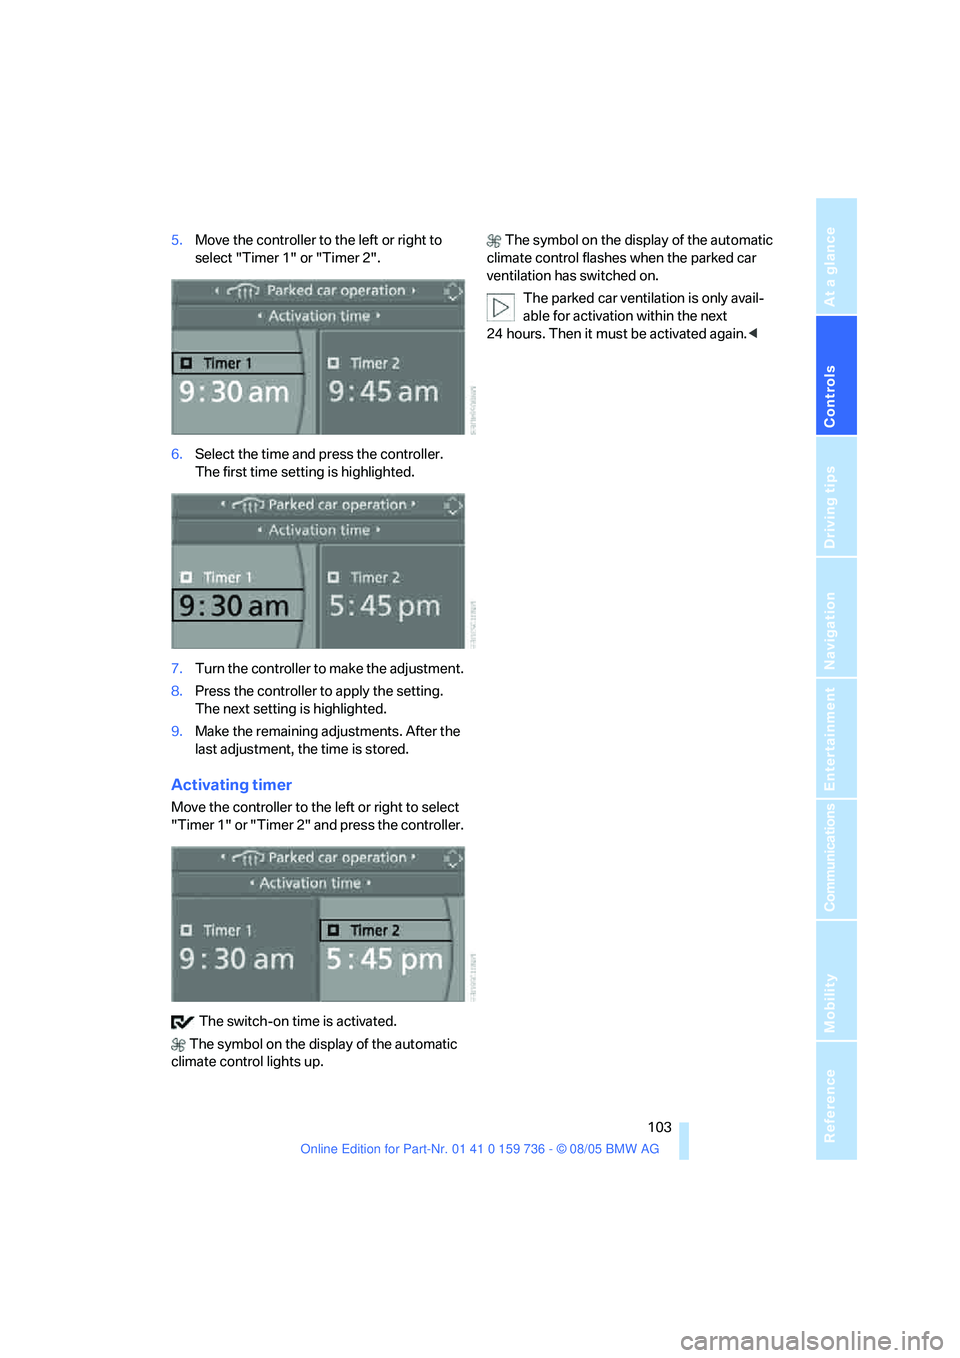
5.Move the controller to the left or right to
select "Timer 1" or "Timer 2".
6.Select the time and press the controller.
The first time setting is highlighted.
7.Turn the controller to make the adjustment.
8.Press the controller to apply the setting.
The next setting is highlighted.
9.Make the remaining adjustments. After the
last adjustment, the time is stored.
Activating timer
Move the controller to the left or right to select
"Timer 1" or "Timer 2" and press the controller.
The switch-on time is activated.
The symbol on the display of the automatic
climate control lights up. The symbol on the display of the automatic
climate control flashes when the parked car
ventilation has switched on.
The parked car ventilation is only avail-
able for activation within the next
24 hours. Then it must be activated again.<
Page 108 of 248
Controls
107Reference
At a glance
Driving tips
Communications
Navigation
Entertainment
Mobility
Ventilating lower compartment
Push the slide in the lower compartment
upward.
Depending on the automatic climate con-
trol setting, the temperature inside the
ventilated compartment may be higher than in
the rest of the interior. Should this be the case,
push the slide downward to close off the venti-
lation.<
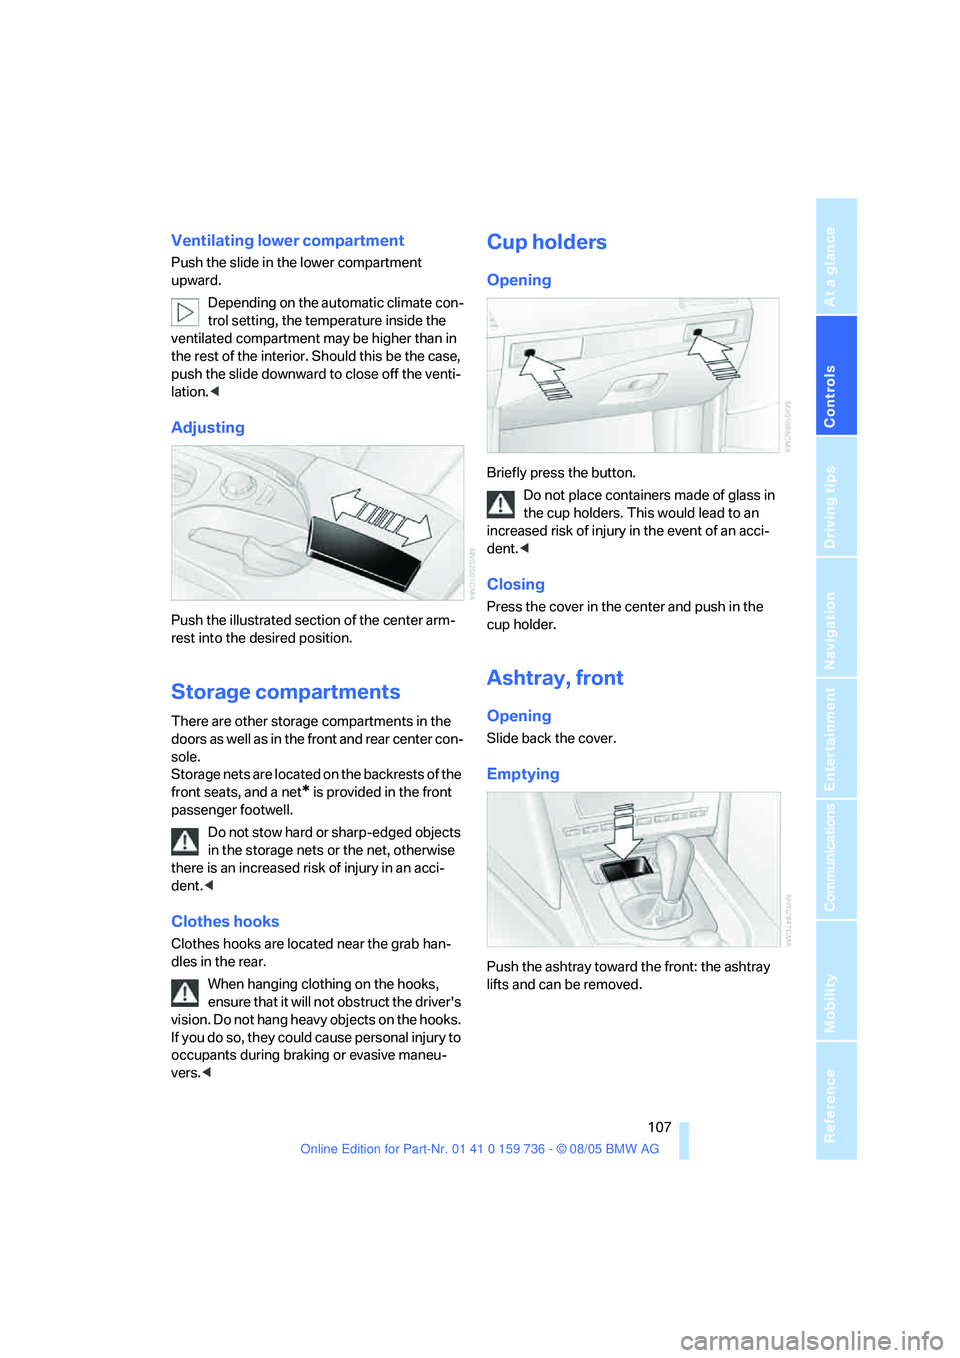
Adjusting
Push the illustrated section of the center arm-
rest into the desired position.
Storage compartments
There are other storage compartments in the
doors as well as in the front and rear center con-
sole.
Storage nets are located on the backrests of the
front seats, and a net
* is provided in the front
passenger footwell.
Do not stow hard or sharp-edged objects
in the storage nets or the net, otherwise
there is an increased risk of injury in an acci-
dent.<
Clothes hooks
Clothes hooks are located near the grab han-
dles in the rear.
When hanging clothing on the hooks,
ensure that it will not obstruct the driver's
vision. Do not hang heavy objects on the hooks.
If you do so, they could cause personal injury to
occupants during braking or evasive maneu-
vers.<
Cup holders
Opening
Briefly press the button.
Do not place containers made of glass in
the cup holders. This would lead to an
increased risk of injury in the event of an acci-
dent.<
Closing
Press the cover in the center and push in the
cup holder.
Ashtray, front
Opening
Slide back the cover.
Emptying
Push the ashtray toward the front: the ashtray
lifts and can be removed.
Page 117 of 248
Things to remember when driving
116
Things to remember when driving
Break-in period
Moving parts need breaking-in time to adjust to
each other. To ensure that your vehicle contin-
ues to provide optimized economy of operation
throughout an extended service life, we request
that you devote careful attention to the follow-
ing section.
Engine and differential
Always obey all official speed limits.
Up to 1,200 miles/2,000 km
Drive at changing engine and driving speeds,
however do not exceed 4,500 rpm or 100 mph/
160 km/h.
Avoid full-throttle operation and use of the
transmission's kick-down mode during these
initial miles.
From 1,200 miles/2,000 km
The engine and vehicle speed can gradually be
increased.
SMG Sequential Manual Gearbox
Do not use the acceleration assistant during the
break-in period, refer to page61.
Tires
Due to technical factors associated with their
manufacture, tires do not achieve their full trac-
tion potential until after an initial break-in
period. Therefore, drive reservedly during the
first 200 miles/300 km.
Brake system
Brakes require an initial break-in period of
approx. 300 miles/500 km to achieve optimized
contact and wear patterns between brake pads
and rotors. Drive in a reserved manner during
this break-in period.
Clutch
The function of the clutch is only at its opti-
mized level after a distance driven of approx.
300 miles/500 km. During this break-in period,
engage the clutch gently.
Following part replacement
Observe the break-in instructions again if com-
ponents mentioned above must be replaced
after subsequent driving operation.
General driving notes
Closing luggage compartment lid/
tailgate
Operate the vehicle only when the lug-
gage compartment lid/tailgate is com-
pletely closed. Otherwise, exhaust fumes could
enter the interior of the vehicle.<
If special circumstances should make it abso-
lutely necessary to operate the vehicle with the
luggage compartment lid/tailgate open:
1.Close all windows and the glass sunroof or
panorama glass sunroof.
2.Increase the air volume of the automatic
climate control to a high level, refer to
page100.
Hot exhaust system
As in all vehicles, extremely high temper-
atures are generated on exhaust system.
Do not remove the heat shields installed adja-
cent to it, and never apply undercoating to
them. When driving, standing at idle and while
parking take care to avoid possible contact
between the hot exhaust system and any highly
flammable materials such as hay, leaves, grass,
etc. Such contact could lead to a fire, and with it
the risk of serious property damage as well as
personal injury.<
Page 193 of 248
Wheels and tires
192
Tire identification marks
Knowledge of the labeling on the side of the tire
makes it easier to identify and choose the right
tires.
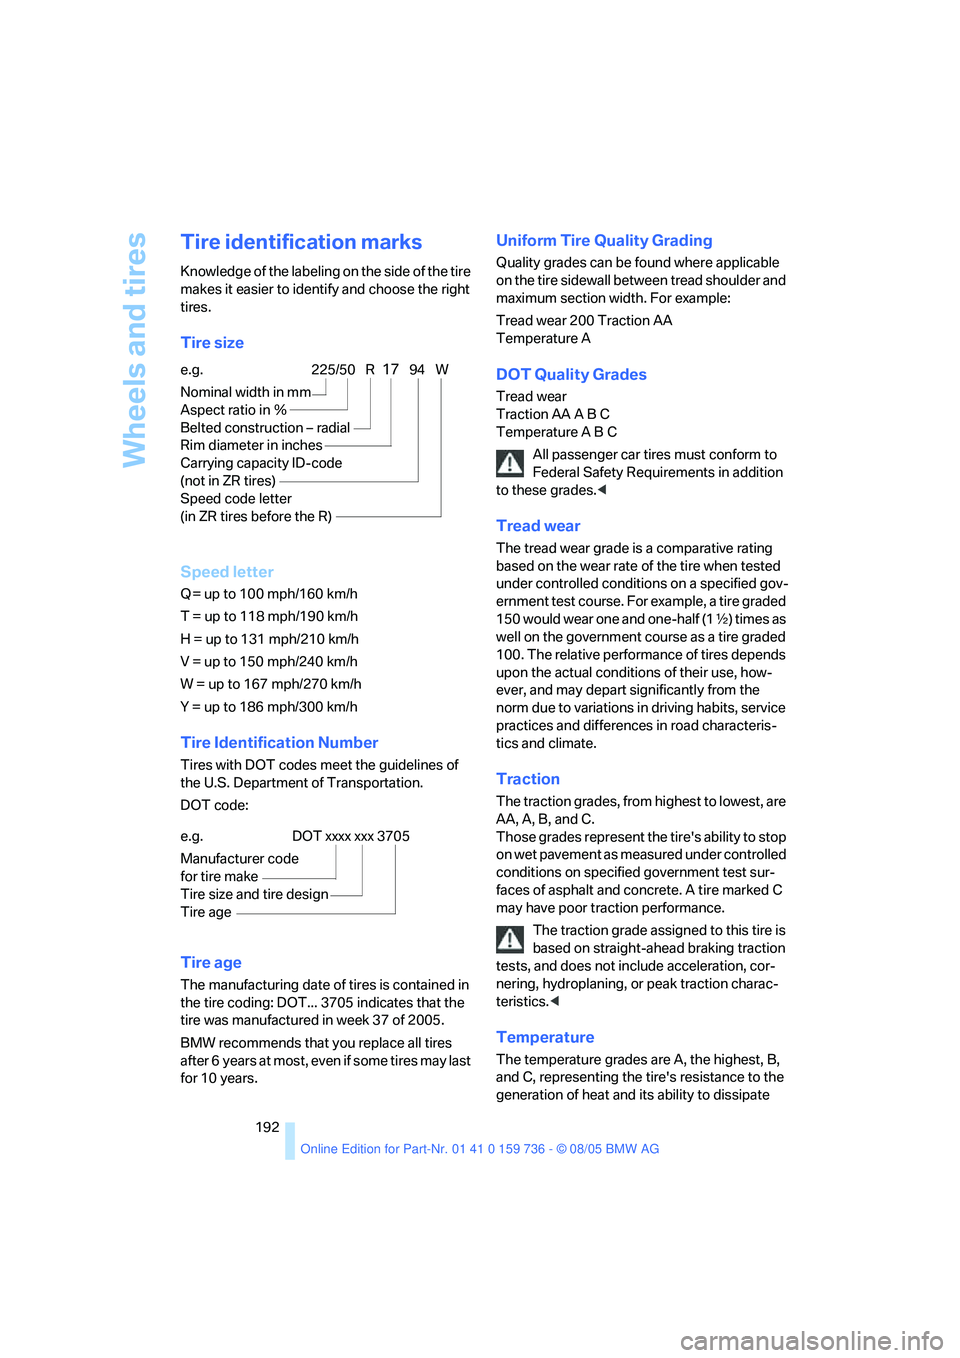
Tire size
Speed letter
Q = up to 100 mph/160 km/h
T = up to 118 mph/190 km/h
H = up to 131 mph/210 km/h
V = up to 150 mph/240 km/h
W = up to 167 mph/270 km/h
Y = up to 186 mph/300 km/h
Tire Identification Number
Tires with DOT codes meet the guidelines of
the U.S. Department of Transportation.
DOT code:
Tire age
The manufacturing date of tires is contained in
the tire coding: DOT... 3705 indicates that the
tire was manufactured in week 37 of 2005.
BMW recommends that you replace all tires
after 6 years at most, even if some tires may last
for 10 years.
Uniform Tire Quality Grading
Quality grades can be found where applicable
on the tire sidewall between tread shoulder and
maximum section width. For example:
Tread wear 200 Traction AA
Temperature A
DOT Quality Grades
Tread wear
Traction AA A B C
Temperature A B C
All passenger car tires must conform to
Federal Safety Requirements in addition
to these grades.<
Tread wear
The tread wear grade is a comparative rating
based on the wear rate of the tire when tested
under controlled conditions on a specified gov-
ernment test course. For example, a tire graded
150 would wear one and one-half (1γ) times as
well on the government course as a tire graded
100. The relative performance of tires depends
upon the actual conditions of their use, how-
ever, and may depart significantly from the
norm due to variations in driving habits, service
practices and differences in road characteris-
tics and climate.
Traction
The traction grades, from highest to lowest, are
AA, A, B, and C.
Those grades represent the tire's ability to stop
on wet pavement as measured under controlled
conditions on specified government test sur-
faces of asphalt and concrete. A tire marked C
may have poor traction performance.
The traction grade assigned to this tire is
based on straight-ahead braking traction
tests, and does not include acceleration, cor-
nering, hydroplaning, or peak traction charac-
teristics.<
Temperature
The temperature grades are A, the highest, B,
and C, representing the tire's resistance to the
generation of heat and its ability to dissipate e.g.
Nominal width in mm
Aspect ratio in Ξ
Belted construction – radial
Rim diameter in inches
Carrying capacity ID-code
(not in ZR tires)
Speed code letter
(in ZR tires before the R)
225/50 R1794 W
e.g.
Manufacturer code
for tire make
Tire size and tire design
Tire ageDOT xxxx xxx 3705
Page 227 of 248
Short commands of voice command system
226
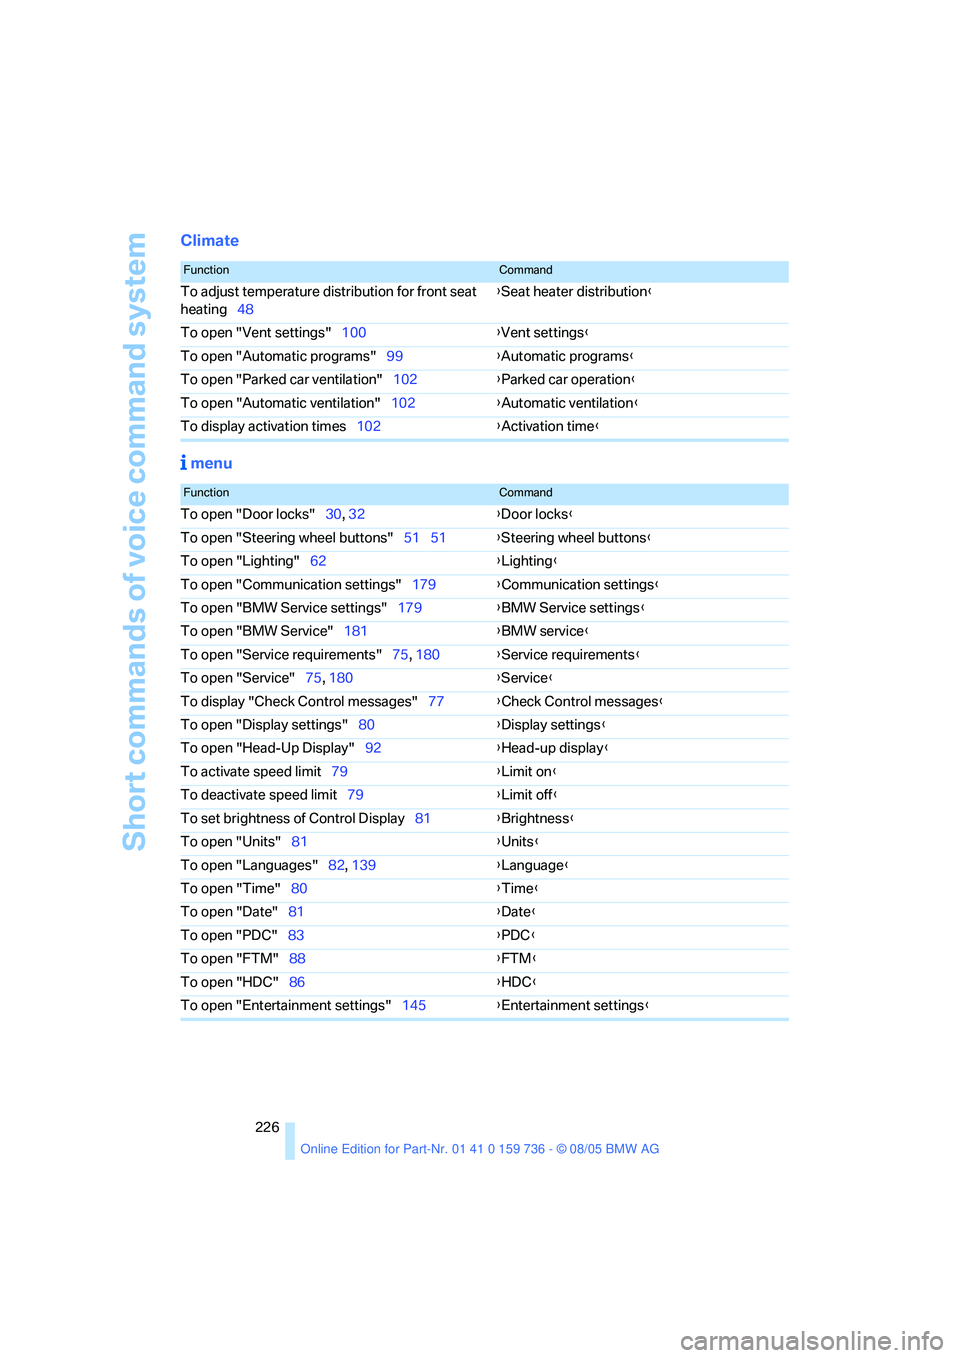
Climate
menu
FunctionCommand
To adjust temperature distribution for front seat
heating48{Seat heater distribution}
To open "Vent settings"100{Vent settings}
To open "Automatic programs"99{Automatic programs}
To open "Parked car ventilation"102{Parked car operation}
To open "Automatic ventilation"102{Automatic ventilation}
To display activation times102{Activation time}
FunctionCommand
To open "Door locks"30, 32{Door locks}
To open "Steering wheel buttons"51 51{Steering wheel buttons}
To open "Lighting"62{Lighting}
To open "Communication settings"179{Communication settings}
To open "BMW Service settings"179{BMW Service settings}
To open "BMW Service"181{BMW service}
To open "Service requirements"75, 180{Service requirements}
To open "Service"75, 180{Service}
To display "Check Control messages"77{Check Control messages}
To open "Display settings"80{Display settings}
To open "Head-Up Display"92{Head-up display}
To activate speed limit79{Limit on}
To deactivate speed limit79{Limit off}
To set brightness of Control Display81{Brightness}
To open "Units"81{Units}
To open "Languages"82, 139{Language}
To open "Time"80{Time}
To open "Date"81{Date}
To open "PDC"83{
PDC}
To open "FTM"88{FTM}
To open "HDC"86{HDC}
To open "Entertainment settings"145{Entertainment settings}
Page 228 of 248
227Reference
At a glance
Controls
Driving tips
Communications
Navigation
Entertainment
Mobility
Everything from A to Z
Index
"..." Identifies Control Display
texts used to select
individual functions, and
indicates where to find them
in the text.
A
ABS Antilock Brake
System84
ACC, refer to Active cruise
control65
Acceleration assistant for
SMG Sequential Manual
Gearbox61
Accessories6
Acoustic signal, refer to Check
Control77
Activated-charcoal filter102
"Activation time" for parked
car ventilation102
Active cruise control65
– indicator lamp68
– radar sensor69
– selecting distance67
– warning lamps69
Active head restraints,
front47
Active seat49
Active seat ventilation49
Active steering89
– warning lamp89
Adapter for spare key28
Adaptive brake lamps, refer to
Brake force display89
Adaptive Head Light95
"Add digits" for mobile
phone172
"Address book" for
navigation132Address for navigation
– deleting133
– entering125,128
– selecting133
– storing132
– storing current position133
"Add to address book"132
"Add to destination
list"128,129
Adjusting active backrest
width45
Adjusting confirmation signals
for locking and unlocking31
Adjusting the thigh support44
Adjusting the tone during
audio operation, refer to
Tone control145
Adjustment in audio mode
– front-to-rear146
– right/left balance146
"After door opened"46
"After unlocking"46
Airbags90
– sitting safely43
– warning lamp91
Air circulation, refer to Air
recirculation101
Air distribution
– automatic99
– manual100
Airing, refer to Ventilation101
Air recirculation
– AUC Automatic recircu-
lated-air control101
– recirculated-air mode101
"Air recirculation on / off"51
Air vent outlets of automatic
climate control98
Air vents98
– refer to Ventilation101
Air volume100
AKI, refer to Fuel quality187Alarm system36
– avoiding unintentional
alarms37
– interior motion sensor37
– switching off the alarm37
– switching off the tilt alarm
sensor and interior motion
sensor37
– tilt alarm sensor37
All around the center
console14
All around the steering
wheel10
"All channels"154
"All doors"30
All-season tires, refer to
Winter tires195
"All stations" calling up with
radio148,151
All-wheel drive, refer to
xDrive85
Alterations, technical, refer to
For your own safety5
Altering stretch of road140
"AM", reception
range144,148
Antenna for mobile phone166
Antifreeze
– coolant199
– washer fluid64
Antilock Brake System
ABS84
Anti-theft alarm system, refer
to Alarm system36
Anti-theft system, refer to
Central locking system29
Anti-trapping mechanism
– glass sunroof, electric41
– panorama glass sunroof42
– power windows39
Approved axle loads, refer to
Weights221
Approved engine oils
198