2006 BMW 525I belt
[x] Cancel search: beltPage 91 of 248
Technology for comfort, convenience and safety
90
Airbags
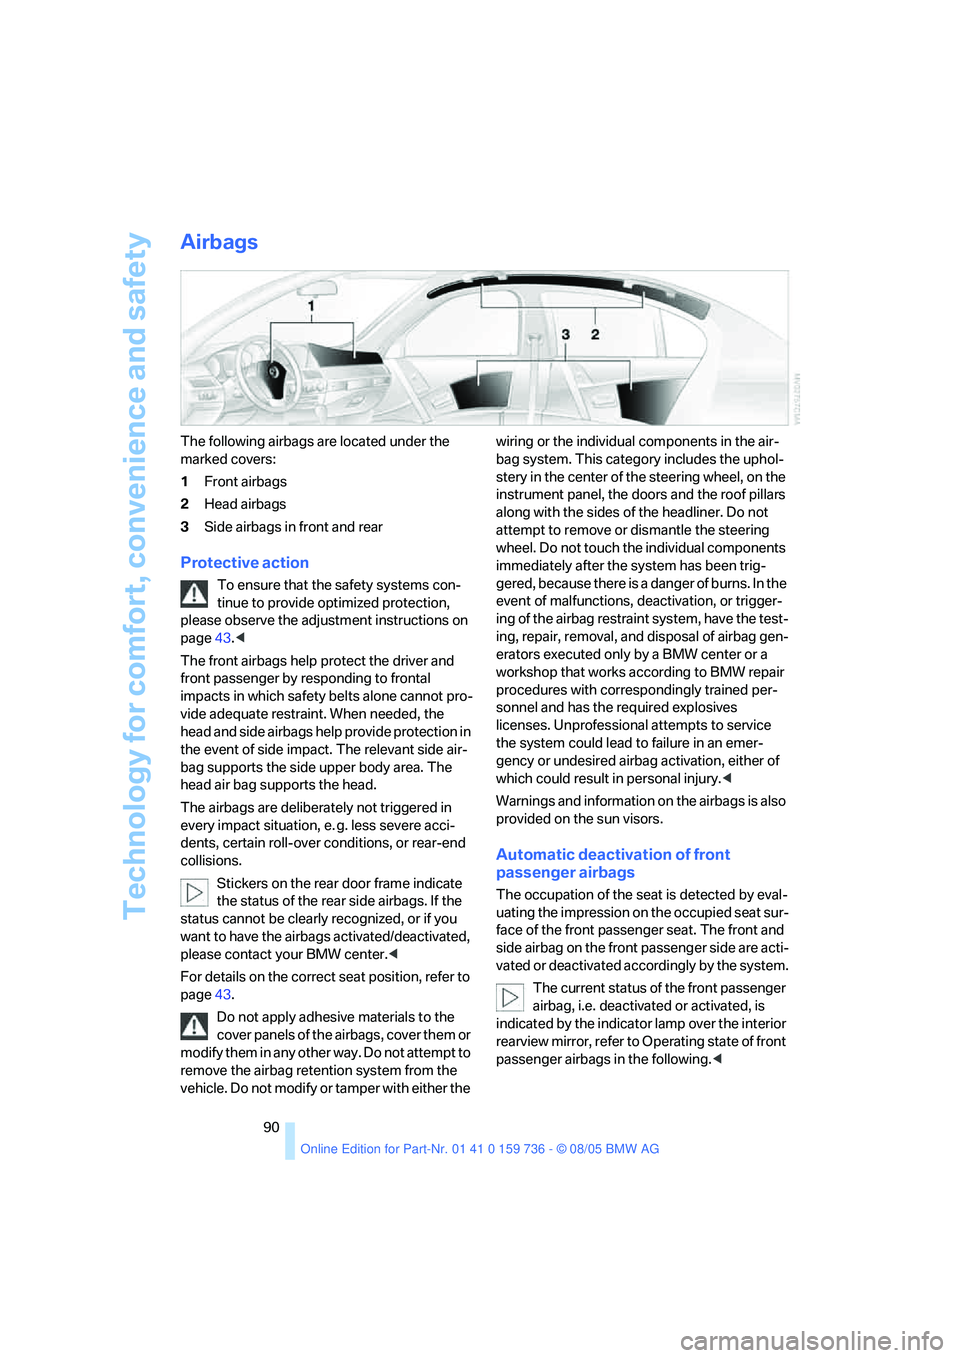
The following airbags are located under the
marked covers:
1Front airbags
2Head airbags
3Side airbags in front and rear
Protective action
To ensure that the safety systems con-
tinue to provide optimized protection,
please observe the adjustment instructions on
page43.<
The front airbags help protect the driver and
front passenger by responding to frontal
impacts in which safety belts alone cannot pro-
vide adequate restraint. When needed, the
head and side airbags help provide protection in
the event of side impact. The relevant side air-
bag supports the side upper body area. The
head air bag supports the head.
The airbags are deliberately not triggered in
every impact situation, e. g. less severe acci-
dents, certain roll-over conditions, or rear-end
collisions.
Stickers on the rear door frame indicate
the status of the rear side airbags. If the
status cannot be clearly recognized, or if you
want to have the airbags activated/deactivated,
please contact your BMW center.<
For details on the correct seat position, refer to
page43.
Do not apply adhesive materials to the
cover panels of the airbags, cover them or
modify them in any other way. Do not attempt to
remove the airbag retention system from the
vehicle. Do not modify or tamper with either the wiring or the individual components in the air-
bag system. This category includes the uphol-
stery in the center of the steering wheel, on the
instrument panel, the doors and the roof pillars
along with the sides of the headliner. Do not
attempt to remove or dismantle the steering
wheel. Do not touch the individual components
immediately after the system has been trig-
gered, because there is a danger of burns. In the
event of malfunctions, deactivation, or trigger-
ing of the airbag restraint system, have the test-
ing, repair, removal, and disposal of airbag gen-
erators executed only by a BMW center or a
workshop that works according to BMW repair
procedures with correspondingly trained per-
sonnel and has the required explosives
licenses. Unprofessional attempts to service
the system could lead to failure in an emer-
gency or undesired airbag activation, either of
which could result in personal injury.<
Warnings and information on the airbags is also
provided on the sun visors.
Automatic deactivation of front
passenger airbags
The occupation of the seat is detected by eval-
uating the impression on the occupied seat sur-
face of the front passenger seat. The front and
side airbag on the front passenger side are acti-
vated or deactivated accordingly by the system.
The current status of the front passenger
airbag, i.e. deactivated or activated, is
indicated by the indicator lamp over the interior
rearview mirror, refer to Operating state of front
passenger airbags in the following.<
Page 92 of 248
Controls
91Reference
At a glance
Driving tips
Communications
Navigation
Entertainment
Mobility
Before transporting a child on the front
passenger seat, observe the safety infor-
mation and handling instructions under Trans-
porting children safely refer to page52.
The front and side airbag on the front passen-
ger side can be deactivated for teenagers and
adults in certain seat positions; then the indica-
tor lamp for the front passenger airbags lights
up. In these cases, change the seat position so
that the front passenger airbags are activated
and the indicator lamp goes out. If the desired
status cannot be produced by changing the
seat position, transport the corresponding per-
son on the rear seat. Do not fit seat covers, seat
cushion padding, ball mats or other items onto
the front passenger seat unless they are specif-
ically recommended by BMW. Do not lay
objects under the seat which could press
against the seat from below. Otherwise a cor-
rect evaluation of the occupied seat surface
cannot be ensured.<
Operating state of front passenger
airbags
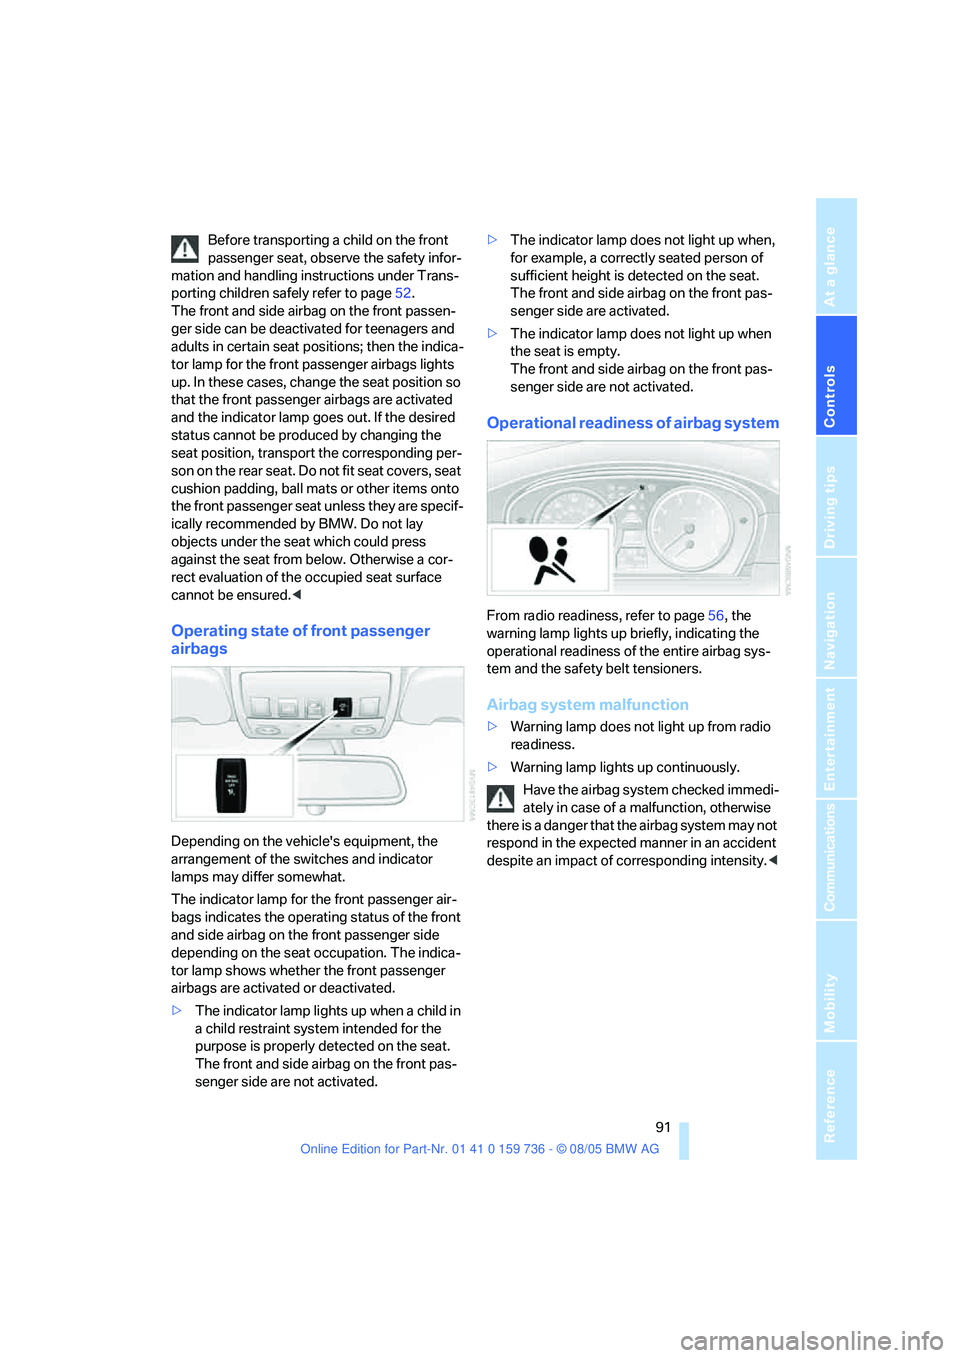
Depending on the vehicle's equipment, the
arrangement of the switches and indicator
lamps may differ somewhat.
The indicator lamp for the front passenger air-
bags indicates the operating status of the front
and side airbag on the front passenger side
depending on the seat occupation. The indica-
tor lamp shows whether the front passenger
airbags are activated or deactivated.
>The indicator lamp lights up when a child in
a child restraint system intended for the
purpose is properly detected on the seat.
The front and side airbag on the front pas-
senger side are not activated.>The indicator lamp does not light up when,
for example, a correctly seated person of
sufficient height is detected on the seat.
The front and side airbag on the front pas-
senger side are activated.
>The indicator lamp does not light up when
the seat is empty.
The front and side airbag on the front pas-
senger side are not activated.
Operational readiness of airbag system
From radio readiness, refer to page56, the
warning lamp lights up briefly, indicating the
operational readiness of the entire airbag sys-
tem and the safety belt tensioners.
Airbag system malfunction
>Warning lamp does not light up from radio
readiness.
>Warning lamp lights up continuously.
Have the airbag system checked immedi-
ately in case of a malfunction, otherwise
there is a danger that the airbag system may not
respond in the expected manner in an accident
despite an impact of corresponding intensity.<
Page 110 of 248
Controls
109Reference
At a glance
Driving tips
Communications
Navigation
Entertainment
Mobility
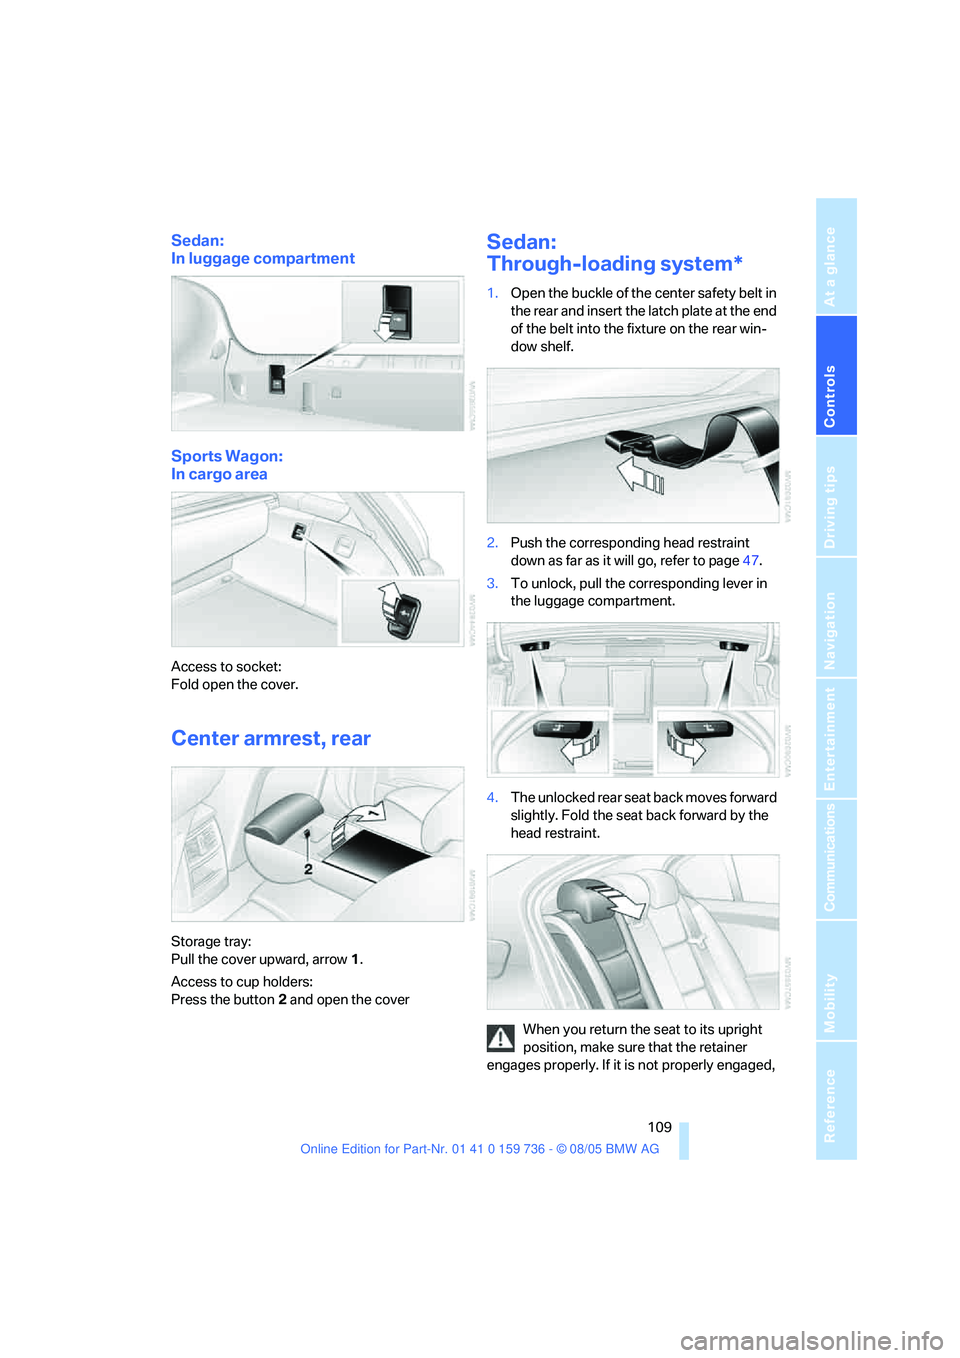
Sedan:
In luggage compartment
Sports Wagon:
In cargo area
Access to socket:
Fold open the cover.
Center armrest, rear
Storage tray:
Pull the cover upward, arrow1.
Access to cup holders:
Press the button2 and open the cover
Sedan:
Through-loading system*
1.Open the buckle of the center safety belt in
the rear and insert the latch plate at the end
of the belt into the fixture on the rear win-
dow shelf.
2.Push the corresponding head restraint
down as far as it will go, refer to page47.
3.To unlock, pull the corresponding lever in
the luggage compartment.
4.The unlocked rear seat back moves forward
slightly. Fold the seat back forward by the
head restraint.
When you return the seat to its upright
position, make sure that the retainer
engages properly. If it is not properly engaged,
Page 111 of 248
Practical interior accessories
110 transported cargo could enter the vehicle dur-
ing braking or evasive maneuvers and endanger
the vehicle occupants.<
The lashing eyes in the luggage compartment
provide you with a way to attach luggage com-
partment nets
* or flexible straps for securing
suitcases and luggage, refer to page120.
Ski bag*
Designed for safe, clean transport of up to
4 pairs of standard skis or up to 2 snowboards.
With the ski bag you can stow skis with a length
o f u p t o 6 . 9 f t / 2 . 1 0 m . W h e n s k i s o f 6 . 9 f t / 2 . 1 0 m
in length are loaded, the ski bag will tend to con-
tract, reducing its overall capacity.
Loading
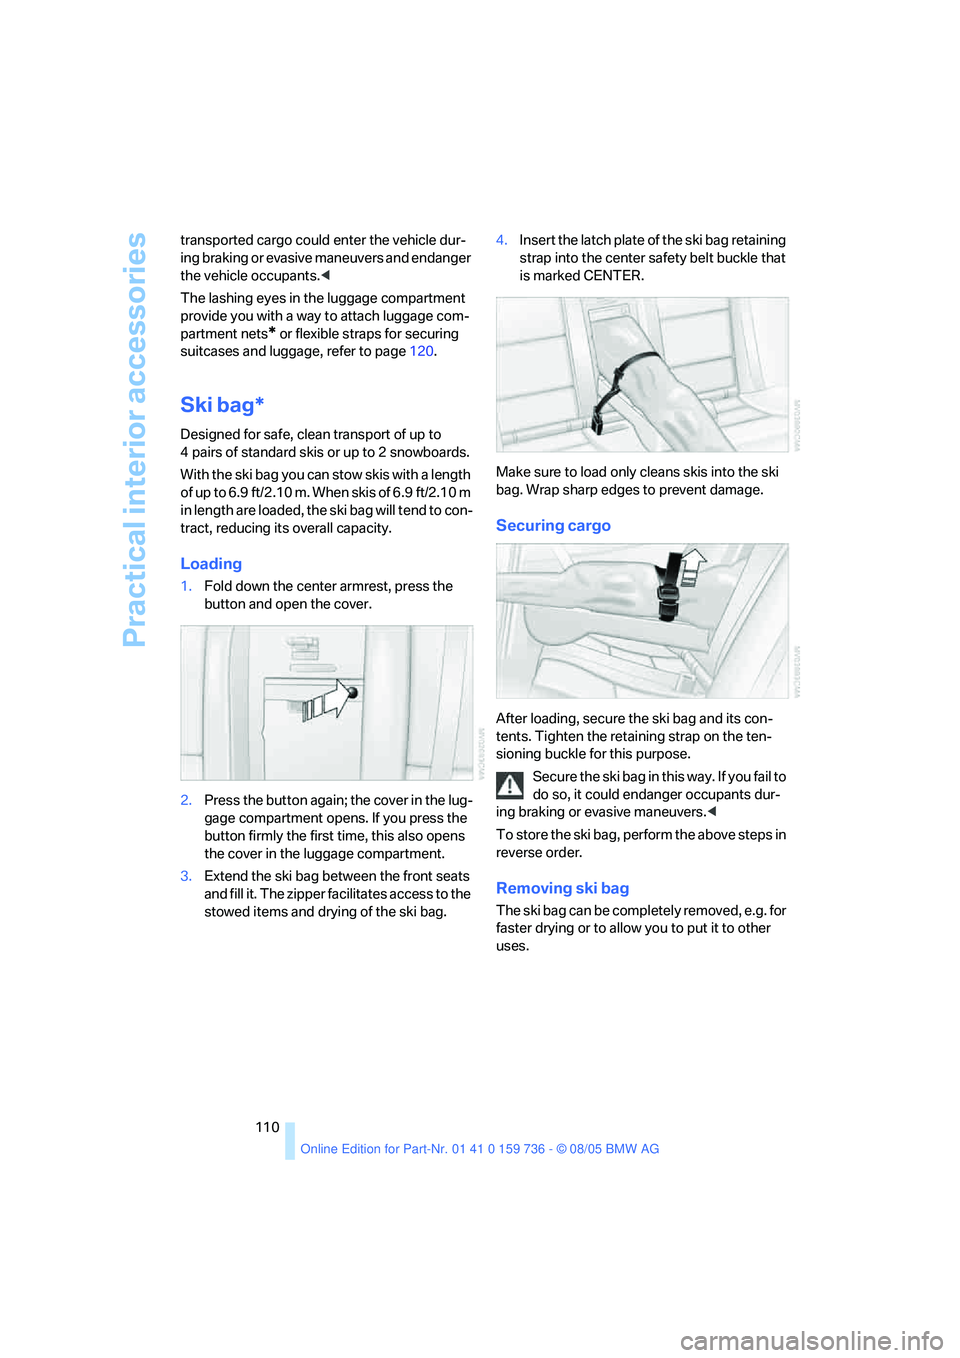
1.Fold down the center armrest, press the
button and open the cover.
2.Press the button again; the cover in the lug-
gage compartment opens. If you press the
button firmly the first time, this also opens
the cover in the luggage compartment.
3.Extend the ski bag between the front seats
and fill it. The zipper facilitates access to the
stowed items and drying of the ski bag.4.Insert the latch plate of the ski bag retaining
strap into the center safety belt buckle that
is marked CENTER.
Make sure to load only cleans skis into the ski
bag. Wrap sharp edges to prevent damage.
Securing cargo
After loading, secure the ski bag and its con-
tents. Tighten the retaining strap on the ten-
sioning buckle for this purpose.
Secure the ski bag in this way. If you fail to
do so, it could endanger occupants dur-
ing braking or evasive maneuvers.<
To store the ski bag, perform the above steps in
reverse order.
Removing ski bag
The ski bag can be completely removed, e.g. for
faster drying or to allow you to put it to other
uses.
Page 112 of 248
Controls
111Reference
At a glance
Driving tips
Communications
Navigation
Entertainment
Mobility
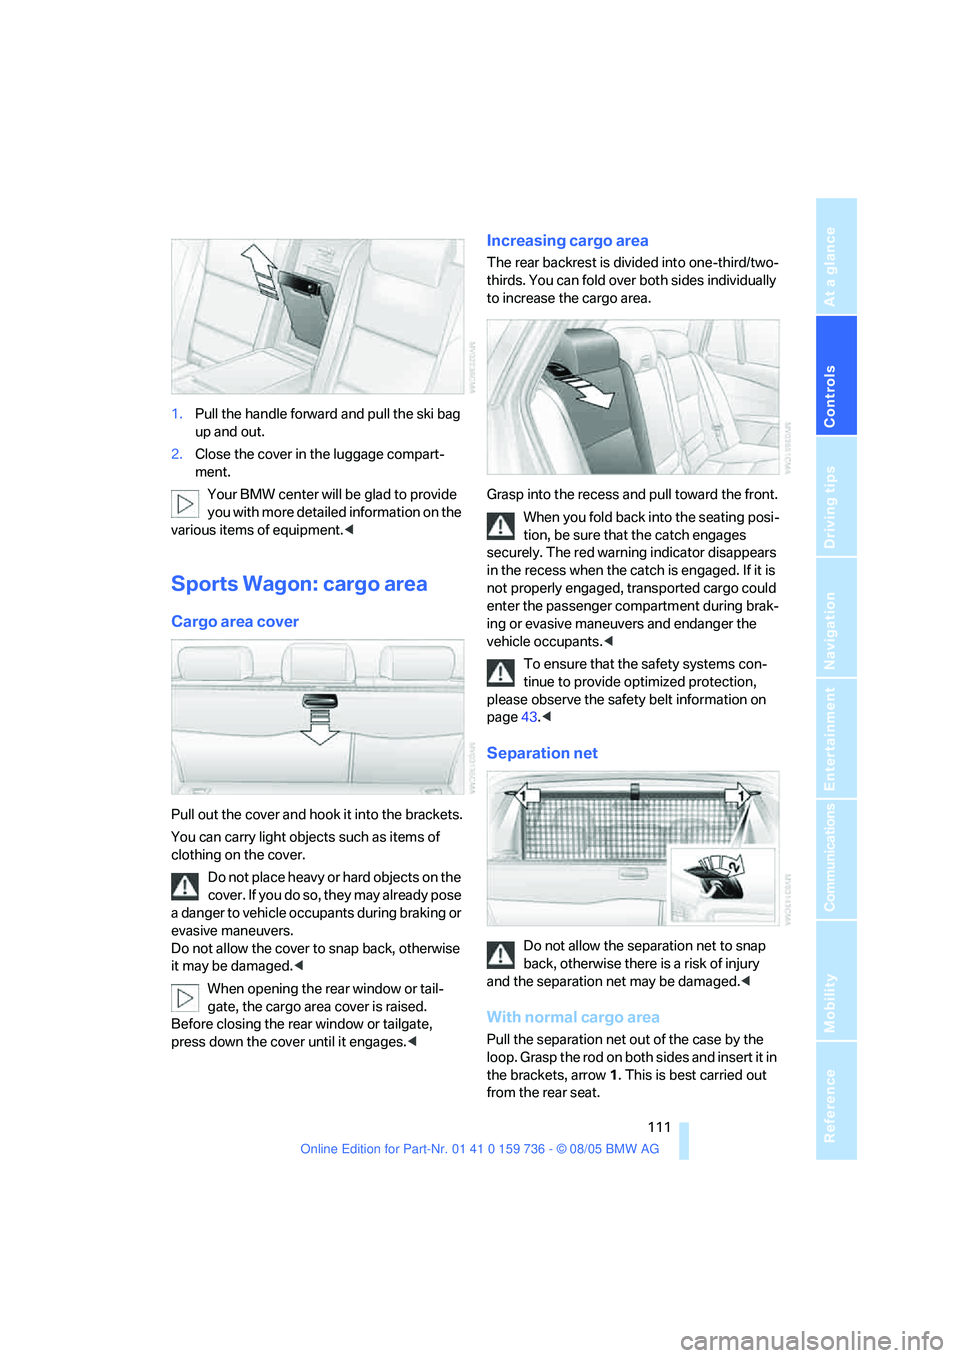
1.Pull the handle forward and pull the ski bag
up and out.
2.Close the cover in the luggage compart-
ment.
Your BMW center will be glad to provide
you with more detailed information on the
various items of equipment.<
Sports Wagon: cargo area
Cargo area cover
Pull out the cover and hook it into the brackets.
You can carry light objects such as items of
clothing on the cover.
Do not place heavy or hard objects on the
c o v e r . If y o u d o s o , t h e y m a y a l r ea d y p o s e
a danger to vehicle occupants during braking or
evasive maneuvers.
Do not allow the cover to snap back, otherwise
it may be damaged.<
When opening the rear window or tail-
gate, the cargo area cover is raised.
Before closing the rear window or tailgate,
press down the cover until it engages.<
Increasing cargo area
The rear backrest is divided into one-third/two-
thirds. You can fold over both sides individually
to increase the cargo area.
Grasp into the recess and pull toward the front.
When you fold back into the seating posi-
tion, be sure that the catch engages
securely. The red warning indicator disappears
in the recess when the catch is engaged. If it is
not properly engaged, transported cargo could
enter the passenger compartment during brak-
ing or evasive maneuvers and endanger the
vehicle occupants.<
To ensure that the safety systems con-
tinue to provide optimized protection,
please observe the safety belt information on
page43.<
Separation net
Do not allow the separation net to snap
back, otherwise there is a risk of injury
and the separation net may be damaged.<
With normal cargo area
Pull the separation net out of the case by the
loop. Grasp the rod on both sides and insert it in
the brackets, arrow1. This is best carried out
from the rear seat.
Page 120 of 248
Driving tips
119Reference
At a glance
Controls
Communications
Navigation
Entertainment
Mobility
damage the vehicle and produce unstable
vehicle operating conditions.<
2.Determine the combined weight of the
driver and passengers that will be riding in
your vehicle.
3.Subtract the combined weight of the driver
and passengers from XXX lbs. or YYY kg.
4.The resulting figure equals the available
amount of cargo and luggage load capacity.
For example, if the XXX amount equals
1,400 lbs. and there will be five 150-lb. pas-
sengers in your vehicle, the amount of avail-
able cargo and luggage load capacity is
650 lbs.:
1,400 Ibs. minus 750 Ibs. = 650 lbs.
5.Determine the combined weight of luggage
and cargo being loaded on the vehicle. That
weight may not safely exceed the available
cargo and luggage load capacity calculated
in step 4.
6.If your vehicle will be towing a trailer, part of
the load from your trailer will be transferred
to your vehicle. Consult the manual for
transporting a trailer to determine how this
may reduce the available cargo and luggage
load capacity of your vehicle.
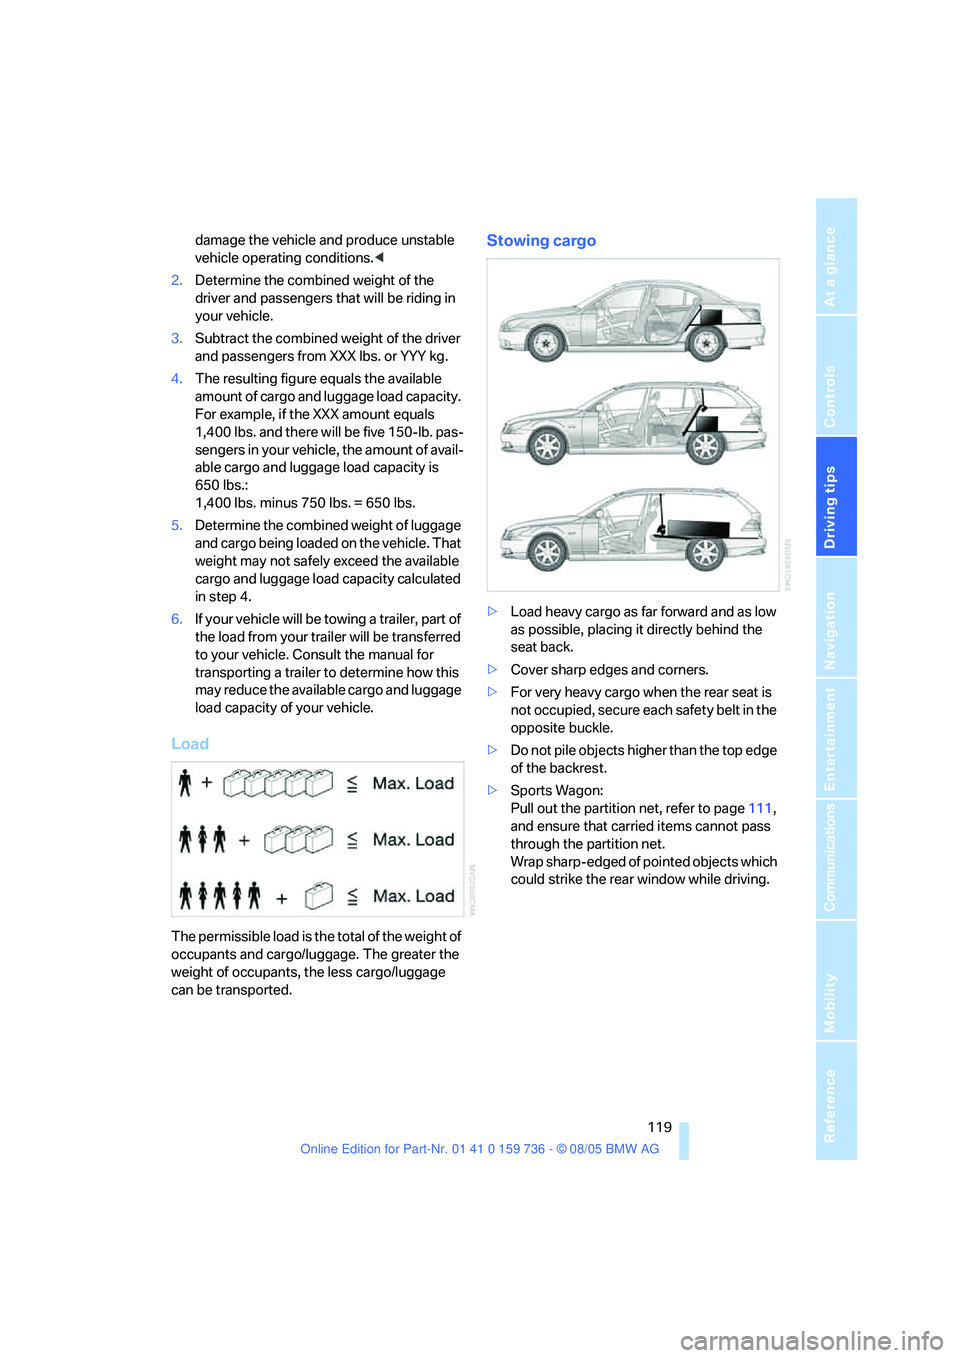
Load
The permissible load is the total of the weight of
occupants and cargo/luggage. The greater the
weight of occupants, the less cargo/luggage
can be transported.
Stowing cargo
>Load heavy cargo as far forward and as low
as possible, placing it directly behind the
seat back.
>Cover sharp edges and corners.
>For very heavy cargo when the rear seat is
not occupied, secure each safety belt in the
opposite buckle.
>Do not pile objects higher than the top edge
of the backrest.
>Sports Wagon:
Pull out the partition net, refer to page111,
and ensure that carried items cannot pass
through the partition net.
Wrap sharp-edged of pointed objects which
could strike the rear window while driving.
Page 193 of 248
Wheels and tires
192
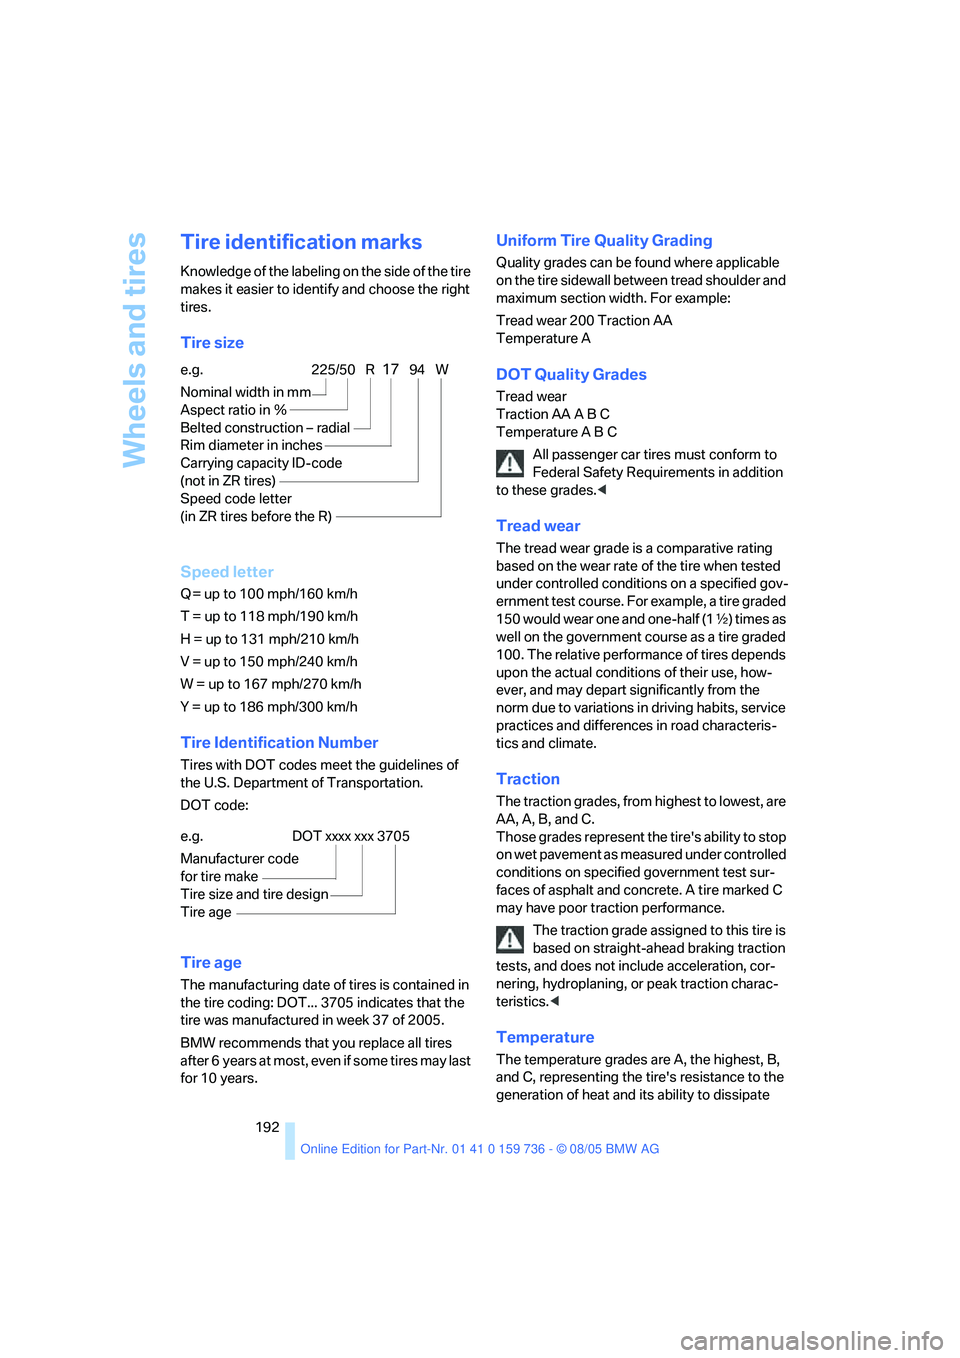
Tire identification marks
Knowledge of the labeling on the side of the tire
makes it easier to identify and choose the right
tires.
Tire size
Speed letter
Q = up to 100 mph/160 km/h
T = up to 118 mph/190 km/h
H = up to 131 mph/210 km/h
V = up to 150 mph/240 km/h
W = up to 167 mph/270 km/h
Y = up to 186 mph/300 km/h
Tire Identification Number
Tires with DOT codes meet the guidelines of
the U.S. Department of Transportation.
DOT code:
Tire age
The manufacturing date of tires is contained in
the tire coding: DOT... 3705 indicates that the
tire was manufactured in week 37 of 2005.
BMW recommends that you replace all tires
after 6 years at most, even if some tires may last
for 10 years.
Uniform Tire Quality Grading
Quality grades can be found where applicable
on the tire sidewall between tread shoulder and
maximum section width. For example:
Tread wear 200 Traction AA
Temperature A
DOT Quality Grades
Tread wear
Traction AA A B C
Temperature A B C
All passenger car tires must conform to
Federal Safety Requirements in addition
to these grades.<
Tread wear
The tread wear grade is a comparative rating
based on the wear rate of the tire when tested
under controlled conditions on a specified gov-
ernment test course. For example, a tire graded
150 would wear one and one-half (1γ) times as
well on the government course as a tire graded
100. The relative performance of tires depends
upon the actual conditions of their use, how-
ever, and may depart significantly from the
norm due to variations in driving habits, service
practices and differences in road characteris-
tics and climate.
Traction
The traction grades, from highest to lowest, are
AA, A, B, and C.
Those grades represent the tire's ability to stop
on wet pavement as measured under controlled
conditions on specified government test sur-
faces of asphalt and concrete. A tire marked C
may have poor traction performance.
The traction grade assigned to this tire is
based on straight-ahead braking traction
tests, and does not include acceleration, cor-
nering, hydroplaning, or peak traction charac-
teristics.<
Temperature
The temperature grades are A, the highest, B,
and C, representing the tire's resistance to the
generation of heat and its ability to dissipate e.g.
Nominal width in mm
Aspect ratio in Ξ
Belted construction – radial
Rim diameter in inches
Carrying capacity ID-code
(not in ZR tires)
Speed code letter
(in ZR tires before the R)
225/50 R1794 W
e.g.
Manufacturer code
for tire make
Tire size and tire design
Tire ageDOT xxxx xxx 3705
Page 229 of 248
Everything from A to Z
228 Approved gross vehicle
weight, refer to Weights221
Armrest, refer to Center
armrest, rear109
Arrival time
– refer to Computer74
– refer to Starting destination
guidance136
"Arrow display" during
navigation137
Ashtray
– front107
– rear108
Assist, refer to
BMW Assist179
Assistance systems, refer to
Driving stability control
systems84
Assistance window20
"Assist. window off"21
AUC Automatic recirculated-
air control101
Audio144
– controls144
– switching on/off144
– tone control145
– volume145
"Audio", refer to Tone
control145
Automatic
– air distribution99
– air volume99
– garage door opener104
– headlamp control94
– service notification180
– steering wheel adjustment,
refer to Easy entry/exit50
– storing stations149
– tailgate operation35
Automatically switching
between high beams and
low beams, refer to High-
beam assistant95
Automatic car washes118
– also refer to Caring for your
vehicle brochure
Automatic climate control98
– automatic air distribution99
– switching off101Automatic curb monitor50
Automatic lighting
– refer to Automatic headlamp
control94
– refer to Daytime driving
lamps94
– refer to High-beam
assistant95
– refer to Interior lamps97
– refer to Pathway lighting94
Automatic low-beam function,
refer to High-beam
assistant95
"Automatic programs"99
Automatic recirculated-air
control AUC101
Automatic station search149
Automatic transmission with
Steptronic61
– deactivating selector lever
interlock62
– interlock61
– kick-down61
– selector lever interlock61
– shiftlock61
– sport program62
– tow starting214
– tow-starting215
– with comfort access38
"Automatic ventilation"102
AUTO program for automatic
climate control99
"Autostore" on the
radio148,150
Average fuel consumption73
– setting the units81
Average speed, refer to
Computer73
"Avoid ferries" for
navigation135
"Avoid highways" for
navigation135
Avoiding freeways for
navigation135
Avoiding unintentional
alarms37
"Avoid tollroads" for
navigation135Axle loads, refer to
Weights221
"A - Z"172
B
Backrest contour, refer to
Lumbar support44
Backrests, refer to Seats44
Backrest width adjustment44
Backup lamps, refer to
Reverse gear59
– replacing bulbs205
"Balance", refer to Tone
control146
Balance, refer to Tone
control146
Band-aids, refer to First-aid
kit212
"Bass", refer to Tone
control146
Bass, refer to Tone
control145
Battery, refer to Vehicle
battery209
– jump starting212
Battery disposal
– remote control with comfort
access39
– vehicle battery209
Battery replacement, remote
control with comfort
access39
Being towed214
Belts, refer to Safety belts47
Beverage holder, refer to
Cup holders107
Blower, refer to Air
volume100
"BMW Assist"181
BMW Assist179
– enabling179
– services offered180
"BMW Contact"183
"BMW Contact
Numbers"183
BMW homepage4
BMW maintenance
system201