2006 BMW 330XI SEDAN navigation
[x] Cancel search: navigationPage 65 of 245

Controls
63Reference
At a glance
Driving tips
Communications
Navigation
Entertainment
Mobility
becomes clear, your vehicle will accelerate to
the speed you have selected by increasing the
throttle setting and shifting gears automatically
or by the driver as needed. Your selected speed
will be held when driving downhill, too.
Since this active cruise control system is a new
technology and operates differently from con-
ventional cruise control systems which you may
be accustomed to, you are strongly urged to
read all of the pages relating to this system
before use. Pay special attention to the System
limitations section beginning on page66.
Braking sensation
The system's automatic brake operation results
in a braking sensation that is slightly different
from what you feel when you brake the vehicle
yourself in a similar situation. Possible noises
during automatic deceleration are normal.
Manual transmission/SMG
You can shift gears while cruise control is acti-
vated. An indicator lamp notifies you that you
should shift gears when you drive for an
extended period at very high or very low engine
speeds, or the system is deactivated.
In Drive mode, the SMG acts similarly to an
automatic transmission in position D.
Range of applications
The minimum desired speed is 20 mph or
30 km/h, and the maximum desired speed is
110 mph or 180 km/h.
As with conventional cruise control sys-
tems, active cruise control in no way
diminishes or substitutes for the driver’s own
personal responsibility, alertness and aware-
ness in adjusting speed, braking or otherwise
controlling the vehicle. The driver should
decide when to use the system on the basis of
road, traffic, visibility, and weather conditions.
Active cruise control is intended for use on
highway-type roadways where traffic is moving
relatively smoothly. Do not use this system in
city driving; heavy traffic such as during rush
hour; on curvy, winding roads, slippery roads or
roads with sharp curves such as highway off-ramps; during inclement weather such as snow,
strong rain or fog; or when entering inter-
changes, service/parking areas or toll booths.
It is also important to regulate your vehicle's
speed and distance setting within applicable
legal limits. Always be ready to take action or
apply the brakes if necessary, especially when
the system is actively following a vehicle in front
of you. Otherwise, driving conditions could
result which violate the law or pose a risk of
accident.<
One lever for all functions
1Store and increase desired speed
2Store and decrease desired speed
3Deactivate system, refer to page65
4Resume stored desired speed and dis-
tance, refer to page65
5Select distance to vehicle driving ahead,
refer to page64
Maintaining current speed
Briefly press the lever, arrow 1, or briefly pull it,
arrow 2, at a driving speed of more than approx.
20 mph or 30 km/h.
Page 67 of 245

Controls
65Reference
At a glance
Driving tips
Communications
Navigation
Entertainment
Mobility
Use good judgement to select the appro-
priate following distance given road con-
ditions, traffic, applicable laws and driving rec-
ommendations for safe following distance.
Otherwise, you may be in violation of the law or
an accident could result.<
Deactivating cruise control
Press the lever upward or downward, arrow3.
The displays in the speedometer disappear.
In addition, the system is automatically deacti-
vated:
>When you brake the vehicle
>When the speed is reduced to below
20 mph or 30 km/h due to a traffic situation
>When you switch gears very slowly or shift
to idle in cars with manual transmission
>When you select the automatic transmis-
sion's/SMG's neutral position N
>When you activate the Dynamic Traction
Control DTC
>When you deactivate the Dynamic Stability
Control DSC
>When DSC or ABS is intervening
>When the system does not recognize any
objects for a longer period of time, e.g. on infrequently traveled roads without a shoul-
der or guard rails, or if the radar sensor is
covered with dirt, refer to page66
>When you apply the handbrake
When the system is deactivated, you
must brake the vehicle yourself and/or
maneuver as necessary, otherwise there is a
risk of accident.<
Warning lamp
The warning lamp comes on when
active cruise control has been auto-
matically deactivated due to a driving
speed below 20 mph or 30km/h, an application
of the handbrake or a DSC intervention. A mes-
sage appears on the Control Display.
Resuming stored desired speed and
distance
Briefly press the button, arrow 4.
The stored speed and distance are regained
and maintained.
In the following instances, the stored speed is
deleted and can no longer be resumed:
>When driving stability control systems are
intervening
>In cars with manual transmission: when you
shift gears very slowly or shift to idle posi-
tion
>With automatic transmission/SMG: when
you engage selector lever position N
>When the ignition is switched off
Displays in the instrument cluster
1Stored desired speed
2Shows yellow: vehicle detected ahead Distance 3
This distance is always set when
the system is used for the first
time after starting the engine.
Distance 4
Page 69 of 245

Controls
67Reference
At a glance
Driving tips
Communications
Navigation
Entertainment
Mobility
parked vehicle. Also, the system does not react
to oncoming traffic, pedestrians or other types
of potential traffic such as a rider on horseback.
It is also possible that the system may not
detect smaller moving objects such as motor-
cycles or bicycles. Be especially alert when
encountering any of these situations as the sys-
tem will neither automatically brake, nor provide
a warning to you. Also, be aware that every
decrease in the distance setting allows your
vehicle to come closer to a vehicle in front of
you and requires a heightened amount of alert-
ness.<
Active cruise control is not and must not
be used as a collision avoidance/warning
system.<
If while your vehicle is actively following a vehi-
cle in front of you and the vehicle ahead speeds
up or the lane ahead becomes clear, then your
vehicle will accelerate to the speed you have
selected. Be aware that changing to a clear,
unobstructed lane will also result in your vehicle
accelerating.
Be certain to deactivate the system when
you pull into an exit lane for a highway off-
ramp.<
Also, vehicles traveling in a staggered manner
on a highway may cause a delay in the system's
reaction to a vehicle in front of you or may cause
the system to react to a vehicle actually in the
lane next to you. Always be ready to take action
or apply the brakes if necessary.
While active cruise control is capable of
braking your vehicle automatically when
you approach a slower vehicle ahead, it is
important to be aware that the ability of the sys-
tem to apply the brakes is also limited, e.g.
when you reduce your desired speed sharply.
The system cannot stop your vehicle. It uses
only a portion of braking system capacity and
does not utilize the full capacity of the vehicle
braking system. Therefore, the system cannot
decrease your speed for large differences in
speed between your vehicle and the vehicle
ahead. Examples: when you approach a vehicle
traveling at a much lower speed than your own
speed such as approaching a toll booth or when a much slower vehicle cuts in front of you at
close range.<
Active cruise control can only decelerate the
vehicle to approx. 20 mph or 30 km/h.
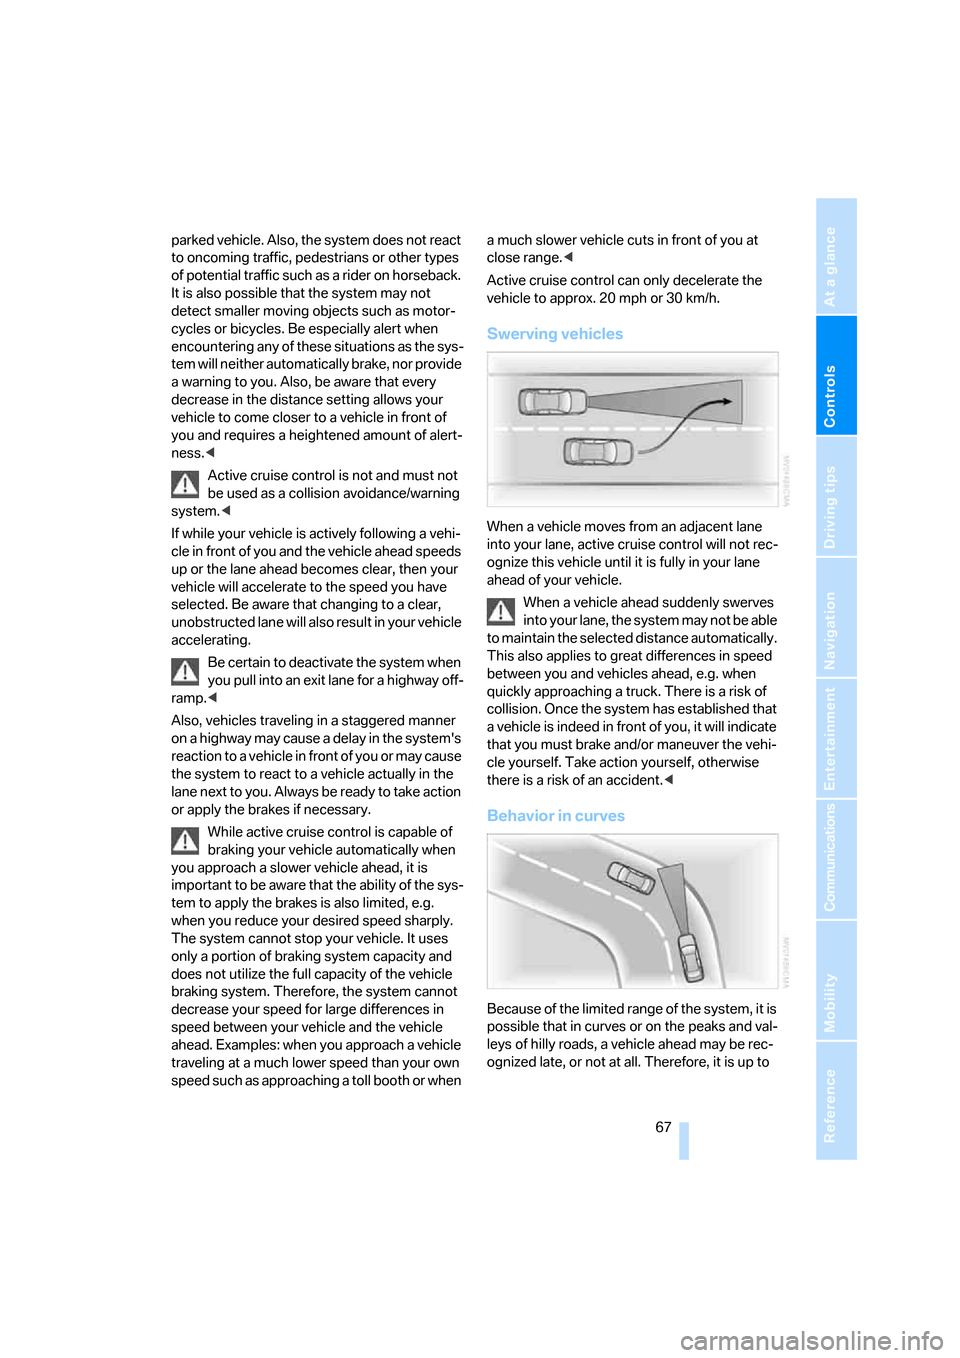
Swerving vehicles
When a vehicle moves from an adjacent lane
into your lane, active cruise control will not rec-
ognize this vehicle until it is fully in your lane
ahead of your vehicle.
When a vehicle ahead suddenly swerves
into your lane, the system may not be able
to maintain the selected distance automatically.
This also applies to great differences in speed
between you and vehicles ahead, e.g. when
quickly approaching a truck. There is a risk of
collision. Once the system has established that
a vehicle is indeed in front of you, it will indicate
that you must brake and/or maneuver the vehi-
cle yourself. Take action yourself, otherwise
there is a risk of an accident.<
Behavior in curves
Because of the limited range of the system, it is
possible that in curves or on the peaks and val-
leys of hilly roads, a vehicle ahead may be rec-
ognized late, or not at all. Therefore, it is up to
Page 71 of 245

Controls
69Reference
At a glance
Driving tips
Communications
Navigation
Entertainment
Mobility
Everything under control
Odometer, outside
temperature display, clock
1Resetting trip odometer
2Outside temperature display and clock
3Odometer and trip odometer
Units of measure
To select the respective units of measure, miles
or km for the odometer as well as 7 or 6 for
the outside temperature, refer to page73.
Outside temperature display, clock
Setting the time, refer to page77.
Outside temperature warning
When the displayed temperature sinks to
approx. +377/+36, a signal sounds and a
warning lamp lights up. There is an increased
risk of black ice.
Black ice can also form at temperatures
above +377/+36. You should there-
fore drive carefully on bridges and shaded
roads, for example, otherwise there is an
increased risk of an accident.<
Odometer and trip odometer
Resetting trip odometer:
With the ignition switched on, press button1 in
the instrument cluster.
When the vehicle is parked
If you still want to view the time, outside tem-
perature and odometer reading briefly after the
remote control has been removed from the igni-
tion lock:
Press button 1 in the instrument cluster.
Tachometer
Never force the engine speed up into the red
warning field, see arrow. In this range, the fuel
supply is interrupted to protect the engine.
Coolant temperature
A warning lamp will come on if the coolant, and
therefore the engine, becomes too hot. In addi-
tion, a message will appear on the Control Dis-
play.
Check coolant level, refer to page201.
Page 73 of 245

Controls
71Reference
At a glance
Driving tips
Communications
Navigation
Entertainment
Mobility
Average fuel consumption
The average fuel consumption is calculated for
the time during which the engine is running.
With the trip computer, refer to page71, you
can have the average consumption for another
trip displayed.
To reset average fuel consumption: press the
button in the turn indicator stalk for approx.
2seconds.
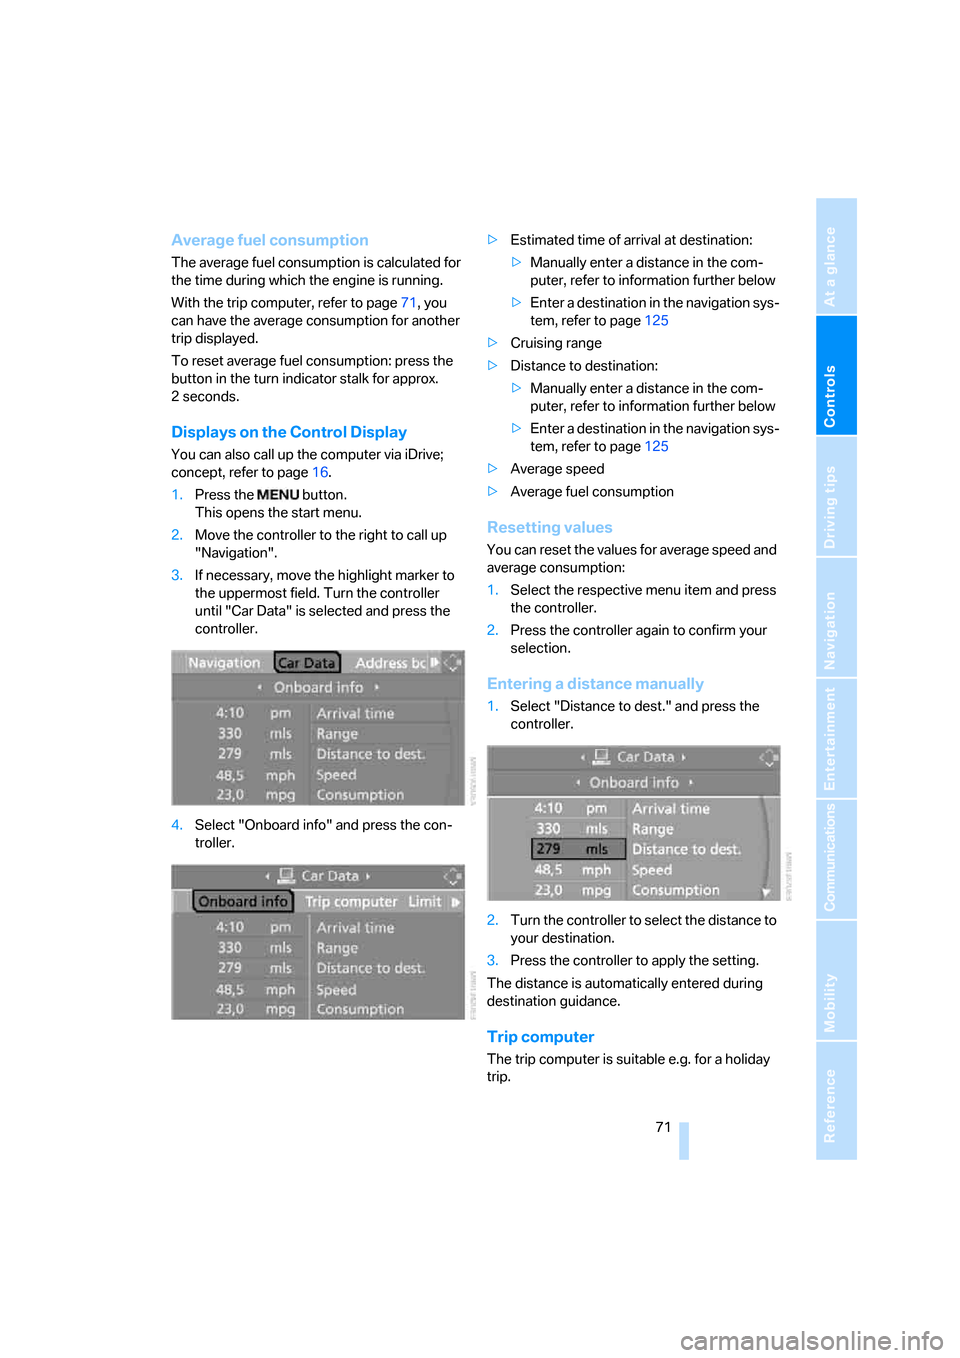
Displays on the Control Display
You can also call up the computer via iDrive;
concept, refer to page16.
1.Press the button.
This opens the start menu.
2.Move the controller to the right to call up
"Navigation".
3.If necessary, move the highlight marker to
the uppermost field. Turn the controller
until "Car Data" is selected and press the
controller.
4.Select "Onboard info" and press the con-
troller.>Estimated time of arrival at destination:
>Manually enter a distance in the com-
puter, refer to information further below
>Enter a destination in the navigation sys-
tem, refer to page125
>Cruising range
>Distance to destination:
>Manually enter a distance in the com-
puter, refer to information further below
>Enter a destination in the navigation sys-
tem, refer to page125
>Average speed
>Average fuel consumption
Resetting values
You can reset the values for average speed and
average consumption:
1.Select the respective menu item and press
the controller.
2.Press the controller again to confirm your
selection.
Entering a distance manually
1.Select "Distance to dest." and press the
controller.
2.Turn the controller to select the distance to
your destination.
3.Press the controller to apply the setting.
The distance is automatically entered during
destination guidance.
Trip computer
The trip computer is suitable e.g. for a holiday
trip.
Page 74 of 245

Everything under control
72 1.Open the start menu.
2.Call up "Navigation".
3.Select "Car Data" and press the controller.
4.Select "Trip computer" and press the con-
troller.
>Departure time
>Driving time
>Distance traveled
>Average speed
>Average fuel consumption
Switching trip computer on/off and resetting all
values to zero:
1.Select "Set" and press the controller.
2.Select the desired menu item and press the
controller.
Display options
You can display the computer or the trip com-
puter in the assistance window.
1.Move the controller to the right to change to
the assistance window and press the con-
troller.
2.Select a menu item:
>"Onboard info"
>"Trip computer"3.Press the controller.
Page 75 of 245

Controls
73Reference
At a glance
Driving tips
Communications
Navigation
Entertainment
Mobility
Settings and information
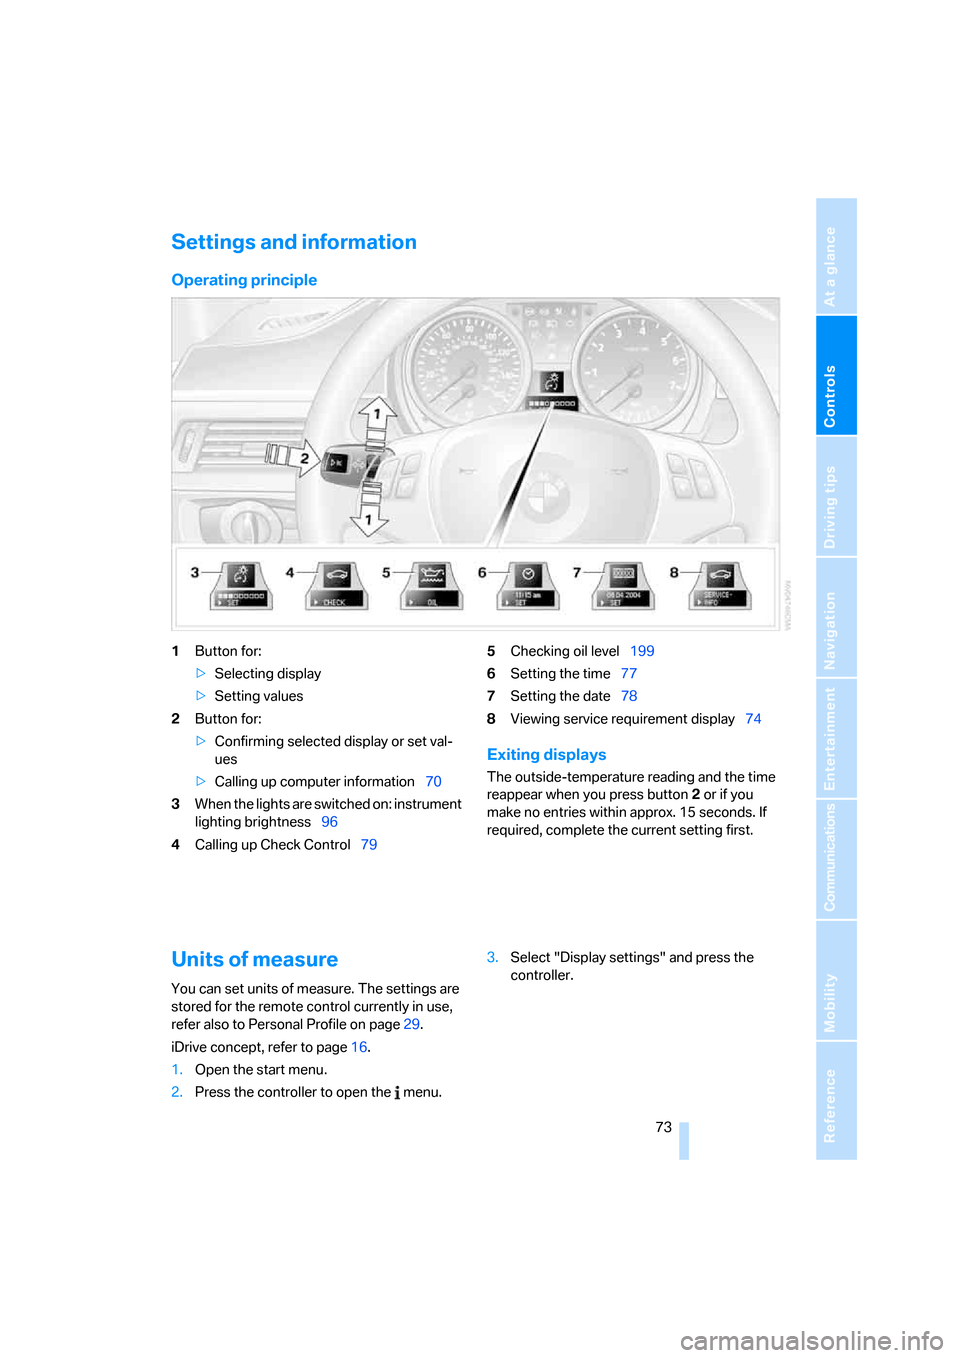
Operating principle
1Button for:
>Selecting display
>Setting values
2Button for:
>Confirming selected display or set val-
ues
>Calling up computer information70
3When the lights are switched on: instrument
lighting brightness96
4Calling up Check Control795Checking oil level199
6Setting the time77
7Setting the date78
8Viewing service requirement display74
Exiting displays
The outside-temperature reading and the time
reappear when you press button2 or if you
make no entries within approx. 15 seconds. If
required, complete the current setting first.
Units of measure
You can set units of measure. The settings are
stored for the remote control currently in use,
refer also to Personal Profile on page29.
iDrive concept, refer to page16.
1.Open the start menu.
2.Press the controller to open the menu.3.Select "Display settings" and press the
controller.
Page 77 of 245

Controls
75Reference
At a glance
Driving tips
Communications
Navigation
Entertainment
Mobility
Possible displays
1Button for selecting functions
2Service requirements
3Engine oil
4Exhaust emissions test
*
5Roadworthiness test*
6Microfilter
7Spark plugs
8Brakes, front
9Brakes, rear
10Brake fluid
Supplementary information
You can have further information on the scope
of maintenance displayed on the Control Dis-
play, refer to page16.
1.Open the start menu.
2.Press the controller to open the menu.
3.Select "Service" and press the controller.
4.If necessary, move the highlight marker to
the uppermost field. Turn the controller until "Service requirements" is selected and
press the controller.
5.If necessary, move the highlight marker to
the second field from the top. Turn the con-