2006 BMW 330I SEDAN speed
[x] Cancel search: speedPage 70 of 245

Driving
68 the driver to select a speed that is prudent in
view of the curves and terrain of the roadway.
In approaching a curve, it is possible that active
cruise control would react briefly to a vehicle in
the adjacent lane. In addition, the system can
sense if your vehicle is in a curve and may not
accelerate. If your vehicle decelerates in either
case, you can choose to overcome the deceler-
ation by briefly pressing the accelerator pedal.
Your responsibility
Your actions have priority at all times. When you
press the accelerator pedal while driving with
active cruise control, the automatic braking
function will be temporarily interrupted. Once
you release the accelerator pedal, the desired
speed or the selected distance to the vehicle
ahead is achieved again.
Do not leave your foot on the accelerator
pedal and make sure that no objects such
as floor mats are lying on the accelerator pedal.
Otherwise the system may not be able to brake
the vehicle.<
Page 71 of 245

Controls
69Reference
At a glance
Driving tips
Communications
Navigation
Entertainment
Mobility
Everything under control
Odometer, outside
temperature display, clock
1Resetting trip odometer
2Outside temperature display and clock
3Odometer and trip odometer
Units of measure
To select the respective units of measure, miles
or km for the odometer as well as 7 or 6 for
the outside temperature, refer to page73.
Outside temperature display, clock
Setting the time, refer to page77.
Outside temperature warning
When the displayed temperature sinks to
approx. +377/+36, a signal sounds and a
warning lamp lights up. There is an increased
risk of black ice.
Black ice can also form at temperatures
above +377/+36. You should there-
fore drive carefully on bridges and shaded
roads, for example, otherwise there is an
increased risk of an accident.<
Odometer and trip odometer
Resetting trip odometer:
With the ignition switched on, press button1 in
the instrument cluster.
When the vehicle is parked
If you still want to view the time, outside tem-
perature and odometer reading briefly after the
remote control has been removed from the igni-
tion lock:
Press button 1 in the instrument cluster.
Tachometer
Never force the engine speed up into the red
warning field, see arrow. In this range, the fuel
supply is interrupted to protect the engine.
Coolant temperature
A warning lamp will come on if the coolant, and
therefore the engine, becomes too hot. In addi-
tion, a message will appear on the Control Dis-
play.
Check coolant level, refer to page201.
Page 72 of 245

Everything under control
70
Energy Control
Displays the current fuel consumption. This
allows you to see whether your current driving
style is conducive to fuel economy with mini-
mum exhaust emissions.
Fuel gauge
Fuel tank capacity: approx. 15.9 US gallons/
60 liters. You can find information on refueling
on page186.
If the tilt of the vehicle varies for a longer period,
when you are driving in mountainous areas, for
example, the indicator may fluctuate slightly.
Reserve
Once the fuel level has fallen to the reserve
zone, a message briefly appears on the Control
Display and the cruising range for the remaining
amount of fuel is displayed on the computer.
Under a cruising range of approx. 30 miles/
50 km, the message remains in the Control Dis-
play.
Refuel as soon as possible once your
cruising range falls below 30 miles/
50 km, otherwise engine functions are not
ensured and damage can occur.<
Computer
Displays in the instrument cluster
To call up the information, press the button in
the turn indicator stalk.
The following items of information are dis-
played in the order listed:
>Cruising range
>Average speed
>Average fuel consumption
To set the corresponding units of measure,
refer to Units of measure on page73.
Cruising range
Displays the estimated cruising range available
with the remaining fuel. The range is calculated
on the basis of the way the car has been driven
over the last 18 miles/30 km and the amount of
fuel currently in the tank.
B e s u r e t o r e f u e l a s s o o n a s p o s s i b l e o n c e
your cruising range falls below 30 miles/
50 km, otherwise engine functions are not
ensured and damage can occur.<
Average speed
Periods with the vehicle parked and the engine
switched off are not included in the calculations
of average speed.
With the trip computer, refer to page71, you
can have the average speed for another trip dis-
played.
To reset average speed: press the button in the
turn indicator stalk for approx. 2 seconds.
Page 73 of 245
Controls
71Reference
At a glance
Driving tips
Communications
Navigation
Entertainment
Mobility
Average fuel consumption
The average fuel consumption is calculated for
the time during which the engine is running.
With the trip computer, refer to page71, you
can have the average consumption for another
trip displayed.
To reset average fuel consumption: press the
button in the turn indicator stalk for approx.
2seconds.
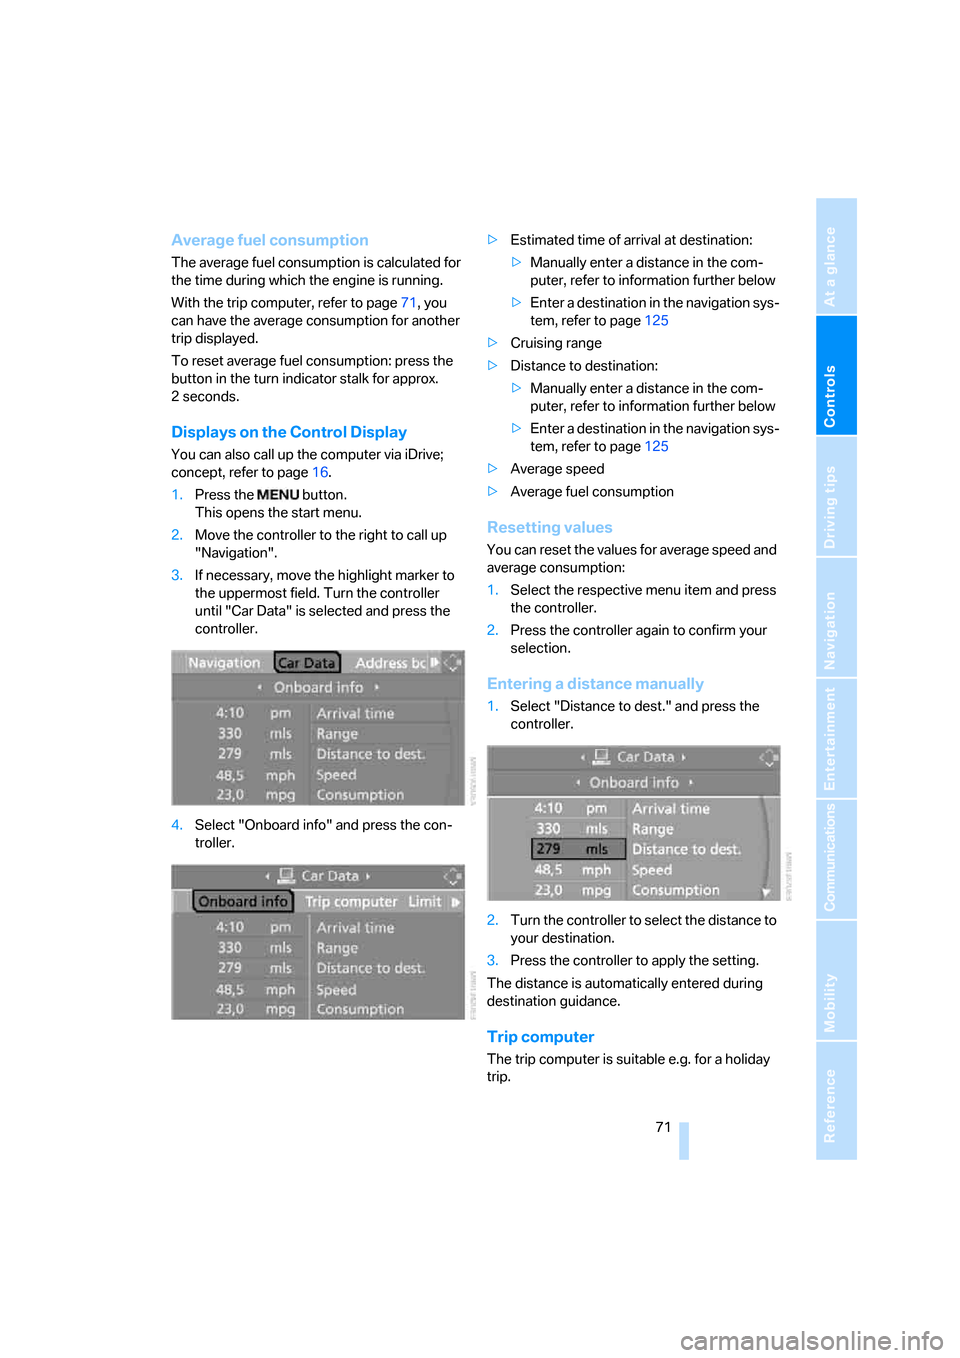
Displays on the Control Display
You can also call up the computer via iDrive;
concept, refer to page16.
1.Press the button.
This opens the start menu.
2.Move the controller to the right to call up
"Navigation".
3.If necessary, move the highlight marker to
the uppermost field. Turn the controller
until "Car Data" is selected and press the
controller.
4.Select "Onboard info" and press the con-
troller.>Estimated time of arrival at destination:
>Manually enter a distance in the com-
puter, refer to information further below
>Enter a destination in the navigation sys-
tem, refer to page125
>Cruising range
>Distance to destination:
>Manually enter a distance in the com-
puter, refer to information further below
>Enter a destination in the navigation sys-
tem, refer to page125
>Average speed
>Average fuel consumption
Resetting values
You can reset the values for average speed and
average consumption:
1.Select the respective menu item and press
the controller.
2.Press the controller again to confirm your
selection.
Entering a distance manually
1.Select "Distance to dest." and press the
controller.
2.Turn the controller to select the distance to
your destination.
3.Press the controller to apply the setting.
The distance is automatically entered during
destination guidance.
Trip computer
The trip computer is suitable e.g. for a holiday
trip.
Page 74 of 245

Everything under control
72 1.Open the start menu.
2.Call up "Navigation".
3.Select "Car Data" and press the controller.
4.Select "Trip computer" and press the con-
troller.
>Departure time
>Driving time
>Distance traveled
>Average speed
>Average fuel consumption
Switching trip computer on/off and resetting all
values to zero:
1.Select "Set" and press the controller.
2.Select the desired menu item and press the
controller.
Display options
You can display the computer or the trip com-
puter in the assistance window.
1.Move the controller to the right to change to
the assistance window and press the con-
troller.
2.Select a menu item:
>"Onboard info"
>"Trip computer"3.Press the controller.
Page 83 of 245

Controls
81Reference
At a glance
Driving tips
Communications
Navigation
Entertainment
Mobility
until "Check Control messages" is selected
and press the controller.
5.Select a text message and press the con-
troller.
To exit the display:
Select the arrow and press the controller.
Speed limit
You can enter a speed, and a Check Control
message will indicate when you reach this
speed. This enables you, for example, to
receive warnings if you exceed a speed limit in
an urban area.
You are only warned of reaching this speed a
second time if your vehicle speed falls below it
again by at least 3 mph or 5 km/h.
Displaying, setting or changing the
limit
iDrive concept, refer to page16.
1.Open the start menu.
2.Call up "Navigation".
3.Select "Car Data" and press the controller.4.Select "Limit" and press the controller.
5.Select the speed value and press the con-
troller.
6.Turn the controller to set the limit.
7.Press the controller to apply the setting.
The limit is automatically switched on.
Applying your current speed as limit
Select "Select current speed" and press the
controller. The system adopts your current
speed as the limit.
Activating the limit
Select "On" and press the controller.
Limit is activated.
Stopwatch
iDrive concept, refer to page16.
1.Open the start menu.
2.Call up "Navigation".
3.Select "Car Data" and press the controller.
4.Select "Stopwatch" and press the control-
ler.
Page 85 of 245

Controls
83Reference
At a glance
Driving tips
Communications
Navigation
Entertainment
Mobility
Technology for driving comfort and safety
PDC Park Distance Control*
The concept
The PDC assists you with maneuvering in tight
parking spaces. Acoustic signals and a visual
indicator
warn you of the presence of an object
in front of
* or behind your car. To measure the
distance, there are four ultrasonic sensors in
each bumper.
These sensors have a range of approx. 6.5 ft/
2 m. However, an acoustic warning does not
sound until an object is approx. 2 ft/60 cm from
the front sensors
* or both rear corner sensors,
or approx. 5 ft/1.50 m from the rear center sen-
sors.
PDC is a parking aid that can indicate
objects when they are approached
slowly, as is usually the case when parking.
Avoid approaching an objec t a t h i g h s p e e d , o t h -
erwise physical circumstances may lead to the
system warning being issued too late.<
Automatic mode
With the engine running or the ignition switched
on, the system is activated automatically after
approx. 1 second when you engage reverse
gear or move the automatic transmission selec-
tor lever to position R. Wait this short period
before driving.
Switching on manually
Press the button, the LED lights up.
Switching off manually
Press the button again; the LED goes out.
The system is automatically deactivated once
the vehicle travels approx. 165 ft/50 m or
exceeds a speed of approx. 20 mph or 30 km/h;
the LED goes out. You can reactivate the sys-
tem as needed.
Signal tones
When nearing an object, its position is indicated
correspondingly by an interval tone. For exam-
ple, the tone sounds at the rear if the system
detects an object behind the car. As the dis-
tance between vehicle and object decreases,
the intervals between the tones become
shorter. If the distance to the nearest object
falls to below roughly 1 ft/30 cm, then a contin-
uous tone sounds.
The warning signal is canceled after approx.
3 seconds, if you are moving parallel to a wall.
Malfunction
The indicator lamp in the instrument
cluster comes on. PDC is malfunc-
tioning. A message appears on the
Control Display. Have the system checked.
To avoid this problem, keep the sensors clean
and free of ice or snow in order to ensure that
they will continue to operate effectively. When
using a high-pressure cleaner, do not spray the
sensors for extended periods of time and only
from a distance of at least 4 in/10 cm.
Manual mode
The LED above the button flashes in addition.
PDC with optical warning
You can also have the system show distances
to objects on the Control Display. The contours
of distant objects are shown on the Control Dis-
play even before the acoustic signal sounds.
iDrive concept, refer to page16.
Page 88 of 245

Technology for driving comfort and safety
86 The warning lamps come on. xDrive
has failed.
Have the system checked as soon as
possible.
The warning lamps come on. xDrive
and DSC have failed.
Have the system checked as soon as
possible.
Hill Descent Control HDC 325xi, 330xi
HDC is a downhill driving assistant that reduces
your speed on steep downhill gradients and
makes it even easier to control your BMW's
handling under these conditions. The vehicle
then moves slightly faster than double walking
speed without the driver needing to intervene.
HDC can be activated as long as you are driving
under approx. 20 mph or 35 km/h. When driving
downhill at a speed of under approx. 20 mph or
35 km/h, the vehicle's speed is automatically
reduced to slightly more than double walking
speed and maintained.
Increasing or decreasing speed
By accelerating or braking you can change the
speed within a range from approx. 3 to 15 mph,
approx. 5 to 25 km/h.
You can specify a target speed within the same
range using the cruise control stalk.
1To increase speed
2To decrease speed
Activating HDC
Press the button; the indicator lamp lights up.
The indicator lamp flashes when the vehicle is
being braked automatically.
Deactivating HDC
Press the button again; the indicator lamp goes
out.
HDC is deactivated instantly above a speed of
approx. 35 mph or 60 km/h, or approx.
10 seconds after the ignition is switched off.
Using HDC
In cars with manual transmission:
Use HDC in lower gears and in reverse gear.
With automatic transmission:
You can use HDC in any drive position.
Displays in the instrument cluster
1Display for target speed
2HDC display
Malfunction
The HDC display disappears during HDC oper-
ation, or does not appear:
HDC is temporarily unavailable due to exces-
sive brake temperature, or DSC has failed.