2006 BMW 330I SEDAN Luggage compartment
[x] Cancel search: Luggage compartmentPage 162 of 245
CD player and CD changer
160 1.Select "Set" and press the controller.
Other menu items are displayed.
2.Select "Random" and press the controller.
Stop random function:
1.Press the controller.
2.Select "Random" and press the controller.
Compressed audio files*
1.Select the current track and press the con-
troller.
2.Select the desired menu item:
>To play all the tracks in the current direc-
tory in random order, select "Random
directory" and press the controller.
>To play all the tracks on the CD in ran-
dom order, select "Random all" and
press the controller.
Stop random function:
1.Press the controller
2.Select "Random directory" or "Random all"
and press the controller.
Fast forward/reverse
Buttons on the CD player:
Press and hold the button for the
corresponding direction.
The tracks can be heard, but reproduction is
distorted.
CD magazine
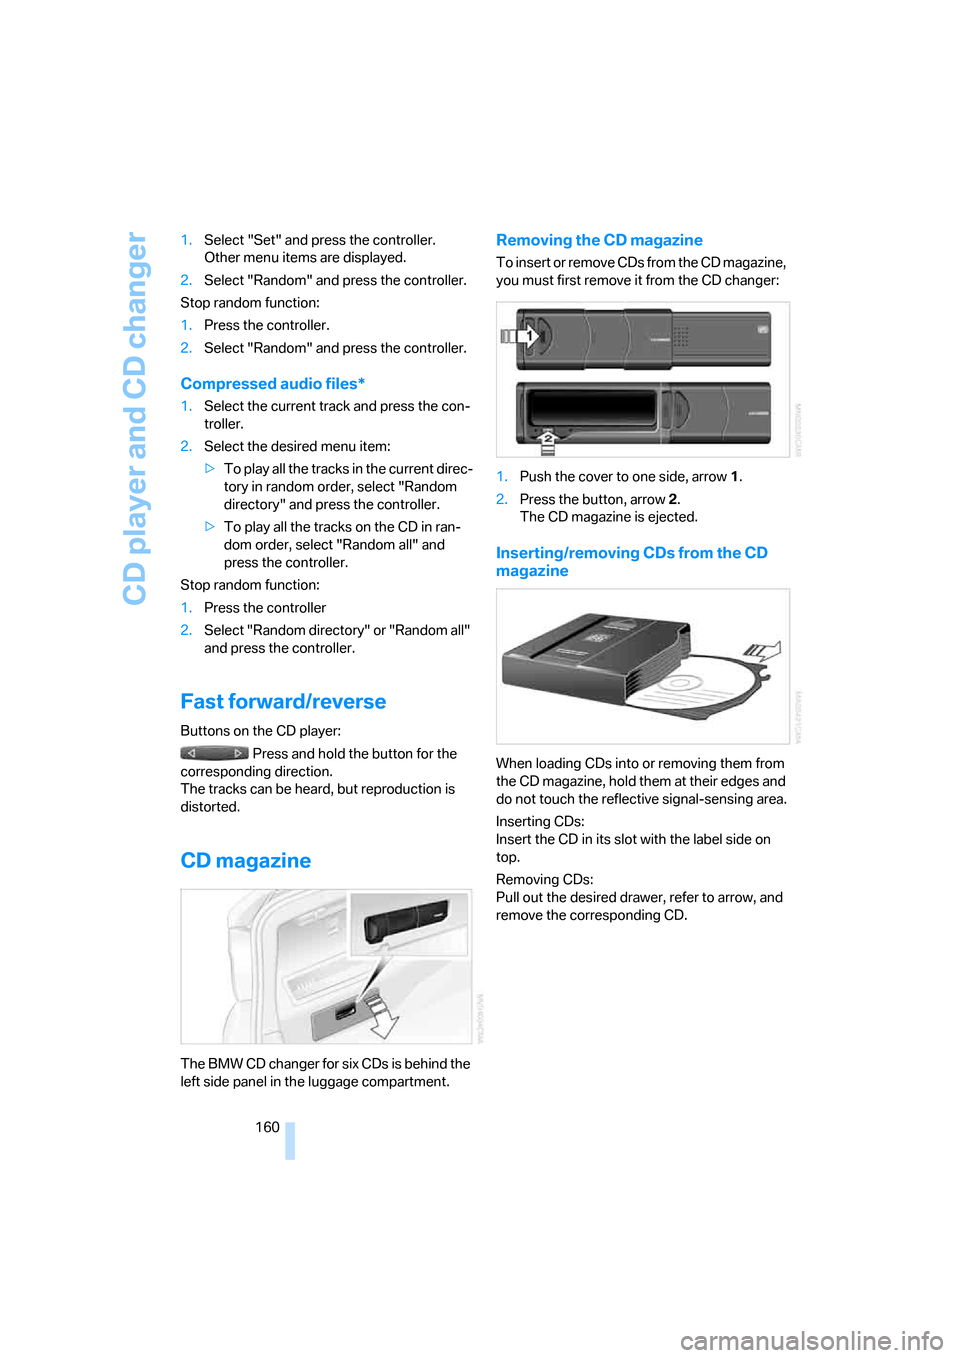
The BMW CD changer for six CDs is behind the
left side panel in the luggage compartment.
Removing the CD magazine
To insert or remove CDs from the CD magazine,
you must first remove it from the CD changer:
1.Push the cover to one side, arrow 1.
2.Press the button, arrow 2.
The CD magazine is ejected.
Inserting/removing CDs from the CD
magazine
When loading CDs into or removing them from
the CD magazine, hold them at their edges and
do not touch the reflective signal-sensing area.
Inserting CDs:
Insert the CD in its slot with the label side on
top.
Removing CDs:
Pull out the desired drawer, refer to arrow, and
remove the corresponding CD.
Page 188 of 245
Refueling
186
Refueling
Always switch off the engine before refu-
eling, otherwise, fuel cannot be added to
the tank and a message will be displayed.<
Take all precautionary measures and
observe all applicable regulations when
handling fuel. Do not carry any spare fuel con-
tainers in your vehicle. They can develop a leak
and cause an explosion or cause a fire in the
event of an accident.<
Gas cap
Opening
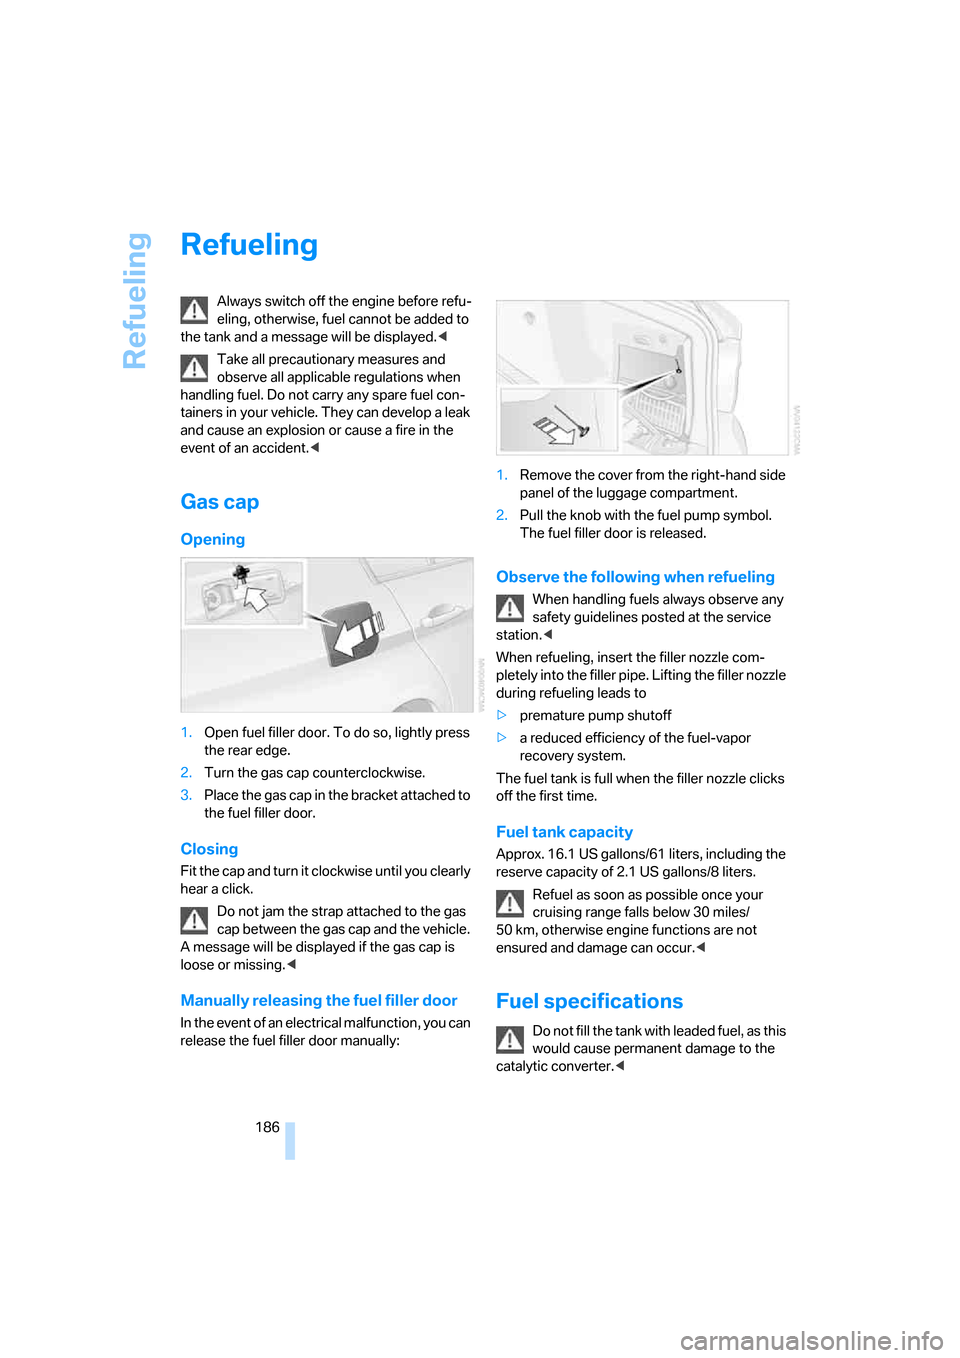
1.Open fuel filler door. To do so, lightly press
the rear edge.
2.Turn the gas cap counterclockwise.
3.Place the gas cap in the bracket attached to
the fuel filler door.
Closing
Fit the cap and turn it clockwise until you clearly
hear a click.
Do not jam the strap attached to the gas
cap between the gas cap and the vehicle.
A message will be displayed if the gas cap is
loose or missing.<
Manually releasing the fuel filler door
In the event of an electrical malfunction, you can
release the fuel filler door manually:1.Remove the cover from the right-hand side
panel of the luggage compartment.
2.Pull the knob with the fuel pump symbol.
The fuel filler door is released.
Observe the following when refueling
When handling fuels always observe any
safety guidelines posted at the service
station.<
When refueling, insert the filler nozzle com-
pletely into the filler pipe. Lifting the filler nozzle
during refueling leads to
>premature pump shutoff
>a reduced efficiency of the fuel-vapor
recovery system.
The fuel tank is full when the filler nozzle clicks
off the first time.
Fuel tank capacity
Approx. 16.1 US gallons/61 liters, including the
reserve capacity of 2.1 US gallons/8 liters.
Refuel as soon as possible once your
cruising range falls below 30 miles/
50 km, otherwise engine functions are not
ensured and damage can occur.<
Fuel specifications
Do not fill the tank with leaded fuel, as this
would cause permanent damage to the
catalytic converter.<
Page 207 of 245
Mobility
205Reference
At a glance
Controls
Driving tips
Communications
Navigation
Entertainment
Replacing components
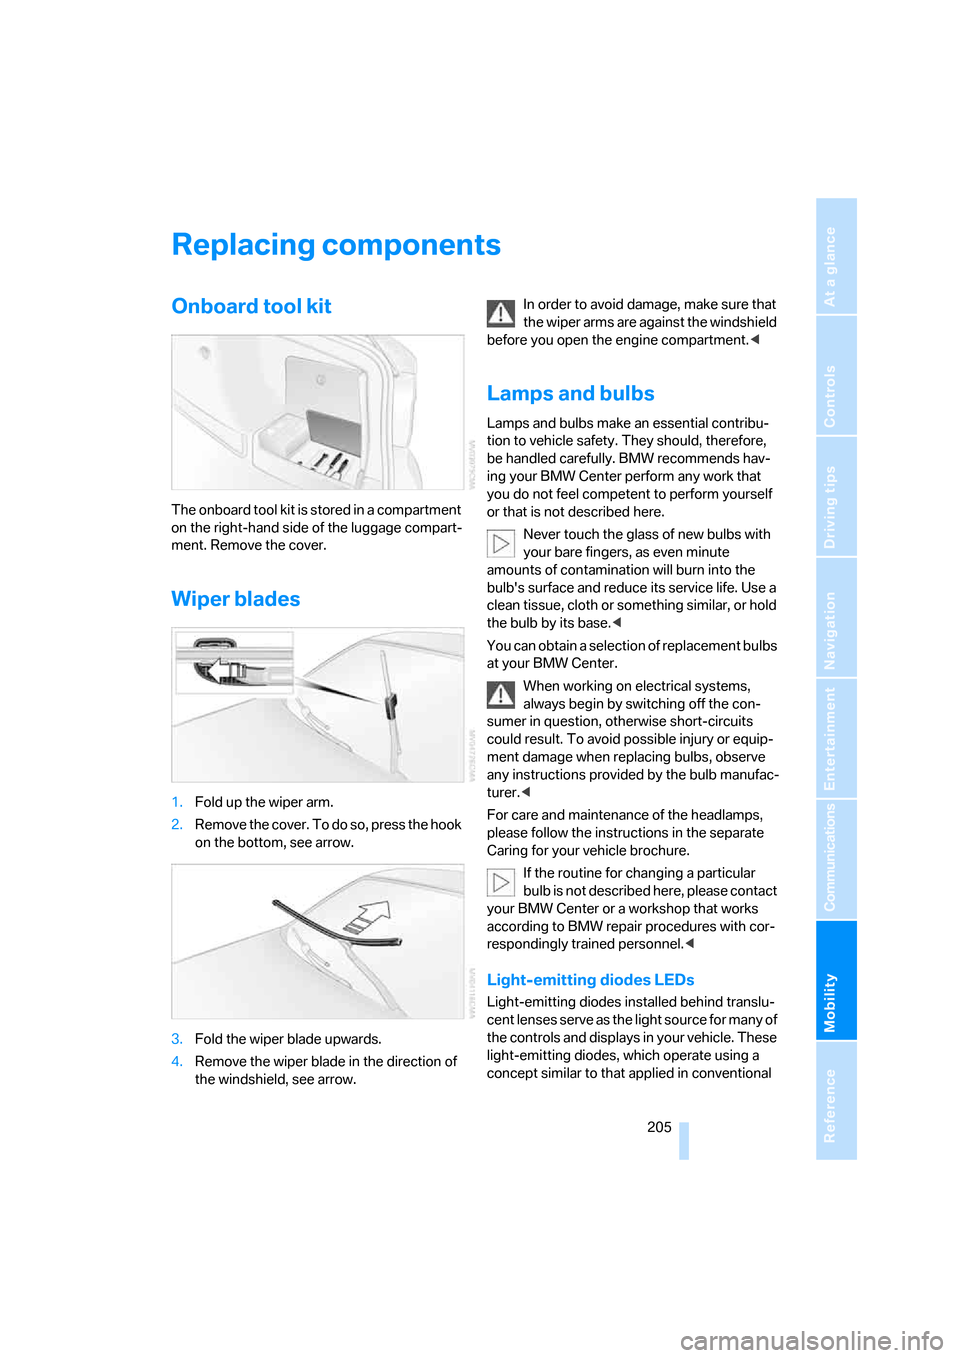
Onboard tool kit
The onboard tool kit is stored in a compartment
on the right-hand side of the luggage compart-
ment. Remove the cover.
Wiper blades
1.Fold up the wiper arm.
2.Remove the cover. To do so, press the hook
on the bottom, see arrow.
3.Fold the wiper blade upwards.
4.Remove the wiper blade in the direction of
the windshield, see arrow.In order to avoid damage, make sure that
the wiper arms are against the windshield
before you open the engine compartment.<
Lamps and bulbs
Lamps and bulbs make an essential contribu-
tion to vehicle safety. They should, therefore,
be handled carefully. BMW recommends hav-
ing your BMW Center perform any work that
you do not feel competent to perform yourself
or that is not described here.
Never touch the glass of new bulbs with
your bare fingers, as even minute
amounts of contamination will burn into the
bulb's surface and reduce its service life. Use a
clean tissue, cloth or something similar, or hold
the bulb by its base.<
You can obtain a selection of replacement bulbs
at your BMW Center.
When working on electrical systems,
always begin by switching off the con-
sumer in question, otherwise short-circuits
could result. To avoid possible injury or equip-
ment damage when replacing bulbs, observe
any instructions provided by the bulb manufac-
turer.<
For care and maintenance of the headlamps,
please follow the instructions in the separate
Caring for your vehicle brochure.
If the routine for changing a particular
bulb is not described here, please contact
your BMW Center or a workshop that works
according to BMW repair procedures with cor-
respondingly trained personnel.<
Light-emitting diodes LEDs
Light-emitting diodes installed behind translu-
c e n t l e n s e s s e r v e a s t h e l i g h t s o u r c e f o r m a n y o f
the controls and displays in your vehicle. These
light-emitting diodes, which operate using a
concept similar to that applied in conventional
Page 209 of 245
Mobility
207Reference
At a glance
Controls
Driving tips
Communications
Navigation
Entertainment
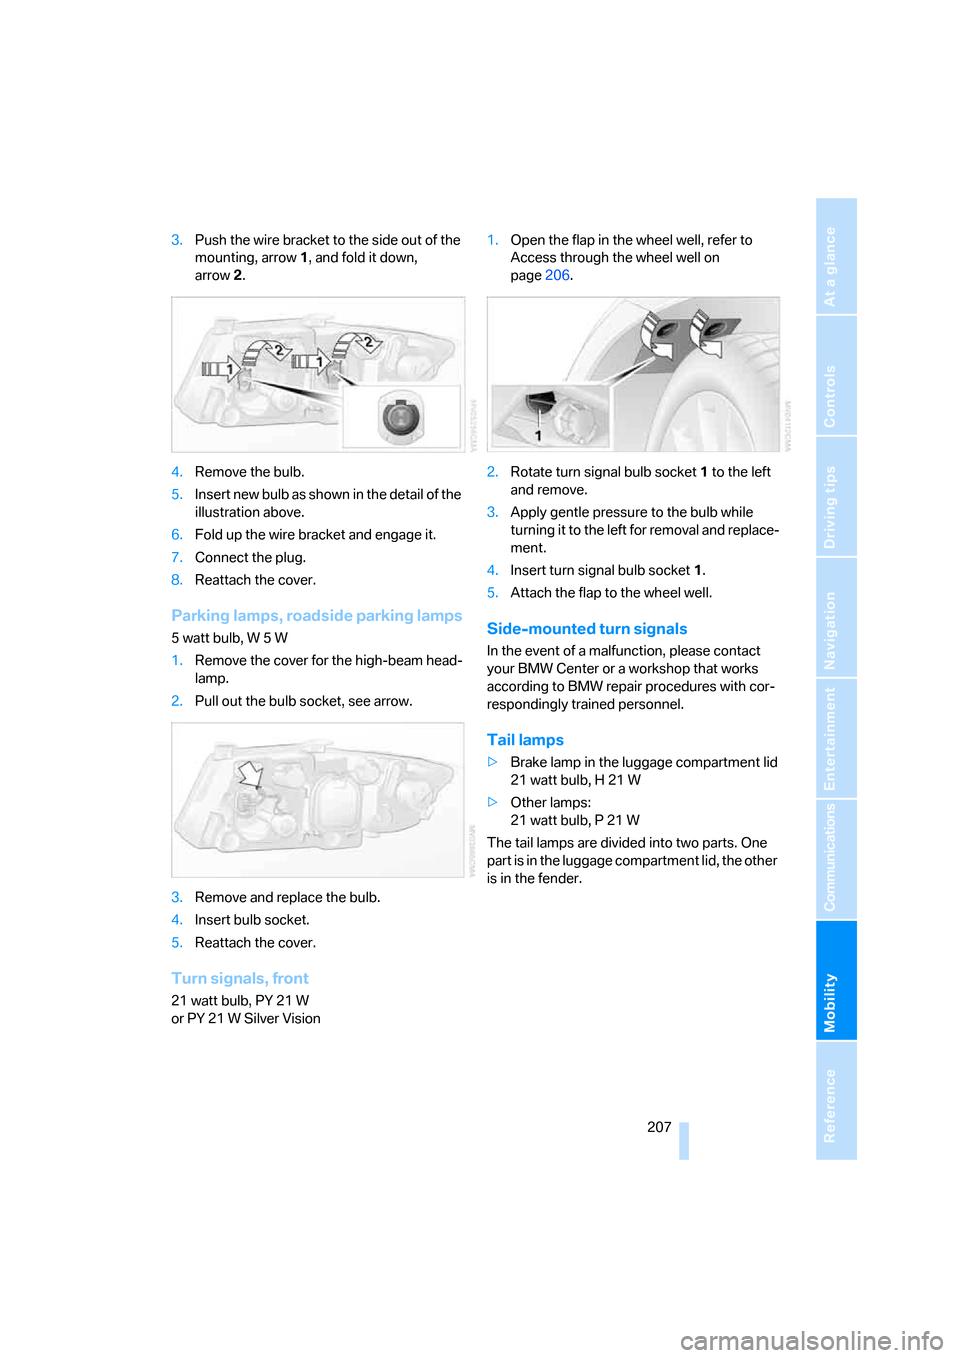
3.Push the wire bracket to the side out of the
mounting, arrow1, and fold it down,
arrow2.
4.Remove the bulb.
5.Insert new bulb as shown in the detail of the
illustration above.
6.Fold up the wire bracket and engage it.
7.Connect the plug.
8.Reattach the cover.
Parking lamps, roadside parking lamps
5 watt bulb, W 5 W
1.Remove the cover for the high-beam head-
lamp.
2.Pull out the bulb socket, see arrow.
3.Remove and replace the bulb.
4.Insert bulb socket.
5.Reattach the cover.
Turn signals, front
21 watt bulb, PY 21 W
or PY 21 W Silver Vision1.Open the flap in the wheel well, refer to
Access through the wheel well on
page206.
2.Rotate turn signal bulb socket 1 to the left
and remove.
3.Apply gentle pressure to the bulb while
turning it to the left for removal and replace-
ment.
4.Insert turn signal bulb socket 1.
5.Attach the flap to the wheel well.
Side-mounted turn signals
In the event of a malfunction, please contact
your BMW Center or a workshop that works
according to BMW repair procedures with cor-
respondingly trained personnel.
Tail lamps
>Brake lamp in the luggage compartment lid
21 watt bulb, H 21 W
>Other lamps:
21 watt bulb, P 21 W
The tail lamps are divided into two parts. One
part is in the luggage compartment lid, the other
is in the fender.
Page 210 of 245
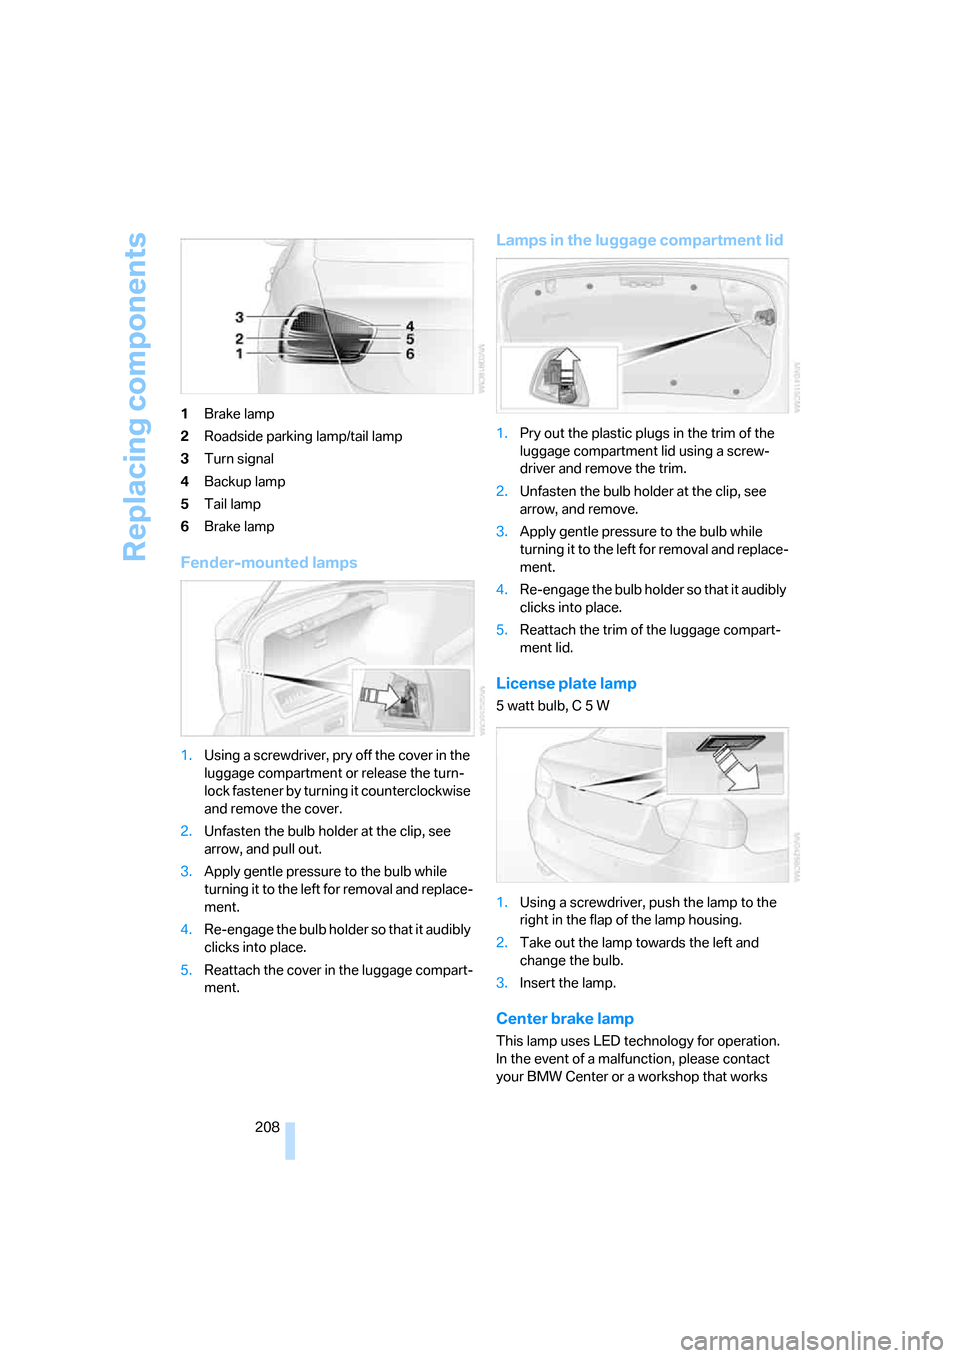
Replacing components
208 1Brake lamp
2Roadside parking lamp/tail lamp
3Turn signal
4Backup lamp
5Tail lamp
6Brake lamp
Fender-mounted lamps
1.Using a screwdriver, pry off the cover in the
luggage compartment or release the turn-
lock fastener by turning it counterclockwise
and remove the cover.
2.Unfasten the bulb holder at the clip, see
arrow, and pull out.
3.Apply gentle pressure to the bulb while
turning it to the left for removal and replace-
ment.
4.Re-engage the bulb holder so that it audibly
clicks into place.
5.Reattach the cover in the luggage compart-
ment.
Lamps in the luggage compartment lid
1.Pry out the plastic plugs in the trim of the
luggage compartment lid using a screw-
driver and remove the trim.
2.Unfasten the bulb holder at the clip, see
arrow, and remove.
3.Apply gentle pressure to the bulb while
turning it to the left for removal and replace-
ment.
4.Re-engage the bulb holder so that it audibly
clicks into place.
5.Reattach the trim of the luggage compart-
ment lid.
License plate lamp
5 watt bulb, C 5 W
1.Using a screwdriver, push the lamp to the
right in the flap of the lamp housing.
2.Take out the lamp towards the left and
change the bulb.
3.Insert the lamp.
Center brake lamp
This lamp uses LED technology for operation.
In the event of a malfunction, please contact
your BMW Center or a workshop that works
Page 214 of 245

Giving and receiving assistance
212
First aid pouch*
The first aid pouch is located on the right-hand
side of the luggage compartment in a storage
area.
Some of the articles contained in the first aid
pouch have a limited service life. Therefore,
check the expiration dates of the contents reg-
ularly and replace any items in good time, if nec-
essary.
Warning triangle*
The warning triangle is located on the left-hand
side of the luggage compartment. Press the tab
to take it out.
Jump starting
If the car's own battery is flat, your BMW's
engine can be started by connecting two
jumper cables to another vehicle's battery. You
can also use the same method to help start
another vehicle. Only use jumper cables with
fully-insulated clamp handles.
Do not touch any electrically live parts
when the engine is running, or a fatal acci-dent may occur. Carefully adhere to the follow-
ing sequence, both to prevent damage to one or
both vehicles, and to guard against possible
personal injuries.<
Preparation
1.Check whether the battery of the other
vehicle has a voltage of 12 volts and
approximately the same capacitance in Ah.
This information can be found on the bat-
tery.
2.Switch off the engine of the assisting vehi-
cle.
3.Switch off any consumers in both vehicles.
There must not be any contact between
the bodies of the two vehicles, otherwise
there is a danger of shorting.<
Connecting jumper cables
Connect the jumper cables in the correct
order, so that no sparks which could
cause injury occur at the battery.<
Your BMW has a jump-starting connection in
the engine compartment which acts as the bat-
tery's positive terminal, refer also to the Engine
compartment overview on page199. The cap is
marked with +.
1.Pull the cap of the BMW jump-starting con-
nection up to remove.
2.Attach one terminal clamp of the plus/+
jumper cable to the positive terminal of the
battery or a starting-aid terminal of the vehi-
cle providing assistance.
3.Attach the second terminal clamp of the
plus/+ jumper cable to the positive terminal
Page 215 of 245

Mobility
213Reference
At a glance
Controls
Driving tips
Communications
Navigation
Entertainment
of the battery or a starting-aid terminal of
the vehicle to be started.
4.Attach one terminal clamp of the minus/–
jumper cable to the negative terminal of the
battery or to an engine or body ground of
the assisting vehicle.
Your BMW has a special nut as body ground
or negative pole.
5.Attach the second terminal clamp of the
minus/– jumper cable to the negative termi-
nal of the battery or to the engine or body
ground of the vehicle to be started.
Starting the engine
1.Start the engine of the donor vehicle and
allow it to run for a few minutes at slightly
increased idle speed.
2.Start the engine on the other vehicle in the
usual way.
If the first start attempt is not successful,
wait a few minutes before another attempt
in order to allow the discharged battery to
recharge.
3.Let the engines run for a few minutes.
4.Disconnect the jumper cables by reversing
the above connecting sequence.
If necessary, have the battery checked and
recharged.
Never use spray fluids to start the
engine.<
Tow-starting, towing away
Observe the applicable laws and regula-
tions for tow-starting and towing vehi-
cles.
towed.<
Using a tow fitting
The screw-in tow fitting must always be carried
in the car. It can be screwed in at the front or
rear of the BMW.
It is stored in the onboard tool kit underneath
the cover on the right-hand side of the luggage
compartment, refer to page205.
Use only the tow fitting provided with the
vehicle and screw it all the way in. Use the
tow fitting for towing on paved roads only. Avoid
lateral loading of the tow fitting, e.g. do not lift
the vehicle by the tow fitting. Otherwise the tow
fitting and the vehicle could be damaged.<
Access to screw thread
Rectangular cover panel in bumper:
Press on the upper edges of the cover panel.
Front
Rear
Being towed
Make sure that the ignition is switched on,
refer to page52, otherwise the low-beam
Page 222 of 245

Technical data
220
Weights
Never exceed either the approved axle loads or
the gross vehicle weight.
323i (Canada)325i325xi
Curb weight
>with manual transmission lbs/kg 3,274/1,485 3,285/1,490 3,560/1,615
>with automatic transmission lbs/kg 3,329/1,510 3,351/1,520 3,605/1,635
Approved gross weight
>with manual transmission lbs/kg 4,332/1,965 4,343/1,970 4,619/2,095
>with automatic transmission lbs/kg 4,387/1,990 4,409/2,000 4,663/2,115
Load lbs/kg 1,058/480 1,058/480 1,058/480
Approved front axle load lbs/kg 2,083/945 2,072/940 2,282/1,035
Approved rear axle load lbs/kg 2,403/1,090 2,425/1,100 2,480/1,125
Approved roof load capacity lbs/kg 165/75 165/75 165/75
Luggage compartment capacity cu ft/l 16.2/460 16.2/460 16.2/460
330i330xi
Curb weight
>with manual transmission lbs/kg 3,417/1,550 3,627/1,645
>with automatic transmission lbs/kg 3,450/1,565 3,671/1,665
Approved gross weight
>with manual transmission lbs/kg 4,475/2,030 4,685/2,125
> with automatic transmission lbs/kg 4,508/2,045 4,729/2,145
Load lbs/kg 1,058/480 1,058/480
Approved front axle load lbs/kg 2,138/970 2,315/1,050
Approved rear axle load lbs/kg 2,469/1,120 2,513/1,140
Approved roof load capacity lbs/kg 165/75 165/75
Luggage compartment capacity cu ft/l 16.2/460 16.2/460