2006 BMW 330I SEDAN seat controls
[x] Cancel search: seat controlsPage 53 of 245

Controls
51Reference
At a glance
Driving tips
Communications
Navigation
Entertainment
Mobility
Rear seats without through-loading
system
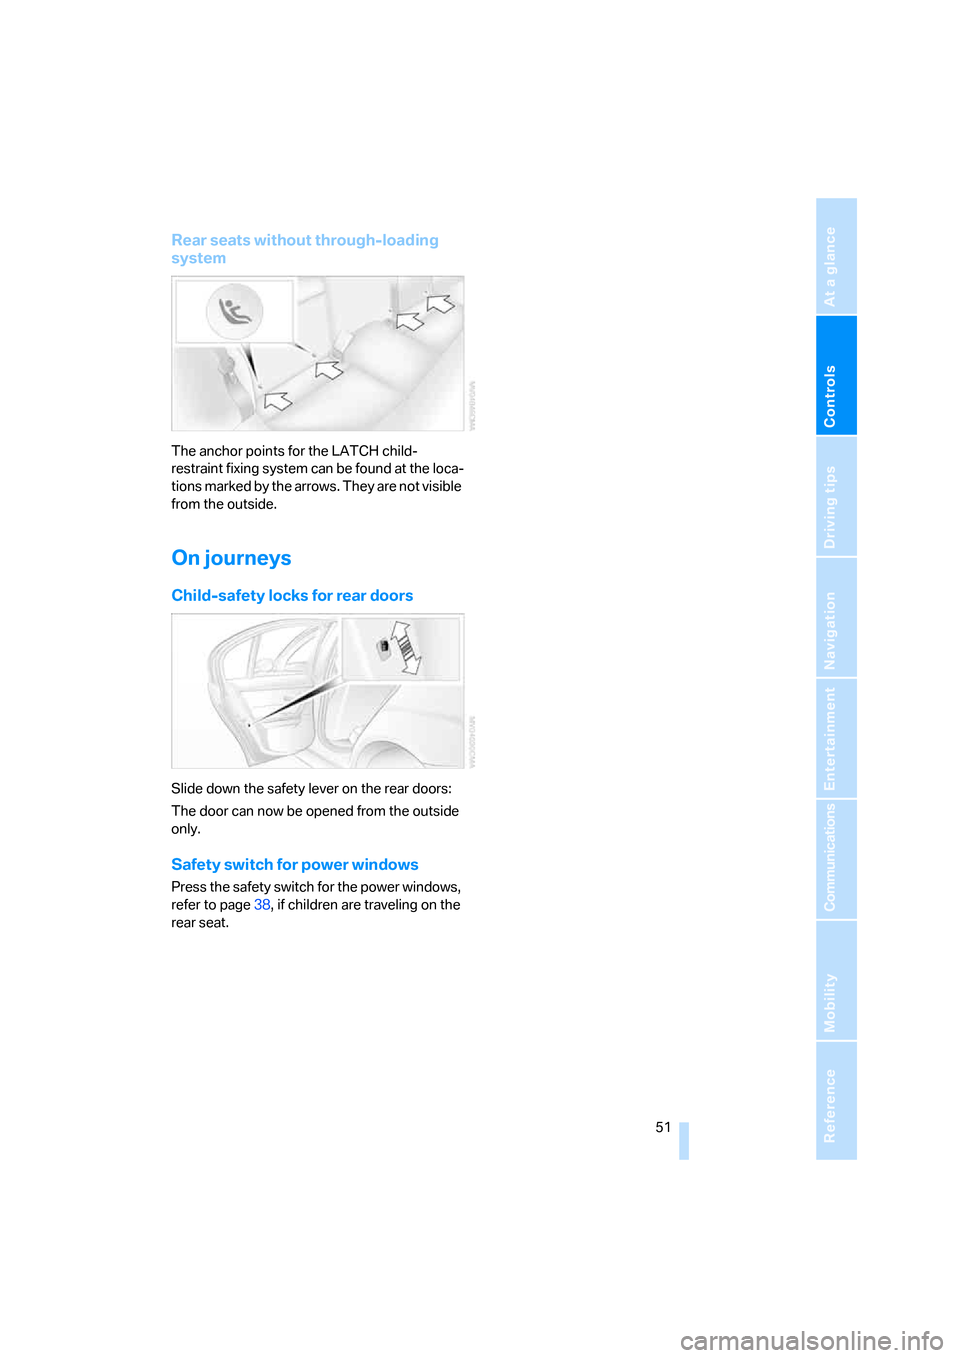
The anchor points for the LATCH child-
restraint fixing system can be found at the loca-
tions marked by the arrows. They are not visible
from the outside.
On journeys
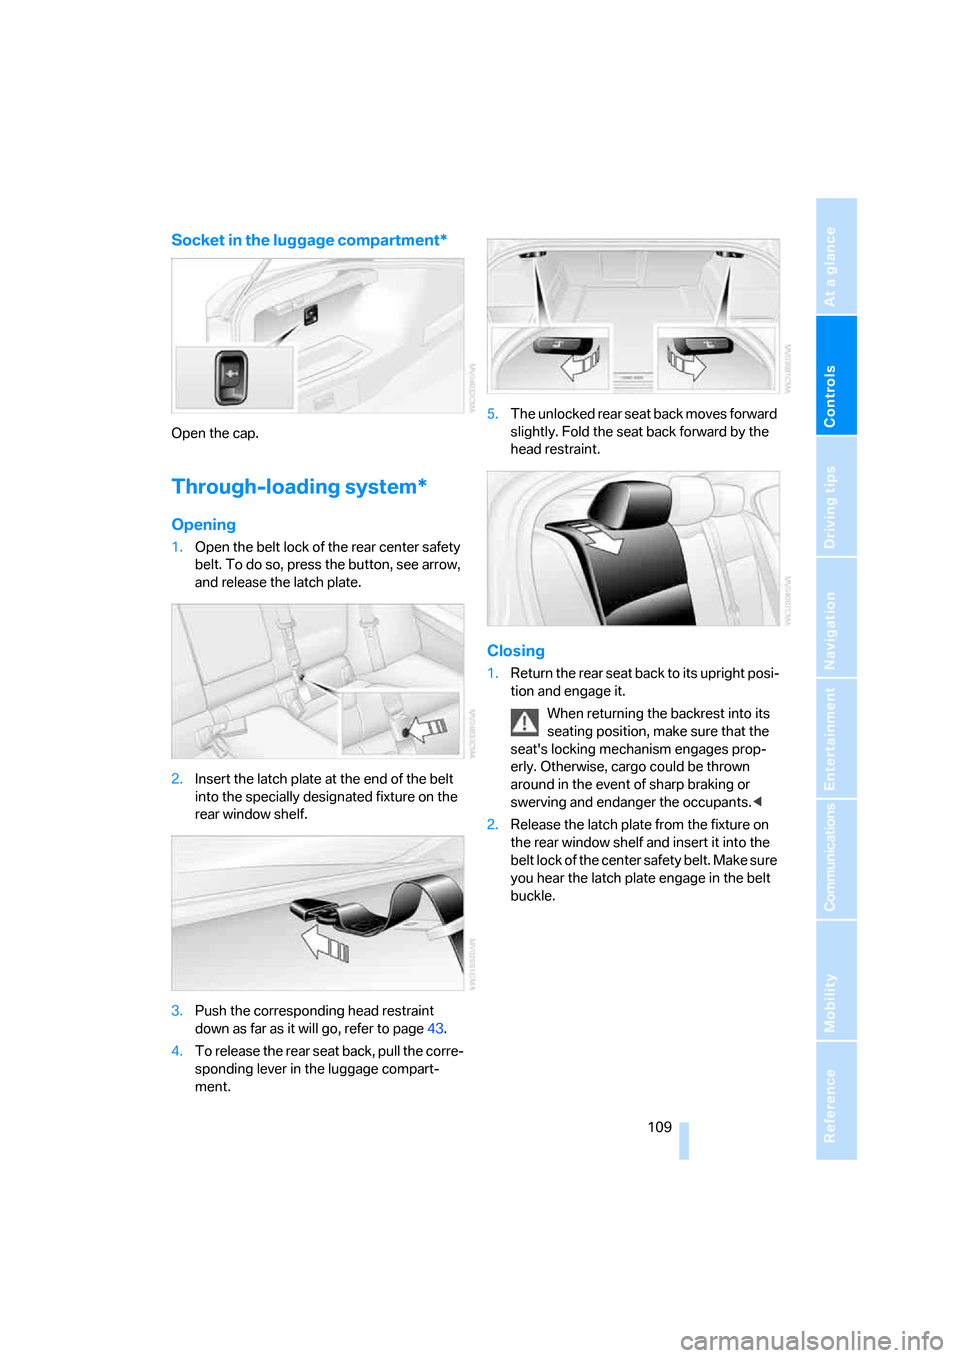
Child-safety locks for rear doors
Slide down the safety lever on the rear doors:
The door can now be opened from the outside
only.
Safety switch for power windows
Press the safety switch for the power windows,
refer to page38, if children are traveling on the
rear seat.
Page 93 of 245

Controls
91Reference
At a glance
Driving tips
Communications
Navigation
Entertainment
Mobility
seat covers, cushions or other objects not spe-
cifically approved for seats with integral side air-
bags to the front seats. Do not hang items of
clothing such as coats or jackets over the back-
rests. Do not attempt to remove the airbag
retention system from the vehicle. Do not mod-
ify the individual components of the system or
its wiring in any way. This includes the uphol-
stered covers on the steering wheel, instrument
panel, seats and roof posts, as well as the sides
of the roof lining. Do not attempt to remove or
dismantle the steering wheel.
Do not touch the individual components imme-
diately after the system has been triggered,
because there is a danger of burns.
In the event of malfunctions, deactivation, or
triggering of the airbag restraint system, have
the testing, repair, removal, and disposal of air-
bag generators executed only by a BMW Cen-
ter or a workshop that works according to BMW
repair procedures with correspondingly trained
personnel and has the required explosives
licenses. Unprofessional attempts to service
the system could lead to failure in an emer-
gency or undesired airbag activation, either of
which could result in personal injury.<
Warning notices and information about the air-
bags can also be found on the sun visors.
Automatic deactivation of the front
passenger airbags
An analysis of the impression in the front pas-
senger seat cushion determines whether and
how the seat is occupied. The front and side air-
bags for the front passenger are activated or
deactivated by the system accordingly.
The indicator lamp above the interior
rearview mirror shows the current status
of the front passenger airbags, deactivated or
activated, refer to Status of front passenger air-
bags below.
Before transporting a child on the front
passenger seat, read the safety precau-
tions and handling instructions under Trans-
porting children safely, refer to page49.
The front and side airbags can also be deacti-
vated by adolescents and adults sitting in cer-
tain positions; the indicator lamp for the front passenger airbags comes on. In such cases, the
passenger should change his or her sitting
position so that the front passenger airbags are
activated and the indicator lamp goes out. If the
desired airbag status cannot be achieved by
changing the sitting position, transport the rele-
vant passenger on a rear seat. Do not attach
seat covers, seat cushion padding, ball mats or
other items to the front passenger seat unless
they are specifically recommended by BMW.
Do not place any items under the seat which
could press against the seat from below. Other-
wise a correct analysis of the seat cushion is not
ensured.<
Status of front passenger airbags
The indicator lamp for the front passenger air-
bags shows the functional status of the front
passenger's front and side airbags in accor-
dance with whether and how the front passen-
ger seat is occupied. The indicator lamp shows
whether the front passenger airbags are acti-
vated or deactivated.
>The indicator lamp comes on as intended
when a child in a specially designated child-
restraint system is detected on the seat.
The front and side airbags for the front pas-
senger are not activated.
>The indicator lamp does not come on as
long as a person of sufficient size and in a
correct sitting position is detected on the
seat.
The front and side airbags for the front pas-
senger are activated.
>The indicator lamp does not come on if the
seat is empty.
The front and side airbags for the front pas-
senger are not activated.
Page 109 of 245

Controls
107Reference
At a glance
Driving tips
Communications
Navigation
Entertainment
Mobility
Ventilated storage compartment
The storage compartment in the center armrest
can be ventilated: slide the switch backwards.
The temperature is controlled via the knurled
wheel for adjusting the temperature of air venti-
lating the rear of the passenger compartment,
refer to page100.
Connection for external audio device
You can connect an external audio device such
as a CD or MP3 player and play audio tracks
over the car's loudspeaker system, refer to
page162.
Storage compartments inside
the vehicle
Depending on your vehicle's equipment, you
will find compartments beside the steering col-
umn
*, in the front doors and in the center con-
sole
*.
There are nets
* on the front-seat backrests.
Clothes hooks
There are clothes hooks on the grab handles in
the rear passenger compartment.
Items of clothing hung from the hooks
must not obstruct the driver's view. Do
not hang heavy objects from the hooks, other-
wise they could endanger the car's occupants,
e.g. in case of heavy braking or sudden swerv-
ing.<
Cup holders
Do not place glassware in a cup holder;
otherwise there is an increased risk of
injury in the event of an accident.<
Front
Opening
Briefly press the center of the cover.
Closing
Briefly press the cover in the center and push in
the cup holder.
Rear
There are two additional cup holders in the rear
center armrest.
Ashtray, front
Opening
Push the ridge on the cover.
Page 111 of 245

Controls
109Reference
At a glance
Driving tips
Communications
Navigation
Entertainment
Mobility
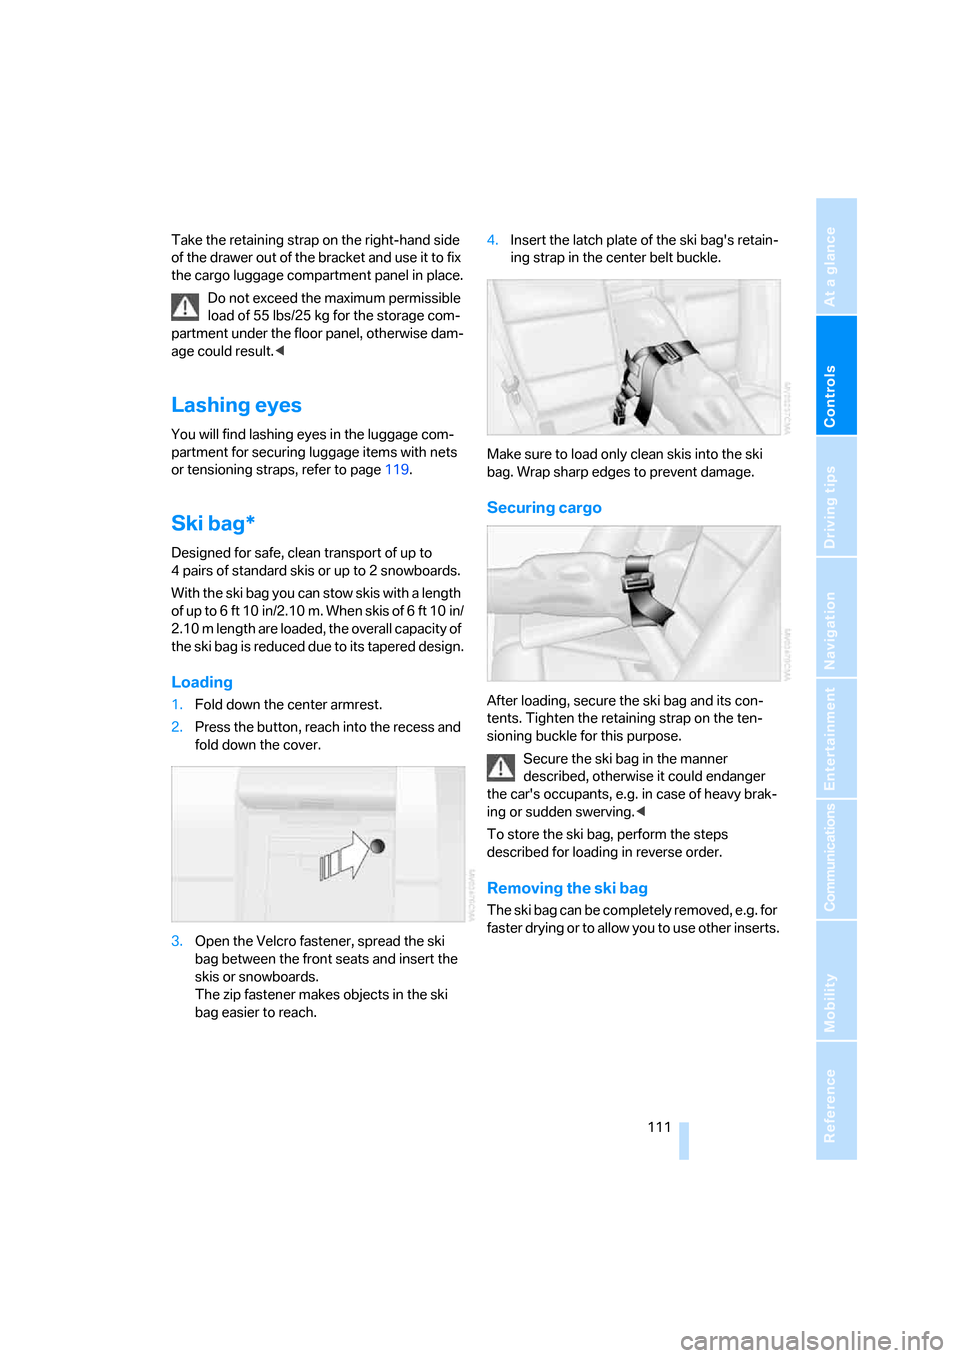
Socket in the luggage compartment*
Open the cap.
Through-loading system*
Opening
1.Open the belt lock of the rear center safety
belt. To do so, press the button, see arrow,
and release the latch plate.
2.Insert the latch plate at the end of the belt
into the specially designated fixture on the
rear window shelf.
3.Push the corresponding head restraint
down as far as it will go, refer to page43.
4.To release the rear seat back, pull the corre-
sponding lever in the luggage compart-
ment.5.The unlocked rear seat back moves forward
slightly. Fold the seat back forward by the
head restraint.
Closing
1.Return the rear seat back to its upright posi-
tion and engage it.
When returning the backrest into its
seating position, make sure that the
seat's locking mechanism engages prop-
erly. Otherwise, cargo could be thrown
around in the event of sharp braking or
swerving and endanger the occupants.<
2.Release the latch plate from the fixture on
the rear window shelf and insert it into the
belt lock of the center safety belt. Make sure
you hear the latch plate engage in the belt
buckle.
Page 113 of 245

Controls
111Reference
At a glance
Driving tips
Communications
Navigation
Entertainment
Mobility
Take the retaining strap on the right-hand side
of the drawer out of the bracket and use it to fix
the cargo luggage compartment panel in place.
Do not exceed the maximum permissible
load of 55 lbs/25 kg for the storage com-
partment under the floor panel, otherwise dam-
age could result.<
Lashing eyes
You will find lashing eyes in the luggage com-
partment for securing luggage items with nets
or tensioning straps, refer to page119.
Ski bag*
Designed for safe, clean transport of up to
4 pairs of standard skis or up to 2 snowboards.
With the ski bag you can stow skis with a length
of up to 6ft 10in/2.10m. When skis of 6ft 10in/
2.10 m length are loaded, the overall capacity of
the ski bag is reduced due to its tapered design.
Loading
1.Fold down the center armrest.
2.Press the button, reach into the recess and
fold down the cover.
3.Open the Velcro fastener, spread the ski
bag between the front seats and insert the
skis or snowboards.
The zip fastener makes objects in the ski
bag easier to reach.4.Insert the latch plate of the ski bag's retain-
ing strap in the center belt buckle.
Make sure to load only clean skis into the ski
bag. Wrap sharp edges to prevent damage.
Securing cargo
After loading, secure the ski bag and its con-
tents. Tighten the retaining strap on the ten-
sioning buckle for this purpose.
Secure the ski bag in the manner
described, otherwise it could endanger
the car's occupants, e.g. in case of heavy brak-
ing or sudden swerving.<
To store the ski bag, perform the steps
described for loading in reverse order.
Removing the ski bag
The ski bag can be completely removed, e.g. for
faster drying or to allow you to use other inserts.
Page 121 of 245

Driving tips
119Reference
At a glance
Controls
Communications
Navigation
Entertainment
Mobility
cargo and luggage load capacity calculated
in step 4.
6.If your vehicle will be towing a trailer, part of
the load from your trailer will be transferred
to your vehicle. Consult the manual for
transporting a trailer to determine how this
may reduce the available cargo and luggage
load capacity of your vehicle.
Load
The permissible load is the total of the weight of
occupants and cargo/luggage. The greater the
weight of the occupants, the less cargo/lug-
gage can be transported.
Stowing cargo
>Position heavy objects as low and as far for-
ward as possible, ideally directly behind the
respective seat backs.
>Cover sharp edges and corners.
>For very heavy cargo when the rear seat is
not occupied, secure each safety belt in the
opposite buckle.
Securing cargo
>Smaller and relatively light items can be
retained with tensioning straps or draw
straps
*.
>Heavy-duty cargo straps
* for securing
larger and heavier objects are available at
your BMW Center. Four lashing eyes are
provided for attaching the cargo straps.
Two are located on the inside rear wall of
the luggage compartment 1, and two others
are on the side walls of the luggage com-
partment 2.
Comply with the information provided with
the cargo straps.
Always position and secure the cargo as
described above, so that it cannot endan-
ger the car's occupants, for example if sudden
braking or swerves are necessary.
Never exceed either the approved gross vehicle
weight or either of the approved axle loads, refer
to page220, as excessive loads can pose a
safety hazard, and may also place you in viola-
tion of traffic safety laws.
Heavy or hard objects should not be carried
loose inside the car, since they could be thrown
around, for example as a result of heavy braking,
sudden swerves, etc., and endanger the occu-
pants.<
Roof-mounted luggage rack*
A special rack system is available as an option
for your BMW. Comply with the precautions
included with the installation instructions.
Page 211 of 245

Mobility
209Reference
At a glance
Controls
Driving tips
Communications
Navigation
Entertainment
according to BMW repair procedures with cor-
respondingly trained personnel.
Changing wheels
Your BMW is equipped with Run-Flat Tires as
standard. This removes the need to change a
wheel immediately in the event of a puncture.
The symbol identifying Run-Flat Tires is a circle
with the letters RSC on the sidewall, refer to
Run-Flat Tires, page196.
When mounting new tires or changing over
from summer to winter tires and vice versa,
mount Run-Flat Tires for your own safety. In the
event of a flat, moreover, no spare wheel is
available. Your BMW Center will be glad to
advise you. Refer also to New wheels and tires,
page196.
The tools for changing wheels are avail-
able as optional accessories from your
BMW Center.<
Jack mounting points
The jacking points are at the positions shown in
the illustration.
Vehicle battery
Battery care
The battery is 100 % maintenance-free, the
electrolyte will last for the life of the battery
when the vehicle is operated in a temperate cli-
mate. Your BMW Center will be glad to advise in
all matters concerning the battery.
Charging the battery
Only charge the battery in the vehicle via the
terminals in the engine compartment with the
engine off. Connections, refer to Jump starting
on page212.
Disposal
Have old batteries disposed of by your
BMW Center or hand them in to a recy-
cling center. Maintain the battery in an upright
position for transport and storage. Always
secure the battery against tipping over during
transport.<
Power failure
After a temporary power loss, the functioning of
some equipment may be limited and require ini-
tialization. Individual settings may likewise have
been lost and will have to be reprogrammed:
>Time and date
These values must be updated, refer to
page77.
>Radio
In some cases, stations may have to be
stored again, refer to page150.
>Navigation system
Operability must be waited for, refer to
page124.
>Seat and mirror memory
The positions must be stored again, refer to
page44.
>Inside rearview mirror with digital compass
The system must be calibrated, refer to
page105.
Fuses
Never attempt to repair a blown fuse and
do not replace a defective fuse with a sub-
stitute of another color or amperage rating, oth-
erwise this could lead to a circuit overload, ulti-
mately resulting in a fire in the vehicle.<
Page 229 of 245

Reference 227
At a glance
Controls
Driving tips
Communications
Navigation
Entertainment
Mobility
Audio device,
external107,162
"Audio" tone settings145
"Auto. headlamps"94
Automatic
– air distribution98
– air flow rate98
– cruise control60,62
– headlamp control93
– service notification179
– storing of stations149
Automatic climate control97
– automatic air distribution98
– settings via iDrive98
Automatic curb monitor46
"Automatic programs" with
automatic climate control99
Automatic recirculated-air
control AUC99
Automatic station search149
Automatic transmission with
Steptronic57
– interlock57
– overriding selector lever
lock58
– shiftlock57
– sport program58
"Automatic ventilation"101
AUTO program for automatic
climate control98
"Autostore"
– on the radio150
AUX-IN162
– port107
Average fuel consumption71
– setting the units73
Average speed70
"Avoid ferries" in
navigation135
"Avoid highways" in
navigation135
Avoid highways in
navigation135
Avoiding unintentional
alarms35
"Avoid tollroads" in
navigation135
Axle loads, refer to
Weights220"A - Z"172
B
Backrests, refer to Seats40
Backrest width adjustment42
Back seats
– refer to Rear seats
Backup lamps
– replacing bulbs208
Backup lamps, refer to Tail
lamps207
Balance, tone control145
Band-aids, refer to First-aid
pouch212
Bar, refer to Tow-starting,
towing away214
Bass, tone control145
Bass sounds, refer to Tone
control145
Bass sounds, refer to Treble
and bass145
Battery209
– charging209
– disposal37,209
– jump starting212
– temporary power failure209
Battery renewal
– remote control37
Being towed213
Belts, refer to Safety belts45
Belt tensioner, refer to Safety
belts45
Beverage holders, refer to
Cup holders107
Black ice, refer to Outside
temperature warning69
Blower, refer to Air flow
rate99
BMW Assist178
– enabling178
– services offered179
"BMW Contact"182
"BMW Contact
Numbers"182
BMW Homepage4
BMW Maintenance
System203
"BMW Service"180"BMW Service settings"179
BMW webpage4
Bottle holders, refer to Cup
holders107
Brake assist, refer to Dynamic
Brake Control84
Brake fluid202
– level too low202
– warning lamp202
Brake fluid, refer to Service
requirements74
Brake Force Display90
Brake hydraulics, refer to
Brakes202
Brake lamps
– Brake Force Display90
– replacing bulbs208
Brake pads, breaking in116
Brake rotors118
– brakes116
– breaking in116
Brakes
– ABS84
– BMW Maintenance
System203
– brake fluid202
– brake pads202
– breaking in116
– handbrake54
– service requirements74
Brakes, refer to Braking
safely117
Brake system116
– BMW Maintenance
System203
– brake fluid202
– brake pads202
– breaking in116
– disc brakes118
Breakdown services, refer to
Roadside Assistance211
Breaking in
– sequential manual gearbox
SMG116
Breaking in the clutch116
Breaking in the
differential116
Break-in period116