2006 BMW 330I SEDAN change time
[x] Cancel search: change timePage 102 of 245

Climate
100 The function can be switched on when the fol-
lowing conditions are met:
>Up to 15 minutes after the engine has been
switched off
>While the engine is at operating tempera-
ture
>As long as battery voltage is sufficient
>At an outside temperature below 777/
256
The LED is lit when the function is on.
As of radio readiness, you can set the interior
temperature, the air flow rate and the air distri-
bution.
Defrosting windows and removing
condensation
Quickly removes ice and conden-
sation from the windshield and
front side windows.
Switching cooling function on/off
The cooling function cools and
dehumidifies the incoming air
before also reheating it as
required, according to the temperature setting.
Depending on the weather, the windshield may
fog over briefly when the engine is started.
The cooling function is automatically switched
on along with the AUTO program. The passen-
ger compartment can only be cooled while the
engine is running.
Rear window defroster
The defroster switches off auto-
matically after a certain time.
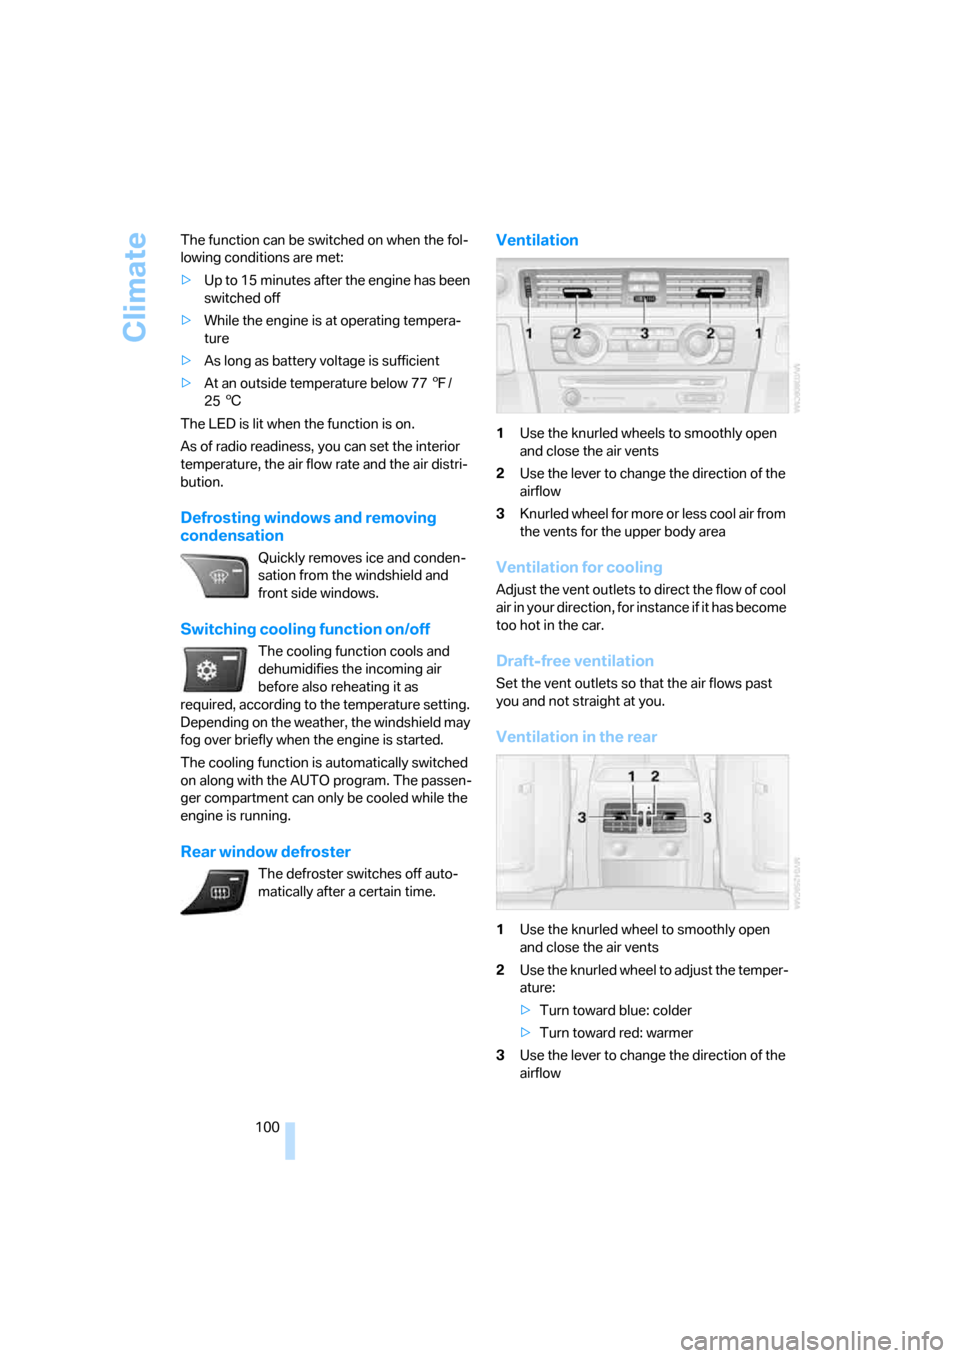
Ventilation
1Use the knurled wheels to smoothly open
and close the air vents
2Use the lever to change the direction of the
airflow
3Knurled wheel for more or less cool air from
the vents for the upper body area
Ventilation for cooling
Adjust the vent outlets to direct the flow of cool
air in your direction, for instance if it has become
too hot in the car.
Draft-free ventilation
Set the vent outlets so that the air flows past
you and not straight at you.
Ventilation in the rear
1Use the knurled wheel to smoothly open
and close the air vents
2Use the knurled wheel to adjust the temper-
ature:
>Turn toward blue: colder
>Turn toward red: warmer
3Use the lever to change the direction of the
airflow
Page 138 of 245

Destination guidance
136
Destination guidance
Starting destination
guidance
iDrive concept, refer to page16.
1.If necessary, move the highlight marker to
the uppermost field. Turn the controller
until "Navigation" is selected and press the
controller.
2.Select the destination from the destination
list and press the controller or enter a new
destination, refer to page125.
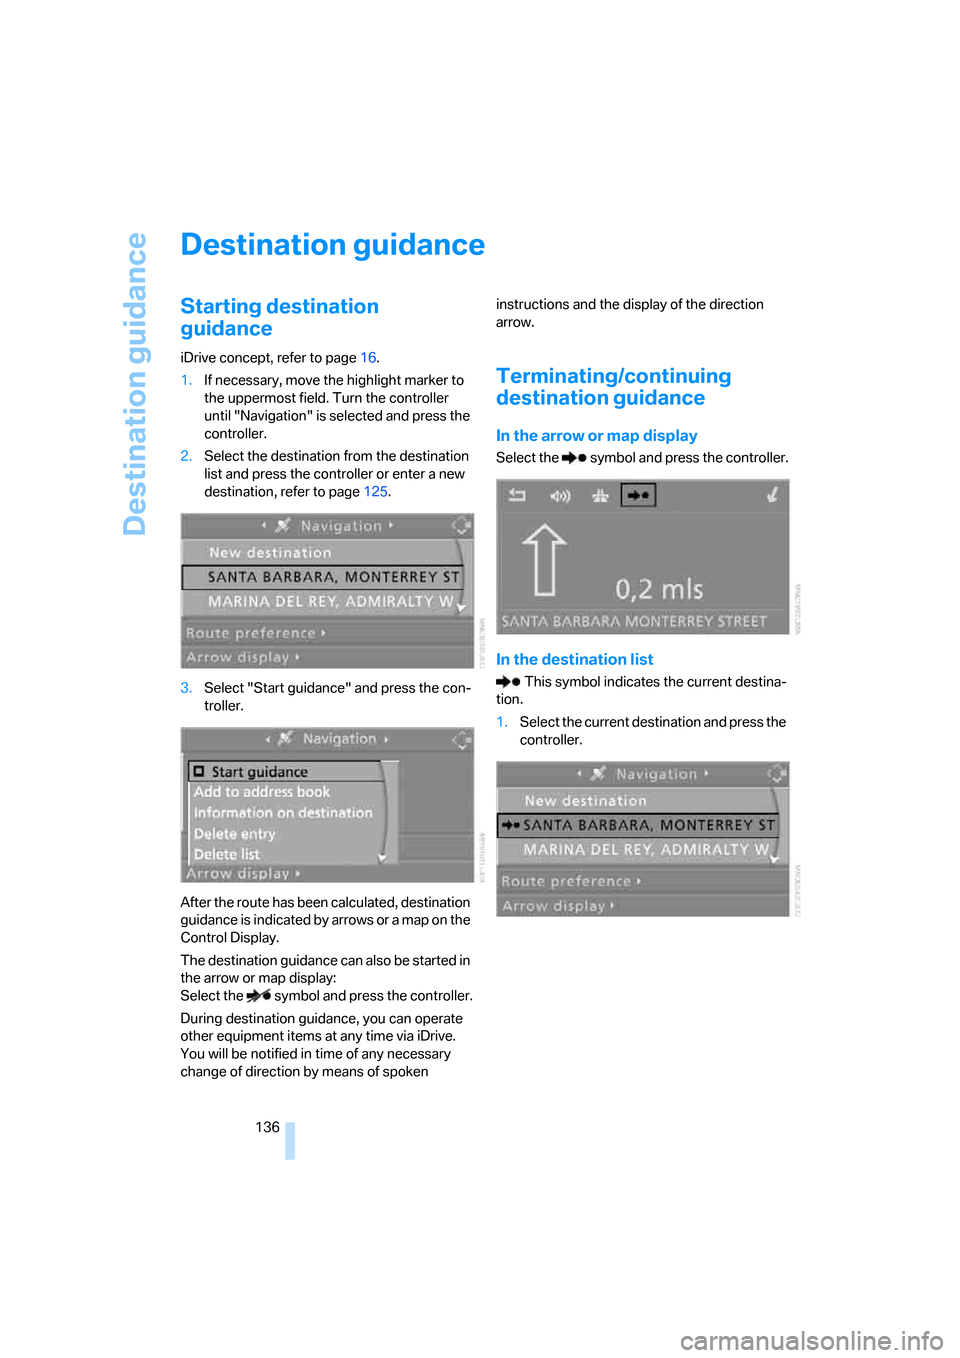
3.Select "Start guidance" and press the con-
troller.
After the route has been calculated, destination
guidance is indicated by arrows or a map on the
Control Display.
The destination guidance can also be started in
the arrow or map display:
Select the symbol and press the controller.
During destination guidance, you can operate
other equipment items at any time via iDrive.
You will be notified in time of any necessary
change of direction by means of spoken instructions and the display of the direction
arrow.
Terminating/continuing
destination guidance
In the arrow or map display
Select the symbol and press the controller.
In the destination list
This symbol indicates the current destina-
tion.
1.Select the current destination and press the
controller.
Page 139 of 245

Navigation
Driving tips
137Reference
At a glance
Controls
Communications
Entertainment
Mobility
2.Select "Start guidance" and press the con-
troller.
If you did not reach your destination before the
end of your last journey, the following question
will appear in the display at the start of the next
journey:
"Continue guidance to destination?".
The destination guidance starts automatically
after a short time.
To start destination guidance immediately:
Select "Yes" and press the controller.
Route display
You have the option of displaying various views
of the route during destination guidance.
From another menu, you can switch
directly to the screen last displayed, refer
to Convenient call-up of menu items on
page18.<
Displaying arrow view
1.Select "Navigation" and press the control-
ler.
2.Move the highlight marker to the fourth field
from the top. Turn the controller until "Arrow display" is selected and press the
controller.
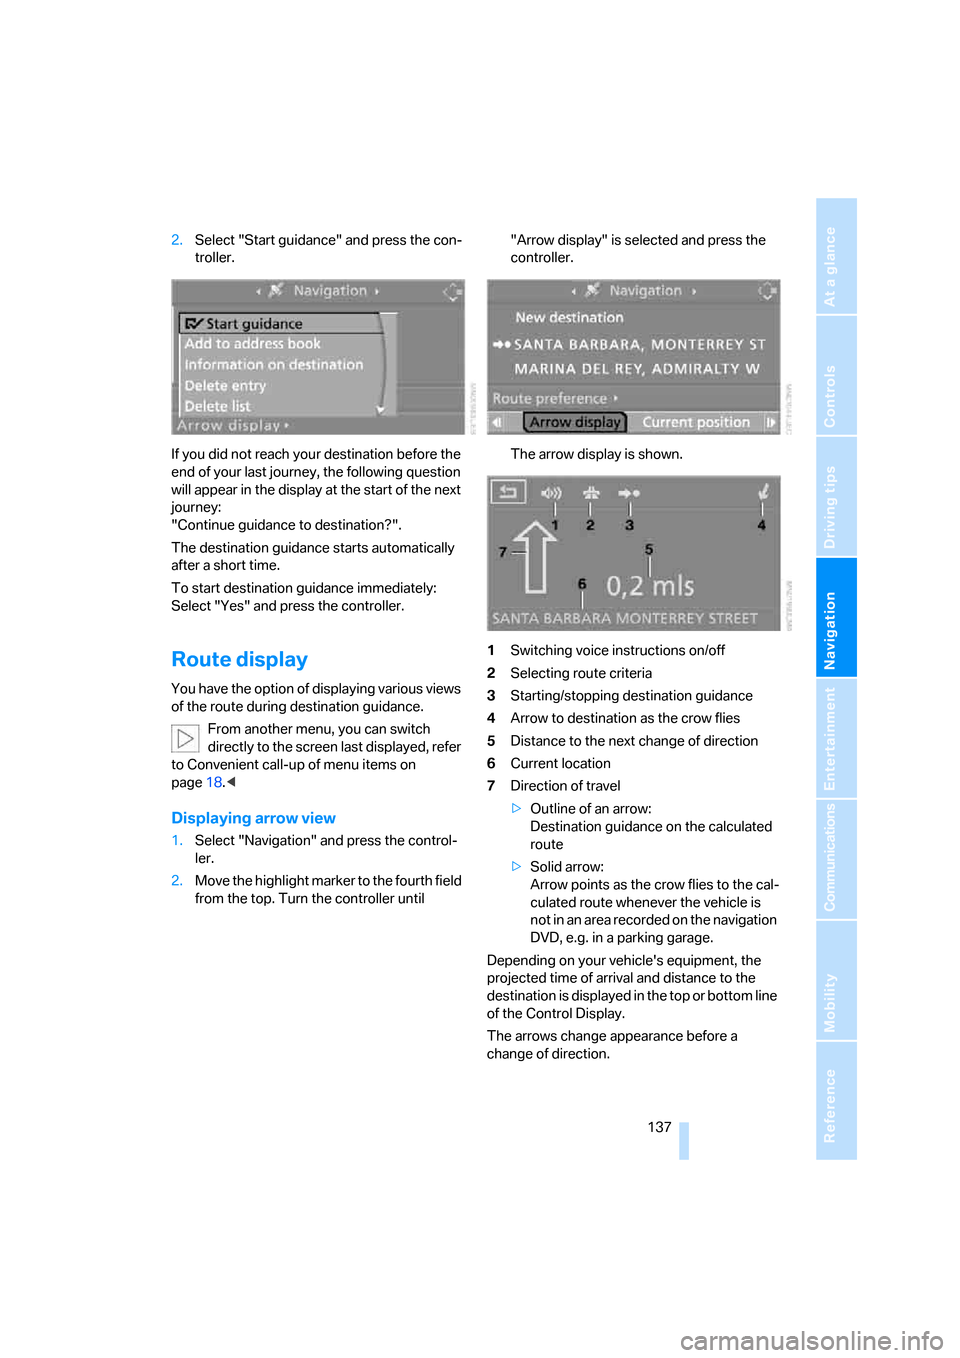
The arrow display is shown.
1Switching voice instructions on/off
2Selecting route criteria
3Starting/stopping destination guidance
4Arrow to destination as the crow flies
5Distance to the next change of direction
6Current location
7Direction of travel
>Outline of an arrow:
Destination guidance on the calculated
route
>Solid arrow:
Arrow points as the crow flies to the cal-
culated route whenever the vehicle is
not in an area recorded on the navigation
DVD, e.g. in a parking garage.
Depending on your vehicle's equipment, the
projected time of arrival and distance to the
destination is displayed in the top or bottom line
of the Control Display.
The arrows change appearance before a
change of direction.
Page 140 of 245

Destination guidance
138 1Street name for change of direction
2Distance to change of direction
3Change of direction
To exit from the menu:
Select the arrow and press the controller.
Displaying maps
You can have your current position displayed on
a map. After starting the destination guidance,
the planned route is shown on the map.
1.Select "Navigation" and press the control-
ler.
2.Move the highlight marker to the fourth field
from the top. Turn the controller until the
desired map view is selected:
>"Map facing north"
>"Map direction of travel"
>"Perspective"
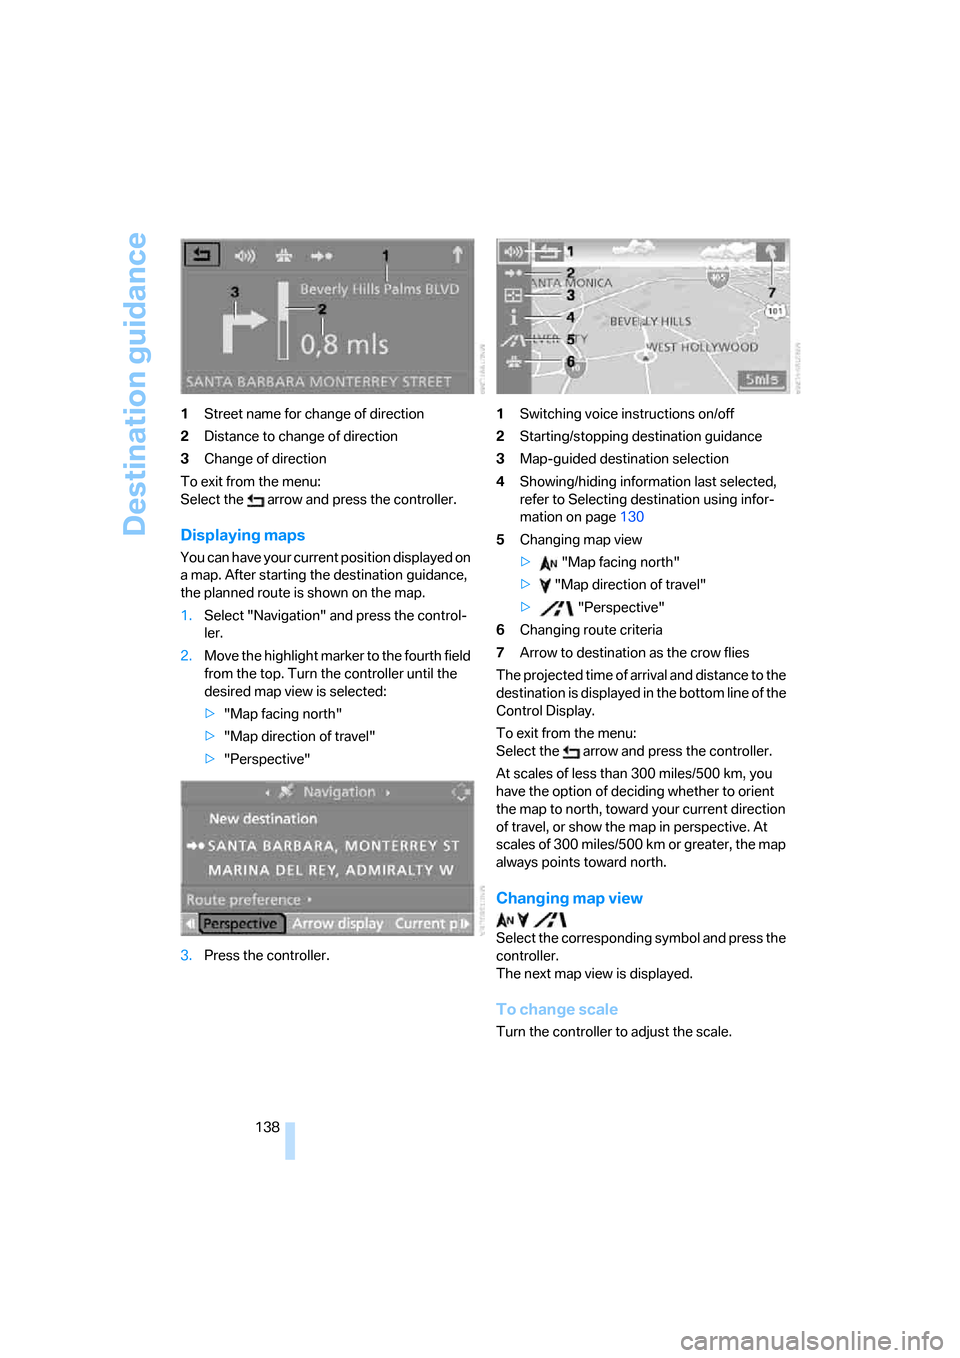
3.Press the controller.1Switching voice instructions on/off
2Starting/stopping destination guidance
3Map-guided destination selection
4Showing/hiding information last selected,
refer to Selecting destination using infor-
mation on page130
5Changing map view
> "Map facing north"
> "Map direction of travel"
> "Perspective"
6Changing route criteria
7Arrow to destination as the crow flies
The projected time of arrival and distance to the
destination is displayed in the bottom line of the
Control Display.
To exit from the menu:
Select the arrow and press the controller.
At scales of less than 300 miles/500 km, you
have the option of deciding whether to orient
the map to north, toward your current direction
of travel, or show the map in perspective. At
scales of 300 miles/500 km or greater, the map
always points toward north.
Changing map view
Select the corresponding symbol and press the
controller.
The next map view is displayed.
To change scale
Turn the controller to adjust the scale.
Page 170 of 245

Telephoning
168
Preparation via the mobile phone
6.Further steps must be carried out with the
mobile phone and vary depending on the
model. Please refer to your mobile phone's
operating instructions, e.g. under the topics
of Searching for a Bluetooth device, Con-
necting or Pairing.
Pairing
Depending on your mobile phone, you will see
messages, first in the mobile phone's display or
on the Control Display, requesting you to enter
the same Bluetooth passkey previously deter-
mined by you.
Message on the Control Display if the Bluetooth
passkey can be entered via iDrive:
7.Select "Add device" and press the control-
ler.
8.Enter the Bluetooth passkey.
Depending on the mobile phone, you will
have approx. 30 seconds to enter your
Bluetooth passkey on the mobile phone
and the Control Display.
9.Select "Confirm passkey" and press the
controller.10.Wait several seconds until the list of paired
mobile phones is displayed on the Control
Display and "Phone" is selected.
To interrupt the mobile phone's pairing with the
vehicle:
Select "Refuse connection" and press the con-
troller.
The next time you use the mobile phone inside
the vehicle, it will be recognized within no more
than two minutes as long as the engine is run-
ning or the ignition is switched on.
As soon as a mobile phone is detected by the
vehicle, the phone book entries stored on the
SIM card or on your mobile phone are transmit-
ted to the vehicle. Refer also your mobile
phone's operating instructions, if necessary.
This data transfer depends on your mobile
phone and can take several minutes; please
refer to your mobile phone's operating instruc-
tions, if necessary.
Up to four mobile phones can be paired, one
after the other. If a fifth mobile phone is paired,
the pairing data for the last mobile phone on the
list is deleted, refer also to the information
below.
List of paired mobile phones
All mobile phones with pairing data stored by
the vehicle can be displayed. If several mobile
phones are detected by the vehicle at the same
time, the mobile phone at the top of the list can
be operated via the vehicle.
You can change the order of the mobile phones
on the list. As long as a mobile phone from this
list is selected, you cannot operate the mobile
phones via the vehicle.
iDrive concept, refer to page16.
1.Press the
button to call up the start
menu.
2.Call up the menu by pressing the control-
ler.
3.Select "Communication settings" and
press the controller.
4.Select "Bluetooth" and press the controller.
5.Select "Phone" and press the controller.
Page 211 of 245

Mobility
209Reference
At a glance
Controls
Driving tips
Communications
Navigation
Entertainment
according to BMW repair procedures with cor-
respondingly trained personnel.
Changing wheels
Your BMW is equipped with Run-Flat Tires as
standard. This removes the need to change a
wheel immediately in the event of a puncture.
The symbol identifying Run-Flat Tires is a circle
with the letters RSC on the sidewall, refer to
Run-Flat Tires, page196.
When mounting new tires or changing over
from summer to winter tires and vice versa,
mount Run-Flat Tires for your own safety. In the
event of a flat, moreover, no spare wheel is
available. Your BMW Center will be glad to
advise you. Refer also to New wheels and tires,
page196.
The tools for changing wheels are avail-
able as optional accessories from your
BMW Center.<
Jack mounting points
The jacking points are at the positions shown in
the illustration.
Vehicle battery
Battery care
The battery is 100 % maintenance-free, the
electrolyte will last for the life of the battery
when the vehicle is operated in a temperate cli-
mate. Your BMW Center will be glad to advise in
all matters concerning the battery.
Charging the battery
Only charge the battery in the vehicle via the
terminals in the engine compartment with the
engine off. Connections, refer to Jump starting
on page212.
Disposal
Have old batteries disposed of by your
BMW Center or hand them in to a recy-
cling center. Maintain the battery in an upright
position for transport and storage. Always
secure the battery against tipping over during
transport.<
Power failure
After a temporary power loss, the functioning of
some equipment may be limited and require ini-
tialization. Individual settings may likewise have
been lost and will have to be reprogrammed:
>Time and date
These values must be updated, refer to
page77.
>Radio
In some cases, stations may have to be
stored again, refer to page150.
>Navigation system
Operability must be waited for, refer to
page124.
>Seat and mirror memory
The positions must be stored again, refer to
page44.
>Inside rearview mirror with digital compass
The system must be calibrated, refer to
page105.
Fuses
Never attempt to repair a blown fuse and
do not replace a defective fuse with a sub-
stitute of another color or amperage rating, oth-
erwise this could lead to a circuit overload, ulti-
mately resulting in a fire in the vehicle.<
Page 231 of 245

Reference 229
At a glance
Controls
Driving tips
Communications
Navigation
Entertainment
Mobility
Cleaning, refer to Caring for
your vehicle brochure
Cleaning headlamps60
– washer fluid60
"Climate"98
Clock69
– 12h/24h mode78
– setting time77
Closing
– from inside32
– from outside30
Clothes hooks107
Cockpit10
Cold start, refer to Starting the
engine53
Combined instrument, refer to
Instrument cluster12
Comfort Access, refer to
Convenient access35
Comfort area, refer to Around
the center console14
"Communication"170
"Communication
settings"179
Compact disc, refer to
– CD changer156
– CD player156
Compartment for remote
control, refer to Ignition
lock52
Compass104
Computer70
– displays on Control
Display71
– hour signal78
Computer, refer to iDrive16
"Concert hall" tone
settings146
Condensation, refer to When
the vehicle is parked118
Configuring settings, refer to
Personal Profile29
Confirmation signals for
locking/unlocking of the
vehicle31
Connecting vacuum cleaner,
refer to Connecting
electrical appliances108Consumption display
– average consumption71
Consumption indicator
– Energy Control70
"Continue guidance to
destination?"137
Control Center, refer to
iDrive16
Control Display
– settings73
– switching on/off21
Control Display, refer to
iDrive16
Controller, refer to iDrive16
Controls and displays10
Control unit, refer to iDrive16
Convenience operation
– windows30
Convenience start, refer to
Starting the engine53
Convenient access35
– replacing the battery37
– what to observe before
entering a car wash36
Convenient operation
– windows with convenient
access36
– with convenient access36
Coolant201
– adding201
– checking level201
Coolant temperature69
Cooling, maximum98
Cooling fluid, refer to
Coolant201
Cornering lamps, refer to
Adaptive Head Light95
Country of destination for
navigation126
Courtesy lamps96
Cross-hairs in navigation129
Cruise control60
– active62
– malfunction62
Cruising range70
Cup holders107
Curb weight, refer to
Weights220Current consumption, refer to
Energy Control70
"Current position"140
Current position
– displaying140
– entering132
– storing132
"Customer
Relations"180,182
D
Dashboard, refer to
Cockpit10
Dashboard, refer to
Instrument cluster12
Dashboard lighting, refer to
Instrument lighting96
Data218
– capacities221
– dimensions219
– engine218
– weights220
"Date"79
Date
– setting78
– setting format79
"Date format"79
Daytime driving lamps94
"Daytime running light"95
DBC Dynamic Brake
Control84
DCC, refer to Cruise
control60
"Deactivated"44
Deactivating front passenger
airbags91
Deadlocking, refer to
Locking30
Decommissioning the vehicle
– refer to Caring for your
vehicle brochure
Defect
– door lock32
– fuel filler door186
– glass sunroof39
Defogging windows100
Defrosting windows100
Page 235 of 245

Reference 233
At a glance
Controls
Driving tips
Communications
Navigation
Entertainment
Mobility
Indicator and warning
lamps13
Individual air distribution98
Individually programmable
buttons on steering
wheel47
Individual settings, refer to
Personal Profile29
Information
– on another location130
– on country130
– on current position130
– on destination location130
"Information" in
navigation131
"Information on
destination"132
Initializing
– compass, refer to
Calibrating105
– Flat Tire Monitor FTM88
– glass sunroof39
"Input map"130
Installation location
– CD changer160
Instructions for navigation
system, refer to Voice
instructions139
Instrument cluster12
Instrument lighting96
Instrument panel, refer to
Cockpit10
Integrated key28
Integrated universal remote
control103
Interesting destination for
navigation130
"Interim time"82
Interior lamps96
– remote control30
Interior motion sensor35
Interior rearview mirror46
– automatic dimming
feature117
Interior rearview mirror with
digital compass104
Interlock57
Intermittent mode of the
wipers59J
Jacking points209
Joystick, refer to iDrive16
Jumpering, refer to Jump
starting212
Jump starting212
K
Key, refer to Integrated key/
remote control28
Keyless Go, refer to
Convenient access35
Keyless opening and closing,
refer to Convenient
access35
Key Memory, refer to Personal
Profile29
"Keypad"173
Kick-down58
– automatic transmission with
Steptronic58
– sequential manual gearbox
SMG56
Knock control186
L
Lamps, refer to Parking lamps/
low beams93
Lamps and bulbs, replacing
bulbs205
"Languages" in
navigation139
"Languages"on the control
display82
Lap-and-shoulder safety
belt45
Lashing eyes, refer to
Securing cargo119
Last destinations, refer to
Destination list131
"Last seat pos."44
LATCH child-restraint fixing
system50
LEDs light-emitting
diodes205Length, refer to
Dimensions219
License plate lamp, replacing
bulbs208
Light-emitting diodes
LEDs205
Lighter108
"Lighting"94
Lighting
– instruments96
– lamps and bulbs205
– of the vehicle, refer to
Lamps93
Light switch93
"Limit"81
Limit, refer to Speed limit81
Loading
– securing cargo119
Load securing equipment,
refer to Securing cargo119
Location
– drive for navigation DVD and
audio CD124
Lock buttons in the doors,
refer to Locking33
Locking
– adjusting confirmation
signal31
– from inside33
– from outside30
– without remote control, refer
to Convenient access35
Locking and unlocking doors
– from inside32
– from outside30
"LOGIC7", refer to Tone
control146
Low beams93
– automatic93
– replacing bulbs206
Lower back support, refer to
Lumbar support41