2006 BMW 330I navigation update
[x] Cancel search: navigation updatePage 126 of 246
Starting the navigation system
124
Starting the navigation system
Your navigation system can use satellites to
ascertain the precise position of your vehicle
and guide you reliably to any destination you
enter.
Navigation DVD
The navigation system requires a special navi-
gation DVD. You can obtain the latest version at
your BMW Center.
Inserting navigation DVD
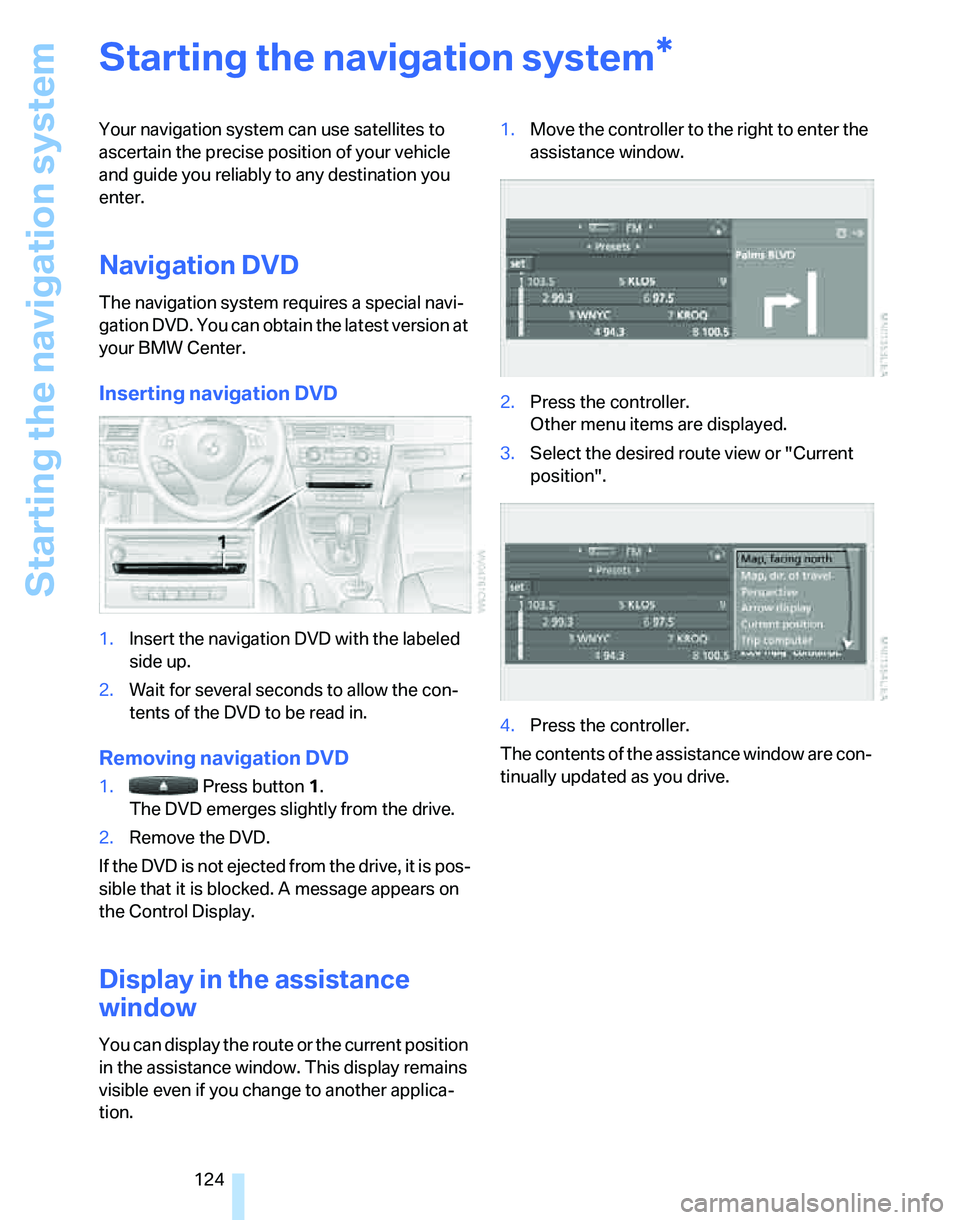
1.Insert the navigation DVD with the labeled
side up.
2.Wait for several seconds to allow the con-
tents of the DVD to be read in.
Removing navigation DVD
1. Press button 1.
The DVD emerges slightly from the drive.
2.Remove the DVD.
If the DVD is not ejected from the drive, it is pos-
sible that it is blocked. A message appears on
the Control Display.
Display in the assistance
window
You can display the route or the current position
in the assistance window. This display remains
visible even if you change to another applica-
tion.1.Move the controller to the right to enter the
assistance window.
2.Press the controller.
Other menu items are displayed.
3.Select the desired route view or "Current
position".
4.Press the controller.
The contents of the assistance window are con-
tinually updated as you drive.
*
Page 146 of 246
On/off and settings
144
On/off and settings
The following audio sources have shared con-
trols and setting options:
>Radio
>CD player
>CD changer
*
Controls
The audio sources can be operated using:
>Buttons near the CD player
>iDrive
>Buttons
on the steering wheel, refer to
page11
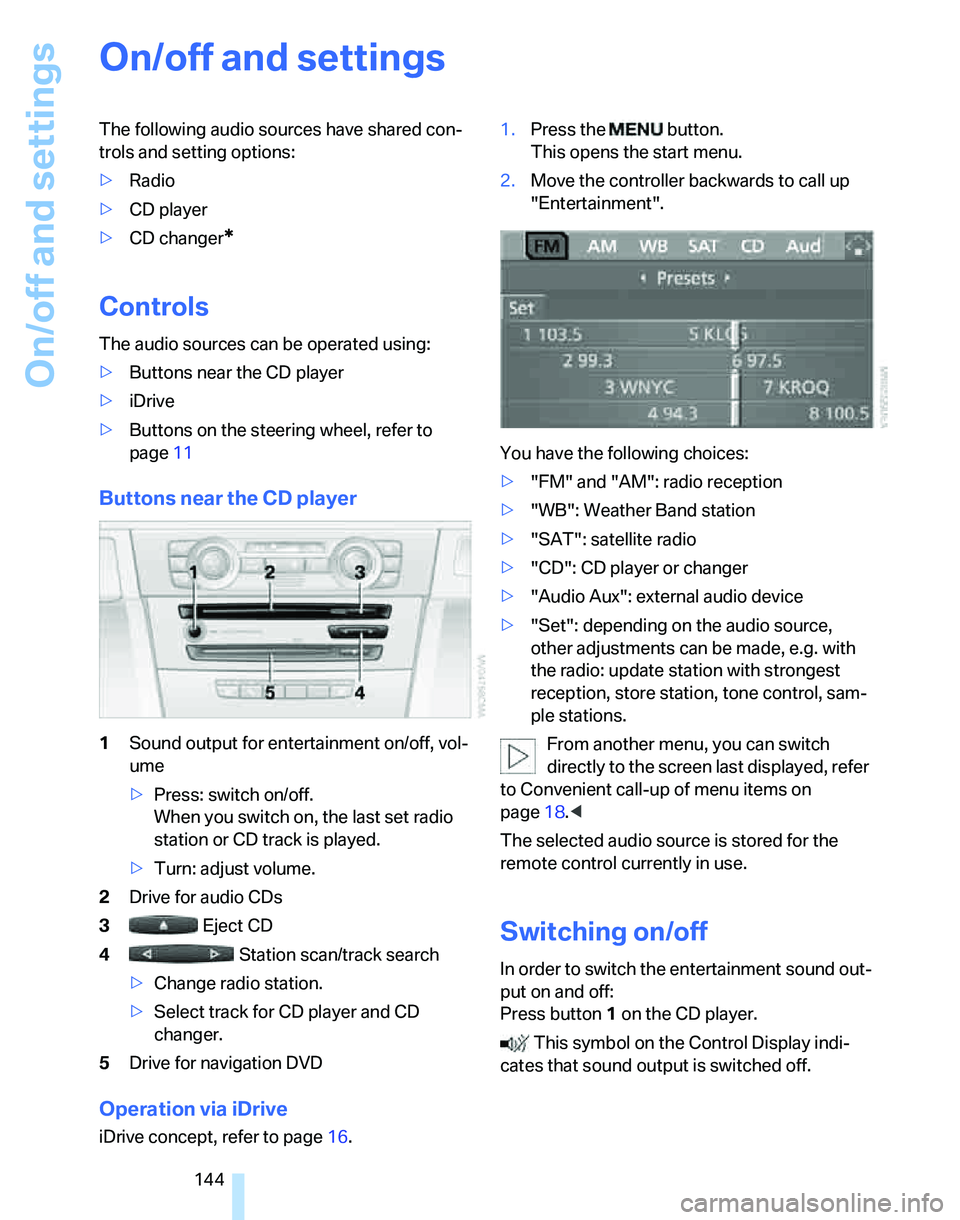
Buttons near the CD player
1Sound output for entertainment on/off, vol-
ume
>Press: switch on/off.
When you switch on, the last set radio
station or CD track is played.
>Turn: adjust volume.
2Drive for audio CDs
3 Eject CD
4 Station scan/track search
>Change radio station.
>Select track for CD player and CD
changer.
5Drive for navigation DVD
Operation via iDrive
iDrive concept, refer to page16.1.Press the button.
This opens the start menu.
2.Move the controller backwards to call up
"Entertainment".
You have the following choices:
>"FM" and "AM": radio reception
>"WB": Weather Band station
>"SAT": satellite radio
>"CD": CD player or changer
>"Audio Aux": external audio device
>"Set": depending on the audio source,
other adjustments can be made, e.g. with
the radio: update station with strongest
reception, store station, tone control, sam-
ple stations.
From another menu, you can switch
directly to the screen last displayed, refer
to Convenient call-up of menu items on
page18.<
The selected audio source is stored for the
remote control currently in use.
Switching on/off
In order to switch the entertainment sound out-
put on and off:
Press button1 on the CD player.
This symbol on the Control Display indi-
cates that sound output is switched off.
Page 151 of 246
Navigation
Entertainment
Driving tips
149Reference
At a glance
Controls
Communications
Mobility
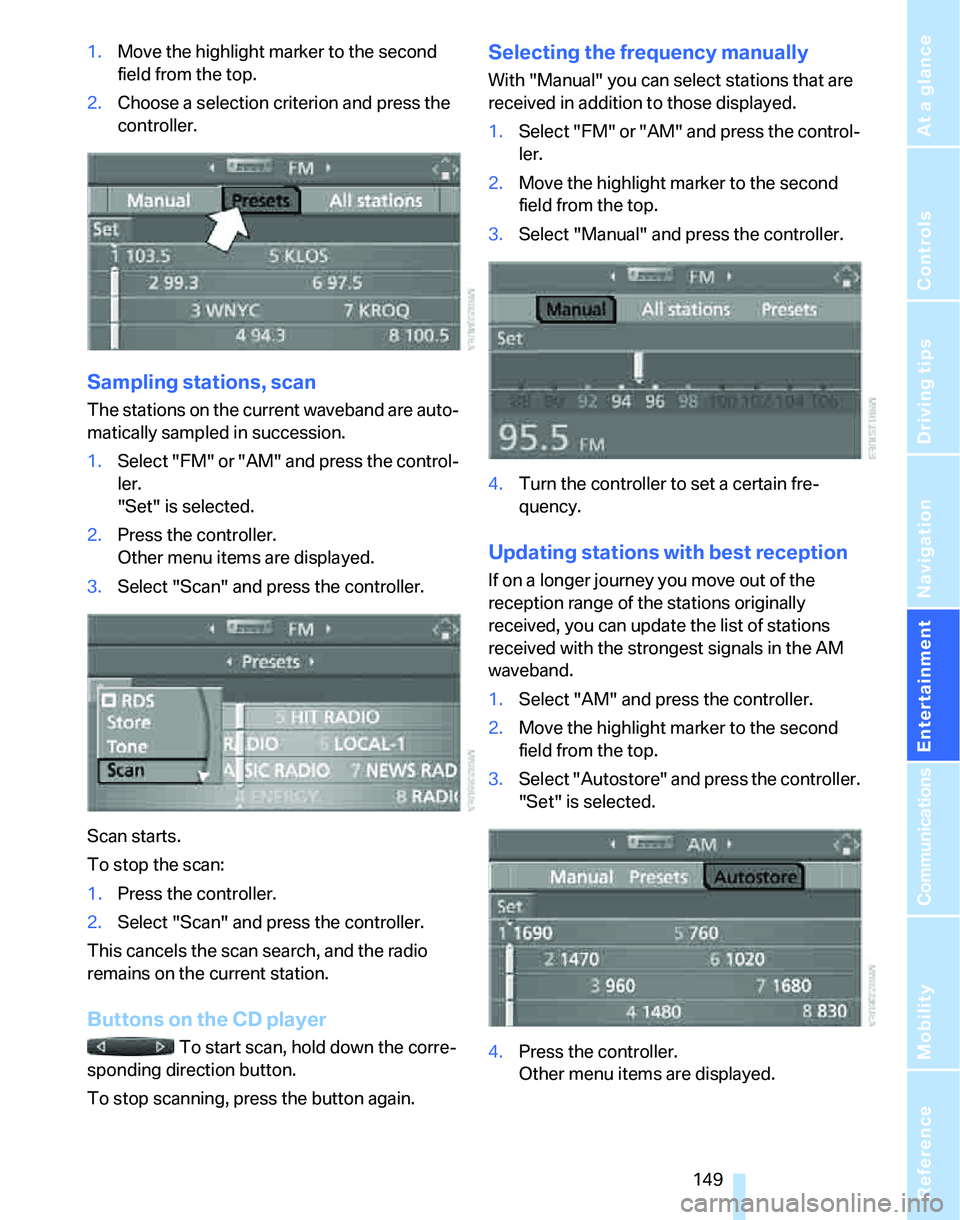
1.Move the highlight marker to the second
field from the top.
2.Choose a selection criterion and press the
controller.
Sampling stations, scan
The stations on the current waveband are auto-
matically sampled in succession.
1.Select "FM" or "AM" and press the control-
ler.
"Set" is selected.
2.Press the controller.
Other menu items are displayed.
3.Select "Scan" and press the controller.
Scan starts.
To stop the scan:
1.Press the controller.
2.Select "Scan" and press the controller.
This cancels the scan search, and the radio
remains on the current station.
Buttons on the CD player
To start scan, hold down the corre-
sponding direction button.
To stop scanning, press the button again.
Selecting the frequency manually
With "Manual" you can select stations that are
received in addition to those displayed.
1.Select "FM" or "AM" and press the control-
ler.
2.Move the highlight marker to the second
field from the top.
3.Select "Manual" and press the controller.
4.Turn the controller to set a certain fre-
quency.
Updating stations with best reception
If on a longer journey you move out of the
reception range of the stations originally
received, you can update the list of stations
received with the strongest signals in the AM
waveband.
1.Select "AM" and press the controller.
2.Move the highlight marker to the second
field from the top.
3.Select "Autostore" and press the controller.
"Set" is selected.
4.Press the controller.
Other menu items are displayed.
Page 153 of 246
Navigation
Entertainment
Driving tips
151Reference
At a glance
Controls
Communications
Mobility
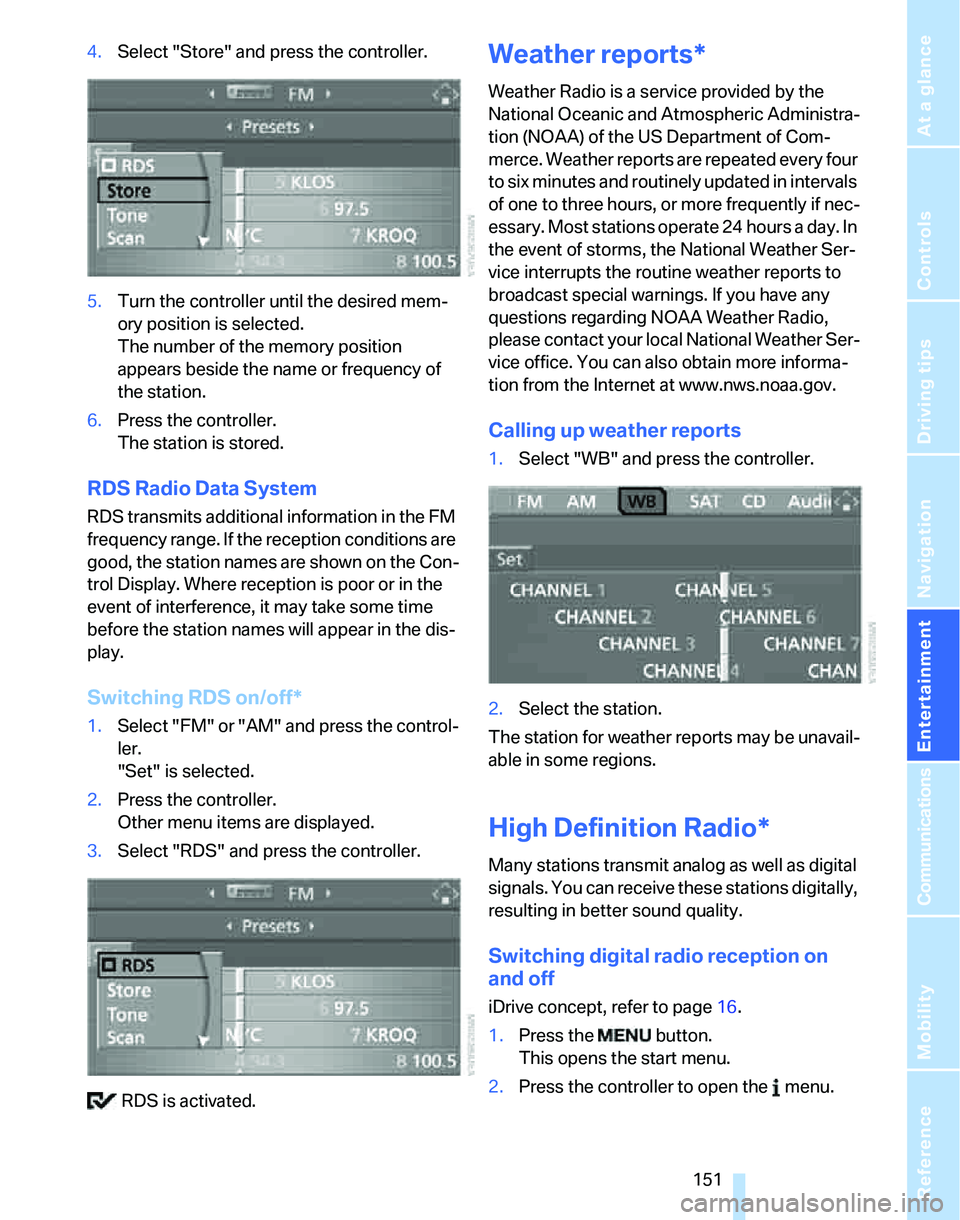
4.Select "Store" and press the controller.
5.Turn the controller until the desired mem-
ory position is selected.
The number of the memory position
appears beside the name or frequency of
the station.
6.Press the controller.
The station is stored.
RDS Radio Data System
RDS transmits additional information in the FM
frequency range. If the reception conditions are
good, the station names are shown on the Con-
trol Display. Where reception is poor or in the
event of interference, it may take some time
before the station names will appear in the dis-
play.
Switching RDS on/off*
1.Select "FM" or "AM" and press the control-
ler.
"Set" is selected.
2.Press the controller.
Other menu items are displayed.
3.Select "RDS" and press the controller.
RDS is activated.
Weather reports*
Weather Radio is a service provided by the
National Oceanic and Atmospheric Administra-
tion (NOAA) of the US Department of Com-
merce. Weather reports are repeated every four
to six minutes and routinely updated in intervals
of one to three hours, or more frequently if nec-
essary. Most stations operate 24 hours a day. In
the event of storms, the National Weather Ser-
vice interrupts the routine weather reports to
broadcast special warnings. If you have any
questions regarding NOAA Weather Radio,
please contact your local National Weather Ser-
vice office. You can also obtain more informa-
tion from the Internet at www.nws.noaa.gov.
Calling up weather reports
1.Select "WB" and press the controller.
2.Select the station.
The station for weather reports may be unavail-
able in some regions.
High Definition Radio*
Many stations transmit analog as well as digital
signals. You can receive these stations digitally,
resulting in better sound quality.
Switching digital radio reception on
and off
iDrive concept, refer to page16.
1.Press the button.
This opens the start menu.
2.Press the controller to open the menu.
Page 183 of 246
181
Entertainment
Reference
At a glance
Controls
Driving tips Communications
Navigation
Mobility
5.Select "Service Status" and press the con-
troller.
The current services available from
TeleService or BMW Assist are displayed.
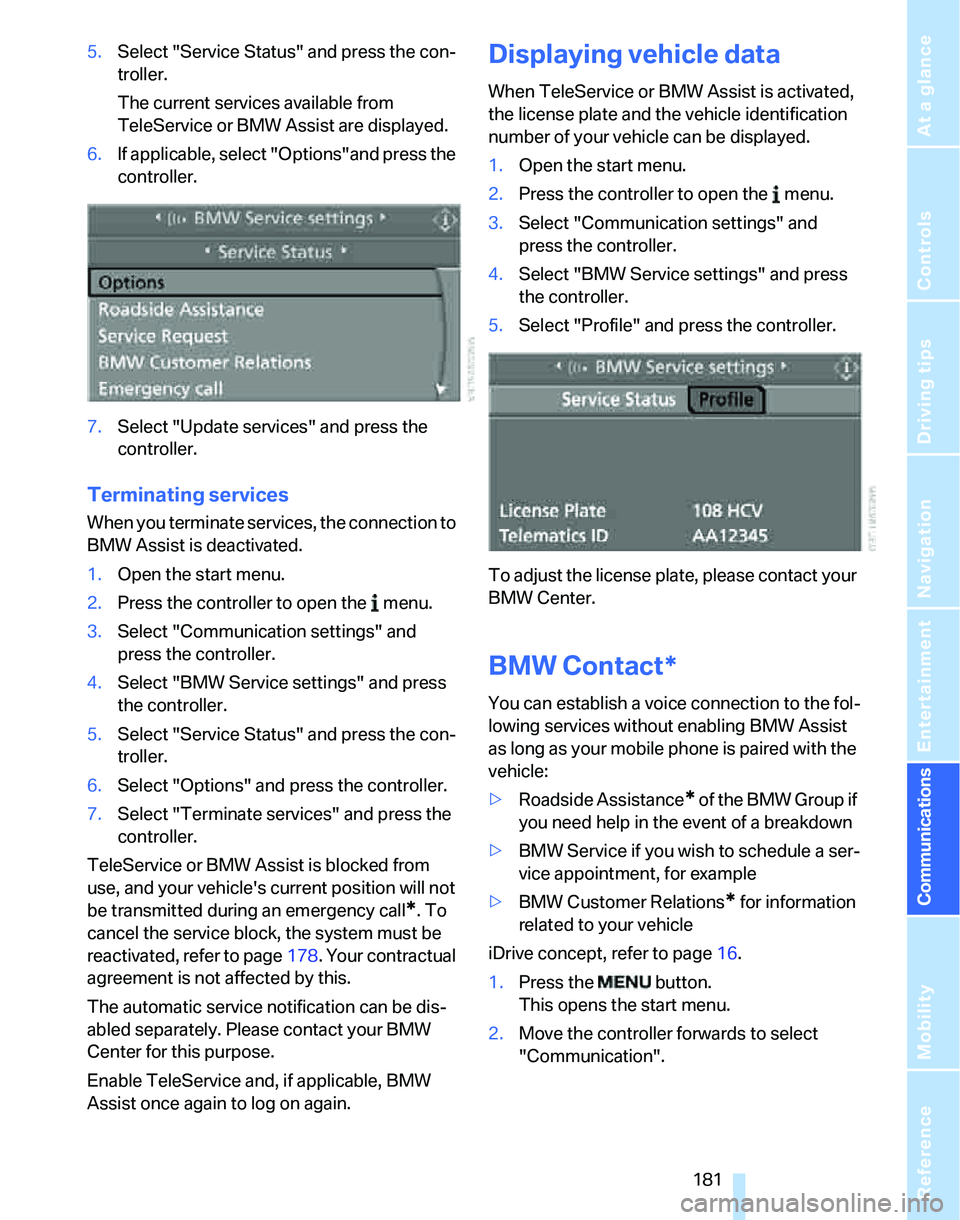
6.If applicable, select "Options"and press the
controller.
7.Select "Update services" and press the
controller.
Terminating services
When you terminate services, the connection to
BMW Assist is deactivated.
1.Open the start menu.
2.Press the controller to open the menu.
3.Select "Communication settings" and
press the controller.
4.Select "BMW Service settings" and press
the controller.
5.Select "Service Status" and press the con-
troller.
6.Select "Options" and press the controller.
7.Select "Terminate services" and press the
controller.
TeleService or BMW Assist is blocked from
use, and your vehicle's current position will not
be transmitted during an emergency call
*. To
cancel the service block, the system must be
reactivated, refer to page178. Your contractual
agreement is not affected by this.
The automatic service notification can be dis-
abled separately. Please contact your BMW
Center for this purpose.
Enable TeleService and, if applicable, BMW
Assist once again to log on again.
Displaying vehicle data
When TeleService or BMW Assist is activated,
the license plate and the vehicle identification
number of your vehicle can be displayed.
1.Open the start menu.
2.Press the controller to open the menu.
3.Select "Communication settings" and
press the controller.
4.Select "BMW Service settings" and press
the controller.
5.Select "Profile" and press the controller.
To adjust the license plate, please contact your
BMW Center.
BMW Contact*
You can establish a voice connection to the fol-
lowing services without enabling BMW Assist
as long as your mobile phone is paired with the
vehicle:
>Roadside Assistance
* of the BMW Group if
you need help in the event of a breakdown
>BMW Service if you wish to schedule a ser-
vice appointment, for example
>BMW Customer Relations
* for information
related to your vehicle
iDrive concept, refer to page16.
1.Press the button.
This opens the start menu.
2.Move the controller forwards to select
"Communication".
Page 211 of 246
Mobility
209Reference
At a glance
Controls
Driving tips
Communications
Navigation
Entertainment
according to BMW repair procedures with cor-
respondingly trained personnel.
Changing wheels
Your BMW is equipped with Run-Flat Tires as
standard. This removes the need to change a
wheel immediately in the event of a puncture.
The symbol identifying Run-Flat Tires is a circle
with the letters RSC on the sidewall, refer to
Run-Flat Tires, page196.
When mounting new tires or changing over
from summer to winter tires and vice versa,
mount Run-Flat Tires for your own safety. In the
event of a flat, moreover, no spare wheel is
available. Your BMW Center will be glad to
advise you. Refer also to New wheels and tires,
page196.
The tools for changing wheels are avail-
able as optional accessories from your
BMW Center.<
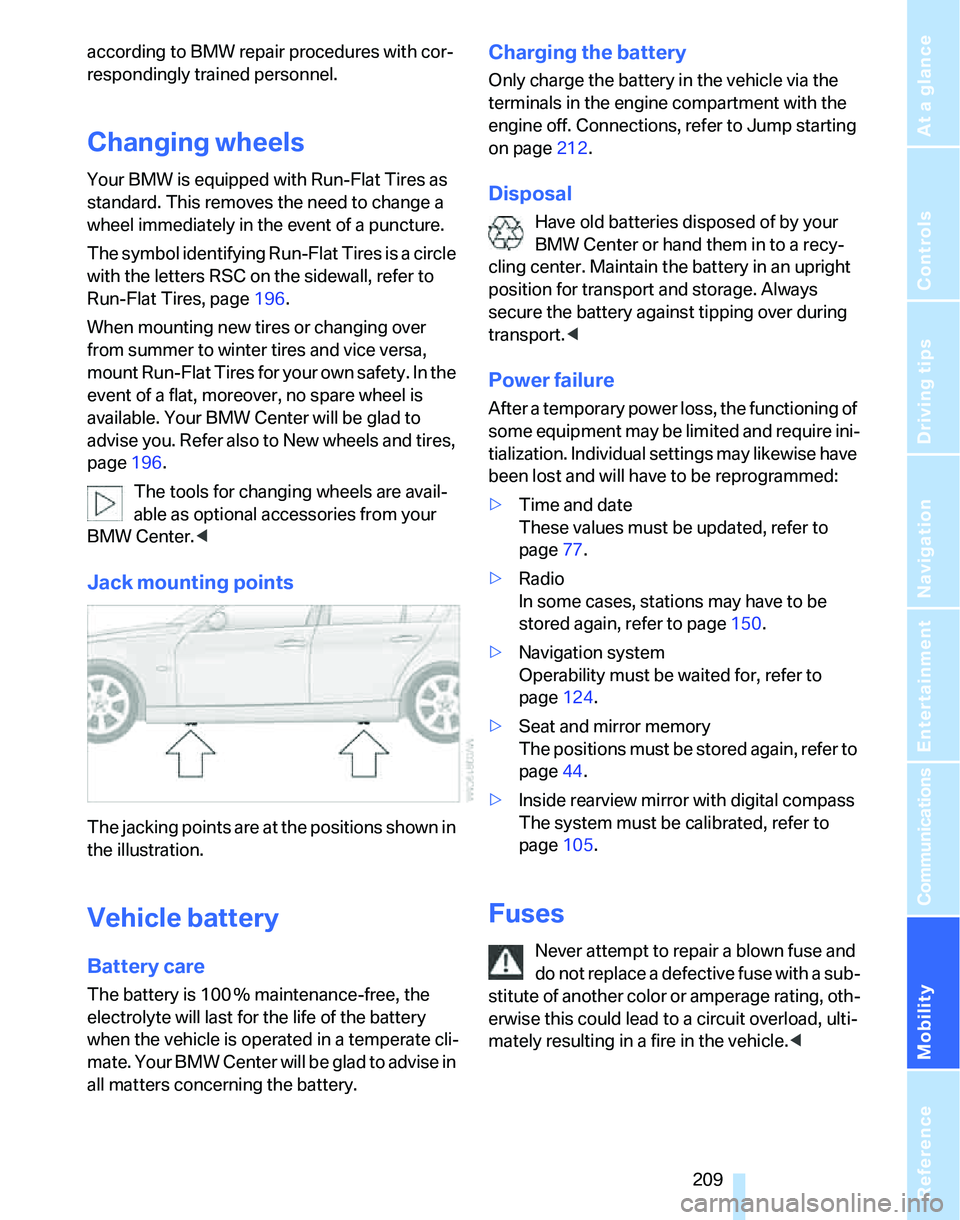
Jack mounting points
The jacking points are at the positions shown in
the illustration.
Vehicle battery
Battery care
The battery is 100 % maintenance-free, the
electrolyte will last for the life of the battery
when the vehicle is operated in a temperate cli-
mate. Your BMW Center will be glad to advise in
all matters concerning the battery.
Charging the battery
Only charge the battery in the vehicle via the
terminals in the engine compartment with the
engine off. Connections, refer to Jump starting
on page212.
Disposal
Have old batteries disposed of by your
BMW Center or hand them in to a recy-
cling center. Maintain the battery in an upright
position for transport and storage. Always
secure the battery against tipping over during
transport.<
Power failure
After a temporary power loss, the functioning of
some equipment may be limited and require ini-
tialization. Individual settings may likewise have
been lost and will have to be reprogrammed:
>Time and date
These values must be updated, refer to
page77.
>Radio
In some cases, stations may have to be
stored again, refer to page150.
>Navigation system
Operability must be waited for, refer to
page124.
>Seat and mirror memory
The positions must be stored again, refer to
page44.
>Inside rearview mirror with digital compass
The system must be calibrated, refer to
page105.
Fuses
Never attempt to repair a blown fuse and
do not replace a defective fuse with a sub-
stitute of another color or amperage rating, oth-
erwise this could lead to a circuit overload, ulti-
mately resulting in a fire in the vehicle.<
Page 242 of 246
Everything from A - Z
240 Tow fittings for tow-starting
and towing away213
Towing213
– methods214
Towing away
– car with automatic
transmission213
"Town / City" in destination
entry126
Tow rope214
Tow-starting213
– sequential manual gearbox
SMG215
Tracks
– random play sequence159
Track width, refer to
Dimensions219
Traction-assist feature, refer
to DSC84
Traction control, refer to DSC
Dynamic Stability
Control84
Trailer towing
– towing loads and gross
weight220
Transmission
– automatic transmission with
Steptronic57
– manual transmission54
– overriding selector lever lock
for automatic transmission
with Steptronic58
– sequential manual gearbox
SMG55
Transporting children
safely49
Transport securing device,
refer to Securing cargo119
Tread depth, refer to Minimum
tire tread195
Treble, refer to Tone
control145
Treble, refer to Treble and
bass145
Treble, tone control145
"Trip computer"72
Trip computer71
Trip-distance counter, refer to
Trip odometer69"Triple turn signal
activation"59
Triple turn signal activation59
Trip odometer69
Trunk
– lid, refer to Luggage
compartment lid33
Trunk lamp, refer to Luggage
compartment lamp96
Trunk lid, refer to Luggage
compartment lid33
Turning circle, refer to
Dimensions219
Turn signals58
– indicator lamp12
– replacing bulbs207
Tying down loads, refer to
Cargo loading119
U
Underbody protection, refer to
Caring for your vehicle
brochure
Uniform Tire Quality Grading/
UTQR194
"Units"74
Units
– average consumption73
– temperature73
Universal garage door opener,
refer to Integrated universal
remote control103
Universal remote control103
Unlatching, refer to
Unlocking35
"Unlock button"30
Unlocking
– from inside32
– from outside30
– luggage compartment lid36
– without remote control, refer
to Convenient access35
"Update services"181
V
Vehicle
– battery209
– breaking in116
– care, refer to Caring for your
vehicle brochure
– cargo loading118
– dimensions219
– Identification Number, refer
to Engine compartment199
– parking53
– washing, refer to Caring for
your vehicle brochure
– weight220
Vehicle jack209
Vehicle position, refer to
Displaying current
position140
"Vehicle settings"88
Ventilation100
– draft-free100
– in the rear100
Ventilation while at a
standstill101
Vents, refer to Ventilation100
"Vent settings"98
Voice commands
– overview22
– short commands222
Voice instructions for
navigation system139
– muting48,139
– repeating48,139
– switching on/off139
– volume139
Voice phone book175
Volume144
– audio sources144
– mobile phone170
– speed-dependent
adjustment145
– voice instructions139
W
Warning and indicator
lamps13