2006 BMW 330CI IDRIVE COUPE ignition
[x] Cancel search: ignitionPage 168 of 239
Telephoning
166 3.Select the menu and press the controller.
4.Select "Communication settings" and
press the controller.
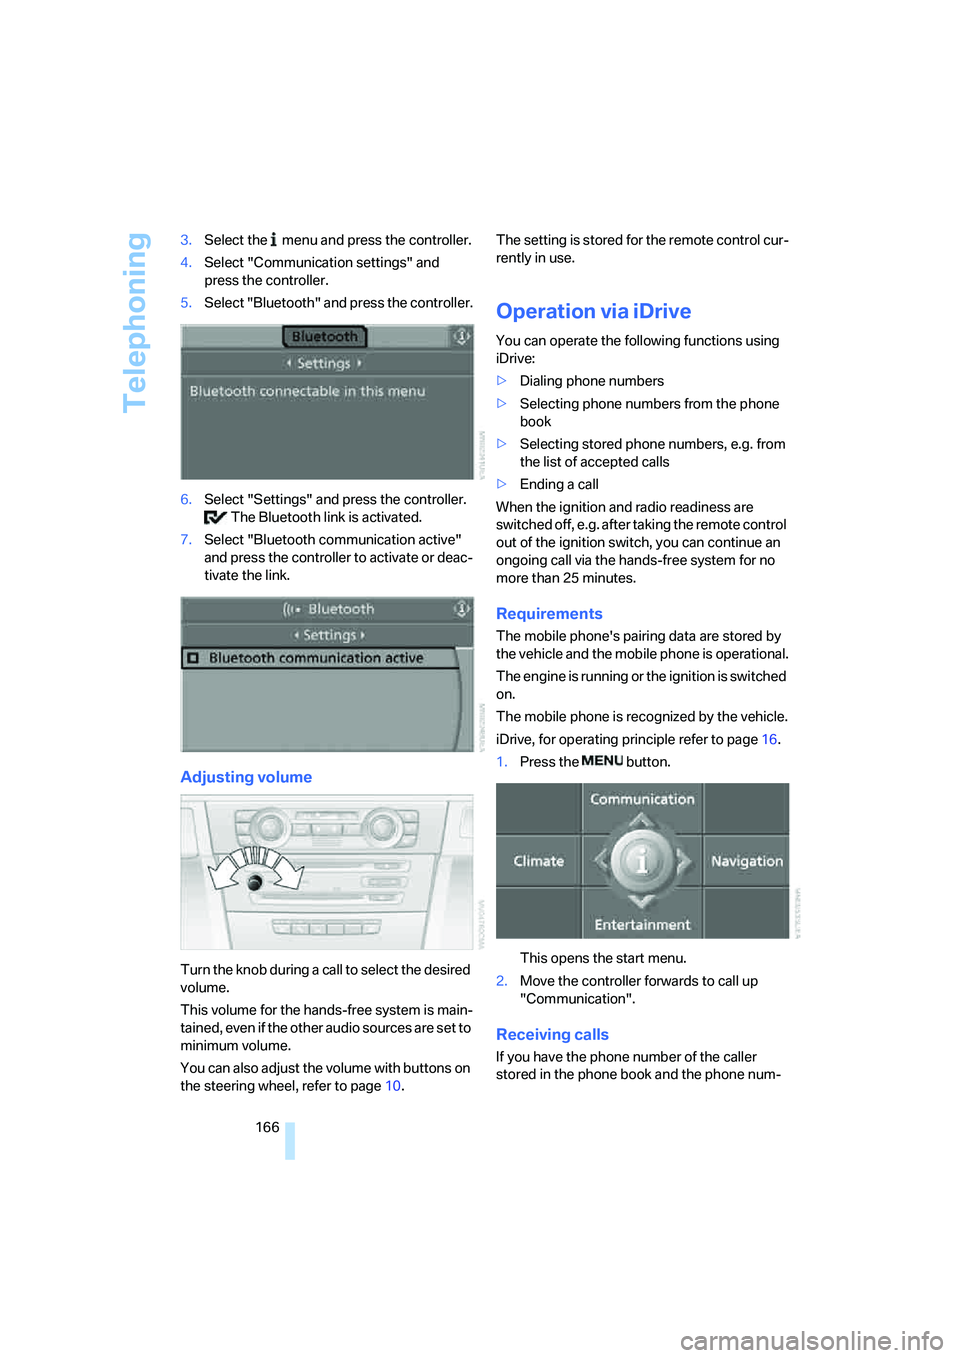
5.Select "Bluetooth" and press the controller.
6.Select "Settings" and press the controller.
The Bluetooth link is activated.
7.Select "Bluetooth communication active"
and press the controller to activate or deac-
tivate the link.
Adjusting volume
Turn the knob during a call to select the desired
volume.
This volume for the hands-free system is main-
tained, even if the other audio sources are set to
minimum volume.
You can also adjust the volume with buttons on
the steering wheel, refer to page10.The setting is stored for the remote control cur-
rently in use.
Operation via iDrive
You can operate the following functions using
iDrive:
>Dialing phone numbers
>Selecting phone numbers from the phone
book
>Selecting stored phone numbers, e.g. from
the list of accepted calls
>Ending a call
When the ignition and radio readiness are
switched off, e.g. after taking the remote control
out of the ignition switch, you can continue an
ongoing call via the hands-free system for no
more than 25 minutes.
Requirements
The mobile phone's pairing data are stored by
the vehicle and the mobile phone is operational.
The engine is running or the ignition is switched
on.
The mobile phone is recognized by the vehicle.
iDrive, for operating principle refer to page16.
1.Press the button.
This opens the start menu.
2.Move the controller forwards to call up
"Communication".
Receiving calls
If you have the phone number of the caller
stored in the phone book and the phone num-
ba8_E9293_US.book Seite 166 Freitag, 5. Mai 2006 1:02 13
Page 172 of 239
Telephoning
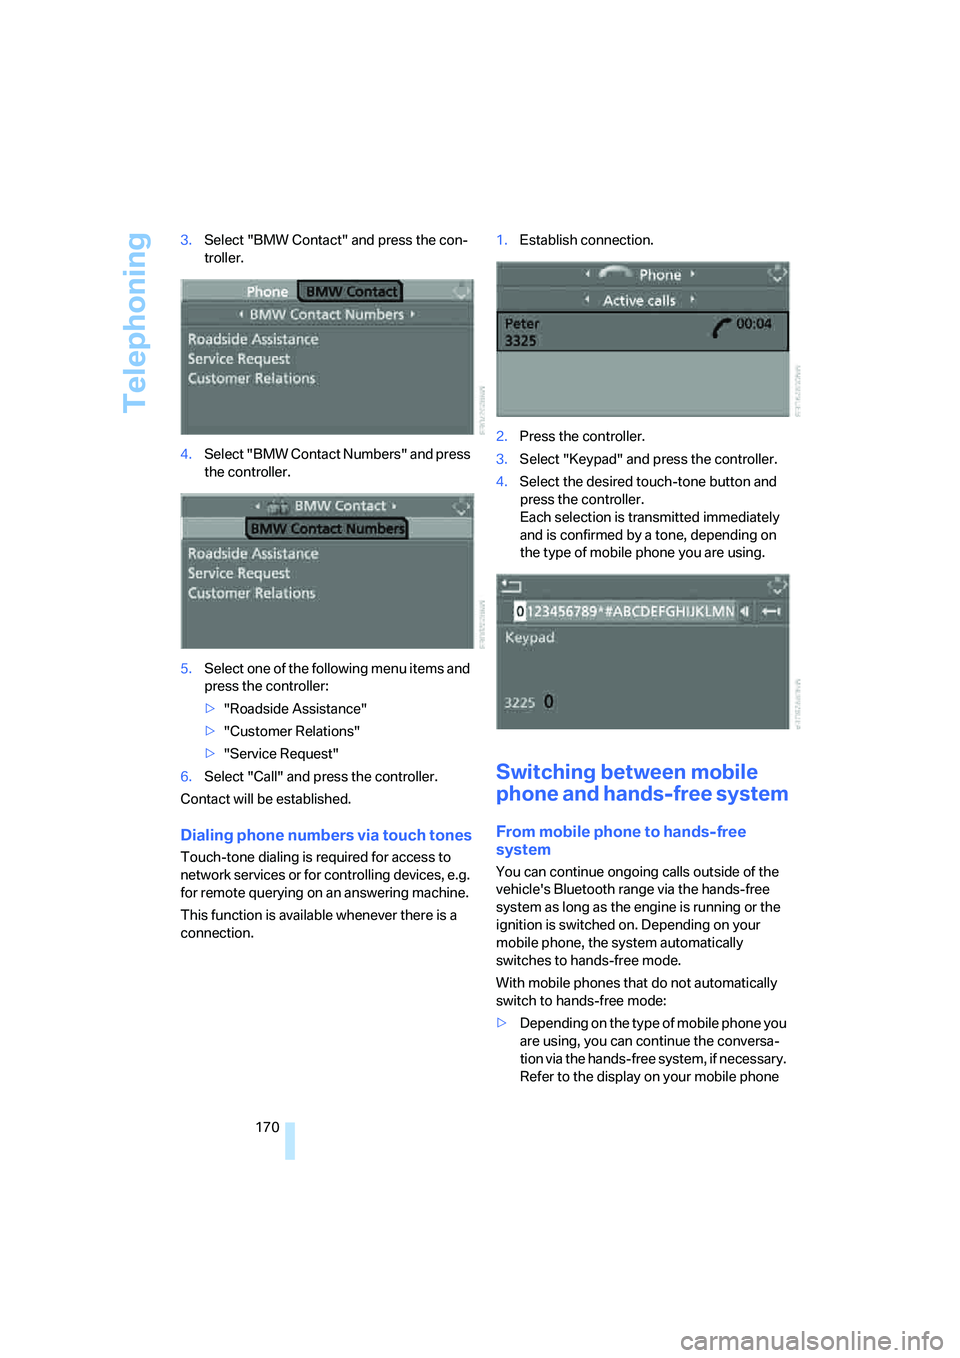
170 3.Select "BMW Contact" and press the con-
troller.
4.Select "BMW Contact Numbers" and press
the controller.
5.Select one of the following menu items and
press the controller:
>"Roadside Assistance"
>"Customer Relations"
>"Service Request"
6.Select "Call" and press the controller.
Contact will be established.
Dialing phone numbers via touch tones
Touch-tone dialing is required for access to
network services or for controlling devices, e.g.
for remote querying on an answering machine.
This function is available whenever there is a
connection.1.Establish connection.
2.Press the controller.
3.Select "Keypad" and press the controller.
4.Select the desired touch-tone button
and
press the controller.
Each selection is transmitted immediately
and is confirmed by a tone, depending on
the type of mobile phone you are using.
Switching between mobile
phone and hands-free system
From mobile phone to hands-free
system
You can continue ongoing calls outside of the
vehicle's Bluetooth range via the hands-free
system as long as the engine is running or the
ignition is switched on. Depending on your
mobile phone, the system automatically
switches to hands-free mode.
With mobile phones that do not automatically
switch to hands-free mode:
>Depending on the type of mobile phone you
are using, you can continue the conversa-
tion via the hands-free system, if necessary.
Refer to the display on your mobile phone
ba8_E9293_US.book Seite 170 Freitag, 5. Mai 2006 1:02 13
Page 176 of 239
Telephoning
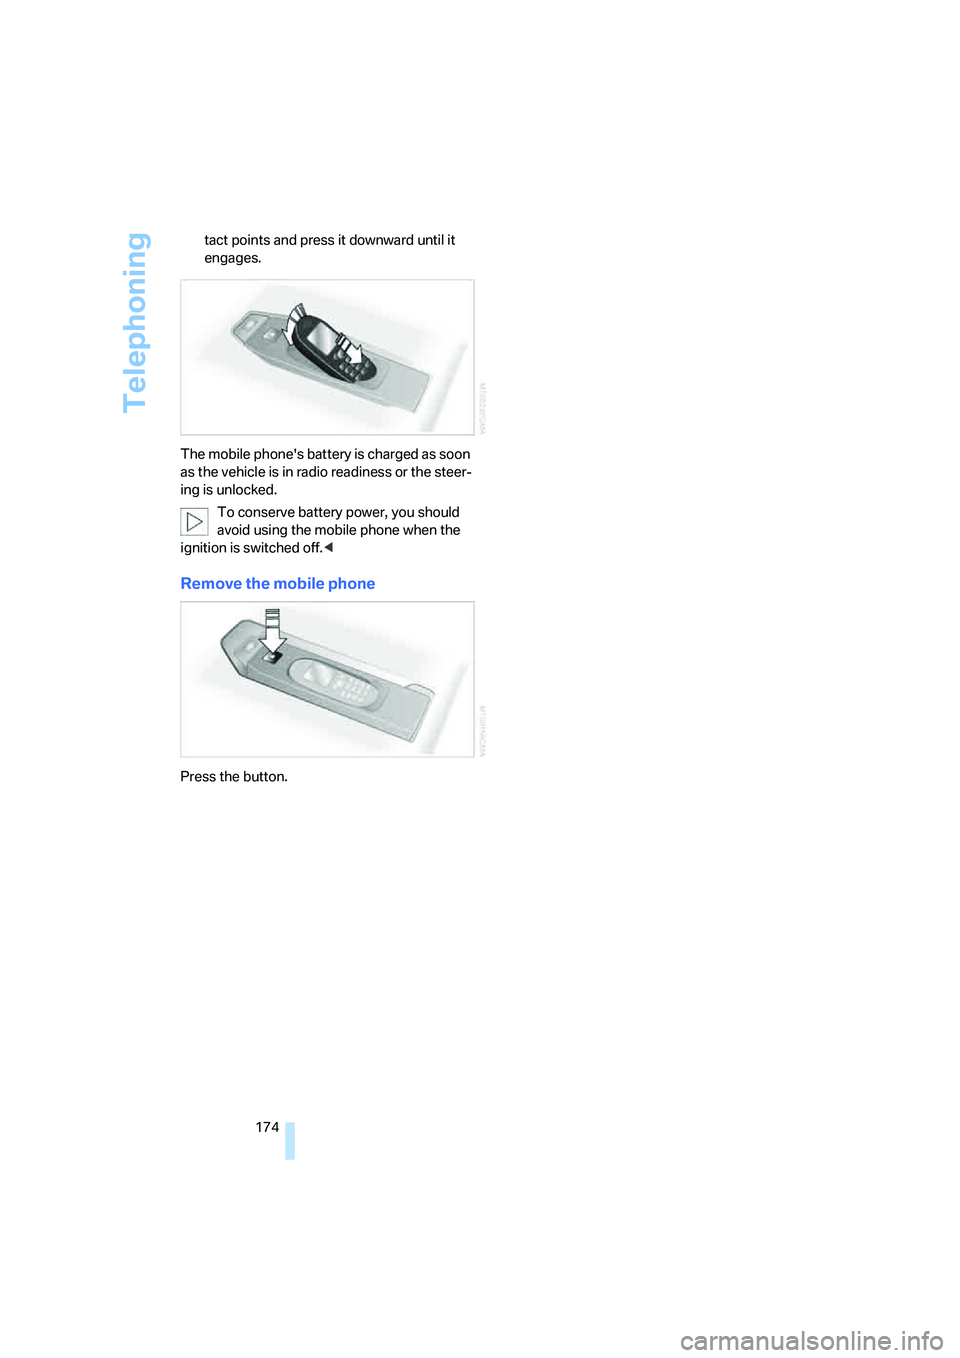
174 tact points and press it downward until it
engages.
The mobile phone's battery is charged as soon
as the vehicle is in radio readiness or the steer-
ing is unlocked.
To conserve battery power, you should
avoid using the mobile phone when the
ignition is switched off.<
Remove the mobile phone
Press the button.
ba8_E9293_US.book Seite 174 Freitag, 5. Mai 2006 1:02 13
Page 201 of 239
Mobility
199Reference
At a glance
Controls
Driving tips
Communications
Navigation
Entertainment
the controls and displays in your vehicle. These
light-emitting diodes, which operate using a
concept similar to that applied in conventional
lasers, are officially designated as Class 1 light-
emitting diodes.
Do not remove the covers or expose the
eyes directly to the unfiltered light source
for several hours at a time, otherwise this could
cause irritation to the retina.<
Xenon lamps
These bulbs have a very long service life and are
highly unlikely to fail. If a xenon lamp fails never-
theless, switch on the fog lamps and continue
the journey with great care, provided that local
legislation does not prohibit this.
Have any work on the xenon lamp system,
including bulb replacements, performed
only by a BMW center or a workshop that works
according to BMW repair procedures with cor-
respondingly trained personnel. Otherwise, if
such work is carried out improperly, the high
voltage in the system presents the danger of
fatal injuries.<
Access to the lamps
1.Switch off the lamps and take the remote
control out of the ignition lock.
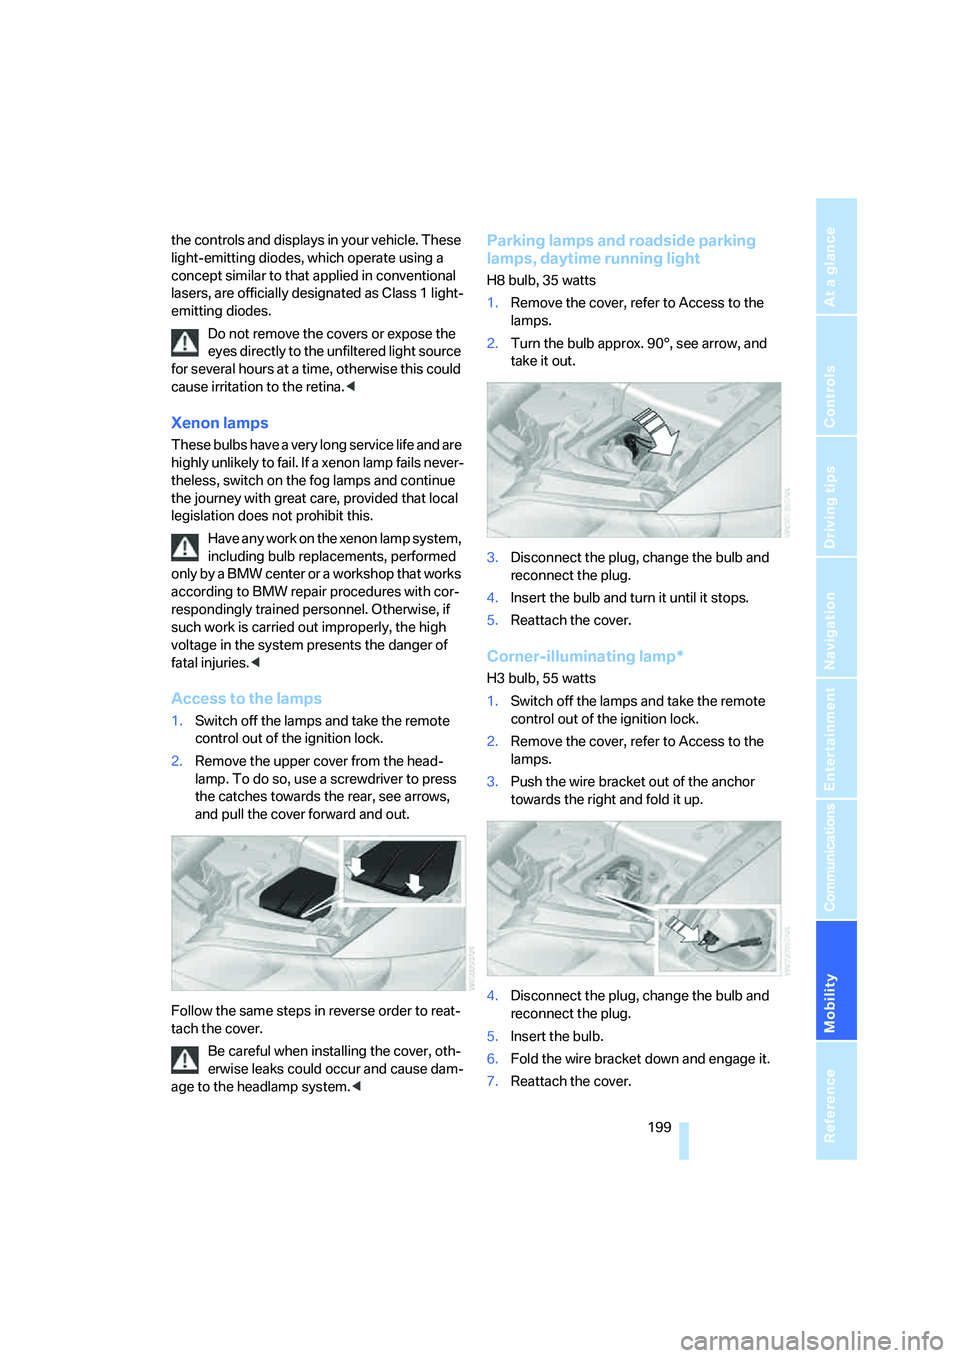
2.Remove the upper cover from the head-
lamp. To do so, use a screwdriver to press
the catches towards the rear, see arrows,
and pull the cover forward and out.
Follow the same steps in reverse order to reat-
tach the cover.
Be careful when installing the cover, oth-
erwise leaks could occur and cause dam-
age to the headlamp system.<
Parking lamps and roadside parking
lamps, daytime running light
H8 bulb, 35 watts
1.Remove the cover, refer to Access to the
lamps.
2.Turn the bulb approx. 90°, see arrow, and
take it out.
3.Disconnect the plug, change the bulb and
reconnect the plug.
4.Insert the bulb and turn it until it stops.
5.Reattach the cover.
Corner-illuminating lamp*
H3 bulb, 55 watts
1.Switch off the lamps and take the remote
control out of the ignition lock.
2.Remove the cover, refer to Access to the
lamps.
3.Push the wire bracket out of the anchor
towards the right and fold it up.
4.Disconnect the plug, change the bulb and
reconnect the plug.
5.Insert the bulb.
6.Fold the wire bracket down and engage it.
7.Reattach the cover.
ba8_E9293_US.book Seite 199 Freitag, 5. Mai 2006 1:02 13
Page 207 of 239
Mobility
205Reference
At a glance
Controls
Driving tips
Communications
Navigation
Entertainment
Your BMW has a special nut as body ground
or negative pole.
5.Attach the second terminal clamp of the
minus/– jumper cable to the negative termi-
nal of the battery or to the engine or body
ground of the vehicle to be started.
Starting the engine
1.Start the engine of the donor vehicle and
allow it to run for a few minutes at slightly
increased idle speed.
2.Start the engine on the other vehicle in the
usual way.
If the first start attempt is not successful,
wait a few minutes before another attempt
in order to allow the discharged battery to
recharge.
3.Let the engines run for a few minutes.
4.Disconnect the jumper cables by reversing
the above connecting sequence.
If necessary, have the battery checked and
recharged.
Never use spray fluids to start the
engine.<
Tow-starting, towing away
Observe the applicable laws and regula-
tions for tow-starting and towing vehi-
cles.<
Do not transport any passengers other
than the driver in a vehicle that is being
towed.<
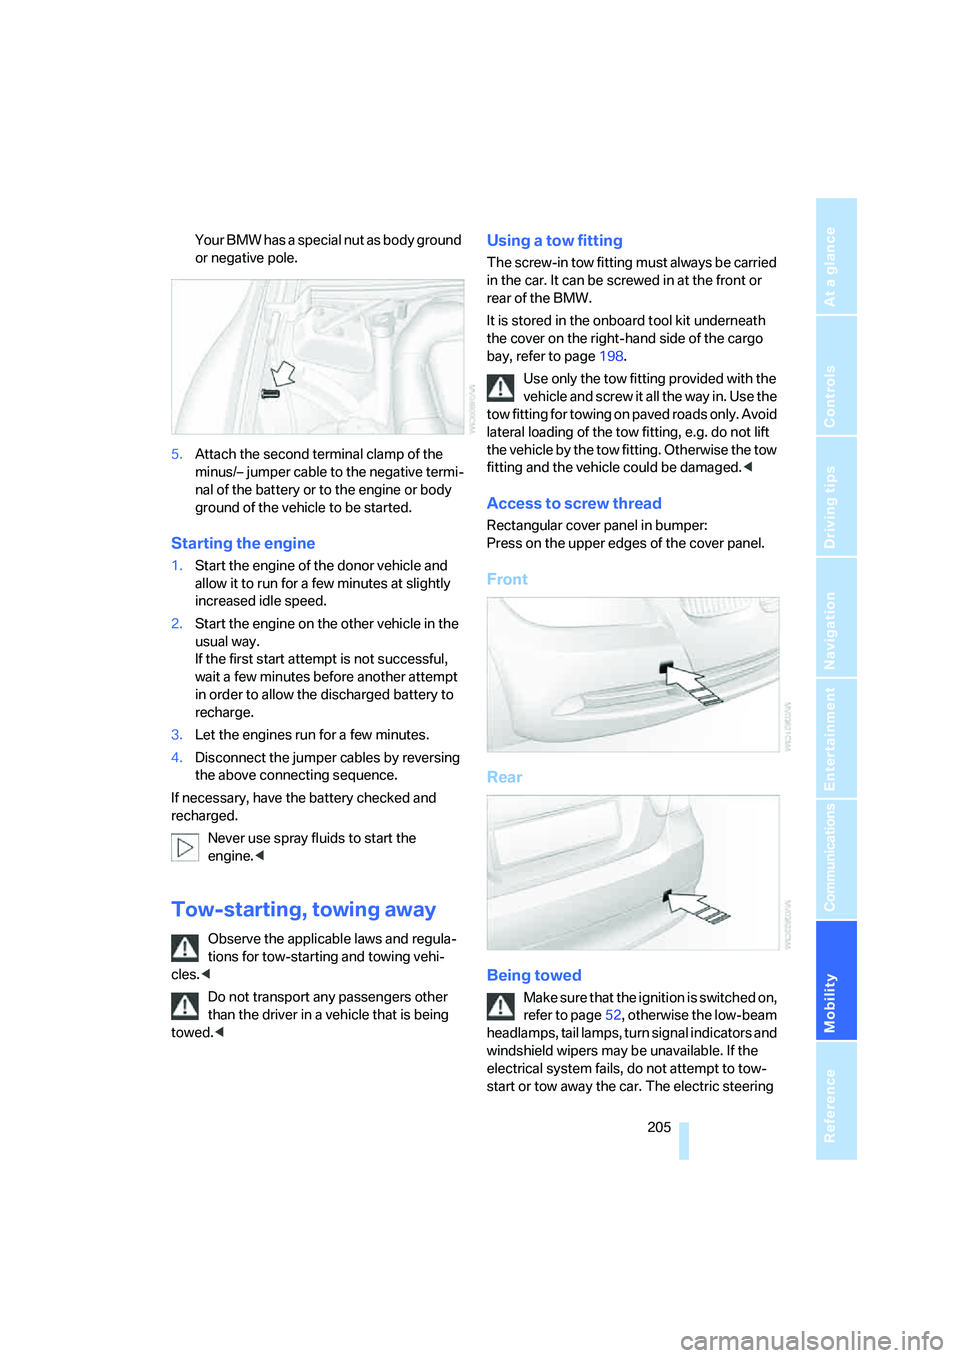
Using a tow fitting
The screw-in tow fitting must always be carried
in the car. It can be screwed in at the front or
rear of the BMW.
It is stored in the onboard tool kit underneath
the cover on the right-hand side of the cargo
bay, refer to page198.
Use only the tow fitting provided with the
vehicle and screw it all the way in. Use the
tow fitting for towing on paved roads only. Avoid
lateral loading of the tow fitting, e.g. do not lift
the vehicle by the tow fitting. Otherwise the tow
fitting and the vehicle could be damaged.<
Access to screw thread
Rectangular cover panel in bumper:
Press on the upper edges of the cover panel.
Front
Rear
Being towed
Make sure that the ignition is switched on,
refer to page52, otherwise the low-beam
headlamps, tail lamps, turn signal indicators and
windshield wipers may be unavailable. If the
electrical system fails, do not attempt to tow-
start or tow away the car. The electric steering
ba8_E9293_US.book Seite 205 Freitag, 5. Mai 2006 1:02 13
Page 208 of 239
Giving and receiving assistance
206 wheel lock cannot be disengaged and the car is
not steerable. Jump starting, refer to page204.
Power steering assistance is not available when
the engine is not running. Thus, braking and
steering will require increased effort.<
Switch on the hazard warning flashers, depend-
ing on local regulations.
Manual transmission
Gearshift lever in idle position.
Automatic transmission
Selector lever in position N.
Changing selector lever positions, refer to
page55.
Do not exceed a towing speed of 45 mph
or 70 km/h and a towing distance of
90 miles/150 km, otherwise the automatic
transmission may be damaged.<
Towing methods
In come countries, it is illegal to tow your vehicle
with a tow bar or tow rope on public highways.
Please familiarize yourself with the relevant
towing regulations for the country in which you
are driving.
With a tow bar
The towing vehicle must not be lighter
than the towed vehicle, otherwise it may
be impossible to maintain control.<
The tow fittings used should be on the same
side on both vehicles. Should it prove impossi-
ble to avoid mounting the tow bar at an angle,
please observe the following:
>Clearance and maneuvering capability will
be sharply limited during cornering.
>The tow bar will generate lateral forces if it is
attached offset.
Attach the tow bar to the tow fittings only,
as attaching it to other parts of the vehicle
could result in damage.<
With a tow rope
When starting off in the towing vehicle, make
sure that the tow rope is taut.
To avoid jerking and the associated
stresses on vehicle components when
towing, always use nylon ropes or nylon straps.
Attach the tow rope to the tow fittings only, as
attaching it to other parts of the vehicle could
result in damage.<
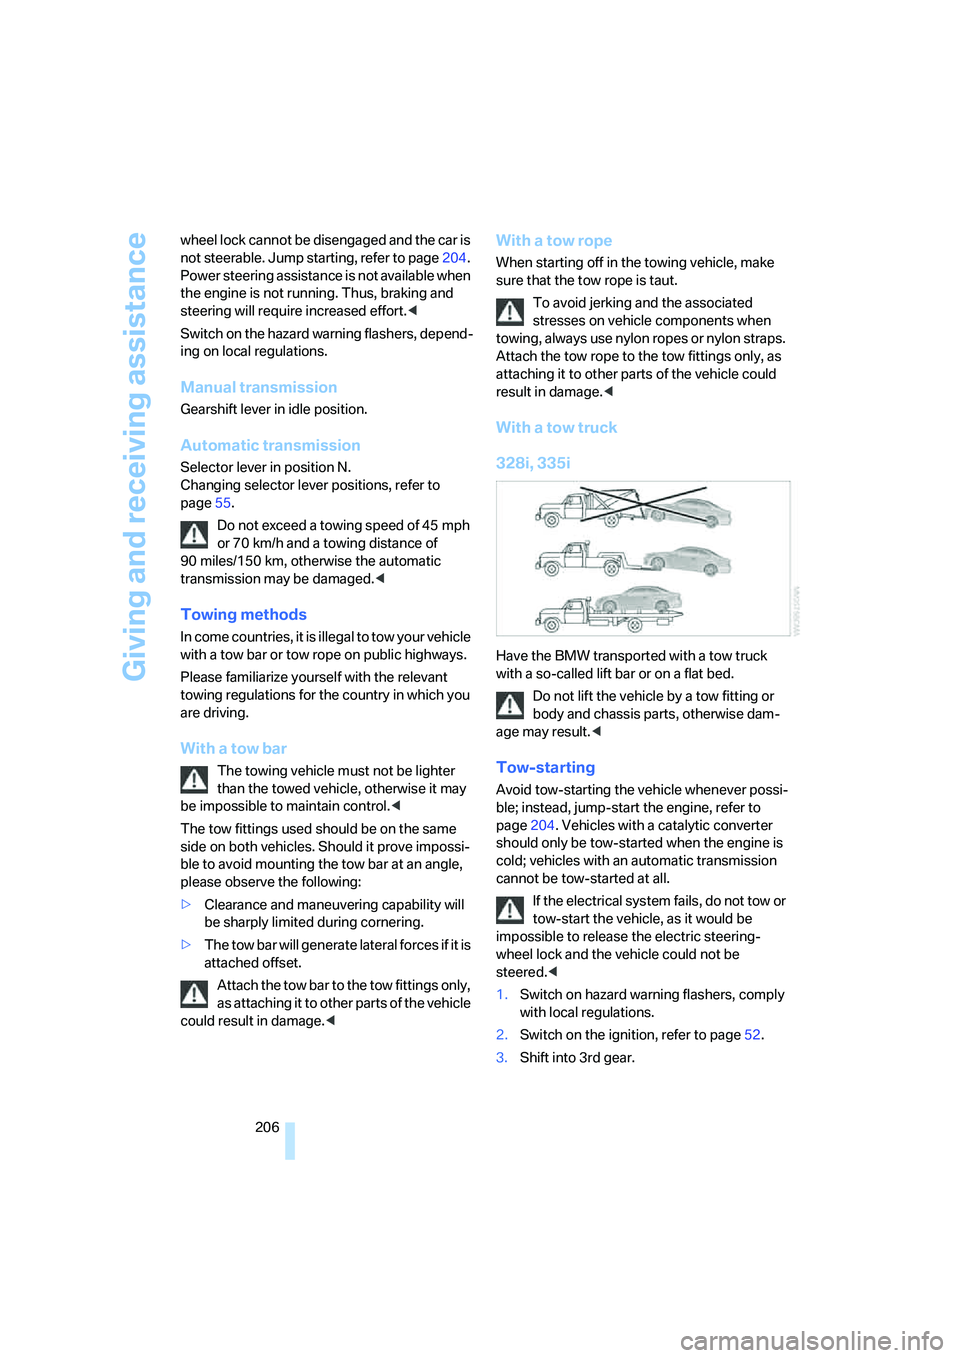
With a tow truck
328i, 335i
Have the BMW transported with a tow truck
with a so-called lift bar or on a flat bed.
Do not lift the vehicle by a tow fitting or
body and chassis parts, otherwise dam-
age may result.<
Tow-starting
Avoid tow-starting the vehicle whenever possi-
ble; instead, jump-start the engine, refer to
page204. Vehicles with a catalytic converter
should only be tow-started when the engine is
cold; vehicles with an automatic transmission
cannot be tow-started at all.
If the electrical system fails, do not tow or
tow-start the vehicle, as it would be
impossible to release the electric steering-
wheel lock and the vehicle could not be
steered.<
1.Switch on hazard warning flashers, comply
with local regulations.
2.Switch on the ignition, refer to page52.
3.Shift into 3rd gear.
ba8_E9293_US.book Seite 206 Freitag, 5. Mai 2006 1:02 13
Page 223 of 239

Reference 221
At a glance
Controls
Driving tips
Communications
Navigation
Entertainment
Mobility
Changes, technical, refer to
For your own safety5
Changing bulbs, refer to
Lamps and bulbs198
Changing the language on the
Control Display78
Changing the measurement
units on the Control
Display70
Changing wheels201
Chassis number, refer to
Engine compartment192
Check Control75
"Check Control
messages"77
Child-restraint fixing system
LATCH51
Child-restraint systems50
Child seats, refer to
Transporting children
safely50
Chrome parts, care, refer to
Caring for your vehicle
brochure
Chrome parts, refer to Caring
for your vehicle brochure
Cigarette lighter, refer to
Lighter106
Cleaning, refer to Caring for
your vehicle brochure
Cleaning headlamps58
– washer fluid58
"Climate"96
Clock66
– 12h/24h mode74
– setting time73
Closing
– from inside32
– from outside29
Clothes hooks105
Cockpit10
Cold start, refer to Starting the
engine53
Combined instrument, refer to
Instrument cluster12
Comfort Access, refer to
Convenient access35
Comfort area, refer to Around
the center console14"Communication"166
"Communication
settings"176
Compact disc, refer to
– CD changer152
– CD player152
Compartment for remote
control, refer to Ignition
lock52
Compass102
Computer67
– displays on Control
Display68
– hour signal74
Computer, refer to iDrive16
"Concert hall" for Tone
control142
Condensation, refer to When
the vehicle is parked
114
Configuring settings, refer to
Personal Profile28
Confirmation signals for
locking/unlocking the
vehicle30
Connecting vacuum cleaner,
refer to Connecting
electrical appliances107
Consumption, refer to
Average consumption68
Consumption display
– average consumption68
"Continue guidance to
destination?"133
Control Center, refer to
iDrive16
Control Display
– brightness79
– changing the language78
– switching on/off21
Control Display, refer to
iDrive16
Controller, refer to iDrive16
Controls and displays10
Control unit, refer to iDrive16
Convenience operation
– windows30Convenient access35
– replacing the battery36
– what to observe before
entering a car wash36
Convenient operation
– glass sunroof30
– glass sunroof with
convenient access36
– windows with convenient
access36
Coolant194
– checking level194
Coolant temperature67
Cooling, maximum97
Cooling fluid, refer to
Coolant194
Cooling system, refer to
Coolant194
Corner-illuminating lamps,
refer to Adaptive Head
Light92
Correct tires189
Courtesy lamps, refer to
Interior lamps93
Cross-hairs in navigation125
Cruise control58
– active60
– malfunction60
Cruising range67
Cup holders105
Curb weight, refer to
Weights212
"Current position"136
Current position
– displaying136
– entering128
– storing
128
"Customer
Relations"170,177
D
Dashboard, refer to
Cockpit10
Dashboard, refer to
Instrument cluster12
Dashboard lighting, refer to
Instrument lighting93
ba8_E9293_US.book Seite 221 Freitag, 5. Mai 2006 1:02 13
Page 226 of 239

Everything from A - Z
224 Filter
– refer to Microfilter/activated-
charcoal filter for automatic
climate control99
Fine wood, refer to Caring for
your vehicle brochure
First aid pouch203
Fixture for remote control,
refer to Ignition lock52
Flashlight, refer to
Rechargeable flashlight104
Flash when locking/
unlocking30
Flat
– Flat Tire Monitor82
– Run-Flat Tires189
– Tire Pressure Monitor
TPM84
Flat tire
– Tire Pressure Monitor84
Flat Tire Monitor FTM82
– indicating a flat tire83
– indicator/warning lamp83
– initializing the system83
– malfunction84
– snow chains83,190
– system limits83
Flat tires, refer to Tire
condition188
Floor mats, carpets, refer to
Caring for your vehicle
brochure
Fluid reservoir, refer to
Washer fluid reservoir58
"FM", waveband140,144
FM, waveband144
Fog lamps93
– indicator lamp13,93
Folding in the mirrors, before
driving into a car wash114
Folding up the floor panel108
Footbrake, refer to Braking
safely113
Footwell lamp, refer to Interior
lamps93
For your own safety5
Front airbags87
"FTM"83FTM, refer to Flat Tire
Monitor82
Fuel182
– average consumption68
– display67
– high-quality brands182
– quality182
– specifications182
– tank contents, refer to
Capacities213
Fuel clock, refer to Fuel
gauge67
Fuel display, refer to Fuel
gauge67
Fuel filler door182
– releasing in the event of
electrical malfunction182
Fuses201
G
Garage door opener, refer to
Integrated universal remote
control101
Gasoline, refer to Required
fuel182
Gasoline display, refer to Fuel
gauge67
Gasoline engine, checking oil
level192
Gear indicator
– automatic transmission with
Steptronic54
Gearshift lever
– automatic transmission with
Steptronic55
– manual transmission54
Gearshifts
– automatic transmission with
Steptronic55
– manual transmission54
General driving notes112Glass sunroof, electric37
– closing after electrical
malfunction38
– convenient operation31
– initializing38
– opening, closing38
– operation with convenient
access36
– pinch protection system38
– power failure38
– raising38
Glove compartment104
– rechargeable flashlight104
GPS navigation, refer to
Navigation system120
Grills95
Gross vehicle weight, refer to
Weights212
H
Handbrake54
– indicator lamp54
Hand lamp, refer to
Rechargeable flashlight104
Hands-free system14
Hazard warning flashers14
HD, refer to Digital radio147
Head airbags87
Headlamp control,
automatic90
Headlamp flasher56
– indicator lamp11,13
Headlamps
– care, refer to Caring for your
vehicle brochure
Head restraints42
– front, removing43
– rear, removing43
– sitting safely40
Heated
– mirrors47
– rear window98
– seats44
Heating
– mirrors47
– rear window98
– residual heat98
– seats44
ba8_E9293_US.book Seite 224 Freitag, 5. Mai 2006 1:02 13