2006 BMW 330CI IDRIVE COUPE lock
[x] Cancel search: lockPage 56 of 239

Driving
54
Handbrake
The handbrake is primarily intended to prevent
the vehicle from rolling while parked; it brakes
the rear wheels.
Indicator lamp
The indicator lamp is lit, and when you
drive off an acoustic signal sounds in
addition. The handbrake is still applied.
Indicator lamp for Canadian models.
Applying
The lever locks in position automatically.
Releasing
Pull slightly upwards, press the button and
lower the lever.
In exceptional cases, if the handbrake has
to be used to slow or stop the car, do not
pull the lever up too hard. In doing so, continu-
ously press the button of the handbrake lever.
Otherwise, too violent an application of the
handbrake can lock up the rear wheels and
cause the rear of the car to swerve.<
To prevent corrosion and one-sided brak-
ing action, occasionally apply the hand-
brake lightly when the vehicle is slowly coming
to a stop if the traffic conditions are suitable.
The brake lamps do not light up when the hand-
brake is applied.<
Manual transmission
When shifting into 5th or 6th gear, press
the gearshift lever to the right. Otherwise
the engine could be damaged if you inadvert-
ently shift into 3rd or 4th gear.<
Reverse gear
Select only when the vehicle is stationary.
When the gearshift lever is pressed to the left, a
slight resistance has to be overcome.
Automatic transmission with
Steptronic*
In addition to fully automatic operation, you can
also shift manually with the Steptronic, refer to
page55.
Vehicle parking
To prevent the vehicle from rolling,
always select position P and apply the
handbrake before leaving the vehicle with the
engine running.<
Disengaging the remote control
In order to remove the remote control from the
ignition lock, you must first move the selector
lever to position P and switch off the engine:
interlock.
Selector lever positions
P R N D M/S + –
ba8_E9293_US.book Seite 54 Freitag, 5. Mai 2006 1:02 13
Page 57 of 239

Controls
55Reference
At a glance
Driving tips
Communications
Navigation
Entertainment
Mobility
Displays in the instrument cluster
P R N D DS M1 to M6
The selector lever position is displayed, or the
current gear in the manual mode.
Changing selector lever positions
>With the ignition switched on or the engine
running, the selector lever can be moved
out of position P: interlock.
>Before moving the lever away from P or N
with the vehicle stationary, first depress the
brake; otherwise the selector lever will
refuse to move: shiftlock.
To prevent the vehicle from creeping
after you select a driving position,
depress the brake until you are ready to
start.<
A lock prevents you from inadvertently engag-
ing selector lever positions R and P. To cancel
the lock, press the button on the front of the
selector lever, see arrow.
P Park
Select only when the vehicle is stationary. The
rear wheels are locked.
R Reverse
Select only when the vehicle is stationary.
N Neutral, idle
You can select this in a car wash, for example.
The vehicle can roll.
D Drive, automatic position
Position for normal vehicle operation. All for-
ward gears are selected automatically.
Under normal operating conditions, fuel con-
sumption is lowest when you are driving in posi-
tion D.
Kick-down
Kick-down enables you to achieve maximum
performance.
Press the accelerator pedal beyond the full-
throttle resistance point.
Manual operation and Sport program
M/S
Move selector lever from position D toward the
left into the M/S shifting slot:
The sport program is activated and DS appears
in the instrument cluster. This position is rec-
ommended for a performance-oriented driving
style.
When you press the selector lever forwards or
backwards, the manual mode is activated and
Steptronic changes gear. The instrument clus-
ter shows M1 through M6.
Upshifts and downshifts are executed only
when they will result in a plausible combination
of engine and vehicle speed; thus, for example,
a downshift that would cause the engine to
overrev will not be executed by the system. The
ba8_E9293_US.book Seite 55 Freitag, 5. Mai 2006 1:02 13
Page 58 of 239

Driving
56 gear selected appears briefly in the instrument
cluster, followed by the gear actually in use.
To use the automatic function again, move the
selector lever to the right into position D.
Shifting gears via shift paddles* on the
steering wheel
>To shift up: pull one of the shift paddles.
>To shift down: press one of the shift pad-
dles.
D Drive, automatic position
With the selector lever in position D, you can
shift gears by pulling or pressing a shift paddle.
The gear currently engaged appears in the
instrument cluster; manual shifting mode is
temporarily activated. If you do not accelerate
or shift gears within approx. 12 seconds, the
transmission switches back to automatic mode.
The system also switches back to automatic
mode when you shift to another gear slot.
Manual operation and Sport program
M/S
In the Sport program, pulling or pressing a shift
paddle shifts gears and switches the transmis-
sion to permanent manual mode. The gear cur-
rently engaged appears in the instrument clus-
ter. The transmission switches back to
automatic mode when you shift to another gear
slot.
Overriding selector lever lock
Should the selector lever refuse to move out of
position P although the button on the selector
lever is pressed, the selector lever lock can be
overridden:1.Unclip the sleeve of the selector lever.
2.Pull the sleeve up over the selector lever
until the sleeve is inside out.
3.Using the screwdriver from the onboard
tool kit, refer to page198, press the red
lever while moving the selector lever to the
desired position.
Turn signals/
headlamp flasher
1High beams
2Headlamp flasher
3Turn signals
Using turn signals
Press the lever beyond the resistance point.
To turn off manually, press the lever to the
resistance point.
Unusually rapid flashing of the indicator
lamp indicates that a turn signal indicator
has failed.<
Indicating a turn briefly
Press the lever as far as the resistance point for
as long as you wish to indicate a turn.
ba8_E9293_US.book Seite 56 Freitag, 5. Mai 2006 1:02 13
Page 68 of 239

Everything under control
66
Everything under control
Odometer, outside
temperature display, clock
1Knob in the instrument cluster
2Outside temperature display and clock
3Odometer and trip odometer
Knob in the instrument cluster
>To reset the trip odometer while the ignition
is switched on
>To display the time, outside temperature
and odometer briefly while the ignition is
switched off
Units of measure
To select the respective units of measure, miles
or km for the odometer as well as 7 or 6 for
the outside temperature, refer to page70.
The setting is stored for the remote control cur-
rently in use.
Time, outside temperature display
Setting the time, refer to page73.
Outside temperature warning
When the displayed temperature sinks to
approx. +377/+36, a signal sounds and a
warning lamp lights up. There is an increased
risk of black ice.
Black ice can also form at temperatures
above +377/+36. You should there-
fore drive carefully on bridges and shaded roads, for example, otherwise there is an
increased risk of an accident.<
Odometer and trip odometer
Resetting trip odometer:
With the ignition switched on, press button1 in
the instrument cluster.
When the vehicle is parked
If you still want to view the time, outside tem-
perature and odometer reading briefly after the
remote control has been taken out of the igni-
tion lock:
Press button 1 in the instrument cluster.
Tachometer
Never force the engine speed up into the red
warning field, see arrow. In this range, the fuel
supply is interrupted to protect the engine.
ba8_E9293_US.book Seite 66 Freitag, 5. Mai 2006 1:02 13
Page 75 of 239

Controls
73Reference
At a glance
Driving tips
Communications
Navigation
Entertainment
Mobility
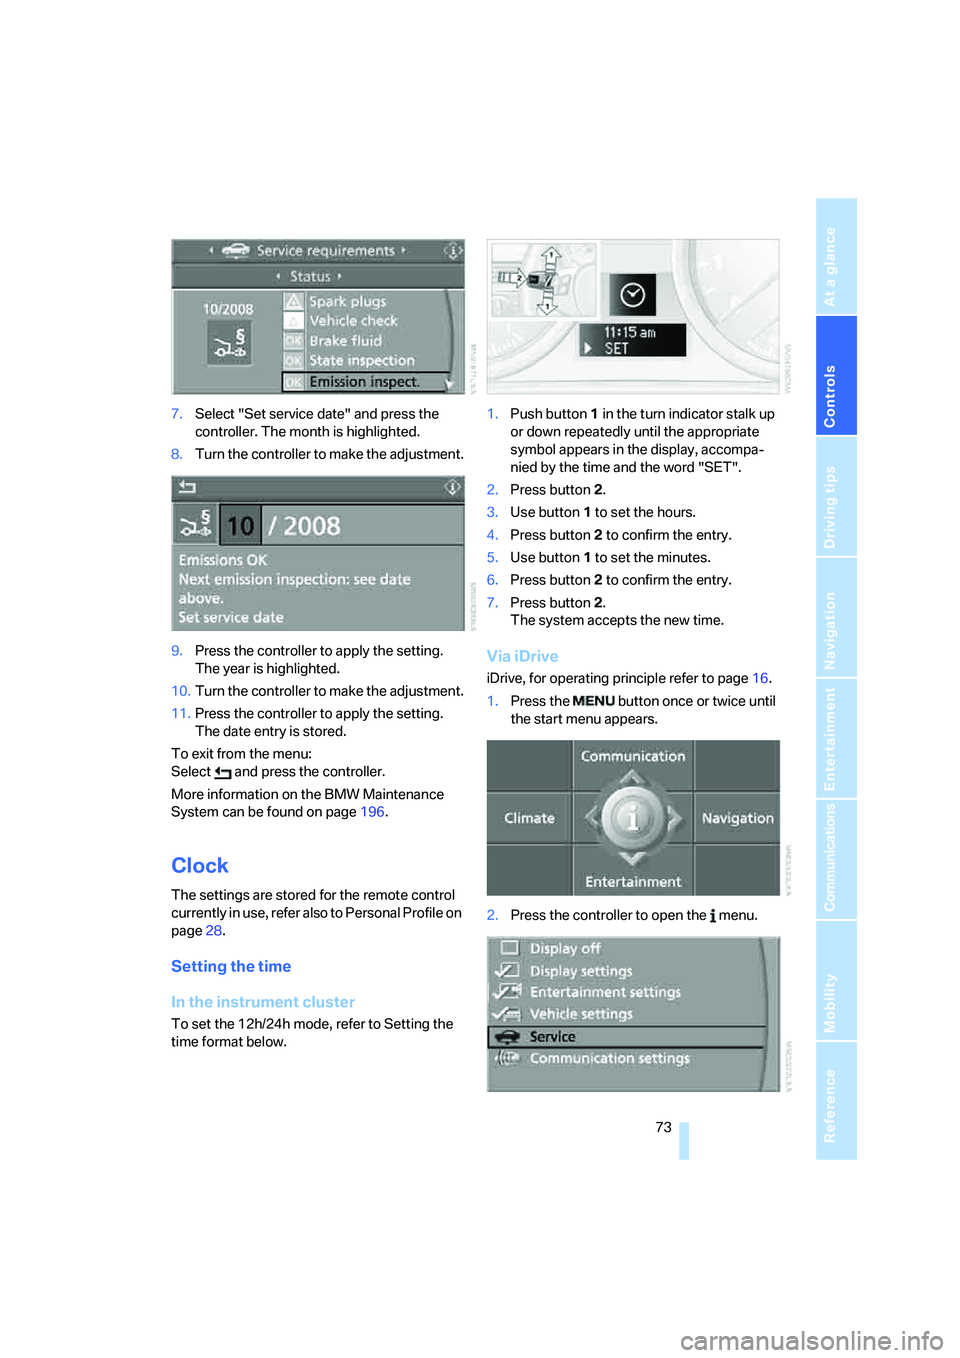
7.Select "Set service date" and press the
controller. The month is highlighted.
8.Turn the controller to make the adjustment.
9.Press the controller to apply the setting.
The year is highlighted.
10.Turn the controller to make the adjustment.
11.Press the controller to apply the setting.
The date entry is stored.
To exit from the menu:
Select and press the controller.
More information on the BMW Maintenance
System can be found on page196.
Clock
The settings are stored for the remote control
currently in use, refer also to Personal Profile on
page28.
Setting the time
In the instrument cluster
To set the 12h/24h mode, refer to Setting the
time format below.1.Push button 1 in the turn indicator stalk up
or down repeatedly until the appropriate
symbol appears in the display, accompa-
nied by the time and the word "SET".
2.Press button 2.
3.Use button 1 to set the hours.
4.Press button 2 to confirm the entry.
5.Use button 1 to set the minutes.
6.Press button 2 to confirm the entry.
7.Press button 2.
The system accepts the new time.
Via iDrive
iDrive, for operating principle refer to page16.
1.Press the button once or twice until
the start menu appears.
2.Press the controller to open the menu.
ba8_E9293_US.book Seite 73 Freitag, 5. Mai 2006 1:02 13
Page 83 of 239

Controls
81Reference
At a glance
Driving tips
Communications
Navigation
Entertainment
Mobility
5.Select "PDC display on" and press the con-
troller.
The PDC screen is activated.
The display is shown on the Control Display as
soon as PDC is activated.
System limitations
Even with PDC, final responsibility for
estimating the distance between the
vehicle and any obstructions always remains
with the driver. Even when sensors are pro-
vided, there is a blind spot in which objects can
no longer be detected. The system is also sub-
ject to the physical limits that apply to all forms
of ultrasonic measurement, such as those
encountered with trailer towbars and couplings,
thin and wedge-shaped objects, etc. Low
objects already indicated, such as a curb, may
enter the sensors' dead areas before a continu-
ous audible signal is given. Higher, protruding
objects, such as wall ledges, may not be detect-
able. Loud sound sources outside or inside the
car can drown out the PDC signal.<
Driving stability control
systems
Your BMW has a number of systems that help
to maintain the vehicle's stability even in
adverse driving conditions.
ABS Antilock Brake System
ABS prevents locking of the wheels during
braking. Safe steering response is maintained
even during full braking. Active safety is thus
increased.
The ABS is operational every time you start the
engine. Braking safely, refer to page113.
Electronic brake-force distribution
The system controls the brake pressure in the
rear wheels to ensure stable braking behavior.
DBC Dynamic Brake Control
When you apply the brakes rapidly, this system
automatically produces the maximum braking force boost and thus helps to achieve the short-
est possible braking distance during full brak-
ing. This system exploits all of the benefits pro-
vided by ABS.
Do not reduce the pressure on the brake for the
duration of the brake application. If the brake is
released, DBC will be switched off.
DSC Dynamic Stability Control
DSC prevents the driving wheels from losing
traction when you pull away from rest or accel-
erate. DSC also recognizes unstable driving
conditions, for example if the rear of the car is
about to swerve or if momentum is acting at an
angle past the front wheels. In these cases,
DSC helps the vehicle maintain a safe course
within physical limits by reducing engine output
and through braking actions at the individual
wheels.
The laws of physics cannot be repealed,
even with DSC. An appropriate driving
style always remains the responsibility of the
driver. Therefore, do not reduce the additional
safety margin again by taking risks.<
Deactivating DSC
Press the button for at least 3 seconds; the indi-
cator lamps for DSC in the instrument cluster
light up. Dynamic Traction Control DTC and
DSC have been simultaneously deactivated.
Stabilizing and drive-output promoting actions
are no longer executed.
To increase vehicle stability, activate DSC again
as soon as possible.
ba8_E9293_US.book Seite 81 Freitag, 5. Mai 2006 1:02 13
Page 91 of 239

Controls
89Reference
At a glance
Driving tips
Communications
Navigation
Entertainment
Mobility
dance with whether and how the front passen-
ger seat is occupied. The indicator lamp shows
whether the front passenger airbags are acti-
vated or deactivated.
>The indicator lamp comes on as intended
when a child in a specially designated child-
restraint system is detected on the seat.
The front and side airbags for the front pas-
senger are not activated.
>The indicator lamp does not come on as
long as a person of sufficient size and in a
correct sitting position is detected on the
seat.
The front and side airbags for the front pas-
senger are activated.
>The indicator lamp does not come on if the
seat is empty.
The front and side airbags for the front pas-
senger are not activated.
Operational readiness of airbag system
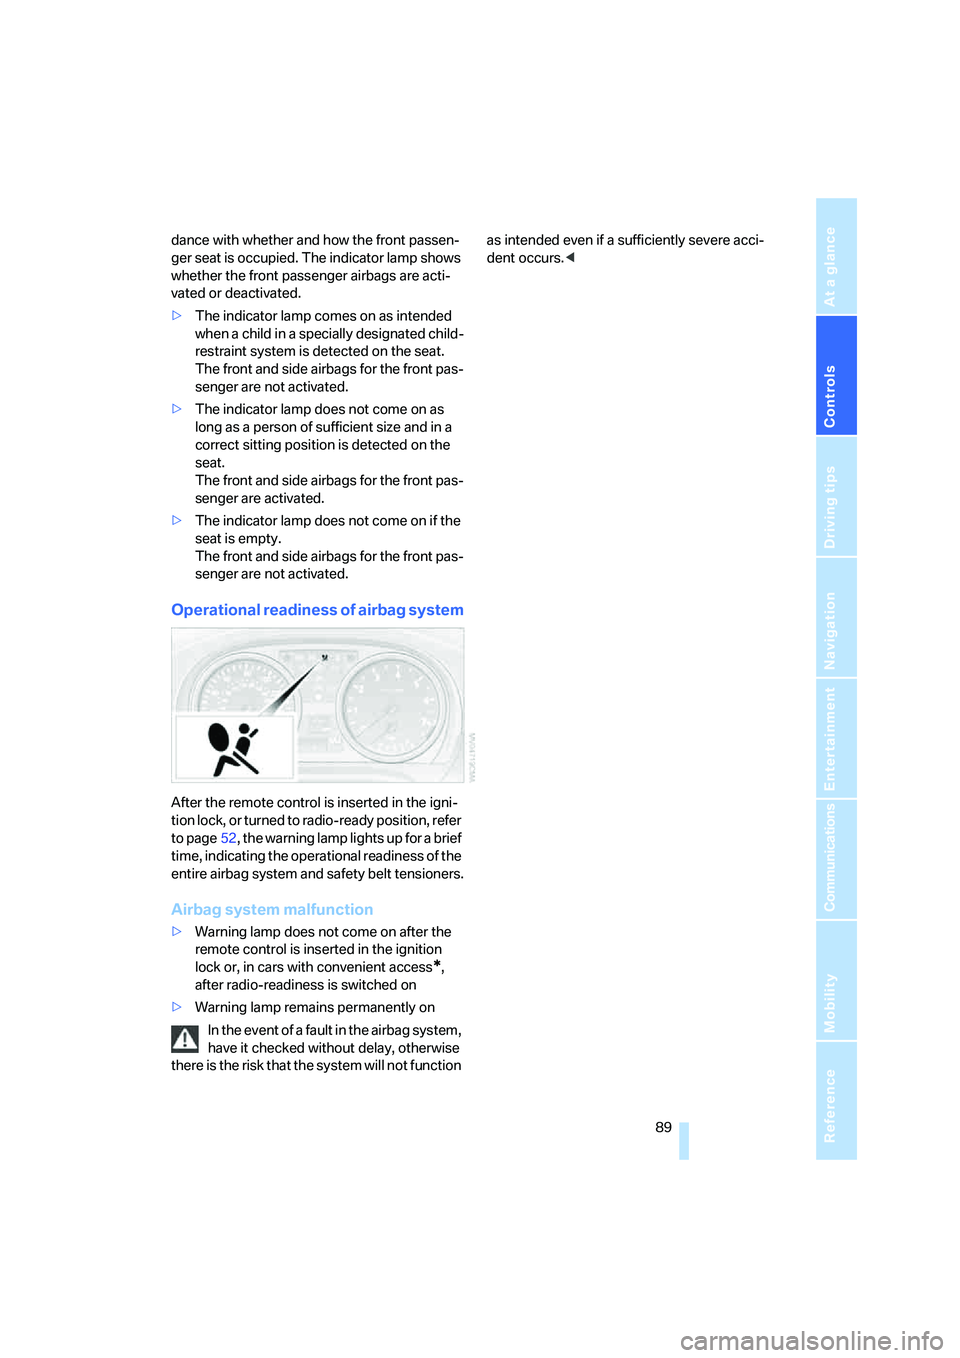
After the remote control is inserted in the igni-
tion lock, or turned to radio-ready position, refer
to page52, the warning lamp lights up for a brief
time, indicating the operational readiness of the
entire airbag system and safety belt tensioners.
Airbag system malfunction
>Warning lamp does not come on after the
remote control is inserted in the ignition
lock or, in cars with convenient access
*,
after radio-readiness is switched on
>Warning lamp remains permanently on
In the event of a fault in the airbag system,
have it checked without delay, otherwise
there is the risk that the system will not function as intended even if a sufficiently severe acci-
dent occurs.<
ba8_E9293_US.book Seite 89 Freitag, 5. Mai 2006 1:02 13
Page 93 of 239

Controls
91Reference
At a glance
Driving tips
Communications
Navigation
Entertainment
Mobility
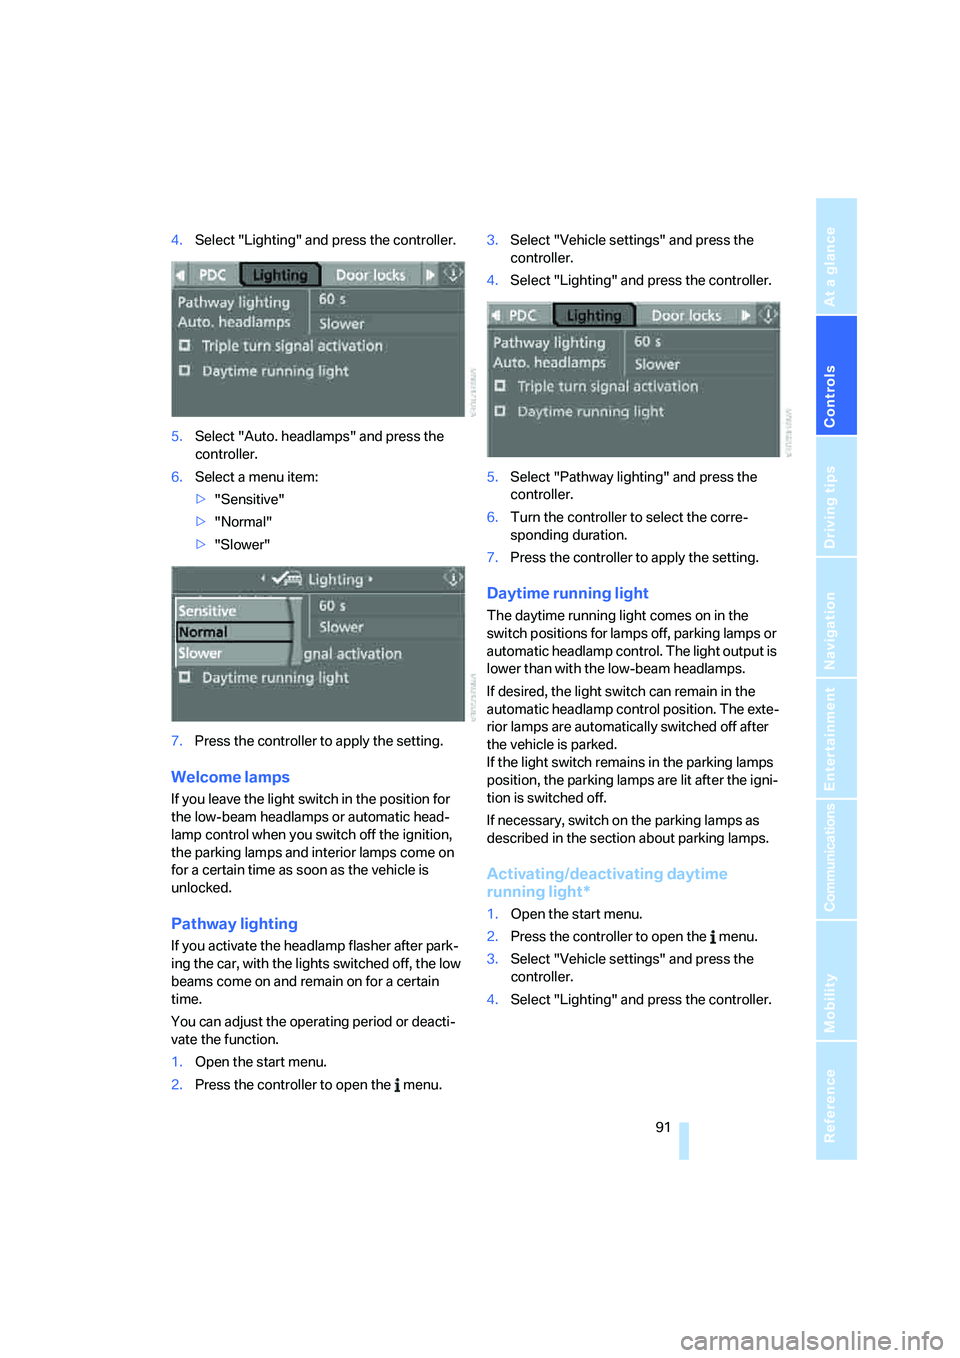
4.Select "Lighting" and press the controller.
5.Select "Auto. headlamps" and press the
controller.
6.Select a menu item:
>"Sensitive"
>"Normal"
>"Slower"
7.Press the controller to apply the setting.
Welcome lamps
If you leave the light switch in the position for
the low-beam headlamps or automatic head-
lamp control when you switch off the ignition,
the parking lamps and interior lamps come on
for a certain time as soon as the vehicle is
unlocked.
Pathway lighting
If you activate the headlamp flasher after park-
ing the car, with the lights switched off, the low
beams come on and remain on for a certain
time.
You can adjust the operating period or deacti-
vate the function.
1.Open the start menu.
2.Press the controller to open the menu.3.Select "Vehicle settings" and press the
controller.
4.Select "Lighting" and press the controller.
5.Select "Pathway lighting" and press the
controller.
6.Turn the controller to select the corre-
sponding duration.
7.Press the controller to apply the setting.
Daytime running light
The daytime running light comes on in the
switch positions for lamps off, parking lamps or
automatic headlamp control. The light output is
lower than with the low-beam headlamps.
If desired, the light switch can remain in the
automatic headlamp control position. The exte-
rior lamps are automatically switched off after
the vehicle is parked.
If the light switch remains in the parking lamps
position, the parking lamps are lit after the igni-
tion is switched off.
If necessary, switch on the parking lamps as
described in the section about parking lamps.
Activating/deactivating daytime
running light*
1.Open the start menu.
2.Press the controller to open the menu.
3.Select "Vehicle settings" and press the
controller.
4.Select "Lighting" and press the controller.
ba8_E9293_US.book Seite 91 Freitag, 5. Mai 2006 1:02 13