2006 BMW 330CI IDRIVE COUPE change time
[x] Cancel search: change timePage 21 of 239
At a glance
19Reference
Controls
Driving tips
Communications
Navigation
Entertainment
Mobility
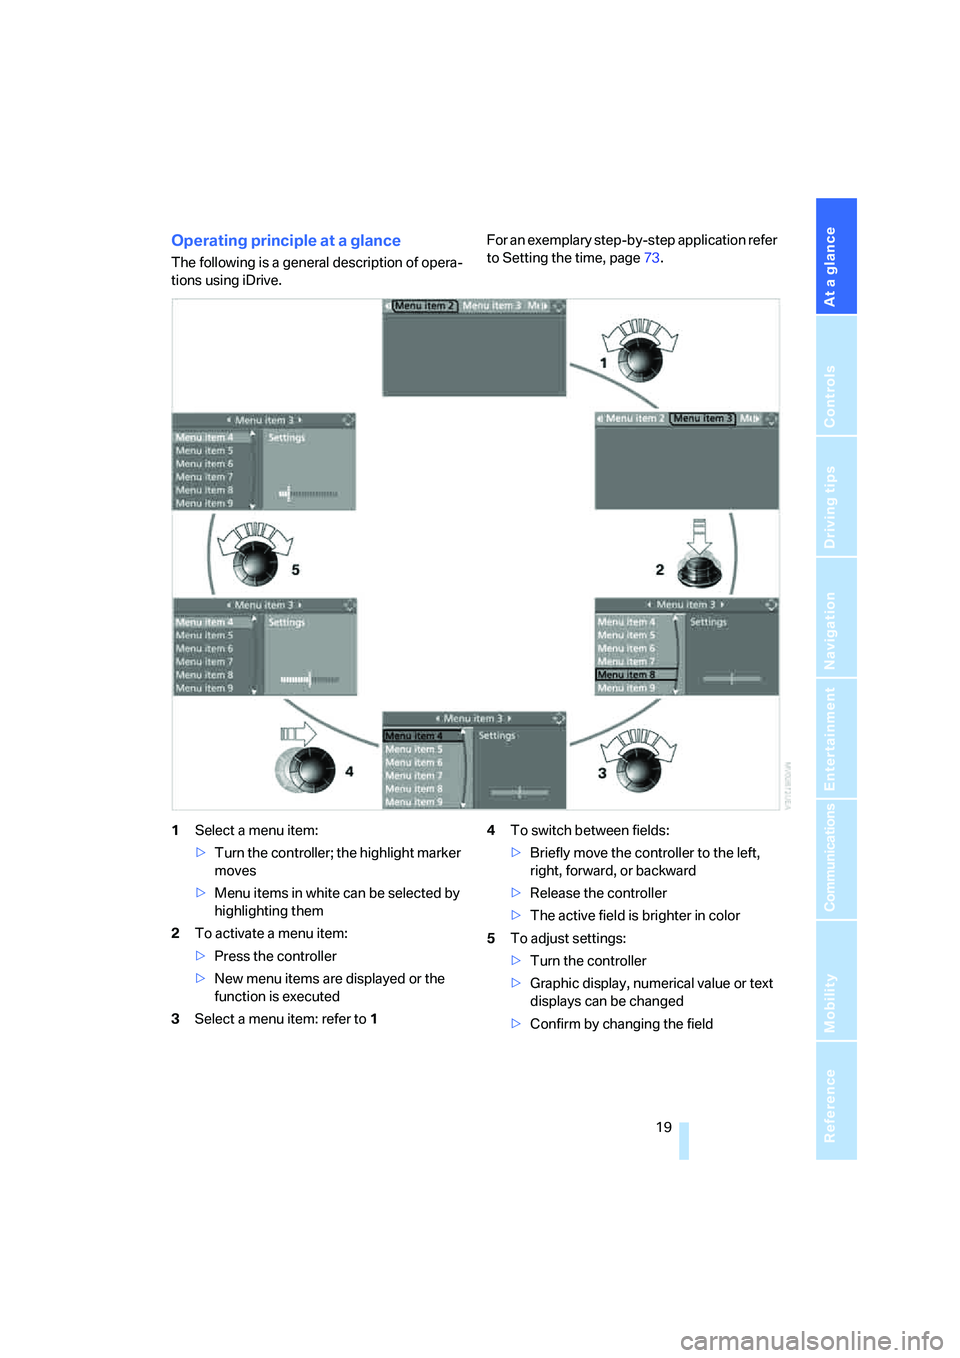
Operating principle at a glance
The following is a general description of opera-
tions using iDrive.For an exemplary step-by-step application refer
to Setting the time, page73.
1Select a menu item:
>Turn the controller; the highlight marker
moves
>Menu items in white can be selected by
highlighting them
2To activate a menu item:
>Press the controller
>New menu items are displayed or the
function is executed
3Select a menu item: refer to14To switch between fields:
>Briefly move the controller to the left,
right, forward, or backward
>Release the controller
>The active field is brighter in color
5To adjust settings:
>Turn the controller
>Graphic display, numerical value or text
displays can be changed
>Confirm by changing the field
ba8_E9293_US.book Seite 19 Freitag, 5. Mai 2006 1:02 13
Page 22 of 239
iDrive
20
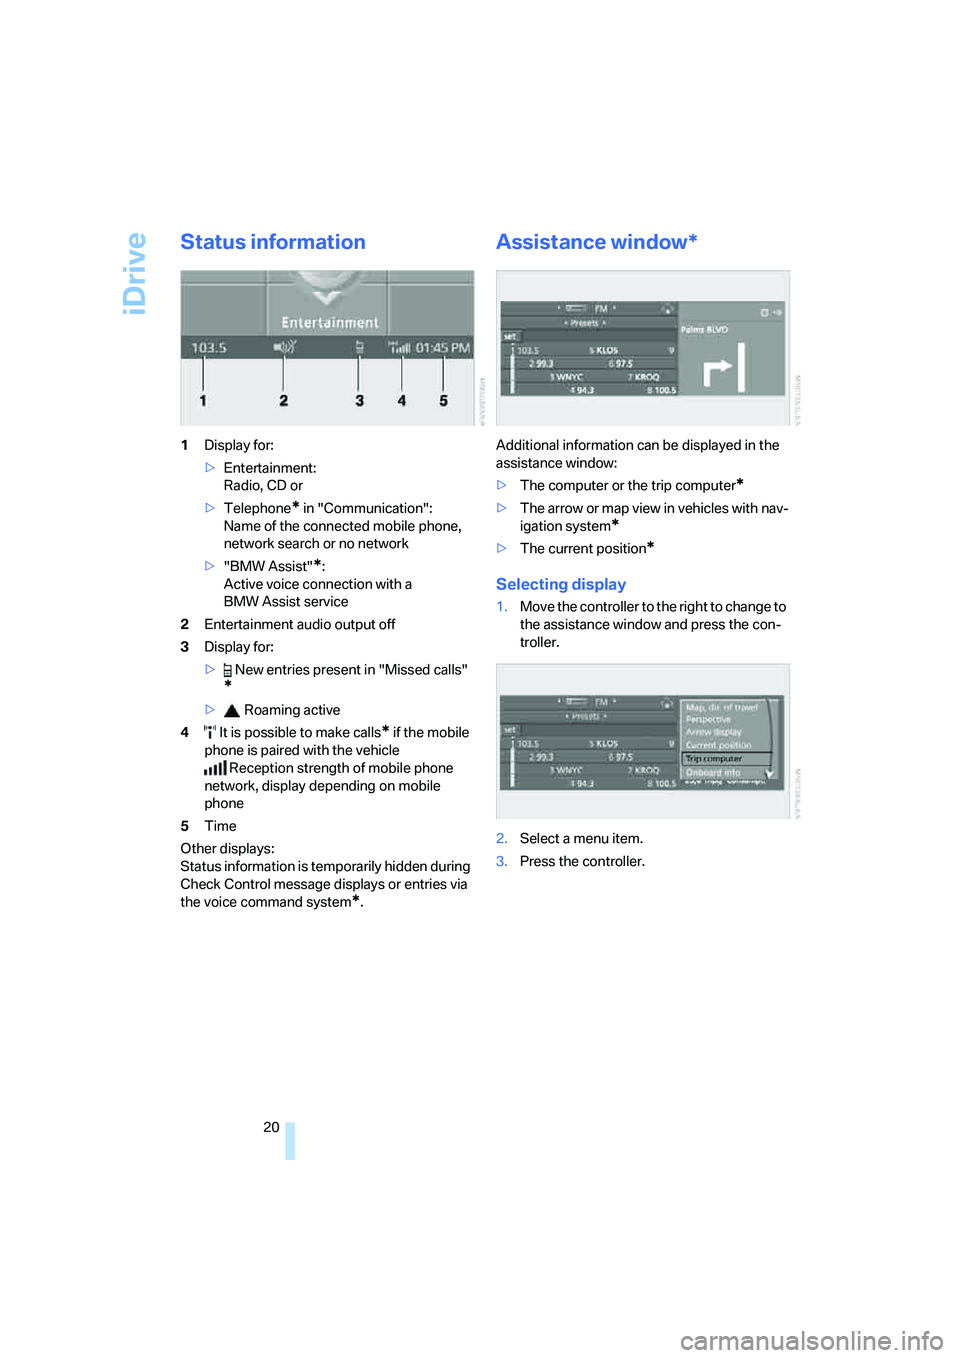
Status information
1Display for:
>Entertainment:
Radio, CD or
>Telephone
* in "Communication":
Name of the connected mobile phone,
network search or no network
>"BMW Assist"
*:
Active voice connection with a
BMW Assist service
2Entertainment audio output off
3Display for:
> New entries present in "Missed calls"
*
> Roaming active
4 It is possible to make calls
* if the mobile
phone is paired with the vehicle
Reception strength of mobile phone
network, display depending on mobile
phone
5Time
Other displays:
Status information is temporarily hidden during
Check Control message displays or entries via
the voice command system
*.
Assistance window*
Additional information can be displayed in the
assistance window:
>The computer or the trip computer
*
>The arrow or map view in vehicles with nav-
igation system
*
>The current position*
Selecting display
1.Move the controller to the right to change to
the assistance window and press the con-
troller.
2.Select a menu item.
3.Press the controller.
ba8_E9293_US.book Seite 20 Freitag, 5. Mai 2006 1:02 13
Page 30 of 239

Opening and closing
28
Opening and closing
Keys/remote controls
Each remote control contains a rechargeable
battery that is automatically recharged when it
is in the ignition lock while the car is being
driven. Use each remote control at least twice a
year for longer road trips in order to maintain the
batteries' charge status. In cars with convenient
access
*, the remote control contains a replace-
able battery, refer to page36.
The settings called up and implemented when
the car is unlocked depend on which remote
control is used to unlock the car, refer to Per-
sonal Profile, page28.
In addition, information about service require-
ments is stored in the remote control, refer to
Service data in the remote control, page196.
Integrated key
Press button1 to release the key.
The integrated key fits the following locks:
>Glove compartment, refer to page104
>Driver's door, refer to page31
>Luggage compartment lid, refer to page33
New remote controls
Your BMW center can supply new remote con-
trols with integrated keys as additional units or
as replacements in the event of loss.
Personal Profile
The concept
You can set many of your BMW's functions to
suit your personal needs and preferences.
Without any action on your part, Personal Pro-
file ensures that most of these settings are
stored for the remote control currently in use.
When you unlock the car, the remote control
used for the purpose is recognized and the set-
tings stored for it are called up and imple-
mented.
This means that your personal settings are
active when you return to your BMW, even if the
car was used in the meantime by someone else
with a remote control of their own and the set-
tings were changed accordingly. The individual
settings are stored for up to three remote con-
trols.
Personal Profile settings
For more information on specific settings, refer
to the specified pages.
>Response of the central locking system
when the car is unlocked, refer to page29
>Automatic locking of the vehicle, refer to
page32
>Automatic call-up
* of the driver's seat and
exterior-mirror positions after unlocking,
refer to page44
>Functions assigned to the programmable
buttons
* on the steering wheel, refer to
page48
>12h/24h mode of the clock, refer to page74
>Date format, refer to page75
ba8_E9293_US.book Seite 28 Freitag, 5. Mai 2006 1:02 13
Page 36 of 239

Opening and closing
34
Closing
The handle recesses on the interior trim of the
luggage compartment lid make it easier to pull
down.
Make sure that the closing path of the
luggage compartment lid is clear, other-
wise injuries may result.<
Alarm system*
The concept
The vehicle alarm system responds:
>When a door, the hood or the luggage com-
partment lid is opened
>To movements inside the vehicle: Interior
motion sensor, refer to page35
>When the car's inclination changes, for
instance if an attempt is made to jack it up
and steal the wheels or to raise it prior to
towing away
>When there is an interruption in the power
supply from the battery
The alarm system signals unauthorized entry
attempts for a short time by means of:
>An acoustic alarm
>Switching on the hazard warning flashers
>Flashing the high beams
Arming and disarming
When you lock or unlock the vehicle, either with
the remote control or at the door lock, the alarm
system is armed or disarmed at the same time.
Even when the alarm system is armed, you can
open the luggage compartment lid by means of the button on the remote control, refer to
page30. When you subsequently close the lid,
it is again locked and monitored.
Switching off an alarm
>Unlock the car with the remote control, refer
to page29.
>Insert the remote control all the way into the
ignition lock.
Indicator lamp displays
>The indicator lamp under the inside rear-
view mirror flashes continuously: the sys-
tem is armed.
>The indicator lamp flashes after locking:
doors, hood or luggage compartment lid are
not properly closed. Even if you do not close
the alerted area, the system begins to mon-
itor the remaining areas, and the indicator
lamp flashes continuously after approx.
10 seconds. However, the interior motion
sensor is not activated.
>The indicator lamp goes out after unlocking:
your vehicle has not been disturbed while
you were away.
>If the indicator lamp flashes after unlocking
until the remote control is inserted in the
ignition, but for no longer than approx.
5 minutes: your vehicle has been disturbed
while you were away.
Tilt alarm sensor
The tilt of the vehicle is monitored. The alarm
system reacts, e.g. to attempts to steal a wheel
or tow the vehicle.
ba8_E9293_US.book Seite 34 Freitag, 5. Mai 2006 1:02 13
Page 63 of 239
Controls
61Reference
At a glance
Driving tips
Communications
Navigation
Entertainment
Mobility
Braking sensation
The system's automatic brake operation results
in a braking sensation that is slightly different
from what you feel when you brake the vehicle
yourself in a similar situation. Possible noises
during automatic deceleration are normal.
Manual transmission
You can shift gears while cruise control is acti-
vated. An indicator lamp notifies you that you
should shift gears when you drive for an
extended period at very high or very low engine
speeds, or the system is deactivated.
Range of applications
The minimum desired speed is 20 mph or
30 km/h, and the maximum desired speed is
110 mph or 180 km/h.
As with conventional cruise control sys-
tems, active cruise control in no way
diminishes or substitutes for the driver’s own
personal responsibility, alertness and aware-
ness in adjusting speed, braking or otherwise
controlling the vehicle. The driver should
decide when to use the system on the basis of
road, traffic, visibility, and weather conditions.
Active cruise control is intended for use on
highway-type roadways where traffic is moving
relatively smoothly. Do not use this system in
city driving; heavy traffic such as during rush
hour; on curvy, winding roads, slippery roads or
roads with sharp curves such as highway off-
ramps; during inclement weather such as snow,
strong rain or fog; or when entering inter-
changes, service/parking areas or toll booths.
It is also important to regulate your vehicle's
speed and distance setting within applicable
legal limits. Always be ready to take action or
apply the brakes if necessary, especially when
the system is actively following a vehicle in front
of you. Otherwise, driving conditions could
result which violate the law or pose a risk of
accident.<
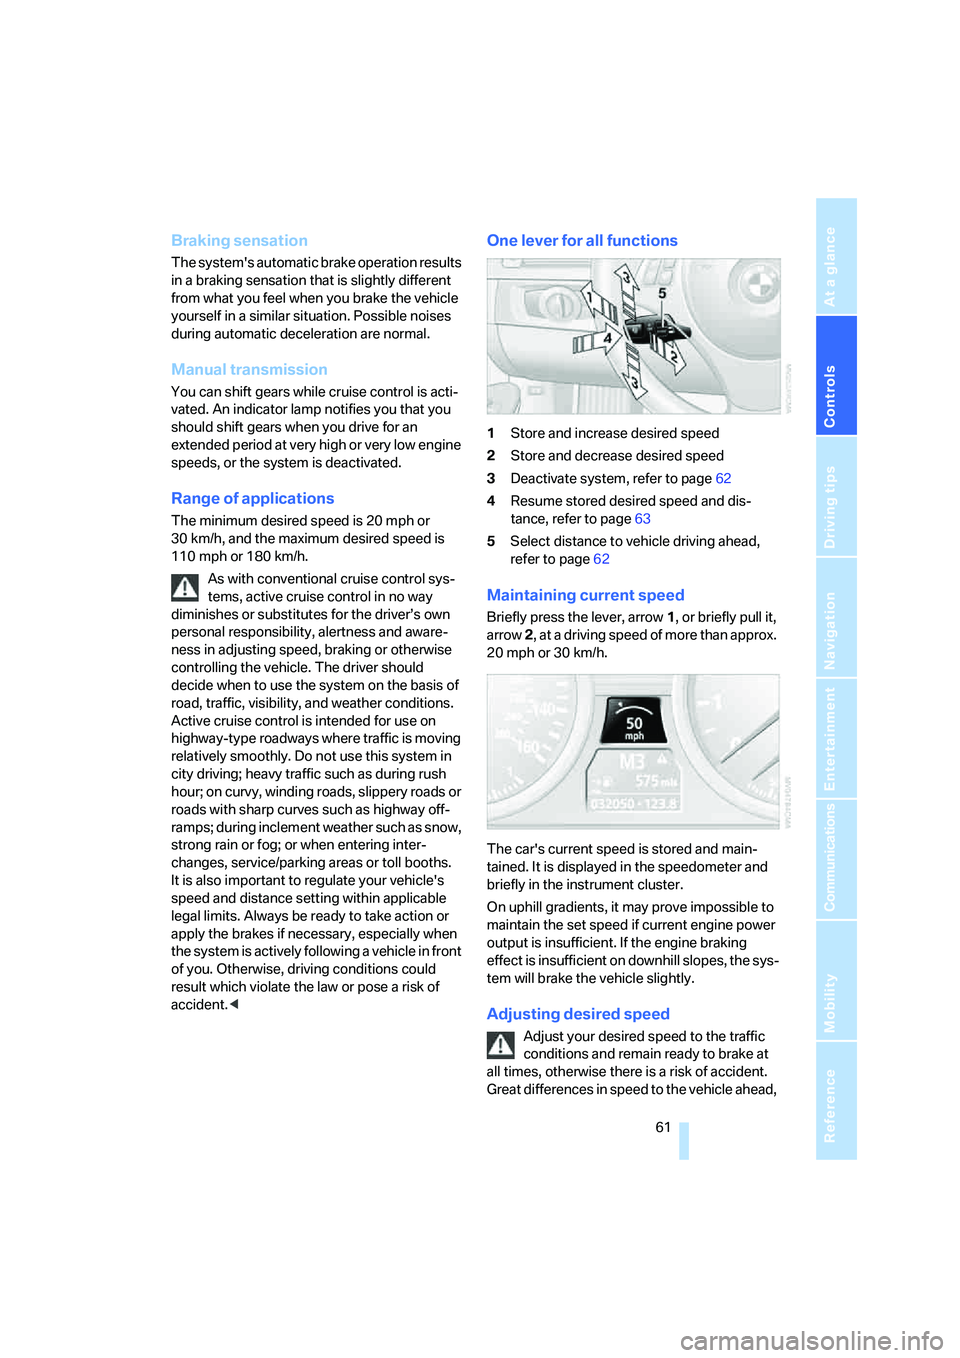
One lever for all functions
1Store and increase desired speed
2Store and decrease desired speed
3Deactivate system, refer to page62
4Resume stored desired speed and dis-
tance, refer to page63
5Select distance to vehicle driving ahead,
refer to page62
Maintaining current speed
Briefly press the lever, arrow 1, or briefly pull it,
arrow 2, at a driving speed of more than approx.
20 mph or 30 km/h.
The car's current speed is stored and main-
tained. It is displayed in the speedometer and
briefly in the instrument cluster.
On uphill gradients, it may prove impossible to
maintain the set speed if current engine power
output is insufficient. If the engine braking
effect is insufficient on downhill slopes, the sys-
tem will brake the vehicle slightly.
Adjusting desired speed
Adjust your desired speed to the traffic
conditions and remain ready to brake at
all times, otherwise there is a risk of accident.
Great differences in speed to the vehicle ahead,
ba8_E9293_US.book Seite 61 Freitag, 5. Mai 2006 1:02 13
Page 71 of 239
Controls
69Reference
At a glance
Driving tips
Communications
Navigation
Entertainment
Mobility
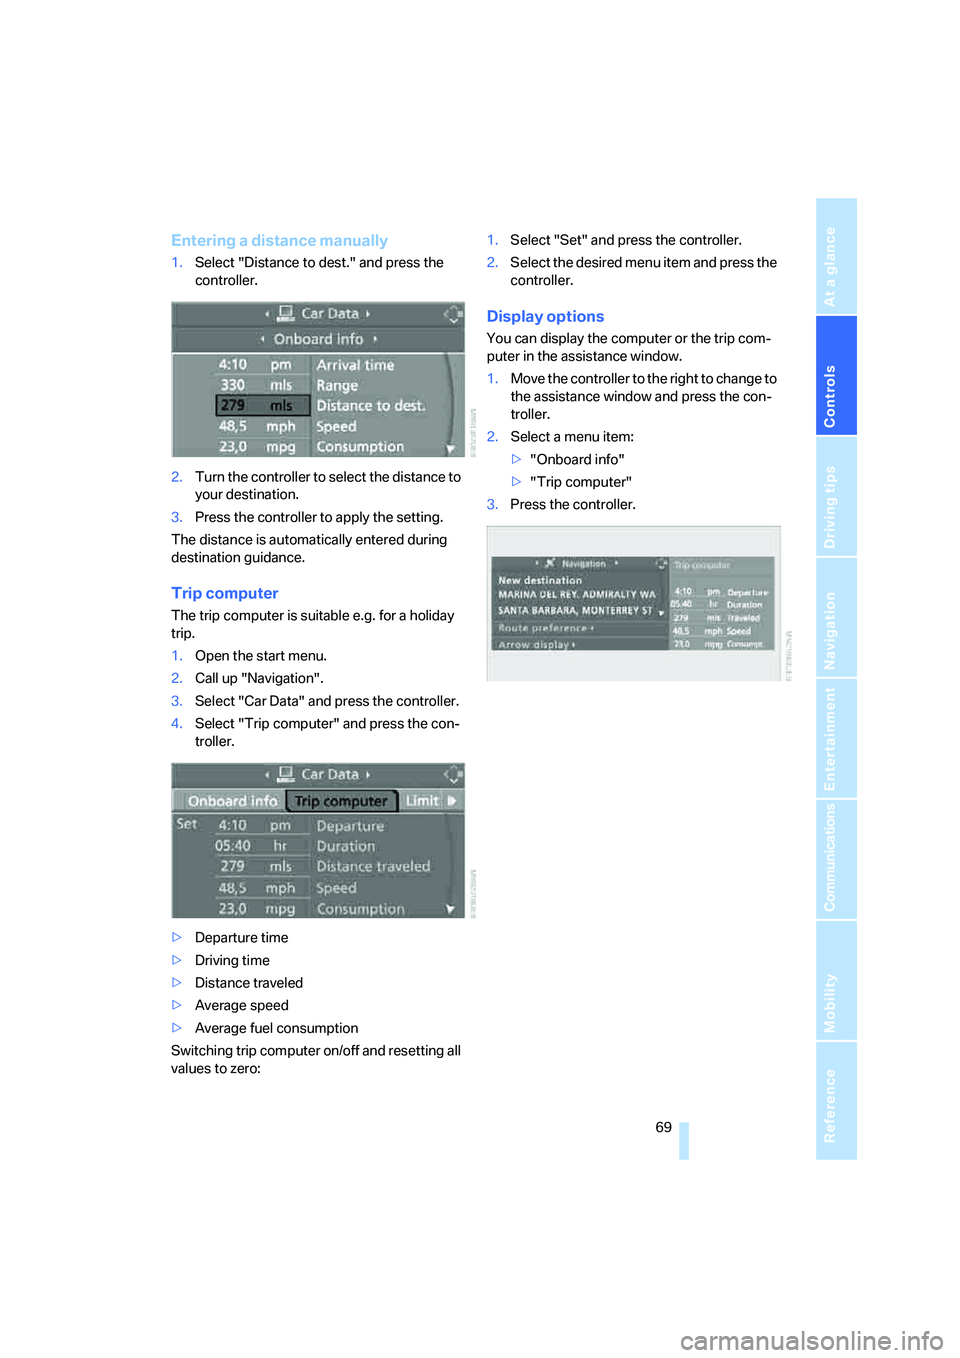
Entering a distance manually
1.Select "Distance to dest." and press the
controller.
2.Turn the controller to select the distance to
your destination.
3.Press the controller to apply the setting.
The distance is automatically entered during
destination guidance.
Trip computer
The trip computer is suitable e.g. for a holiday
trip.
1.Open the start menu.
2.Call up "Navigation".
3.Select "Car Data" and press the controller.
4.Select "Trip computer" and press the con-
troller.
>Departure time
>Driving time
>Distance traveled
>Average speed
>Average fuel consumption
Switching trip computer on/off and resetting all
values to zero:1.Select "Set" and press the controller.
2.Select the desired menu item and press the
controller.
Display options
You can display the computer or the trip com-
puter in the assistance window.
1.Move the controller to the right to change to
the assistance window and press the con-
troller.
2.Select a menu item:
>"Onboard info"
>"Trip computer"
3.Press the controller.
ba8_E9293_US.book Seite 69 Freitag, 5. Mai 2006 1:02 13
Page 84 of 239
Technology for driving comfort and safety
82
Activating DSC
Press the button again; the indicator lamps in
the instrument cluster go out.
To control
If the indicator lamp flashes:
DSC controls the drive forces and
brake forces.
If the indicator lamps are on:
DSC is deactivated.
DTC Dynamic Traction Control
DTC is a version of DSC in which the drive out-
put is optimized for particular road conditions,
e.g. unplowed snow-covered roads. The sys-
tem assures the maximal drive output, but with
reduced driving stability. It is therefore neces-
sary to drive with appropriate caution.
You may find it useful to briefly activate DTC
under the following special circumstances:
>When driving uphill on snow-covered roads,
in slush or on unplowed, snow-covered
roads
>When rocking a stuck vehicle free or start-
ing off in deep snow or on loose ground
>When driving with snow chains
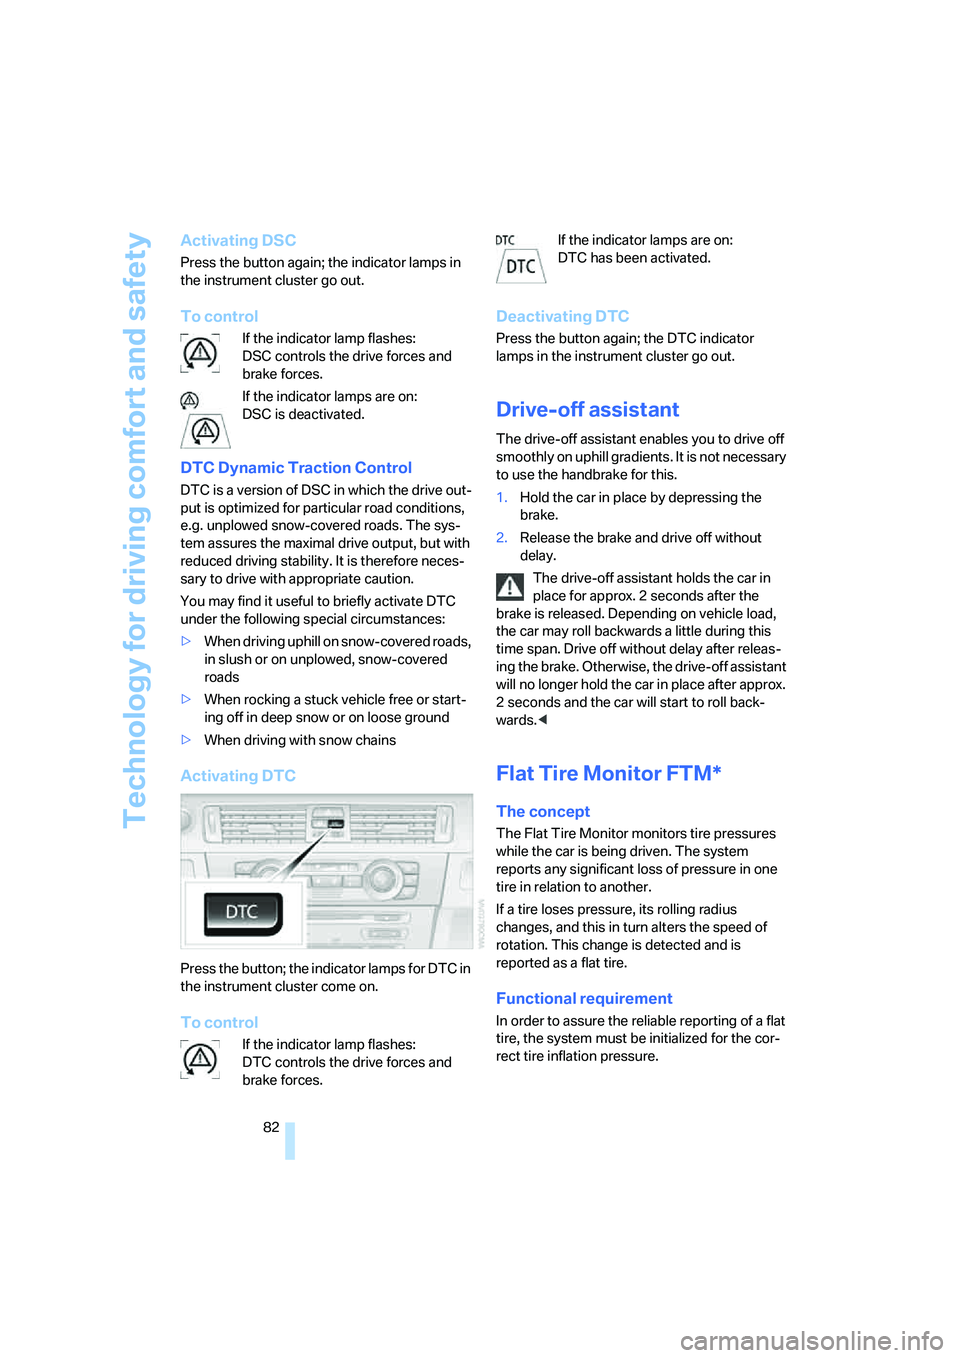
Activating DTC
Press the button; the indicator lamps for DTC in
the instrument cluster come on.
To control
If the indicator lamp flashes:
DTC controls the drive forces and
brake forces.If the indicator lamps are on:
DTC has been activated.
Deactivating DTC
Press the button again; the DTC indicator
lamps in the instrument cluster go out.
Drive-off assistant
The drive-off assistant enables you to drive off
smoothly on uphill gradients. It is not necessary
to use the handbrake for this.
1.Hold the car in place by depressing the
brake.
2.Release the brake and drive off without
delay.
The drive-off assistant holds the car in
place for approx. 2 seconds after the
brake is released. Depending on vehicle load,
the car may roll backwards a little during this
time span. Drive off without delay after releas-
ing the brake. Otherwise, the drive-off assistant
will no longer hold the car in place after approx.
2 seconds and the car will start to roll back-
wards.<
Flat Tire Monitor FTM*
The concept
The Flat Tire Monitor monitors tire pressures
while the car is being driven. The system
reports any significant loss of pressure in one
tire in relation to another.
If a tire loses pressure, its rolling radius
changes, and this in turn alters the speed of
rotation. This change is detected and is
reported as a flat tire.
Functional requirement
In order to assure the reliable reporting of a flat
tire, the system must be initialized for the cor-
rect tire inflation pressure.
ba8_E9293_US.book Seite 82 Freitag, 5. Mai 2006 1:02 13
Page 85 of 239

Controls
83Reference
At a glance
Driving tips
Communications
Navigation
Entertainment
Mobility
The system must be reinitialized each
time a tire inflation pressure has been cor-
rected or a wheel or tire has been changed.<
System limitations
The Flat Tire Monitor is unable to warn
the driver of sudden, severe tire damage
caused by external factors, nor can it identify
the gradual loss of pressure that will inevitably
occur in all four tires over a lengthy period of
time.<
In the following situations, the system could be
delayed or malfunction:
>System has not been initialized
>Driving on snowy or slippery road surface
>Performance-oriented style of driving: slip
in the drive wheels, high lateral acceleration
>If snow chains are attached
Initializing the system
The initialization is completed during driv-
ing, which can be interrupted at any time.
When driving resumes, the initialization is con-
tinued automatically.
Do not initialize the system while snow chains
are attached.<
iDrive, for operating principle refer to page16.
1.Press the button.
This opens the start menu.
2.Press the controller to open the menu.
3.Select "Vehicle settings" and press the
controller.
4.If necessary, move the highlight marker to
the uppermost field. Turn the controller
until "FTM" is selected and press the con-
troller.5.Start the engine, but do not start driving.
6.Select "Reset" and press the controller.
7.Select "Yes" and press the controller.
8.Start to drive.
Initialization is completed while the car is in
motion. "Status: FTM active" reappears in
the Control Display.
Indication of a flat tire
The warning lamps come on in yellow
and red. A message appears on the
Control Display. In addition, an
acoustic signal sounds. There is a flat
tire or substantial loss of tire pressure.
1.Cautiously reduce speed to below 50 mph
or 80 km/h. Avoid sudden braking and
steering maneuvers. Do not exceed a speed
of 50 mph or 80 km/h.
If the car is not equipped with Run-
Flat Tires, refer to page189, the stan-
dard equipment by design, do not continue
driving. Otherwise a severe accident could
result after a tire puncture if you continue
driving.<
2.At the next opportunity, check the air pres-
sure in all four tires.
If all four tires are inflated to the cor-
rect pressures, the Flat Tire Monitor
might not have been initialized. The system
must then be initialized.<
3.In the event of complete tire pressure loss,
0 psi/0 kPa, you can estimate the possible
ba8_E9293_US.book Seite 83 Freitag, 5. Mai 2006 1:02 13