2006 BMW 325XI TOURING ECO mode
[x] Cancel search: ECO modePage 8 of 160

Notes
6 to the vehicle, compromise its safety, interfere
with the vehicle's electrical system or affect the
validity of the BMW Limited Warranty. See your
BMW Center for additional information.<
Maintenance, replacement, or repair of
the emission control devices and sys-
tems may be performed by any automotive
repair establishment or individual using any cer-
tified automotive part.<
California Proposition 65 warning
California law requires us to issue the following
warning:
Engine exhaust and a wide variety of
automobile components and parts,
including components found in the interior fur-
nishings in a vehicle, contain or emit chemicals
known to the State of California to cause cancer
and birth defects and reproductive harm. In
addition, certain fluids contained in vehicles and
certain products of component wear contain or
emit chemicals known to the State of California
to cause cancer and birth defects or other
reproductive harm.
Battery posts, terminals and related accesso-
ries contain lead and lead compounds. Wash
your hands after handling.
Used engine oil contains chemicals that have
caused cancer in laboratory animals. Always
protect your skin by washing thoroughly with
soap and water.<
Service and warranty
We recommend that you read this publication
thoroughly.
Your BMW is covered by the following warran-
ties:
>New Vehicle Limited Warranty
>Rust Perforation Limited Warranty
>Federal Emissions System Defect Warranty
>Federal Emissions Performance Warranty
>California Emission Control System Limited
Warranty
Detailed information about these warranties is
listed in the Service and Warranty Information
Booklet for US models or in the Warranty and
Service Guide Booklet for Canadian models.
Reporting safety defects
For US customers
The following applies only to vehicles owned
and operated in the US.
If you believe that your vehicle has a defect
which could cause a crash or could cause injury
or death, you should immediately inform the
National Highway Traffic Safety Administration,
NHTSA, in addition to notifying BMW of North
America, LLC, P.O. Box 1227, Westwood, New
Jersey 07675-1227, Telephone 1-800-831-
1117.
If NHTSA receives similar complaints, it may
open an investigation, and if it finds that a safety
defect exists in a group of vehicles, it may order
a recall and remedy campaign. However,
NHTSA cannot become involved in individual
problems between you, your dealer, or BMW of
North America, LLC.
To contact NHTSA, you may call the Vehicle
Safety Hotline toll-free at 1-800-327-4236
(TTY: 1-800-424-9153); go to
http://www.safercar.gov; or write to: Adminis-
trator, NHTSA, 400 Seventh Street, SW.,
Washington, DC 20590. You can also obtain
other information about motor vehicle safety
from http://www.safercar.gov
Page 21 of 160

Reference
At a glance
Controls
Driving tips
Mobility
19
Take the adapter out of the bracket on the
inside of the glove compartment and slide the
spare key into the adapter before using it.
Personal Profile
The concept
You can set many of your BMW's functions to
suit your personal needs and preferences.
Without any action on your part, Personal Pro-
file ensures that most of these settings are
stored for the remote control currently in use.
When you unlock the car, the remote control
used for the purpose is recognized and the set-
tings stored for it are called up and imple-
mented.
This means that your personal settings are
active when you return to your BMW, even if the
car was used in the meantime by someone else
with a remote control of their own and the set-
tings were changed accordingly.
You can configure a maximum of three remote
controls for three different people. The prereq-
uisite for this is that each person has his or her
own remote control.
Personal Profile settings
For more information on specific settings, refer
to the specified pages.
>Automatic call-up
* of the driver's-seat and
exterior-mirror positions after unlocking,
refer to page34
>12h/24h mode of the clock, refer to page60
>Date format, refer to page60>Units of measure for fuel consumption, dis-
tance covered/remaining distances, and
temperature, refer to page60
>Automatic climate control
*: AUTO pro-
gram, activating/deactivating cooling func-
tion and automatic recirculated-air control,
setting temperature, air flow rate and distri-
bution, refer to page81 ff
>Audio volume, refer to separate Owner's
Manual
>Speed-dependent volume, refer to sepa-
rate Owner's Manual
Central locking system
The concept
The central locking system is ready for opera-
tion whenever the driver's door is closed.
The system simultaneously engages and
releases the locks on the following:
>Doors
>Tailgate
>Fuel filler door
Operating from outside
>Via the remote control
>Via the door lock
>In cars with convenient access
*, via the
handles on the driver's and front passen-
ger's doors
The anti-theft system is also operated at the
same time. It prevents the doors from being
unlocked using the lock buttons or door han-
dles. The interior lamp and the courtesy lamps
*
are also switched on or off with the remote con-
trol. The alarm system
* is also armed or dis-
armed.
For further details of the alarm system,
refer to
page25.
Operating from inside
By means of the button for central locking, refer
to page22.
Page 22 of 160

Opening and closing
20 In the event of a sufficiently severe accident, the
central locking system unlocks automatically. In
addition, the hazard warning flashers and inte-
rior lamps come on.
Opening and closing: from
outside
Using the remote control
Persons or animals in a parked vehicle
could lock the doors from the inside. You
should therefore take the remote control with
you so that the car can be opened from the out-
side.<
Unlocking
Press the button.
The interior lamp and the doors' courtesy
lamps
* come on. Exterior mirrors that were
folded in are automatically folded back out
*.
You can also set the way in which the car is
unlocked. The setting is stored for the remote
control currently in use.
Operating principle, refer to page59.
1.Lightly push button1 in the turn indicator
stalk up or down repeatedly until the symbol
appears in the display accompanied by the
word "SET".
2.Press button 2.3.Lightly push button1 in the turn indicator
stalk down repeatedly until the symbol
appears in the display.
4.Press button 2.
5.Use button 1 to select:
>
Press the button once to unlock only
the driver's door and the fuel filler door.
Press the button twice to unlock the
entire vehicle.
>
Press the button once to unlock the
entire vehicle.
6.Press button 2.
The setting is stored for the remote control
currently in use.
Convenience opening
Hold the button down. The electric windows
and the panorama glass roof
* are opened.
Locking
Press the button.
Switching on interior lamps
While the car is locked:
Press the button.
You can also use this function to locate your
vehicle in parking garages etc.
Panic mode*
You can also trigger the alarm system if you find
yourself in a dangerous situation:
Press the button for at least three seconds.
To switch off the alarm: press any button.
Page 62 of 160

Everything under control
60
Exiting displays
The outside-temperature reading and the time
reappear when you press button2 or if you
make no entries within approx. 15 seconds. If
required, complete the current setting first.
Formats and units of measure
You can set formats and units of measure. The
settings are stored for the remote control cur-
rently in use, refer also to Personal Profile on
page19.
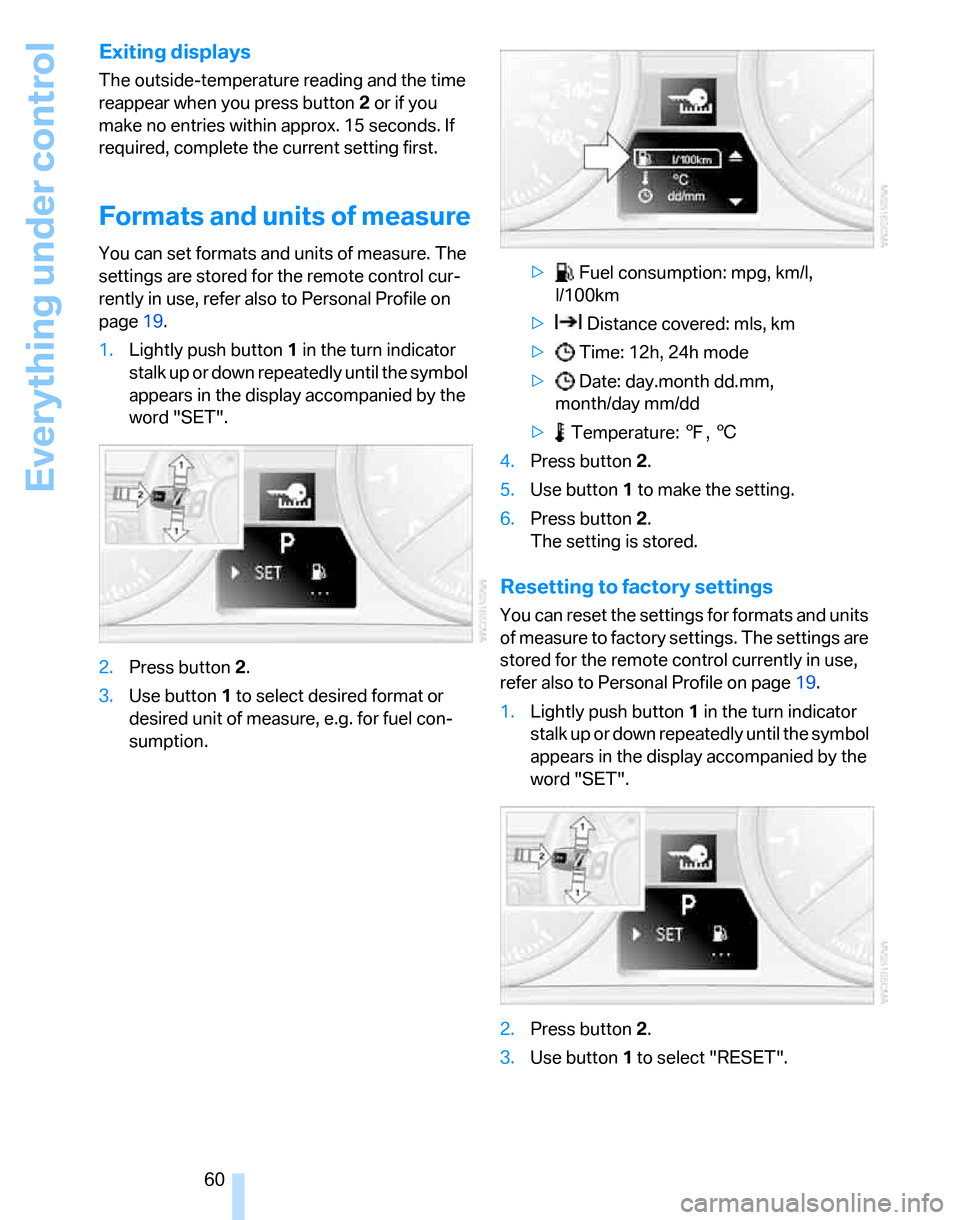
1.Lightly push button1 in the turn indicator
stalk up or down repeatedly until the symbol
appears in the display accompanied by the
word "SET".
2.Press button 2.
3.Use button 1 to select desired format or
desired unit of measure, e.g. for fuel con-
sumption.> Fuel consumption: mpg, km/l,
l/100km
> Distance covered: mls, km
> Time: 12h, 24h mode
> Date: day.month dd.mm,
month/day mm/dd
> Temperature: 7, 6
4.Press button 2.
5.Use button 1 to make the setting.
6.Press button 2.
The setting is stored.
Resetting to factory settings
You can reset the settings for formats and units
of measure to factory settings. The settings are
stored for the remote control currently in use,
refer also to Personal Profile on page19.
1.Lightly push button1 in the turn indicator
stalk up or down repeatedly until the symbol
appears in the display accompanied by the
word "SET".
2.Press button 2.
3.Use button1 to select "RESET".
Page 67 of 160

Reference
At a glance
Controls
Driving tips
Mobility
65
Technology for driving comfort and safety
PDC Park Distance Control*
The concept
The PDC assists you with maneuvering in tight
parking spaces. Acoustic signals warn you of
the presence of an object in front of
* or behind
your car. To measure the distance, there are
four ultrasonic sensors in each bumper.
An acoustic warning sounds once an object is
closer than approx. 2 ft/60 cm to the front sen-
sors
* or both rear corner sensors, or closer than
approx. 5 ft/1.50 m to the rear center sensors.
PDC is a parking aid that can indicate
objects when they are approached
slowly, as is usually the case when parking.
Avoid approaching an objec t a t h i g h s p e e d , o t h -
erwise physical circumstances may lead to the
system warning being issued too late.<
Automatic mode
With the engine running or the ignition switched
on, the system is activated automatically after
approx. 1 second when you engage reverse
gear or move the automatic transmission selec-
tor lever to position R. Wait this short period
before driving.
Switching on manually
Press the button, the LED lights up.
Switching off manually
Press the button again; the LED goes out.The system is automatically deactivated once
the vehicle travels approx. 165 ft/50 m or
exceeds a speed of approx. 20 mph or 30 km/h;
the LED goes out. You can reactivate the sys-
tem as needed.
Signal tones
When nearing an object, its position is indicated
correspondingly by an interval tone. For exam-
ple, the tone sounds at the rear if the system
detects an object behind the car. As the dis-
tance between vehicle and object decreases,
the intervals between the tones become
shorter. If the distance to the nearest object
falls to below roughly 1 ft/30 cm, then a contin-
uous tone sounds.
The warning signal is canceled after approx.
3 seconds, if you are moving parallel to a wall.
Malfunction
The indicator lamp in the instrument
cluster comes on. PDC is malfunc-
tioning. Have the system checked.
To avoid this problem, keep the sensors clean
and free of ice or snow in order to ensure that
they will continue to operate effectively. When
using a high-pressure cleaner, do not spray the
sensors for extended periods of time and only
from a distance of at least 4 in/10 cm.
Manual mode
The LED above the button flashes in addition.
System limitations
Even with PDC, final responsibility for
estimating the distance between the
vehicle and any obstructions always remains
with the driver. Even when sensors are pro-
vided, there is a blind spot in which objects can
no longer be detected. The system is also sub-
ject to the physical limits that apply to all forms
of ultrasonic measurement, such as those
encountered with trailer towbars and couplings,
Page 70 of 160

Technology for driving comfort and safety
68
Activating HDC
Press the button; the indicator lamp lights up.
The indicator lamp flashes when the vehicle is
being braked automatically.
Deactivating HDC
Press the button again; the indicator lamp goes
out.
HDC is deactivated instantly above a speed of
approx. 35 mph or 60 km/h, or approx.
10 seconds after the ignition is switched off.
Using HDC
In cars with manual transmission:
Use HDC in lower gears and in reverse gear.
With automatic transmission:
You can use HDC in any drive position.
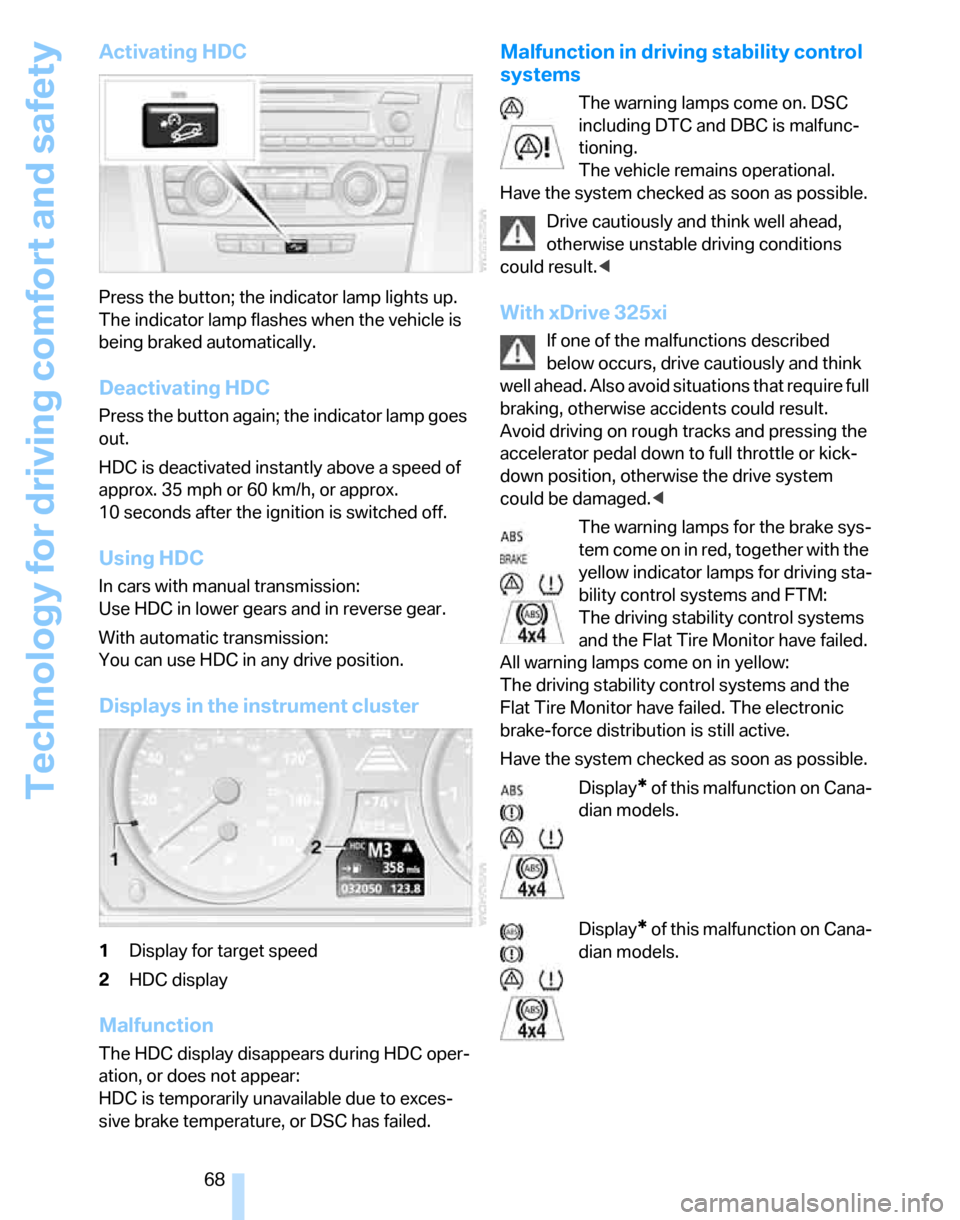
Displays in the instrument cluster
1Display for target speed
2HDC display
Malfunction
The HDC display disappears during HDC oper-
ation, or does not appear:
HDC is temporarily unavailable due to exces-
sive brake temperature, or DSC has failed.
Malfunction in driving stability control
systems
The warning lamps come on. DSC
including DTC and DBC is malfunc-
tioning.
The vehicle remains operational.
Have the system checked as soon as possible.
Drive cautiously and think well ahead,
otherwise unstable driving conditions
could result.<
With xDrive 325xi
If one of the malfunctions described
below occurs, drive cautiously and think
well ahead. Also avoid situations that require full
braking, otherwise accidents could result.
Avoid driving on rough tracks and pressing the
accelerator pedal down to full throttle or kick-
down position, otherwise the drive system
could be damaged.<
The warning lamps for the brake sys-
tem come on in red, together with the
yellow indicator lamps for driving sta-
bility control systems and FTM:
The driving stability control systems
and the Flat Tire Monitor have failed.
All warning lamps come on in yellow:
The driving stability control systems and the
Flat Tire Monitor have failed. The electronic
brake-force distribution is still active.
Have the system checked as soon as possible.
Display
* of this malfunction on Cana-
dian models.
Display
* of this malfunction on Cana-
dian models.
Page 71 of 160

Reference
At a glance
Controls
Driving tips
Mobility
69
Drive-off assistant
The drive-off assistant enables you to drive off
smoothly on uphill gradients. It is not necessary
to use the handbrake for this.
1.Hold the car in place by depressing the
brake.
2.Release the brake and drive off without
delay.
The drive-off assistant holds the car in
place for approx. 2 seconds after the
brake is released. Depending on vehicle load,
the car may roll backwards a little during this
time span. Drive off without delay after releas-
ing the brake. Otherwise, the drive-off assistant
will no longer hold the car in place after approx.
2 seconds and the car will start to roll back-
wards.<
Malfunction
The warning lamps for the brake sys-
tem light up in yellow. The drive-off
assistant has failed. The car will not
be held in place after the brake is
released. Have the system checked as soon as
possible.
Canadian models display these warn-
ing lamps.
Flat Tire Monitor FTM
The concept
The Flat Tire Monitor monitors tire pressures
while the car is being driven. The system
reports any significant loss of pressure in one
tire in relation to another.
If a tire loses pressure, its rolling radius
changes, and this in turn alters the speed of
rotation. This change is detected and is
reported as a flat tire.
Functional requirement
In order to assure the reliable reporting of a flat
tire, the system must be initialized for the cor-
rect tire inflation pressure.The system must be reinitialized each
time a tire inflation pressure has been cor-
rected or a wheel or tire has been changed.<
System limitations
The Flat Tire Monitor is unable to warn
the driver of sudden, severe tire damage
caused by external factors, nor can it identify
the gradual loss of pressure that will inevitably
occur in all four tires over a lengthy period of
time.<
In the following situations, the system could be
delayed or malfunction:
>System has not been initialized
>Driving on snowy or slippery road surface
>Performance-oriented style of driving: slip
in the drive wheels, high lateral acceleration
>If snow chains are attached
Initializing the system
The initialization is completed during driv-
ing, which can be interrupted at any time.
When driving resumes, the initialization is con-
tinued automatically.
Do not initialize the system while snow chains
are attached.<
Operating principle, refer to page59.
1.Start the engine immediately before pulling
away, but do not drive off yet.
2.Lightly push button 1 in the turn indicator
stalk up or down repeatedly until the appro-
priate symbol appears in the display,
accompanied by the word "INIT".
3.Press button 2 t o c o n f i r m y o u r c h o i c e o f t h e
Flat Tire Monitor.
Page 98 of 160

Things to remember when driving
96
Things to remember when driving
Break-in period
Moving parts need breaking-in time to adjust to
each other. Please follow the instructions below
in order to achieve the optimal service life and
economy of operation for your vehicle.
Engine and differential
Always obey all official speed limits.
Up to 1,200 miles/2,000 km
Attempt to vary both engine and vehicle
speeds, but refrain from exceeding an engine
speed of 4,500 rpm or a driving speed of
100 mph or 160 km/h.
Avoid full-throttle operation and use of the
transmission's kick-down mode.
After 1,200 miles/2,000 km
Engine and vehicle speeds can be gradually
increased.
Tires
Due to technical factors associated with their
manufacture, tires do not achieve their full trac-
tion potential until after an initial break-in
period. Therefore, drive cautiously during the
first 200 miles/300 km.
Brake system
Brakes require an initial break-in period of
approx. 300 miles/500 km to achieve optimized
contact and wear patterns between brake pads
and rotors. Drive cautiously during this break-in
period.
Clutch
The function of the clutch reaches its optimal
level only after a distance driven of approx.
300 miles/500 km. During this break-in period,
engage the clutch gently.
Following part replacement
The same break-in procedures should be
observed if any of the components mentioned
above have to be renewed in the course of the
vehicle's operating life.
General driving notes
Close the tailgate
Operate the vehicle only when the tail-
gate and rear window are closed. Other-
wise, exhaust fumes could enter the interior of
the vehicle.<
If special circumstances make it absolutely nec-
essary to drive with the tailgate or rear window
open:
1.Close all windows and the glass sunroof.
2.Increase the air flow rate of the air condi-
tioner or automatic climate control consid-
erably, refer to page79 or82.
Hot exhaust system
In all vehicles, extremely high tempera-
tures are generated in the exhaust sys-
tem. Do not remove the heat shields installed
adjacent to various sections of the exhaust sys-
tem, and never apply undercoating to them.
When driving, standing at idle and while park-
ing, take care to avoid possible contact
between the hot exhaust system and any highly
flammable materials such as hay, leaves, grass,
etc. Such contact could lead to a fire, with the
risk of serious personal injuries and property
damage.<
Mobile phone in the vehicle
BMW discourages the use of mobile
communications devices, e.g. mobile
phones, inside the vehicle without a direct con-
nection to an outside antenna. Otherwise, the
vehicle electronics and mobile communication
device can influence one another. In addition,