2006 BMW 325XI TOURING steering wheel
[x] Cancel search: steering wheelPage 74 of 160

Technology for driving comfort and safety
72 seat covers, cushions or other objects not spe-
cifically approved for seats with integral side air-
bags to the front seats. Do not hang items of
clothing such as coats or jackets over the back-
rests. Do not attempt to remove the airbag
retention system from the vehicle. Do not mod-
ify the individual components of the system or
its wiring in any way. This includes the uphol-
stered covers on the steering wheel, instrument
panel, seats and roof posts, as well as the sides
of the roof lining. Do not attempt to remove or
dismantle the steering wheel.
Do not touch the individual components imme-
diately after the system has been triggered,
because there is a danger of burns.
In the event of malfunctions, deactivation, or
triggering of the airbag restraint system, have
the testing, repair, removal, and disposal of air-
bag generators executed only by a BMW Cen-
ter or a workshop that works according to BMW
repair procedures with correspondingly trained
personnel and has the required explosives
licenses. Unprofessional attempts to service
the system could lead to failure in an emer-
gency or undesired airbag activation, either of
which could result in personal injury.<
Warning notices and information about the air-
bags can also be found on the sun visors.
Automatic deactivation of the front
passenger airbags
An analysis of the impression in the front pas-
senger seat cushion determines whether and
how the seat is occupied. The front and side air-
bags for the front passenger are activated or
deactivated by the system accordingly.
The indicator lamp above the interior
rearview mirror shows the current status
of the front passenger airbags, deactivated or
activated, refer to Status of front passenger air-
bags below.
Before transporting a child on the front
passenger seat, read the safety precau-
tions and handling instructions under Trans-
porting children safely, refer to page39.
The front and side airbags can also be deacti-
vated by adolescents and adults sitting in cer-
tain positions; the indicator lamp for the front passenger airbags comes on. In such cases, the
passenger should change his or her sitting
position so that the front passenger airbags are
activated and the indicator lamp goes out. If the
desired airbag status cannot be achieved by
changing the sitting position, transport the rele-
vant passenger on a rear seat. Do not attach
seat covers, seat cushion padding, ball mats or
other items to the front passenger seat unless
they are specifically recommended by BMW.
Do not place any items under the seat which
could press against the seat from below. Other-
wise a correct analysis of the seat cushion is not
ensured.<
Status of front passenger airbags
The indicator lamp for the front passenger air-
bags shows the functional status of the front
passenger's front and side airbags in accor-
dance with whether and how the front passen-
ger seat is occupied. The indicator lamp shows
whether the front passenger airbags are acti-
vated or deactivated.
>The indicator lamp comes on as intended
when a child in a specially designated child-
restraint system is detected on the seat.
The front and side airbags for the front pas-
senger are not activated.
>The indicator lamp does not come on as
long as a person of sufficient size and in a
correct sitting position is detected on the
seat.
The front and side airbags for the front pas-
senger are activated.
>The indicator lamp does not come on if the
seat is empty.
The front and side airbags for the front pas-
senger are not activated.
Page 81 of 160

Reference
At a glance
Controls
Driving tips
Mobility
79
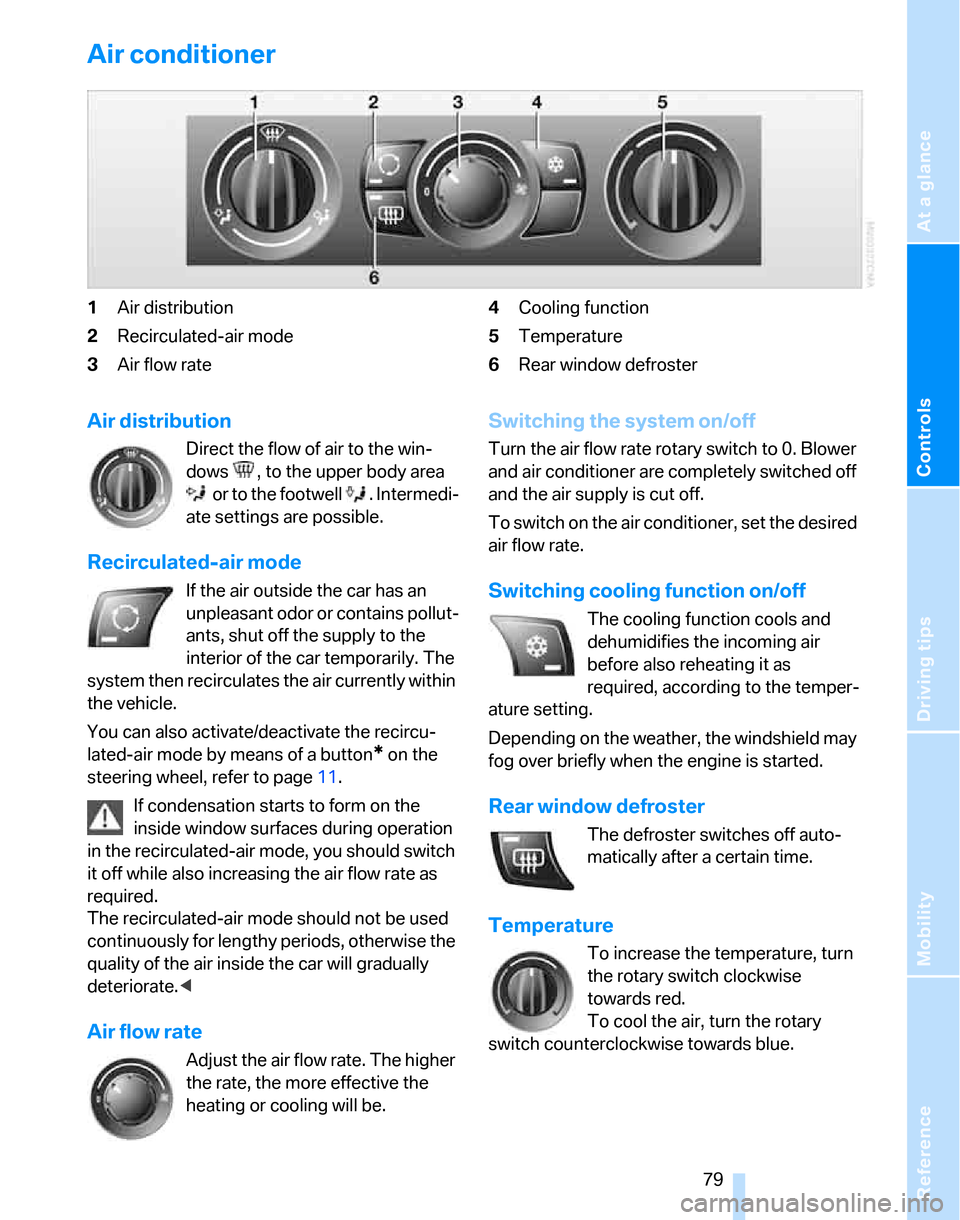
Air conditioner
1Air distribution
2Recirculated-air mode
3Air flow rate4Cooling function
5Temperature
6Rear window defroster
Air distribution
Direct the flow of air to the win-
dows , to the upper body area
or to the footwell . Intermedi-
ate settings are possible.
Recirculated-air mode
If the air outside the car has an
unpleasant odor or contains pollut-
ants, shut off the supply to the
interior of the car temporarily. The
system then recirculates the air currently within
the vehicle.
You can also activate/deactivate the recircu-
lated-air mode by means of a button
* on the
steering wheel, refer to page11.
If condensation starts to form on the
inside window surfaces during operation
in the recirculated-air mode, you should switch
it off while also increasing the air flow rate as
required.
The recirculated-air mode should not be used
continuously for lengthy periods, otherwise the
quality of the air inside the car will gradually
deteriorate.<
Air flow rate
Adjust the air flow rate. The higher
the rate, the more effective the
heating or cooling will be.
Switching the system on/off
Turn the air flow rate rotary switch to 0. Blower
and air conditioner are completely switched off
and the air supply is cut off.
To switch on the air conditioner, set the desired
air flow rate.
Switching cooling function on/off
The cooling function cools and
dehumidifies the incoming air
before also reheating it as
required, according to the temper-
ature setting.
Depending on the weather, the windshield may
fog over briefly when the engine is started.
Rear window defroster
The defroster switches off auto-
matically after a certain time.
Temperature
To increase the temperature, turn
the rotary switch clockwise
towards red.
To cool the air, turn the rotary
switch counterclockwise towards blue.
Page 84 of 160

Climate
82 should therefore open them for maximum cool-
ing.
AUTO program
The AUTO program adjusts the air
distribution to the windshield and
side windows, towards the upper
body area and into the footwell for you. The air
flow rate and your temperature specifications
will be adapted to outside influences as a result
of seasonal changes, e.g. sunlight or window
condensation.
The cooling is switched on automatically with
the AUTO program.
Adjusting air flow rate manually
Press the left side of the button to
reduce airflow. Press the right side
of the button to increase it.
You can reactivate the automatic mode for the
air flow rate with the AUTO button.
Switching the system on/off
With the blower at its lowest setting, press the
left side of the button to switch off the auto-
matic climate control. All indicators go out.
Press any button except REST to reactivate the
automatic climate control.
AUC Automatic recirculated-air
control/Recirculated-air mode
Switch on the desired operating
mode by pressing this button
repeatedly:
>LEDs off: outside air flows in continuously.
>Left-hand LED on, AUC mode: a sensor
detects pollutants in the outside air. If nec-
essary, the system blocks the supply of out-
side air and recirculates the inside air. As
soon as the concentration of pollutants in
the outside air has decreased sufficiently,
the system automatically switches back to
outside air supply.
>Right-hand LED on, recirculated-air mode:
the supply of outside air is permanently shut off. The system then recirculates the
air currently within the vehicle.
If condensation starts to form on the
inside window surfaces during operation
in the recirculated-air mode, you should switch
it off while also increasing the air flow rate as
required.
The recirculated-air mode should not be used
over an extended period of time, otherwise the
air quality inside the car will deteriorate contin-
uously.<
Via the button* on the steering wheel
You can switch between operating modes via a
button
on the steering wheel, refer to page11:
>When outside air is coming in, you can use
the button on the steering wheel to switch
between outside air and recirculated-air
mode.
>When recirculated-air mode or AUC mode
is switched on, you can use the button on
the steering wheel to switch between recir-
culated-air mode and AUC mode.
Residual heat
The heat stored in the engine is
used to heat the passenger com-
partment, e.g. while stopped at a
school to pick up a child.
The function can be switched on when the fol-
lowing conditions are met:
>Up to 15 minutes after the engine has been
switched off
>While the engine is at operating tempera-
ture
>As long as battery voltage is sufficient
>At an outside temperature below 777/
256
The LED is lit when the function is on.
As of radio readiness, you can set the interior
temperature, the air flow rate and the air distri-
bution.
Page 129 of 160

Reference
At a glance
Controls
Driving tips
Mobility
127
Your BMW has a special nut as body ground
or negative pole.
5.Attach the second terminal clamp of the
minus/– jumper cable to the negative termi-
nal of the battery or to the engine or body
ground of the vehicle to be started.
Starting the engine
1.Start the engine of the donor vehicle and
allow it to run for a few minutes at slightly
increased idle speed.
2.Start the engine on the other vehicle in the
usual way.
If the first start attempt is not successful,
wait a few minutes before another attempt
in order to allow the discharged battery to
recharge.
3.Let the engines run for a few minutes.
4.Disconnect the jumper cables by reversing
the above connecting sequence.
If necessary, have the battery checked and
recharged.
Never use spray fluids to start the
engine.<
Tow-starting, towing away
Observe the applicable laws and regula-
tions for tow-starting and towing vehi-
cles.<
Do not transport any occupants other
than the driver in a vehicle that is being
towed.<
Using a tow fitting
The screw-in tow fitting must always be carried
in the car. It can be screwed in at the front or
rear of the BMW.
It is stored in the onboard tool kit underneath
the cover on the right-hand side of the cargo
area, refer to page119.
Use only the tow fitting provided with the
vehicle and screw it all the way in. Use the
tow fitting for towing on paved roads only. Avoid
lateral loading of the tow fitting, e.g. do not lift
the vehicle by the tow fitting. Otherwise the tow
fitting and the vehicle could be damaged.<
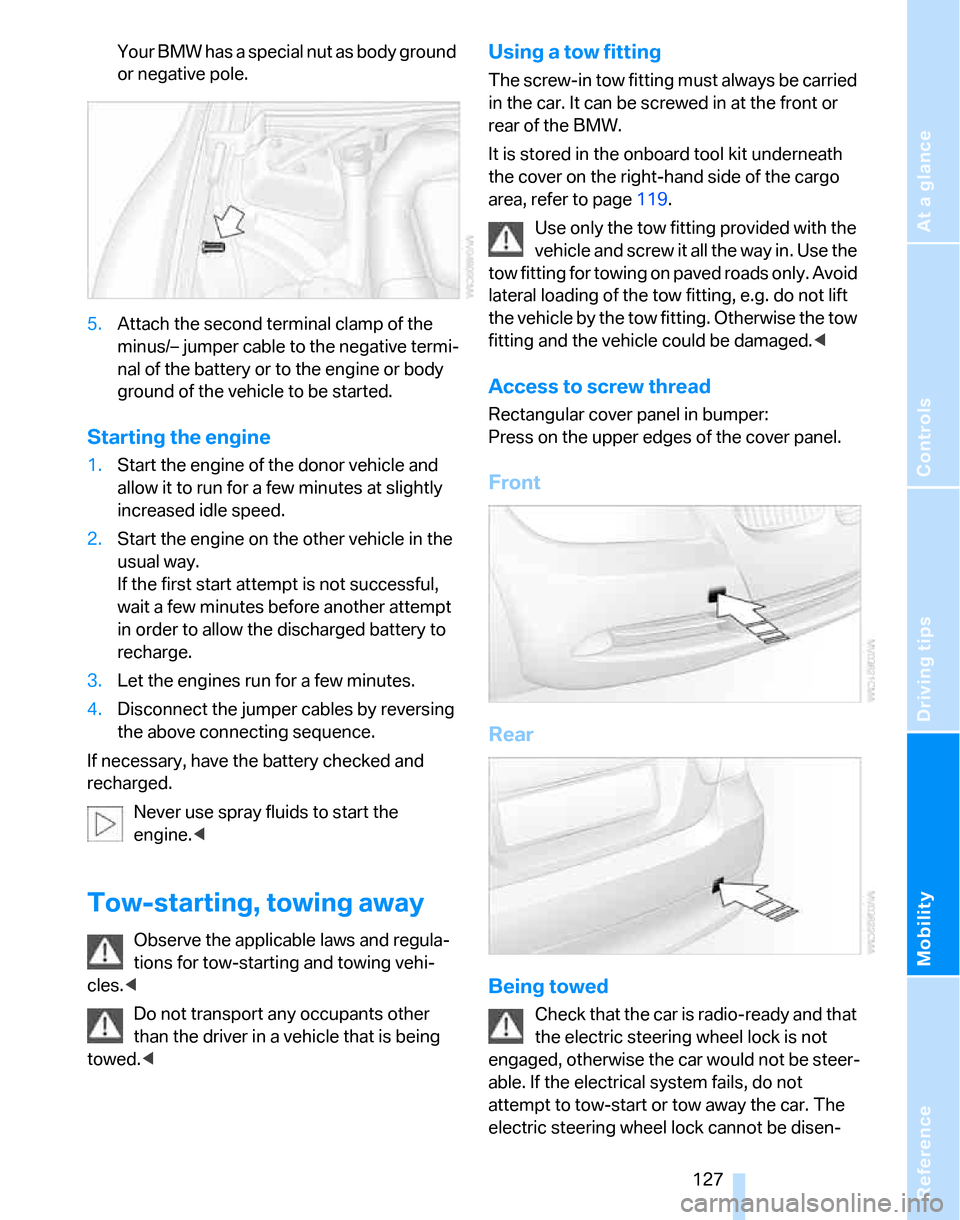
Access to screw thread
Rectangular cover panel in bumper:
Press on the upper edges of the cover panel.
Front
Rear
Being towed
Check that the car is radio-ready and that
the electric steering wheel lock is not
engaged, otherwise the car would not be steer-
able. If the electrical system fails, do not
attempt to tow-start or tow away the car. The
electric steering wheel lock cannot be disen-
Page 130 of 160

Giving and receiving assistance
128 gaged and the car is not steerable. Jump start-
ing, refer to page126.
Power steering assistance is not available when
the engine is not running. Thus, braking and
steering will require increased effort.<
Switch on the hazard warning flashers, depend-
ing on local regulations.
Manual transmission
Gearshift lever in idle position.
Automatic transmission
Selector lever in position N.
Changing selector lever positions, refer to
page45.
Do not exceed a towing speed of 45 mph
or 70 km/h and a towing distance of
90 miles/150 km, otherwise the automatic
transmission may be damaged.<
Towing with a tow bar
The towing vehicle must not be lighter
than the towed vehicle, otherwise it may
be impossible to maintain control.<
The tow fittings used should be on the same
side on both vehicles. Should it prove impossi-
ble to avoid mounting the tow bar at an angle,
please observe the following:
>Clearance and maneuvering capability will
be sharply limited during cornering.
>The tow bar will generate lateral forces if it is
attached offset.
Attach the tow bar to the tow fittings only,
as attaching it to other parts of the vehicle
could result in damage.<
Towing with a tow rope
When starting off in the towing vehicle, make
sure that the tow rope is taut.
To avoid jerking and the associated
stresses on vehicle components when
towing, always use nylon ropes or nylon straps.
Attach the tow rope to the tow fittings only, as
attaching it to other parts of the vehicle could
result in damage.<
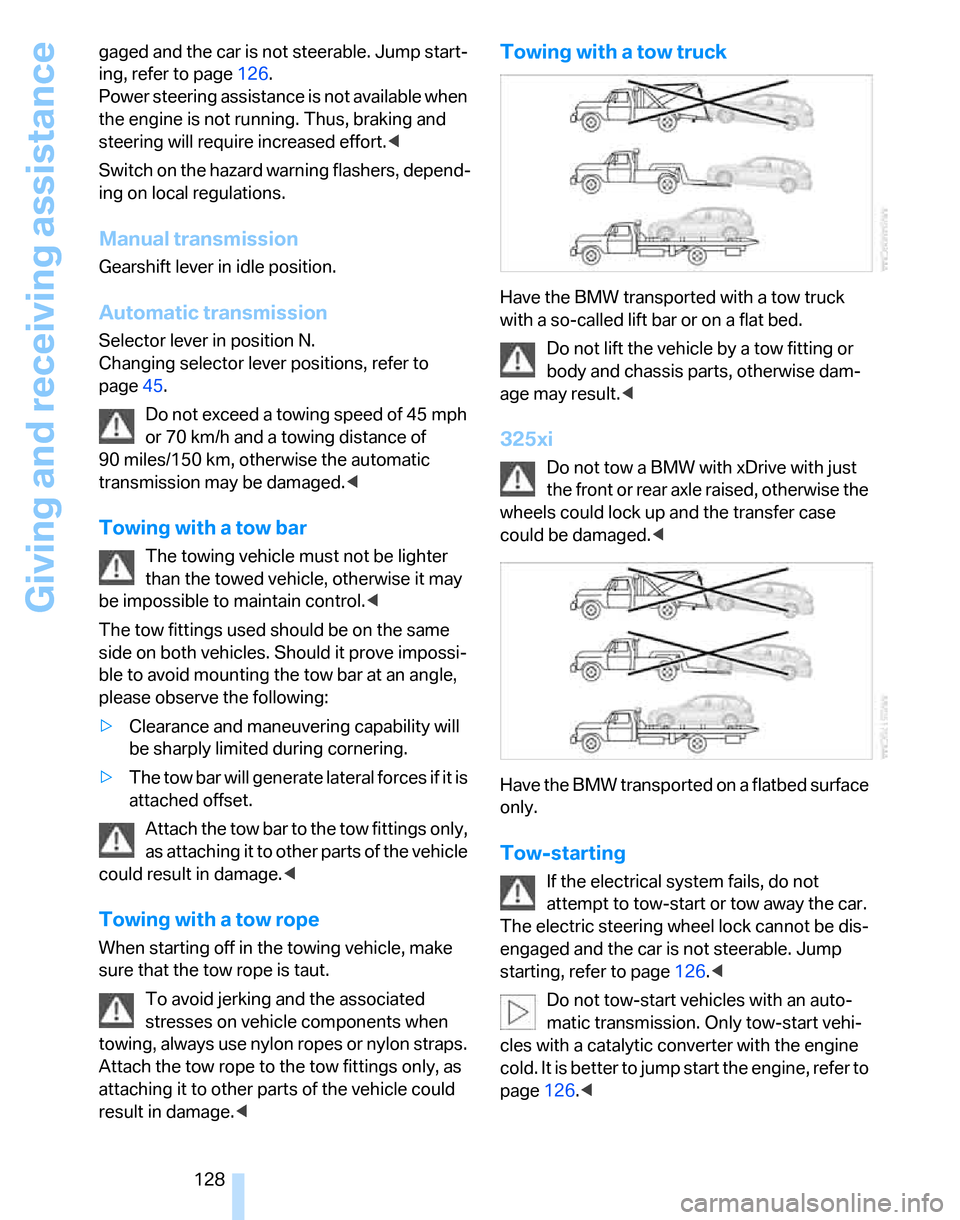
Towing with a tow truck
Have the BMW transported with a tow truck
with a so-called lift bar or on a flat bed.
Do not lift the vehicle by a tow fitting or
body and chassis parts, otherwise dam-
age may result.<
325xi
Do not tow a BMW with xDrive with just
the front or rear axle raised, otherwise the
wheels could lock up and the transfer case
could be damaged.<
Have the BMW transported on a flatbed surface
only.
Tow-starting
If the electrical system fails, do not
attempt to tow-start or tow away the car.
The electric steering wheel lock cannot be dis-
engaged and the car is not steerable. Jump
starting, refer to page126.<
Do not tow-start vehicles with an auto-
matic transmission. Only tow-start vehi-
cles with a catalytic converter with the engine
cold. It is better to jump start the engine, refer to
page126.<
Page 133 of 160

Reference
At a glance
Controls
Driving tips
Mobility
131
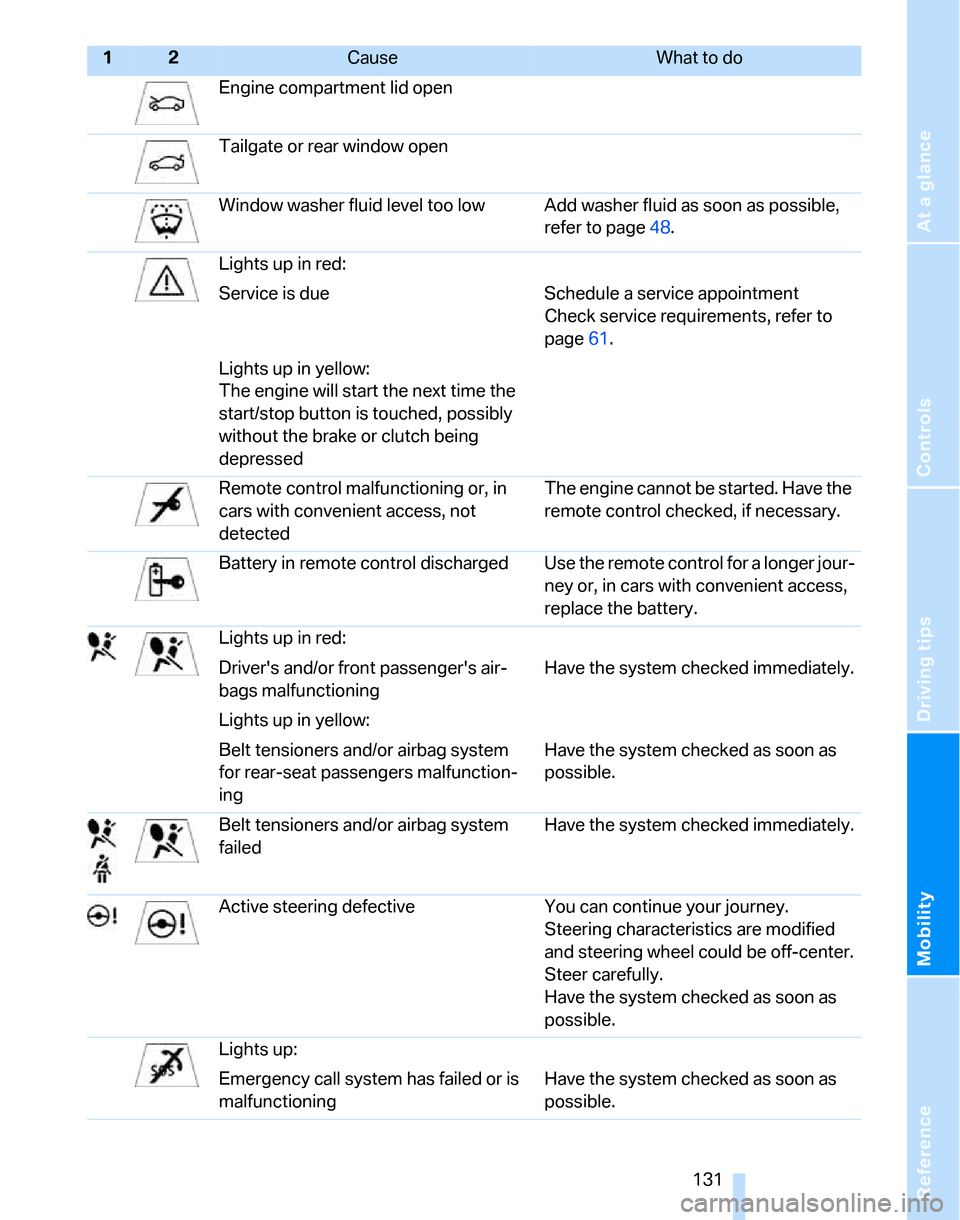
Engine compartment lid open
Tailgate or rear window open
Window washer fluid level too low Add washer fluid as soon as possible,
refer to page48.
Lights up in red:
Service is due Schedule a service appointment
Check service requirements, refer to
page61.
Lights up in yellow:
The engine will start the next time the
start/stop button is touched, possibly
without the brake or clutch being
depressed
Remote control malfunctioning or, in
cars with convenient access, not
detectedThe engine cannot be started. Have the
remote control checked, if necessary.
Battery in remote control discharged Use the remote control for a longer jour-
ney or, in cars with convenient access,
replace the battery.
Lights up in red:
Driver's and/or front passenger's air-
bags malfunctioningHave the system checked immediately.
Lights up in yellow:
Belt tensioners and/or airbag system
for rear-seat passengers malfunction-
ingHave the system checked as soon as
possible.
Belt tensioners and/or airbag system
failedHave the system checked immediately.
Active steering defective You can continue your journey.
Steering characteristics are modified
and steering wheel could be off-center.
Steer carefully.
Have the system checked as soon as
possible.
Lights up:
Emergency call system has failed or is
malfunctioningHave the system checked as soon as
possible.
12Cause What to do
Page 139 of 160

Reference
At a glance
Controls
Driving tips
Mobility
137
Selector lever position P not engaged.
Ignition cannot be switched offEngage selector lever position P when
you wish to switch off the ignition, refer
to page42.
Lights up in red:
Electric steering wheel lock malfunc-
tioningThe engine can no longer be started. If
applicable, do not switch off the engine.
Contact your BMW Center.
Lights up in yellow:
Electric steering wheel lock jammed Move the steering wheel before starting
the engine.
Anti-trapping mechanism of the power
windows malfunctioningHave the system checked.
Anti-trapping mechanism of the elec-
tric glass sunroof malfunctioningHave the system checked.
Cruise control deactivated:
>Driving stability control systems are
active or
>handbrake is applied or
>the vehicle has not achieved a
speed of 20 mph or 30 km/h or
>engaged gear not suitable for the
speed being driven
Cruise control system failed You can continue your journey. Have
the system checked.
Engine speed too low Select a lower gear if the driving situa-
tion permits you to do so.
Engine speed too high Select a higher gear if the driving situa-
tion permits you to do so.
Active cruise control deactivated:
>Driving stability control systems are
active or
>handbrake is applied or
>the vehicle has not achieved a
speed of 20 mph or 30 km/h or
>engaged gear not suitable for the
speed being driven orKeep a safe distance.
>radar sensor dirty Clean the radar sensor, refer to
page54.
12Cause What to do
Page 149 of 160

Reference
At a glance
Controls
Driving tips
Mobility
147
Backup lamps, refer to Tail
lamps122
Band-aids, refer to First-aid
pouch125
Bar, refer to Tow-starting,
towing away128
Battery123
– charging123
– disposal27,123
– jump starting126
– temporary power failure123
Battery renewal
– remote control27
Being towed127
Belts, refer to Safety belts36
Belt tensioner, refer to Safety
belts36
Beverage holders, refer to
Cup holders88
Black ice, refer to Outside
temperature warning57
Blower, refer to Air flow
rate79,82
BMW Homepage4
BMW Maintenance
System117
BMW webpage4
Bottle holders, refer to Cup
holders88
Brake assist, refer to Dynamic
Brake Control66
Brake fluid115
– level too low115
– warning lamp115,116
Brake fluid, refer to Service
requirements61
Brake Force Display71
Brake hydraulics, refer to
Brakes115
Brake lamps
– Brake Force Display71
– replacing bulbs122
Brake pads, breaking in96
Brake rotors98
– brakes96
– breaking in96Brakes
– ABS66
– BMW Maintenance
System117
– brake fluid115
– brake pads116
– breaking in96
– handbrake44
– service requirements61
Brakes, refer to Braking
safely97
Brake system96
– BMW Maintenance
System117
– brake fluid115
– brake pads116
– breaking in96
– disc brakes98
Breakdown services, refer to
Roadside Assistance125
Breaking in the clutch96
Breaking in the differential96
Break-in period96
Bulb changing, refer to Lamps
and bulbs119
Burned fuel
– refer to Average
consumption58
Button for starting engine42
Buttons on steering wheel11
C
California Proposition 65
warning6
Can holders, refer to Cup
holders88
Capacities145
Capacity of cargo area144
Car battery, refer to Vehicle
battery123
Car care, refer to Caring for
your vehicle brochure
Car-care products, refer to
Caring for your vehicle
brochure
Care, refer to Caring for your
vehicle brochure
Cargo, securing99Cargo area90
– capacity144
– convenient access26
– cover90
– folding up the floor panel92
– lamp77
– lid, refer to Tailgate23
– net90
– opening from outside23
Cargo area net90
Cargo loading
– stowing cargo99
– vehicle98
Caring for artificial leather,
refer to Caring for your
vehicle brochure
Caring for leather, refer to
Caring for your vehicle
brochure
Caring for light-alloy wheels,
refer to Caring for your
vehicle brochure
Caring for plastic, refer to
Caring for your vehicle
brochure
Caring for the carpet, refer to
Caring for your vehicle
brochure
Caring for the vehicle finish,
refer to Caring for your
vehicle brochure
Car jack
– jacking points123
Car key, refer to Integrated
key/remote control18
Car phone
– installation location, refer to
Center armrest87
– refer to separate Owner's
Manual
Car wash98
– also refer to Caring for your
vehicle brochure
Catalytic converter, refer to
Hot exhaust system96
CBS Condition Based
Service117
Center armrest87