2006 BMW 325XI SPORTS WAGON traction control
[x] Cancel search: traction controlPage 16 of 236

At a glance
15Reference
Controls
Driving tips
Communications
Navigation
Entertainment
Mobility
1Microphone for voice command system*
and for telephone in hands-free mode*
2Initiating an emergency call*
3Reading lamps93
4Panorama glass roof
*38
5Interior lamps93
6Passenger airbag status lamp
*89
7Control Display16
8Hazard warning flashers
9DTC Dynamic Traction Control83
10Central locking system32
11Automatic climate control
12Ejecting
>Audio CD140
>Navigation DVD12013Changing
>Radio station144
>Track153
15Controller16
Can be turned, pressed, or moved horizon-
tally in four directions
16Activating voice command system
*22
17Opening start menu on Control Display17
18Drive for navigation DVD120
19Switching audio sources on/off and adjust-
ing volume140
20Drive for audio CDs140 Air distribution to the
windshield95
Air distribution to the upper body
area95
Air distribution to the footwell95
Automatic air distribution and flow
rate95
Cooling function97
AUC Automatic recirculated-air
control96
Recirculated-air mode96
Maximum cooling95
Residual heat mode96
Air flow rate96
Defrosting windows97
Rear window defroster97
14
Heated seats*44
PDC Park Distance Control
*81
Hill Descent Control HDC
*84
Page 64 of 236
Controls
63Reference
At a glance
Driving tips
Communications
Navigation
Entertainment
Mobility
Increasing continuously
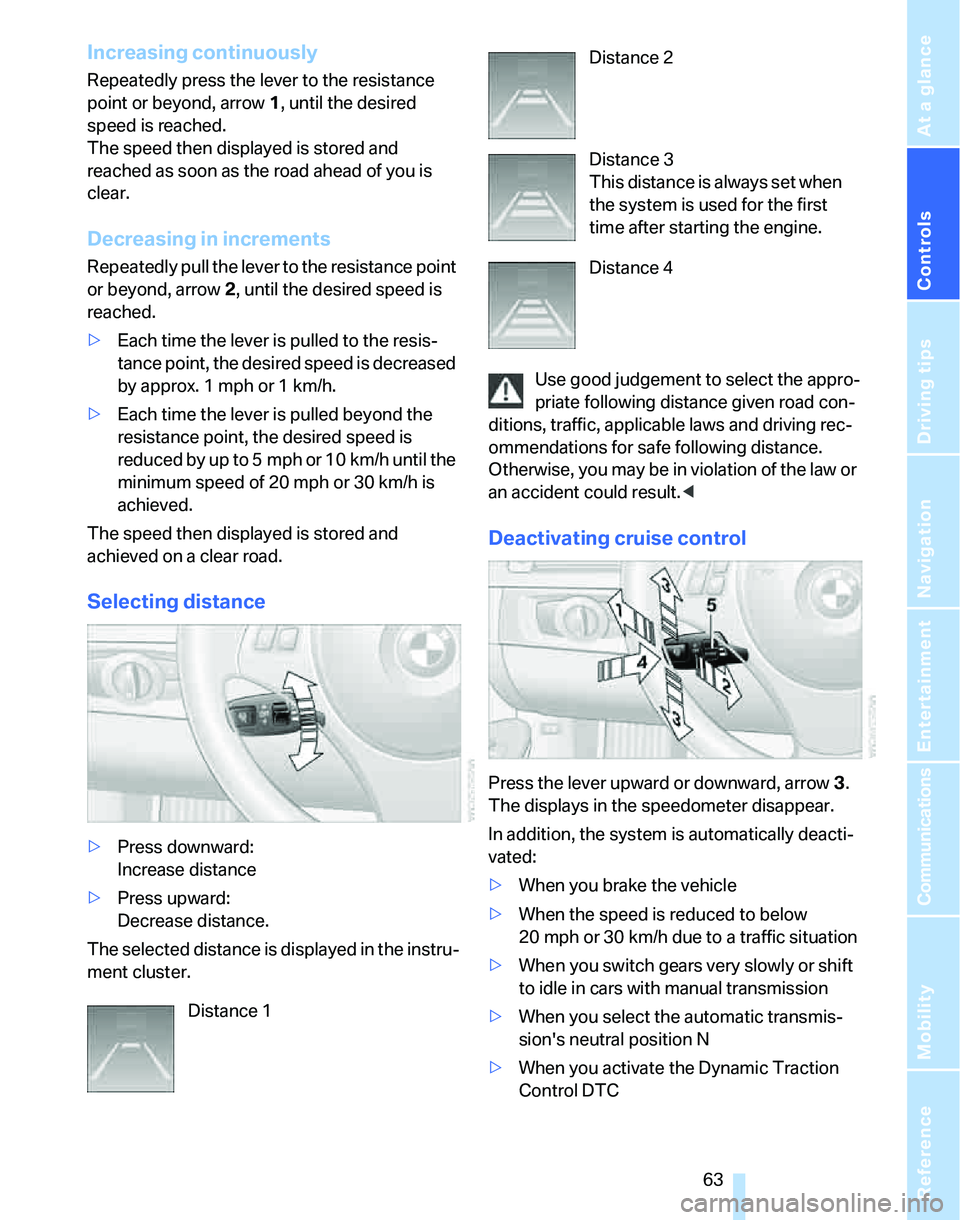
Repeatedly press the lever to the resistance
point or beyond, arrow1, until the desired
speed is reached.
The speed then displayed is stored and
reached as soon as the road ahead of you is
clear.
Decreasing in increments
Repeatedly pull the lever to the resistance point
or beyond, arrow 2, until the desired speed is
reached.
>Each time the lever is pulled to the resis-
tance point, the desired speed is decreased
by approx. 1 mph or 1 km/h.
>Each time the lever is pulled beyond the
resistance point, the desired speed is
reduced by up to 5 mph or 10 km/h until the
minimum speed of 20 mph or 30 km/h is
achieved.
The speed then displayed is stored and
achieved on a clear road.
Selecting distance
>Press downward:
Increase distance
>Press upward:
Decrease distance.
The selected distance is displayed in the instru-
ment cluster.Use good judgement to select the appro-
priate following distance given road con-
ditions, traffic, applicable laws and driving rec-
ommendations for safe following distance.
Otherwise, you may be in violation of the law or
an accident could result.<
Deactivating cruise control
Press the lever upward or downward, arrow3.
The displays in the speedometer disappear.
In addition, the system is automatically deacti-
vated:
>When you brake the vehicle
>When the speed is reduced to below
20 mph or 30 km/h due to a traffic situation
>When you switch gears very slowly or shift
to idle in cars with manual transmission
>When you select the automatic transmis-
sion's neutral position N
>When you activate the Dynamic Traction
Control DTC Distance 1
Distance 2
Distance 3
This distance is always set when
the system is used for the first
time after starting the engine.
Distance 4
Page 83 of 236
Technology for driving comfort and safety
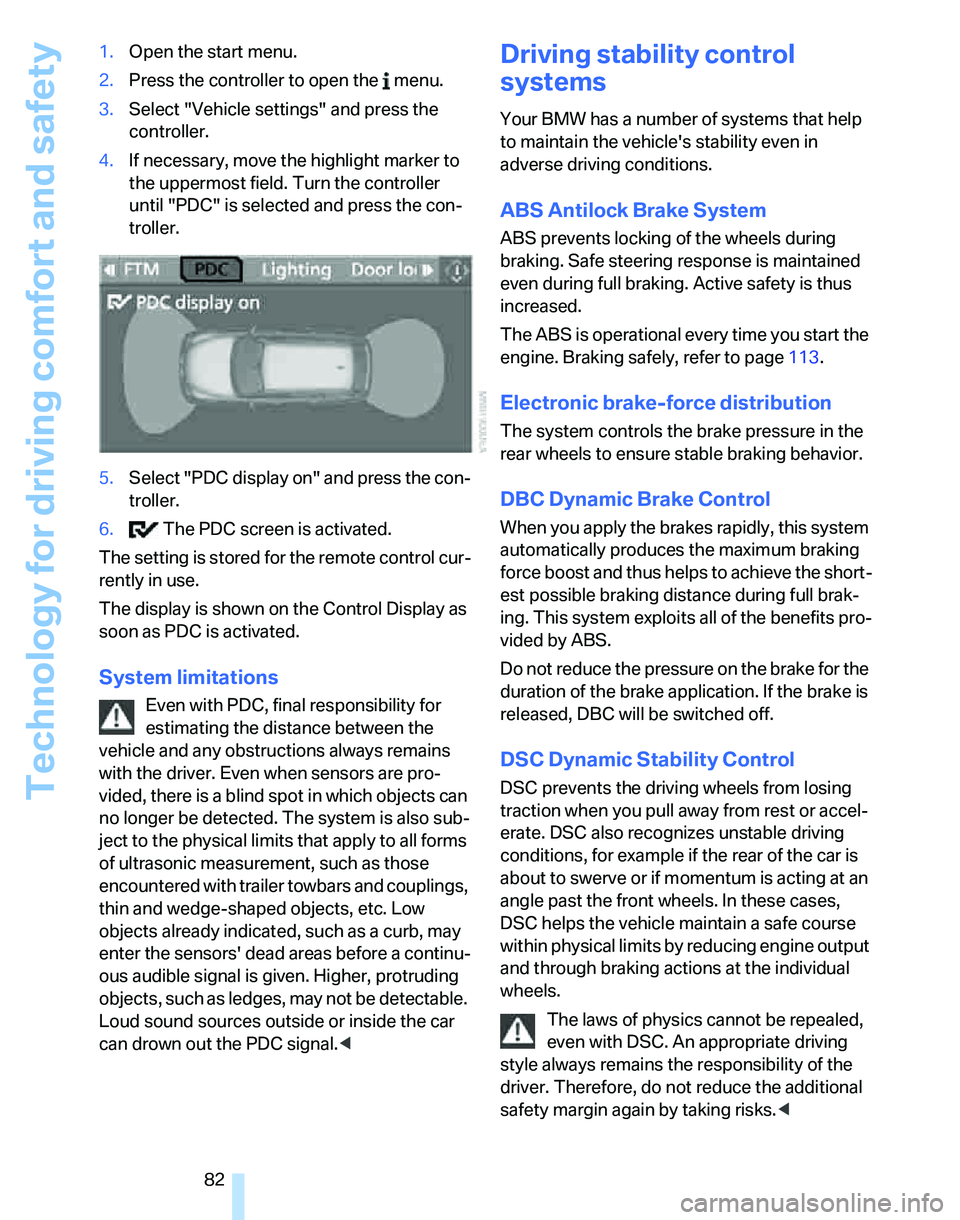
82 1.Open the start menu.
2.Press the controller to open the menu.
3.Select "Vehicle settings" and press the
controller.
4.If necessary, move the highlight marker to
the uppermost field. Turn the controller
until "PDC" is selected and press the con-
troller.
5.Select "PDC display on" and press the con-
troller.
6. The PDC screen is activated.
The setting is stored for the remote control cur-
rently in use.
The display is shown on the Control Display as
soon as PDC is activated.
System limitations
Even with PDC, final responsibility for
estimating the distance between the
vehicle and any obstructions always remains
with the driver. Even when sensors are pro-
vided, there is a blind spot in which objects can
no longer be detected. The system is also sub-
ject to the physical limits that apply to all forms
of ultrasonic measurement, such as those
encountered with trailer towbars and couplings,
thin and wedge-shaped objects, etc. Low
objects already indicated, such as a curb, may
enter the sensors' dead areas before a continu-
ous audible signal is given. Higher, protruding
objects, such as ledges, may not be detectable.
Loud sound sources outside or inside the car
can drown out the PDC signal.<
Driving stability control
systems
Your BMW has a number of systems that help
to maintain the vehicle's stability even in
adverse driving conditions.
ABS Antilock Brake System
ABS prevents locking of the wheels during
braking. Safe steering response is maintained
even during full braking. Active safety is thus
increased.
The ABS is operational every time you start the
engine. Braking safely, refer to page113.
Electronic brake-force distribution
The system controls the brake pressure in the
rear wheels to ensure stable braking behavior.
DBC Dynamic Brake Control
When you apply the brakes rapidly, this system
automatically produces the maximum braking
force boost and thus helps to achieve the short-
est possible braking distance during full brak-
ing. This system exploits all of the benefits pro-
vided by ABS.
Do not reduce the pressure on the brake for the
duration of the brake application. If the brake is
released, DBC will be switched off.
DSC Dynamic Stability Control
DSC prevents the driving wheels from losing
traction when you pull away from rest or accel-
erate. DSC also recognizes unstable driving
conditions, for example if the rear of the car is
about to swerve or if momentum is acting at an
angle past the front wheels. In these cases,
DSC helps the vehicle maintain a safe course
within physical limits by reducing engine output
and through braking actions at the individual
wheels.
The laws of physics cannot be repealed,
even with DSC. An appropriate driving
style always remains the responsibility of the
driver. Therefore, do not reduce the additional
safety margin again by taking risks.<
Page 84 of 236
Controls
83Reference
At a glance
Driving tips
Communications
Navigation
Entertainment
Mobility
Deactivating DSC
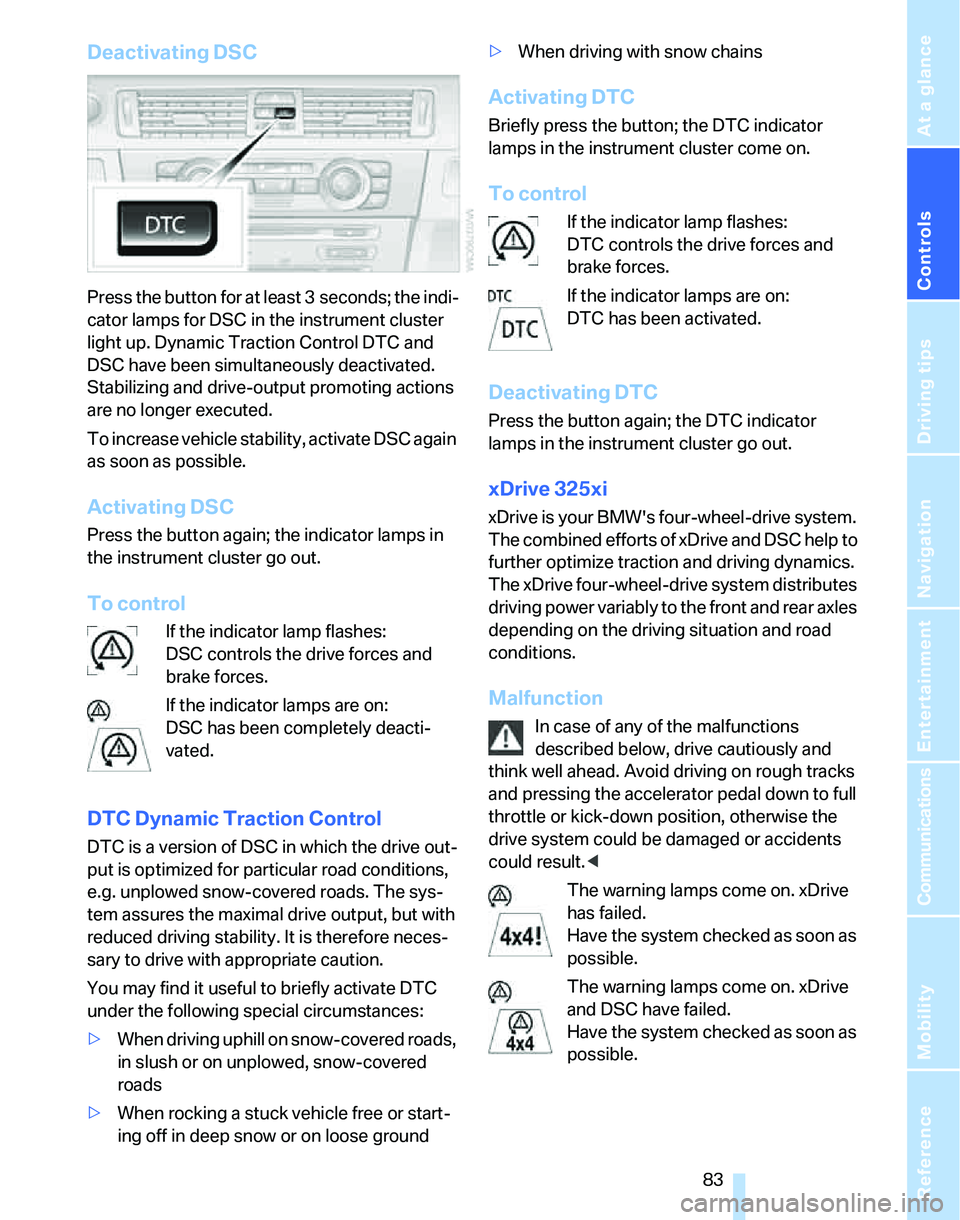
Press the button for at least 3 seconds; the indi-
cator lamps for DSC in the instrument cluster
light up. Dynamic Traction Control DTC and
DSC have been simultaneously deactivated.
Stabilizing and drive-output promoting actions
are no longer executed.
To increase vehicle stability, activate DSC again
as soon as possible.
Activating DSC
Press the button again; the indicator lamps in
the instrument cluster go out.
To control
If the indicator lamp flashes:
DSC controls the drive forces and
brake forces.
If the indicator lamps are on:
DSC has been completely deacti-
vated.
DTC Dynamic Traction Control
DTC is a version of DSC in which the drive out-
put is optimized for particular road conditions,
e.g. unplowed snow-covered roads. The sys-
tem assures the maximal drive output, but with
reduced driving stability. It is therefore neces-
sary to drive with appropriate caution.
You may find it useful to briefly activate DTC
under the following special circumstances:
>When driving uphill on snow-covered roads,
in slush or on unplowed, snow-covered
roads
>When rocking a stuck vehicle free or start-
ing off in deep snow or on loose ground>When driving with snow chains
Activating DTC
Briefly press the button; the DTC indicator
lamps in the instrument cluster come on.
To control
If the indicator lamp flashes:
DTC controls the drive forces and
brake forces.
If the indicator lamps are on:
DTC has been activated.
Deactivating DTC
Press the button again; the DTC indicator
lamps in the instrument cluster go out.
xDrive 325xi
xDrive is your BMW's four-wheel-drive system.
The combined efforts of xDrive and DSC help to
further optimize traction and driving dynamics.
The xDrive four-wheel-drive system distributes
driving power variably to the front and rear axles
depending on the driving situation and road
conditions.
Malfunction
In case of any of the malfunctions
described below, drive cautiously and
think well ahead. Avoid driving on rough tracks
and pressing the accelerator pedal down to full
throttle or kick-down position, otherwise the
drive system could be damaged or accidents
could result.<
The warning lamps come on. xDrive
has failed.
Have the system checked as soon as
possible.
The warning lamps come on. xDrive
and DSC have failed.
Have the system checked as soon as
possible.
Page 187 of 236
Wheels and tires
186
Tire identification marks
Knowledge of the labeling on the side of the tire
makes it easier to identify and choose the right
tires.
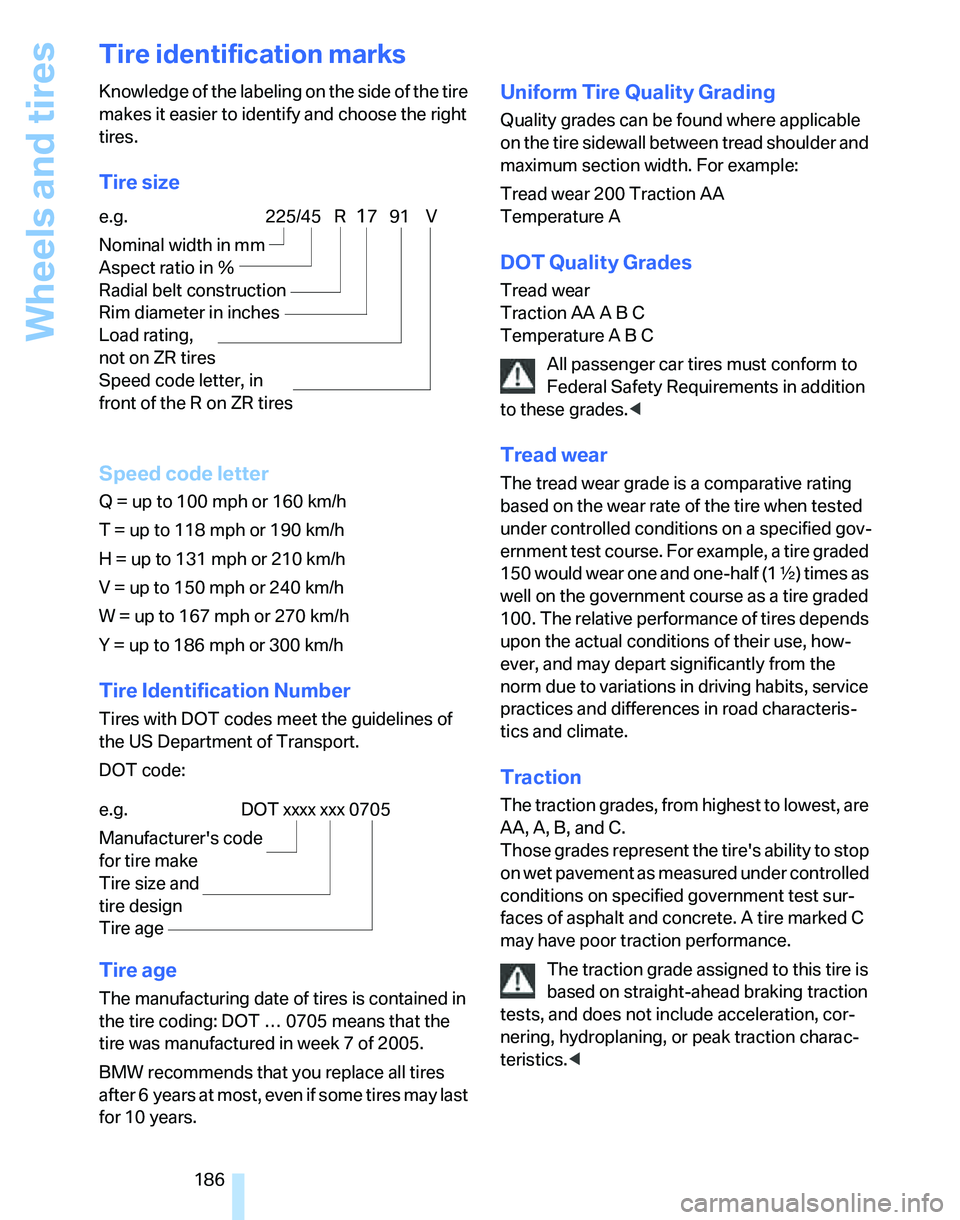
Tire size
Speed code letter
Q = up to 100 mph or 160 km/h
T = up to 118 mph or 190 km/h
H = up to 131 mph or 210 km/h
V = up to 150 mph or 240 km/h
W = up to 167 mph or 270 km/h
Y = up to 186 mph or 300 km/h
Tire Identification Number
Tires with DOT codes meet the guidelines of
the US Department of Transport.
DOT code:
Tire age
The manufacturing date of tires is contained in
the tire coding: DOT … 0705 means that the
tire was manufactured in week 7 of 2005.
BMW recommends that you replace all tires
after 6 years at most, even if some tires may last
for 10 years.
Uniform Tire Quality Grading
Quality grades can be found where applicable
on the tire sidewall between tread shoulder and
maximum section width. For example:
Tread wear 200 Traction AA
Temperature A
DOT Quality Grades
Tread wear
Traction AA A B C
Temperature A B C
All passenger car tires must conform to
Federal Safety Requirements in addition
to these grades.<
Tread wear
The tread wear grade is a comparative rating
based on the wear rate of the tire when tested
under controlled conditions on a specified gov-
ernment test course. For example, a tire graded
150 would wear one and one-half (1γ) times as
well on the government course as a tire graded
100. The relative performance of tires depends
upon the actual conditions of their use, how-
ever, and may depart significantly from the
norm due to variations in driving habits, service
practices and differences in road characteris-
tics and climate.
Traction
The traction grades, from highest to lowest, are
AA, A, B, and C.
Those grades represent the tire's ability to stop
on wet pavement as measured under controlled
conditions on specified government test sur-
faces of asphalt and concrete. A tire marked C
may have poor traction performance.
The traction grade assigned to this tire is
based on straight-ahead braking traction
tests, and does not include acceleration, cor-
nering, hydroplaning, or peak traction charac-
teristics.< e.g.
Nominal width in mm
Aspect ratio in Ξ
Radial belt construction
Rim diameter in inches
Load rating,
not on ZR tires
Speed code letter, in
front of the R on ZR tires
225/45 R1791 V
e.g.
Manufacturer's code
for tire make
Tire size and
tire design
Tire ageDOT xxxx xxx 0705
Page 190 of 236
Mobility
189Reference
At a glance
Controls
Driving tips
Communications
Navigation
Entertainment
Run-Flat Tires
When mounting new tires or changing over
from summer to winter tires and vice versa,
mount Run-Flat Tires for your own safety. In the
event of a flat, moreover, no spare wheel is
available. Your BMW Center will be glad to
advise you.
For safety reasons, BMW recommends
that damaged Run-Flat Tires be replaced
rather than repaired.<
Special characteristics of winter tires
BMW recommends winter tires for use in cold
winter driving conditions. Although all-season
M+S tires provide better winter traction than
summer tires, they generally fail to provide the
same levels of cold-weather performance as
winter tires.
Pay attention to speed
Always comply with the speed limit for the
winter tires mounted on your car; failure
to do so could result in tire damage and acci-
dents.<
If the car is capable of speeds higher than that
permitted for the winter tires, a label stating the
maximum permitted speed for the mounted
tires must be displayed in your field of view.
Specialist tire dealers and your BMW Center
can supply these labels.
Storage
Always store wheels and tires in a cool, dry
place with as little exposure to light as possible.
Always protect tires against all contact with oil,
grease and fuels. Do not exceed the maximum
tire inflation pressure indicated on the sidewall
of the tire.
Snow chains*
Only certain fine-link snow chains have been
tested by BMW, classified as safe for use and
recommended. Consult your BMW Center for
more information. Attach snow chains in pairs
and only to the rear wheels. Observe the manu-facturer's instructions when mounting snow
chains. Do not exceed a speed of 30 mph or
50 km/h.
You are not permitted to mount snow chains to
tires of the following sizes:
>255/40 R 17
>255/35 R 18
>255/30 R 19
Do not initialize the Flat Tire Monitor if
snow chains are mounted, otherwise the
instrument might issue an incorrect reading.
When driving with snow chains, you may find it
helpful to activate DTC temporarily, refer to
page83.<
Page 223 of 236
Everything from A - Z
222 Deadlocking, refer to
Locking30
Decommissioning the vehicle
– refer to Caring for your
vehicle brochure
Defect
– door lock32
– fuel filler door182
– panorama glass roof39
Defogging windows97
Defrosting windows97
Defrosting windows and
removing condensation
– automatic climate control97
Defrosting windshield, refer to
Defrosting windows97
Defrost position, refer to
Defrosting windows97
"Delete address book" in
navigation130
"Delete all numbers" on the
mobile phone169
"Delete data" in
navigation130
"Delete" for mobile
phone169
Destination address
– deleting129
– entering121,124
Destination for navigation
– entry121
– navigation list127
– selecting from address
book129
– selecting using
information126
– storing128Destination guidance132
– bypassing route
sections136
– canceling voice
instructions49
– changing specified
route130
– displaying route133
– displaying routes133
– distance and arrival132
– interrupting132
– starting132
– terminating/continuing132
– voice instructions135
– volume of voice
instructions135
Destination list for navigation
system127
Destinations recently driven
to127
"Dial" for mobile phone167
"Dial number"167
Digital clock67
Digital compass
101
Digital radio147
Dimensions211
Directional indicators, refer to
Turn signals57
Direction instructions, refer to
Voice instructions135
Directory for navigation, refer
to Address book128
Displacement, refer to Engine
data210
Display, refer to iDrive
controls16
Display lighting, refer to
Instrument lighting93
"Display off"21
Displays
– instrument cluster12
– on the Control Display16
Displays and controls10
"Display settings"75
Disposal
– coolant193
– remote control battery37
– vehicle battery201Distance control, refer to
Active cruise control61
Distance remaining to service,
refer to Service
requirements72
"Distance to dest."69
Distance warning, refer to
PDC Park Distance
Control81
Door key, refer to Integrated
key/remote control28
Door lock32
Door locking, confirmation
signals31
"Door locks"30
Doors, emergency
operation32
DOT Quality Grades186
Draft-free ventilation97
Drinks holders, refer to Cup
holders104
Drive-off assistant85
Driving lamps, refer to Parking
lamps/low beams90
Driving notes112
Driving route, refer to
Displaying route133
Driving stability control
systems82
Driving through water113
Driving tips, refer to Driving
notes112
Dry air, refer to Cooling
function97
DSC Dynamic Stability
Control82
DTC Dynamic Traction
Control83
– indicator lamps
83
DVD for navigation120
Dynamic Traction Control
DTC
– indicator lamps83
E
EBV Electronic brake-force
distribution82
Page 233 of 236
Everything from A - Z
232 Tow fitting
– screw thread205
Tow fittings205
Tow fittings for tow-starting
and towing away205
Towing205
– methods206
Towing away
– car with automatic
transmission205
"Town / City" in destination
entry122
Tow rope206
Tow-starting205
– sequential manual gearbox
SMG206
Tracks
– random play sequence155
Track width, refer to
Dimensions211
Traction-assist feature, refer
to DSC82
Traction control, refer to DSC
Dynamic Stability
Control82
Trailer towing
– towing loads and gross
weight212
Transmission
– automatic transmission with
Steptronic55
– manual transmission55
– overriding selector lever lock
for automatic transmission
with Steptronic57
Transporting children
safely50
Transport securing device,
refer to Securing cargo115
Tread depth, refer to Minimum
tire tread187
Treble, refer to Tone
control141
Treble, refer to Treble and
bass141
Treble, tone control141
"Trip computer"70
Trip computer69Trip-distance counter, refer to
Trip odometer67
"Triple turn signal
activation"57
Triple turn signal activation57
Trip odometer67
Trunk lamp, refer to Cargo
area lamp93
Trunk lid, refer to Tailgate33
Turning circle, refer to
Dimensions211
Turn signals57
– indicator lamp12
– replacing bulbs199
Tying down loads, refer to
Cargo loading115
U
Underbody protection, refer to
Caring for your vehicle
brochure
Uniform Tire Quality Grading/
UTQR186
"Units"71
Units
– average consumption71
– temperature71
Universal garage door opener,
refer to Integrated universal
remote control100
Universal remote control100
Unlatching, refer to
Unlocking35
"Unlock button"30
Unlocking
– from inside33
– from outside30
– tailgate36
– without remote control, refer
to Convenient access35
"Update services"177
V
Vehicle
– battery201
– breaking in112
– care, refer to Caring for your
vehicle brochure
– cargo loading114
– dimensions211
– Identification Number, refer
to Engine compartment191
– parking54
– washing, refer to Caring for
your vehicle brochure
– weight212
Vehicle jack201
Vehicle position, refer to
Displaying current
position136
"Vehicle settings"86
Ventilation97
– draft-free97
– in the rear97
Ventilation while at a
standstill98
Vents, refer to Ventilation97
"Vent settings"95
Voice commands
– overview22
– short commands214
Voice instructions for
navigation system135
– muting49,135
– repeating49,135
– switching on/off135
– volume135
Voice phone book171
Volume140
– audio sources140
– mobile phone166
– speed-dependent
adjustment141
– voice instructions135
W
Warning and indicator
lamps13