2006 BMW 325XI SEDAN rear entertainment
[x] Cancel search: rear entertainmentPage 109 of 245

Controls
107Reference
At a glance
Driving tips
Communications
Navigation
Entertainment
Mobility
Ventilated storage compartment
The storage compartment in the center armrest
can be ventilated: slide the switch backwards.
The temperature is controlled via the knurled
wheel for adjusting the temperature of air venti-
lating the rear of the passenger compartment,
refer to page100.
Connection for external audio device
You can connect an external audio device such
as a CD or MP3 player and play audio tracks
over the car's loudspeaker system, refer to
page162.
Storage compartments inside
the vehicle
Depending on your vehicle's equipment, you
will find compartments beside the steering col-
umn
*, in the front doors and in the center con-
sole
*.
There are nets
* on the front-seat backrests.
Clothes hooks
There are clothes hooks on the grab handles in
the rear passenger compartment.
Items of clothing hung from the hooks
must not obstruct the driver's view. Do
not hang heavy objects from the hooks, other-
wise they could endanger the car's occupants,
e.g. in case of heavy braking or sudden swerv-
ing.<
Cup holders
Do not place glassware in a cup holder;
otherwise there is an increased risk of
injury in the event of an accident.<
Front
Opening
Briefly press the center of the cover.
Closing
Briefly press the cover in the center and push in
the cup holder.
Rear
There are two additional cup holders in the rear
center armrest.
Ashtray, front
Opening
Push the ridge on the cover.
Page 111 of 245

Controls
109Reference
At a glance
Driving tips
Communications
Navigation
Entertainment
Mobility
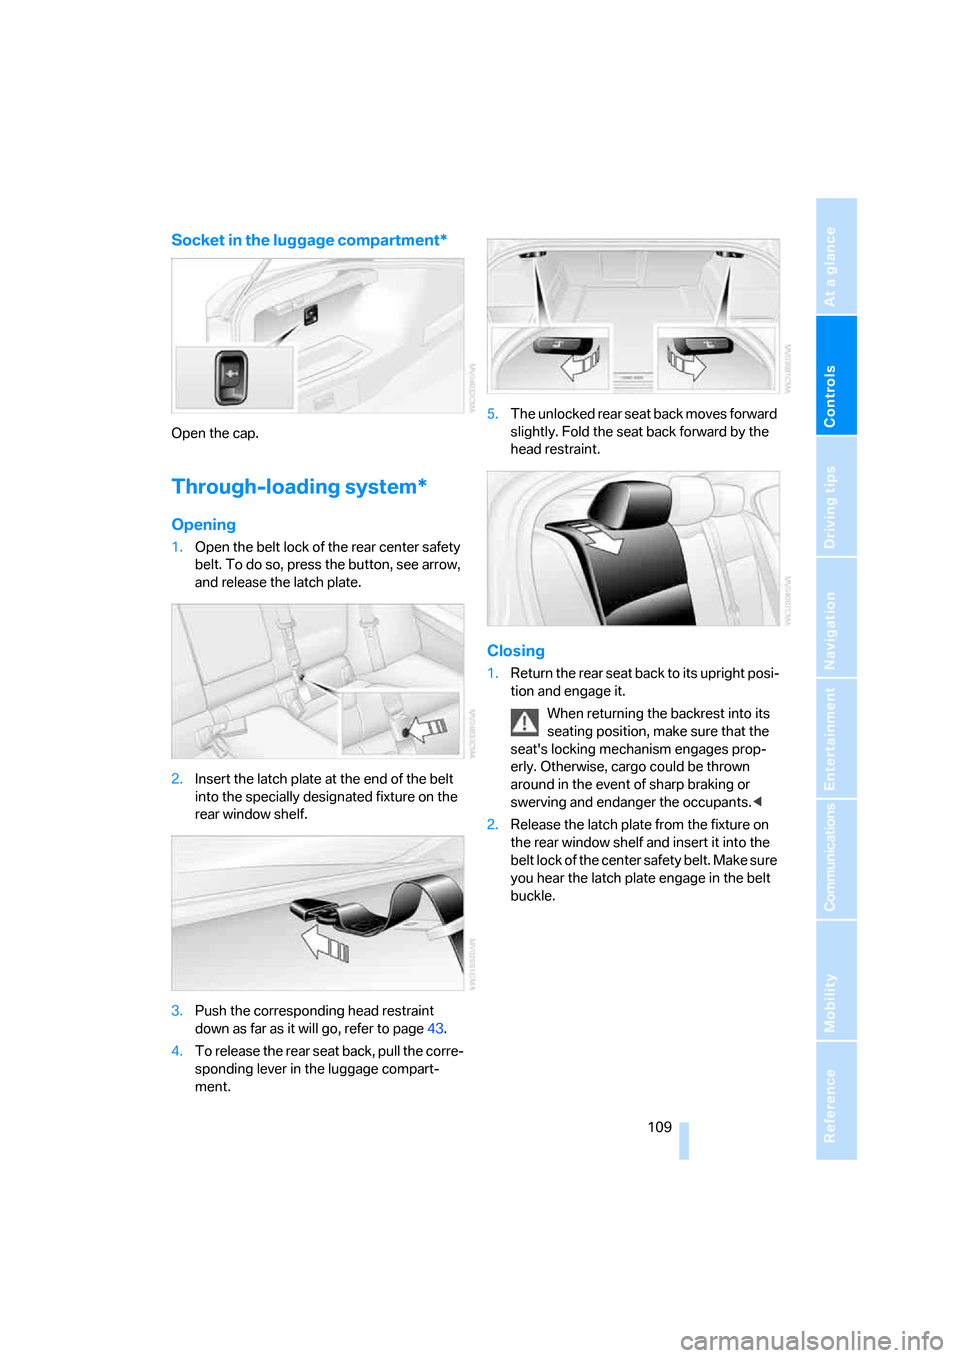
Socket in the luggage compartment*
Open the cap.
Through-loading system*
Opening
1.Open the belt lock of the rear center safety
belt. To do so, press the button, see arrow,
and release the latch plate.
2.Insert the latch plate at the end of the belt
into the specially designated fixture on the
rear window shelf.
3.Push the corresponding head restraint
down as far as it will go, refer to page43.
4.To release the rear seat back, pull the corre-
sponding lever in the luggage compart-
ment.5.The unlocked rear seat back moves forward
slightly. Fold the seat back forward by the
head restraint.
Closing
1.Return the rear seat back to its upright posi-
tion and engage it.
When returning the backrest into its
seating position, make sure that the
seat's locking mechanism engages prop-
erly. Otherwise, cargo could be thrown
around in the event of sharp braking or
swerving and endanger the occupants.<
2.Release the latch plate from the fixture on
the rear window shelf and insert it into the
belt lock of the center safety belt. Make sure
you hear the latch plate engage in the belt
buckle.
Page 119 of 245

Driving tips
117Reference
At a glance
Controls
Communications
Navigation
Entertainment
Mobility
nection to an outside antenna. Otherwise, the
vehicle electronics and mobile communication
device can influence one another. In addition,
there is no assurance that the radiation which
results from transmission will be dissipated
from the vehicle interior.<
Interior and exterior mirrors, automatic
dimming feature*
The automatic dimming feature of the interior
and exterior mirrors
* is controlled by two photo
cells in the interior rearview mirror. One photo
cell is in the mirror frame, see arrow; the other is
on the back of the mirror.
In order to ensure that the system functions
correctly, keep the photo cells clean, do not
cover the area between the interior rearview
mirror and windshield, and do not affix adhesive
labels or stickers of any kind to the windshield
directly in front of the mirror.
Hydroplaning
When driving on wet or slushy roads,
reduce road speed. If you do not, a wedge
of water can form between tires and road sur-
face. This situation, known as hydroplaning,
means that the tire can completely lose contact
with the road surface, so that neither the car can
be steered nor the brake be properly applied.<
The risk of hydroplaning increases with declin-
ing tread depth on the tires, refer also to Mini-
mum tread depth on page195.
Driving through water
Drive through water on the road only if it is
not deeper than 1 ft/30 cm, and then only
at walking speed at the most. Otherwise, the vehicle's engine, the electrical systems and the
transmission may be damaged.<
Use the handbrake on inclines
On inclines, do not hold the vehicle with
the clutch; use the handbrake. Otherwise
greater clutch wear will result.<
Sequential manual gearbox SMG
On uphill slopes, drive off without delay.
Do not hold the vehicle in place by
depressing the accelerator pedal; apply the
handbrake instead. Otherwise, the transmis-
sion could overheat.<
Also use the drive-off assistant, refer to
page87.
Braking safely
Your BMW is equipped with ABS as a standard
feature. Applying the brakes fully is the most
effective way of braking in situations in which
this is necessary. Since the vehicle maintains
steering responsiveness, you can still avoid
possible obstacles with a minimum of steering
effort.
Pulsation of the brake pedal, combined with
sounds from the hydraulic circuits, indicate that
ABS is in its active mode.
Driving in wet conditions
When roads are wet or there is heavy rain,
briefly exert gentle pressure on the brake pedal
every few miles. Monitor traffic conditions to
ensure that this maneuver does not endanger
other road users. The heat generated in this
process helps dry the pads and rotors to ensure
that full braking efficiency will then be available
when you need it.
Hills
To prevent overheating and the resulting
reduced efficiency of the brake system,
drive long or steep downhill gradients in the
gear in which the least braking is required. Even
light but consistent brake pressure can lead to
high temperatures, brake wear and possibly
even brake failure.<
Page 121 of 245

Driving tips
119Reference
At a glance
Controls
Communications
Navigation
Entertainment
Mobility
cargo and luggage load capacity calculated
in step 4.
6.If your vehicle will be towing a trailer, part of
the load from your trailer will be transferred
to your vehicle. Consult the manual for
transporting a trailer to determine how this
may reduce the available cargo and luggage
load capacity of your vehicle.
Load
The permissible load is the total of the weight of
occupants and cargo/luggage. The greater the
weight of the occupants, the less cargo/lug-
gage can be transported.
Stowing cargo
>Position heavy objects as low and as far for-
ward as possible, ideally directly behind the
respective seat backs.
>Cover sharp edges and corners.
>For very heavy cargo when the rear seat is
not occupied, secure each safety belt in the
opposite buckle.
Securing cargo
>Smaller and relatively light items can be
retained with tensioning straps or draw
straps
*.
>Heavy-duty cargo straps
* for securing
larger and heavier objects are available at
your BMW Center. Four lashing eyes are
provided for attaching the cargo straps.
Two are located on the inside rear wall of
the luggage compartment 1, and two others
are on the side walls of the luggage com-
partment 2.
Comply with the information provided with
the cargo straps.
Always position and secure the cargo as
described above, so that it cannot endan-
ger the car's occupants, for example if sudden
braking or swerves are necessary.
Never exceed either the approved gross vehicle
weight or either of the approved axle loads, refer
to page220, as excessive loads can pose a
safety hazard, and may also place you in viola-
tion of traffic safety laws.
Heavy or hard objects should not be carried
loose inside the car, since they could be thrown
around, for example as a result of heavy braking,
sudden swerves, etc., and endanger the occu-
pants.<
Roof-mounted luggage rack*
A special rack system is available as an option
for your BMW. Comply with the precautions
included with the installation instructions.
Page 147 of 245

Navigation
Entertainment
Driving tips
145Reference
At a glance
Controls
Communications
Mobility
Adjusting volume
Turn knob1 on the CD player until the desired
volume is obtained.
You can also adjust the volume with buttons on
the steering wheel, refer to page11.
The setting is stored for the remote control cur-
rently in use.
Tone control
You can alter various tone settings, e.g. treble
and bass or the speed-dependent volume
increase.
The tone settings are applied to all audio
sources.
The settings are stored for the remote control
currently in use.
Changing tone settings
1.Press the button.
This opens the start menu.
2.Press the controller to open the menu.
3.Select "Entertainment settings" and press
the controller.
4.Select "Audio" and press the controller.The tone settings can also be selected if you
have called up "Entertainment" in the start
menu:
Select "Set" and then "Tone", and press the
controller.
Treble and bass
1.Select "Treble / Bass" and press the con-
troller.
2.Move the controller to the left or right to
select "Treble" or "Bass".
3.Turn the controller until the desired setting
is selected.
Balance and fader
You can adjust the volume distribution in the
same manner as "Treble / Bass".
>"Balance": left/right volume distribution
>"Fader": front/rear volume distribution
Speed-dependent volume control
The speed-dependent volume control auto-
matically increases the volume with increasing
driving speed. You can set various stages for
the increase in volume.
Page 191 of 245

Mobility
189Reference
At a glance
Controls
Driving tips
Communications
Navigation
Entertainment
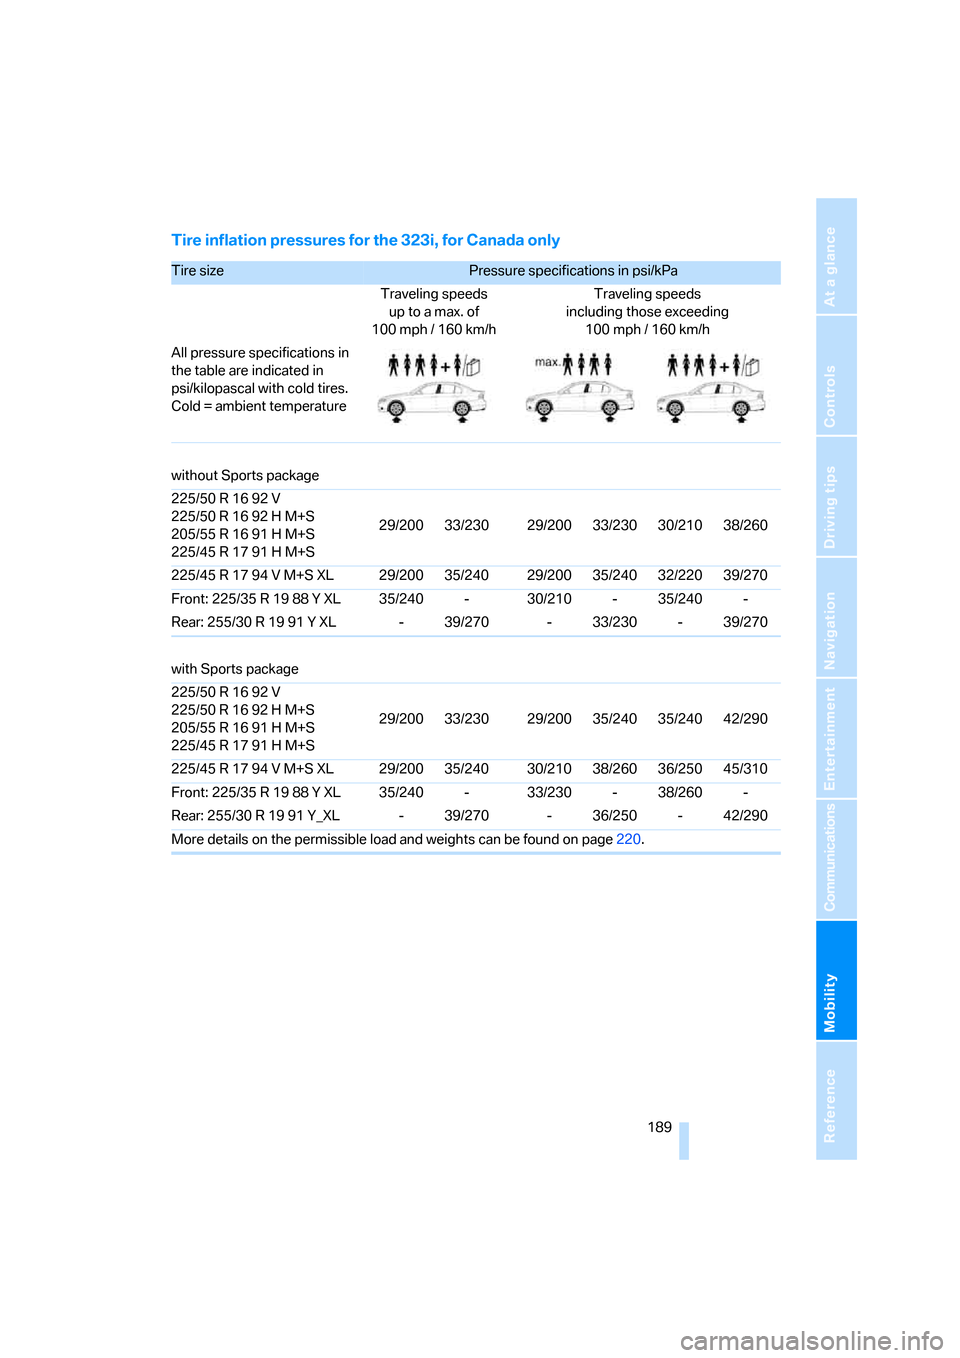
Tire inflation pressures for the 323i, for Canada only
Tire size Pressure specifications in psi/kPa
Traveling speeds
up to a max. of
100 mph / 160 km/hTraveling speeds
including those exceeding
100 mph / 160 km/h
All pressure specifications in
the table are indicated in
psi/kilopascal with cold tires.
Cold = ambient temperature
without Sports package
225/50 R 16 92 V
225/50 R 16 92 H M+S
205/55 R 16 91 H M+S
225/45 R 17 91 H M+S29/200 33/230 29/200 33/230 30/210 38/260
225/45 R 17 94 V M+S XL 29/200 35/240 29/200 35/240 32/220 39/270
Front: 225/35 R 19 88 Y XL 35/240 - 30/210 - 35/240 -
Rear: 255/30 R 19 91 Y XL - 39/270 - 33/230 - 39/270
with Sports package
225/50 R 16 92 V
225/50 R 16 92 H M+S
205/55 R 16 91 H M+S
225/45 R 17 91 H M+S29/200 33/230 29/200 35/240 35/240 42/290
225/45 R 17 94 V M+S XL 29/200 35/240 30/210 38/260 36/250 45/310
Front: 225/35 R 19 88 Y XL 35/240 - 33/230 - 38/260 -
Rear: 255/30 R 19 91 Y_XL - 39/270 - 36/250 - 42/290
More details on the permissible load and weights can be found on page220.
Page 193 of 245

Mobility
191Reference
At a glance
Controls
Driving tips
Communications
Navigation
Entertainment
Tire inflation pressures for the 325xi
Tire size Pressure specifications in psi/kPa
Traveling speeds
up to a max. of
100 mph / 160 km/hTraveling speeds
including those exceeding
100 mph / 160 km/h
All pressure specifications in
the table are indicated in
psi/kilopascal with cold tires.
Cold = ambient temperature
without Sports package:
205/55 R 16 91 H M+S
225/45 R 17 91 H M+S
225/50 R 16 92 H M+S
225/45 R 17 94 V M+S XL30/210 36/250 30/210 33/230 35/240 41/280
Front: 225/45 R 17 91 V 30/210 - 30/210 - 35/240 -
Rear: 255/40 R 17 94 V - 32/220 32/220 - 35/240
Front: 225/35 R 19 88 Y XL 39/270 - 35/240 - 39/270 -
Rear: 255/30 R 19 91 Y XL - 41/280 - 35/240 - 41/280
with Sports package:
205/55 R 16 91 H M+S
225/50 R 16 92 H M+S
225/45 R 17 91 H M+S30/210 36/250 30/210 33/230 35/240 41/280
225/45 R 17 94 V M+S XL 30/210 36/250 35/240 38/260 39/270 45/310
Front: 225/45 R 17 91 V 30/210 - 33/230 - 38/260 -
Rear: 255/40 R 17 94 V - 32/220 - 33/230 - 39/270
Front: 225/35 R 19 88 Y XL 39/270 - 38/260 - 42/290 -
Rear: 255/30 R 19 91 Y XL - 41/280 - 38/260 - 44/300
More details on the permissible load and weights can be found on page220.
Page 195 of 245

Mobility
193Reference
At a glance
Controls
Driving tips
Communications
Navigation
Entertainment
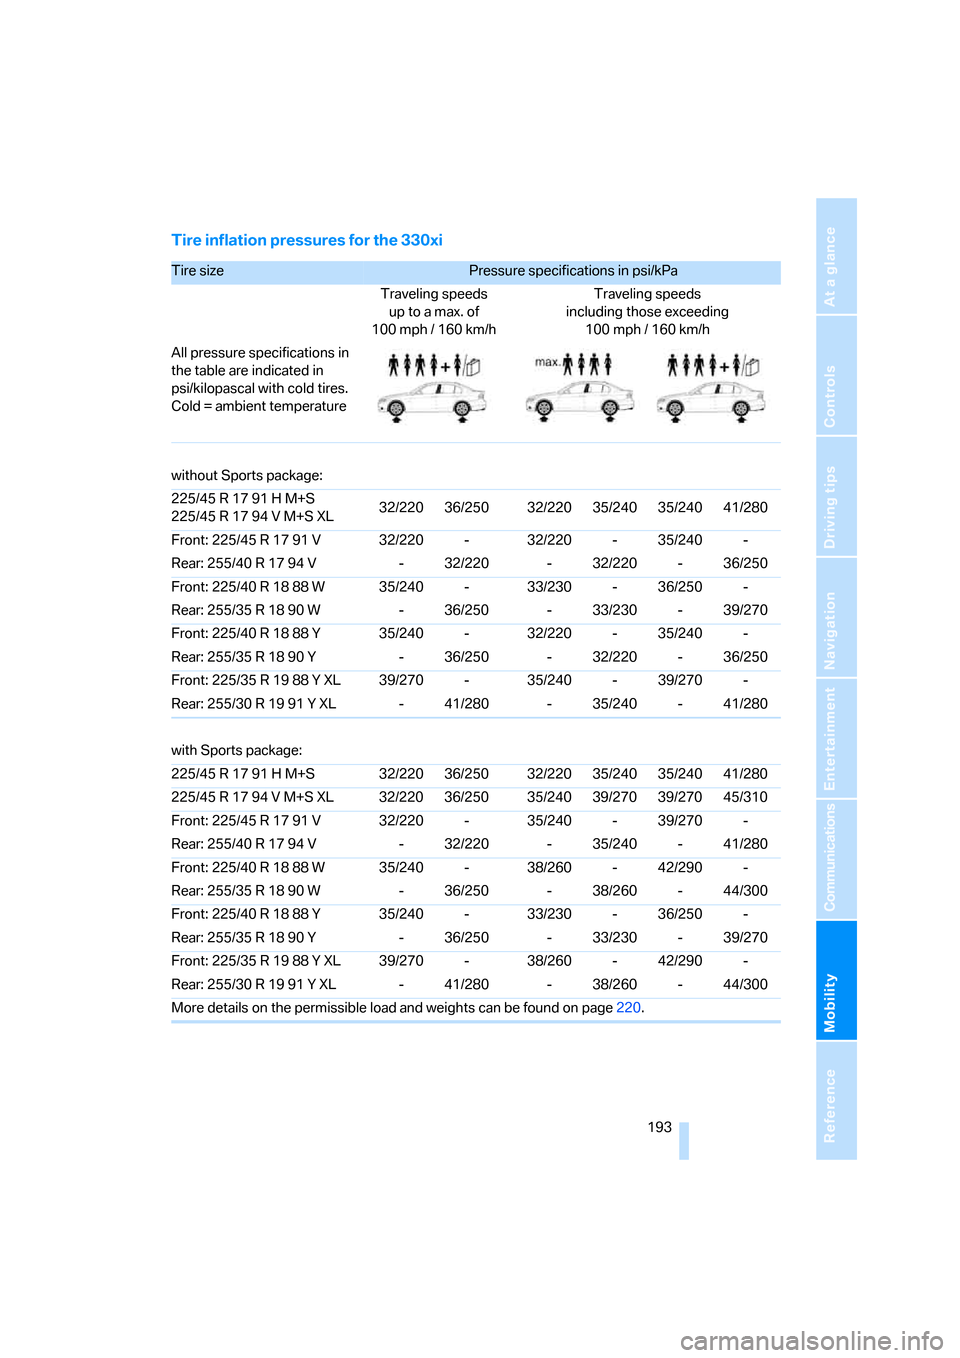
Tire inflation pressures for the 330xi
Tire size Pressure specifications in psi/kPa
Traveling speeds
up to a max. of
100 mph / 160 km/hTraveling speeds
including those exceeding
100 mph / 160 km/h
All pressure specifications in
the table are indicated in
psi/kilopascal with cold tires.
Cold = ambient temperature
without Sports package:
225/45 R 17 91 H M+S
225/45 R 17 94 V M+S XL32/220 36/250 32/220 35/240 35/240 41/280
Front: 225/45 R 17 91 V 32/220 - 32/220 - 35/240 -
Rear: 255/40 R 17 94 V - 32/220 - 32/220 - 36/250
Front: 225/40 R 18 88 W 35/240 - 33/230 - 36/250 -
Rear: 255/35 R 18 90 W - 36/250 - 33/230 - 39/270
Front: 225/40 R 18 88 Y 35/240 - 32/220 - 35/240 -
Rear: 255/35 R 18 90 Y - 36/250 - 32/220 - 36/250
Front: 225/35 R 19 88 Y XL 39/270 - 35/240 - 39/270 -
Rear: 255/30 R 19 91 Y XL - 41/280 - 35/240 - 41/280
with Sports package:
225/45 R 17 91 H M+S 32/220 36/250 32/220 35/240 35/240 41/280
225/45 R 17 94 V M+S XL 32/220 36/250 35/240 39/270 39/270 45/310
Front: 225/45 R 17 91 V 32/220 - 35/240 - 39/270 -
Rear: 255/40 R 17 94 V - 32/220 - 35/240 - 41/280
Front: 225/40 R 18 88 W 35/240 - 38/260 - 42/290 -
Rear: 255/35 R 18 90 W - 36/250 - 38/260 - 44/300
Front: 225/40 R 18 88 Y 35/240 - 33/230 - 36/250 -
Rear: 255/35 R 18 90 Y - 36/250 - 33/230 - 39/270
Front: 225/35 R 19 88 Y XL 39/270 - 38/260 - 42/290 -
Rear: 255/30 R 19 91 Y XL - 41/280 - 38/260 - 44/300
More details on the permissible load and weights can be found on page220.