2006 BMW 325I SEDAN turn signal
[x] Cancel search: turn signalPage 143 of 245

Navigation
Driving tips
141Reference
At a glance
Controls
Communications
Entertainment
Mobility
What to do if …
What to do if …
>a navigation DVD is inserted, but an instruc-
tion to insert the DVD appears on the Con-
trol Display?
The navigation DVD may not be the correct
DVD for the navigation system. This infor-
mation is indicated on the DVD label.
>you request the current position of your
vehicle, but do not receive a precise dis-
play?
The system is unable to receive enough
GPS signals at your current position owing
to obstructions, your current position is not
yet available on your navigation DVD, or the
system is in the process of calculating your
current position. As a rule, reception is
guaranteed when you are in the open.
>the destination guidance does not accept a
destination?
The data of the destination is not stored on
the navigation DVD that is loaded. Choose a
destination as close as possible to the orig-
inal one.
>the destination guidance does not accept
an address without the street name?
On the navigation DVD, no downtown area
can be determined for the city or town
entered. Enter any street, or a destination
such as the railway station in the selected
town, and then start the destination guid-
ance.
>you want to enter a destination for the des-
tination guidance, but it is not possible to
select the letters for your desired entry?
The data of the destination is not stored on
the navigation DVD that is loaded. In this
case, the system will not offer you any let-
ters to choose from. Choose a destination
as close as possible to the original one.
>the system stops furnishing directions on
which way to turn as you approach intersec-
tions?
You are driving in an area that has not yet
been completely recorded on the naviga-tion DVD. Instead of an arrow indicating a
turn, you will see an arrow which indicates
the general direction of your planned route.
Or you have left the recommended route
and the system requires a few seconds to
calculate a new recommended route.
>the navigation system does not react to
entries?
If the battery was disconnected, it takes
about 10 minutes before the system is once
again operational.
Page 150 of 245

Radio
148
Radio
Your radio provides reception of the FM and AM
wavebands:
Listening to the radio
Press the button if the sound output is switched
off.
iDrive concept, refer to page16.
1.Press the button.
This opens the start menu.
2.Move the controller backwards to call up
"Entertainment".
3.If necessary, move the highlight marker to
the uppermost field. Select "FM" or "AM".
4.Press the controller.
Stations are shown on the Control Display on
the basis of various selection criteria, e.g. "Pre-
sets".
If "Autostore" does not show a station in the AM
waveband or if the displayed stations are no
longer receivable, update the stations with the
strongest received signal, refer to page149.
Changing stations
Turn the controller.
Buttons on the CD player
Press the button for the corre-
sponding direction.
The system switches to the next displayed sta-
tion.
You can also change the station with buttons on
the steering wheel, refer to page11.
Changing selection criteria
In addition to the stations currently displayed,
you can have stations with another selection
criterion displayed.
You can choose from the following selection
criteria:
>"All stations":
Stations that can currently be received on
the "FM" waveband.
>"Autostore":
The stations with the strongest received
signals in the "AM" waveband.
>"Presets":
Stations you have previously stored, refer to
page150.
To change the selection criterion:
Page 151 of 245

Navigation
Entertainment
Driving tips
149Reference
At a glance
Controls
Communications
Mobility
1.Move the highlight marker to the second
field from the top.
2.Choose a selection criterion and press the
controller.
Sampling stations, scan
The stations on the current waveband are auto-
matically sampled in succession.
1.Select "FM" or "AM" and press the control-
ler.
"Set" is selected.
2.Press the controller.
Other menu items are displayed.
3.Select "Scan" and press the controller.
Scan starts.
To stop the scan:
1.Press the controller.
2.Select "Scan" and press the controller.
This cancels the scan search, and the radio
remains on the current station.
Buttons on the CD player
To start scan, hold down the corre-
sponding direction button.
To stop scanning, press the button again.
Selecting the frequency manually
With "Manual" you can select stations that are
received in addition to those displayed.
1.Select "FM" or "AM" and press the control-
ler.
2.Move the highlight marker to the second
field from the top.
3.Select "Manual" and press the controller.
4.Turn the controller to set a certain fre-
quency.
Updating stations with best reception
If on a longer journey you move out of the
reception range of the stations originally
received, you can update the list of stations
received with the strongest signals in the AM
waveband.
1.Select "AM" and press the controller.
2.Move the highlight marker to the second
field from the top.
3.Select "Autostore" and press the controller.
"Set" is selected.
4.Press the controller.
Other menu items are displayed.
Page 153 of 245

Navigation
Entertainment
Driving tips
151Reference
At a glance
Controls
Communications
Mobility
4.Select "Store" and press the controller.
5.Turn the controller until the desired mem-
ory position is selected.
The number of the memory position
appears beside the name or frequency of
the station.
6.Press the controller.
The station is stored.
RDS Radio Data System
RDS transmits additional information in the FM
frequency range. If the reception conditions are
good, the station names are shown on the Con-
trol Display. Where reception is poor or in the
event of interference, it may take some time
before the station names will appear in the dis-
play.
Switching RDS on/off*
1.Select "FM" or "AM" and press the control-
ler.
"Set" is selected.
2.Press the controller.
Other menu items are displayed.
3.Select "RDS" and press the controller.
RDS is activated.
Weather reports*
Weather Radio is a service provided by the
National Oceanic and Atmospheric Administra-
tion (NOAA) of the US Department of Com-
merce. Weather reports are repeated every four
to six minutes and routinely updated in intervals
of one to three hours, or more frequently if nec-
essary. Most stations operate 24 hours a day. In
the event of storms, the National Weather Ser-
vice interrupts the routine weather reports to
broadcast special warnings. If you have any
questions regarding NOAA Weather Radio,
please contact your local National Weather Ser-
vice office. You can also obtain more informa-
tion from the Internet at www.nws.noaa.gov.
Calling up weather reports
1.Select "WB" and press the controller.
2.Select the station.
The station for weather reports may be unavail-
able in some regions.
High Definition Radio*
Many stations transmit analog as well as digital
signals. You can receive these stations digitally,
resulting in better sound quality.
Switching digital radio reception on
and off
iDrive concept, refer to page16.
1.Press the button.
This opens the start menu.
2.Press the controller to open the menu.
Page 157 of 245

Navigation
Entertainment
Driving tips
155Reference
At a glance
Controls
Communications
Mobility
6.Press the controller.
Other menu items are displayed.
7.Select "Play" and press the controller.
Additional information
The name of the channel and additional infor-
mation on the current track are displayed, e.g.
the name of the artist.
1Artist
2Track
Storing a channel
1.Select the desired channel.
2.Press the controller.
Other menu items are displayed.
3.Select "Store" and press the controller.
"Presets" is displayed.4.Turn the controller to select a memory loca-
tion and press the controller.
The channel is stored. The channels of the last
selection criterion are displayed once again
after a short time.
Changing channels with buttons on CD
player
Press the button for the corre-
sponding direction.
The system switches to the next enabled chan-
nel.
Notes
If no signal can be received for more than four
seconds, a message will appear on the Control
Display.
Under some circumstances, e.g. depend-
ing on environmental influences or topo-
graphic conditions, it may not be possible to
receive any signal. The satellite radio cannot
influence this.
A signal may not be available in tunnels or
underground garages, next to high-rise build-
ings, in the vicinity of trees, mountains or other
strong sources of radio interference.
Reception usually resumes as soon as the sig-
nal becomes available again.<
Page 208 of 245

Replacing components
206 lasers, are officially designated as Class 1 light-
emitting diodes.
Do not remove the covers or expose the
eyes directly to the unfiltered light source
for several hours at a time, otherwise this could
cause irritation to the retina.<
Xenon lamps*
The service life of these bulbs is very long and
the probability of a failure is very low, provided
that they are not switched on and off an unusual
number of times. If a xenon lamp fails neverthe-
less, switch on the fog lamps and continue the
journey with great care, provided that local leg-
islation does not prohibit this.
Have work on the xenon lighting system
performed only by your BMW Center or a
workshop that works according to BMW repair
procedures with correspondingly trained per-
sonnel. Due to the high electrical voltages
present, there is a risk of potentially fatal acci-
dents if work is performed inappropriate.<
Parking lamps, roadside parking lamps
In the event of a malfunction, please contact
your BMW Center or a workshop that works
according to BMW repair procedures with cor-
respondingly trained personnel.
Halogen lamps
H7 bulb, 55 watts
Always wear gloves and eye protection;
the atmosphere within the H7 bulb is
pressurized. Otherwise there is a risk of injury if
the bulb is damaged.<
There are separate headlamp covers for low-
beam headlamps and high-beam headlamps.
Be careful when installing the covers, oth-
erwise leaks could occur and cause dam-
age to the headlamp system.<
For checking and adjusting headlamp
aim, please contact your BMW Center.<
Access to the lamps
The high-beam headlamp can be accessed
from the engine compartment, whereas the low-beam headlamp is accessed through a flap
in the wheel well.
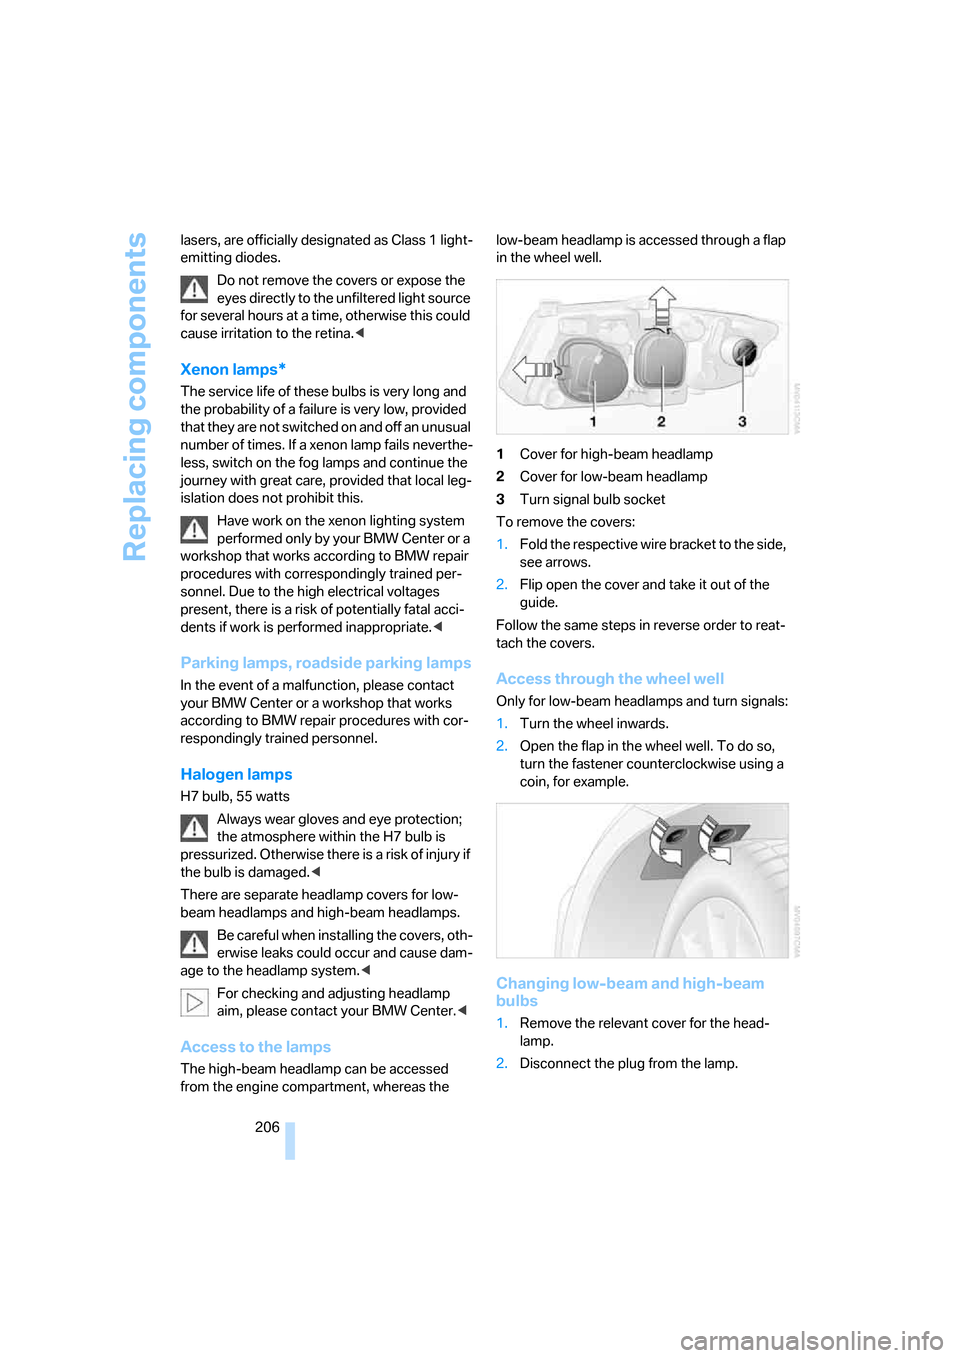
1Cover for high-beam headlamp
2Cover for low-beam headlamp
3Turn signal bulb socket
To remove the covers:
1.Fold the respective wire bracket to the side,
see arrows.
2.Flip open the cover and take it out of the
guide.
Follow the same steps in reverse order to reat-
tach the covers.
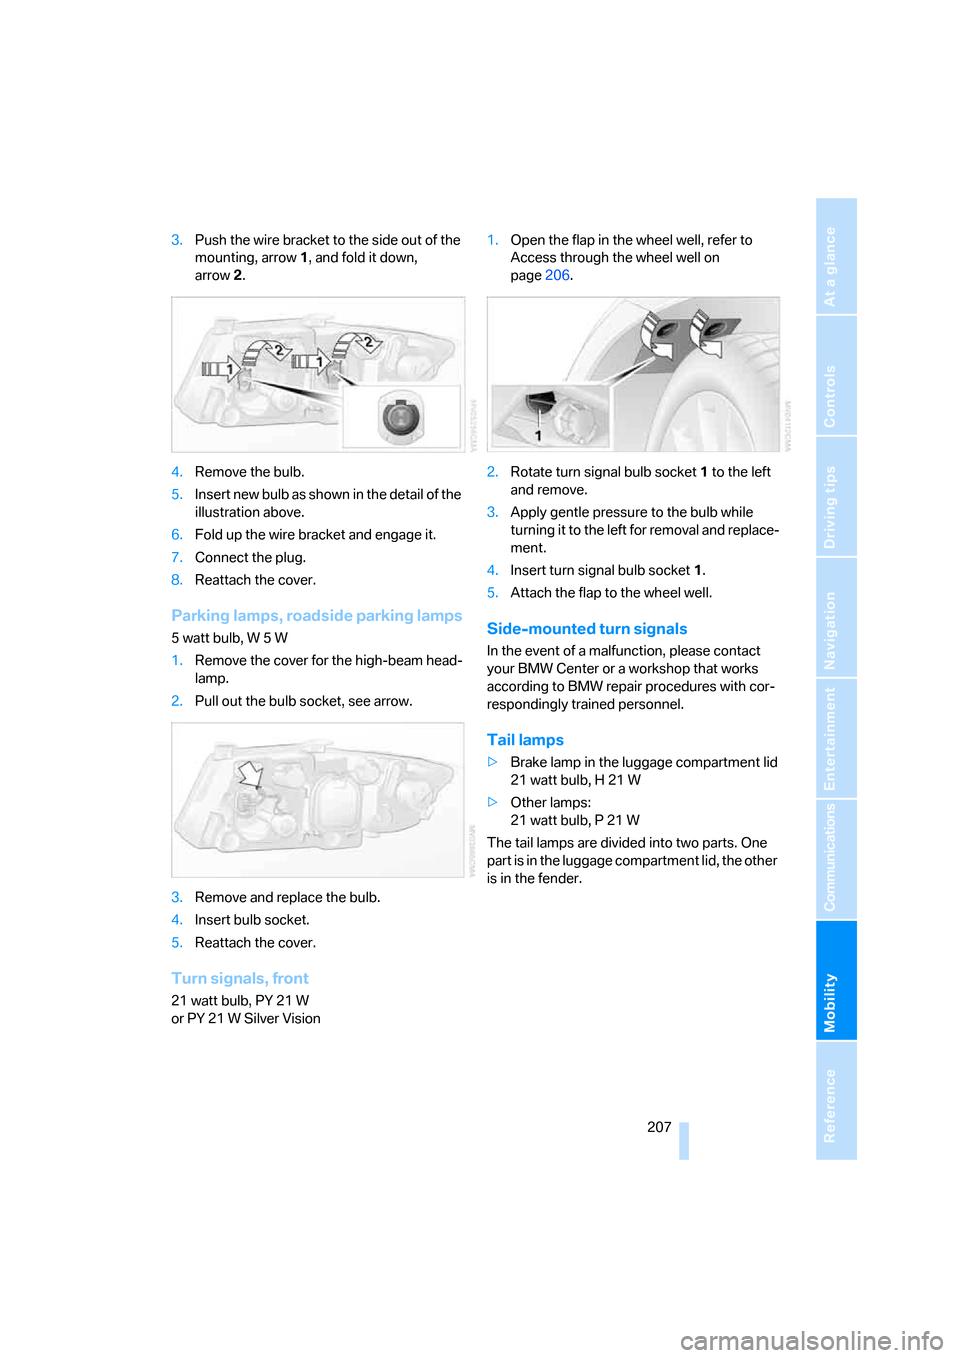
Access through the wheel well
Only for low-beam headlamps and turn signals:
1.Turn the wheel inwards.
2.Open the flap in the wheel well. To do so,
turn the fastener counterclockwise using a
coin, for example.
Changing low-beam and high-beam
bulbs
1.Remove the relevant cover for the head-
lamp.
2.Disconnect the plug from the lamp.
Page 209 of 245

Mobility
207Reference
At a glance
Controls
Driving tips
Communications
Navigation
Entertainment
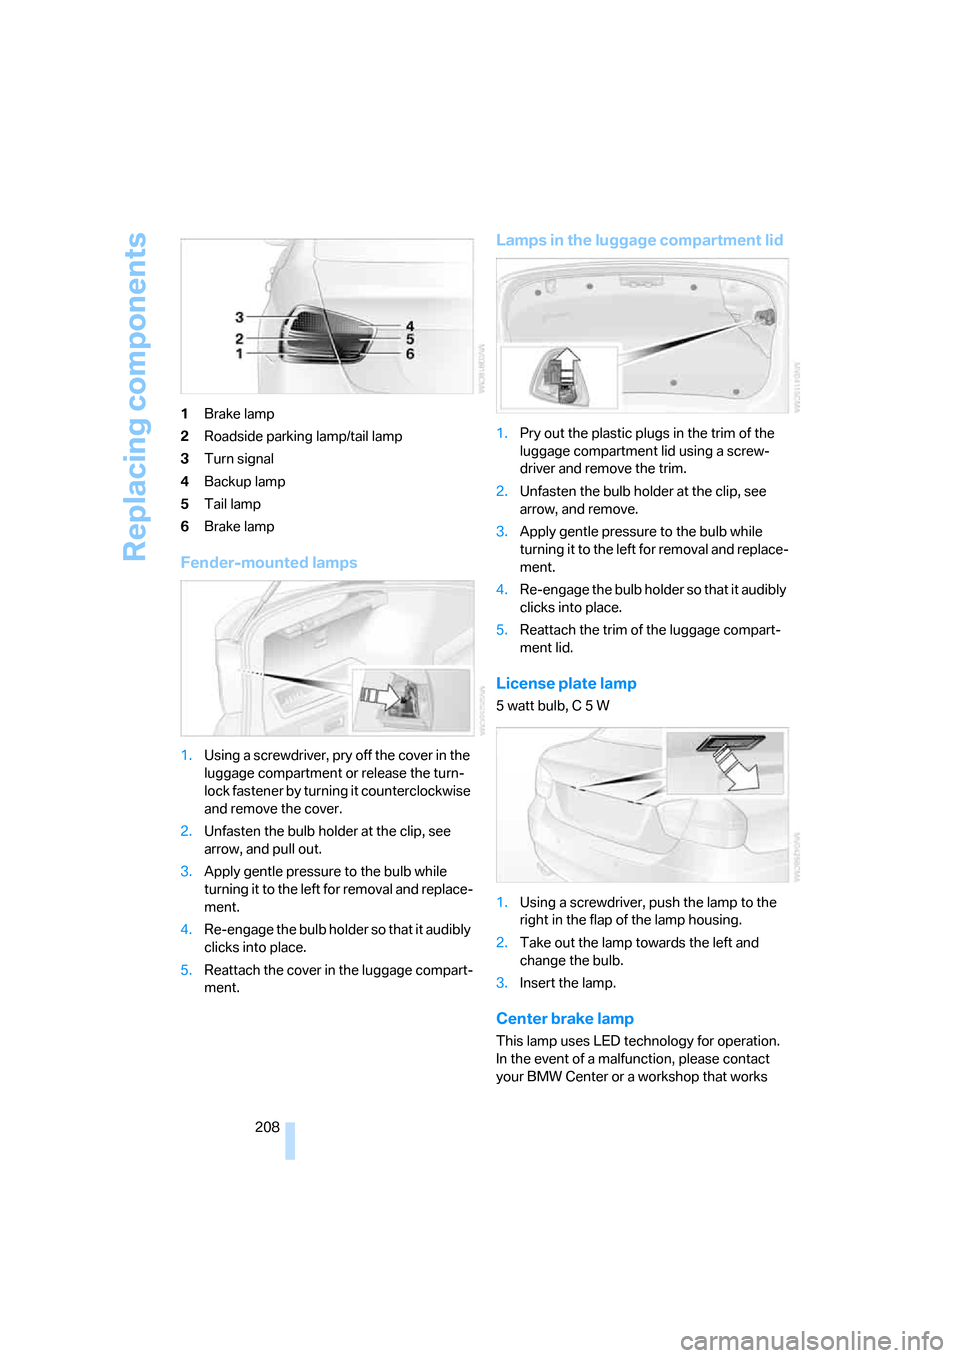
3.Push the wire bracket to the side out of the
mounting, arrow1, and fold it down,
arrow2.
4.Remove the bulb.
5.Insert new bulb as shown in the detail of the
illustration above.
6.Fold up the wire bracket and engage it.
7.Connect the plug.
8.Reattach the cover.
Parking lamps, roadside parking lamps
5 watt bulb, W 5 W
1.Remove the cover for the high-beam head-
lamp.
2.Pull out the bulb socket, see arrow.
3.Remove and replace the bulb.
4.Insert bulb socket.
5.Reattach the cover.
Turn signals, front
21 watt bulb, PY 21 W
or PY 21 W Silver Vision1.Open the flap in the wheel well, refer to
Access through the wheel well on
page206.
2.Rotate turn signal bulb socket 1 to the left
and remove.
3.Apply gentle pressure to the bulb while
turning it to the left for removal and replace-
ment.
4.Insert turn signal bulb socket 1.
5.Attach the flap to the wheel well.
Side-mounted turn signals
In the event of a malfunction, please contact
your BMW Center or a workshop that works
according to BMW repair procedures with cor-
respondingly trained personnel.
Tail lamps
>Brake lamp in the luggage compartment lid
21 watt bulb, H 21 W
>Other lamps:
21 watt bulb, P 21 W
The tail lamps are divided into two parts. One
part is in the luggage compartment lid, the other
is in the fender.
Page 210 of 245

Replacing components
208 1Brake lamp
2Roadside parking lamp/tail lamp
3Turn signal
4Backup lamp
5Tail lamp
6Brake lamp
Fender-mounted lamps
1.Using a screwdriver, pry off the cover in the
luggage compartment or release the turn-
lock fastener by turning it counterclockwise
and remove the cover.
2.Unfasten the bulb holder at the clip, see
arrow, and pull out.
3.Apply gentle pressure to the bulb while
turning it to the left for removal and replace-
ment.
4.Re-engage the bulb holder so that it audibly
clicks into place.
5.Reattach the cover in the luggage compart-
ment.
Lamps in the luggage compartment lid
1.Pry out the plastic plugs in the trim of the
luggage compartment lid using a screw-
driver and remove the trim.
2.Unfasten the bulb holder at the clip, see
arrow, and remove.
3.Apply gentle pressure to the bulb while
turning it to the left for removal and replace-
ment.
4.Re-engage the bulb holder so that it audibly
clicks into place.
5.Reattach the trim of the luggage compart-
ment lid.
License plate lamp
5 watt bulb, C 5 W
1.Using a screwdriver, push the lamp to the
right in the flap of the lamp housing.
2.Take out the lamp towards the left and
change the bulb.
3.Insert the lamp.
Center brake lamp
This lamp uses LED technology for operation.
In the event of a malfunction, please contact
your BMW Center or a workshop that works