2006 BMW 325I ignition
[x] Cancel search: ignitionPage 170 of 246
Telephoning
168
Preparation via the mobile phone
6.Further steps must be carried out with the
mobile phone and vary depending on the
model. Please refer to your mobile phone's
operating instructions, e.g. under the topics
of Searching for a Bluetooth device, Con-
necting or Pairing.
Pairing
Depending on your mobile phone, you will see
messages, first in the mobile phone's display or
on the Control Display, requesting you to enter
the same Bluetooth passkey previously deter-
mined by you.
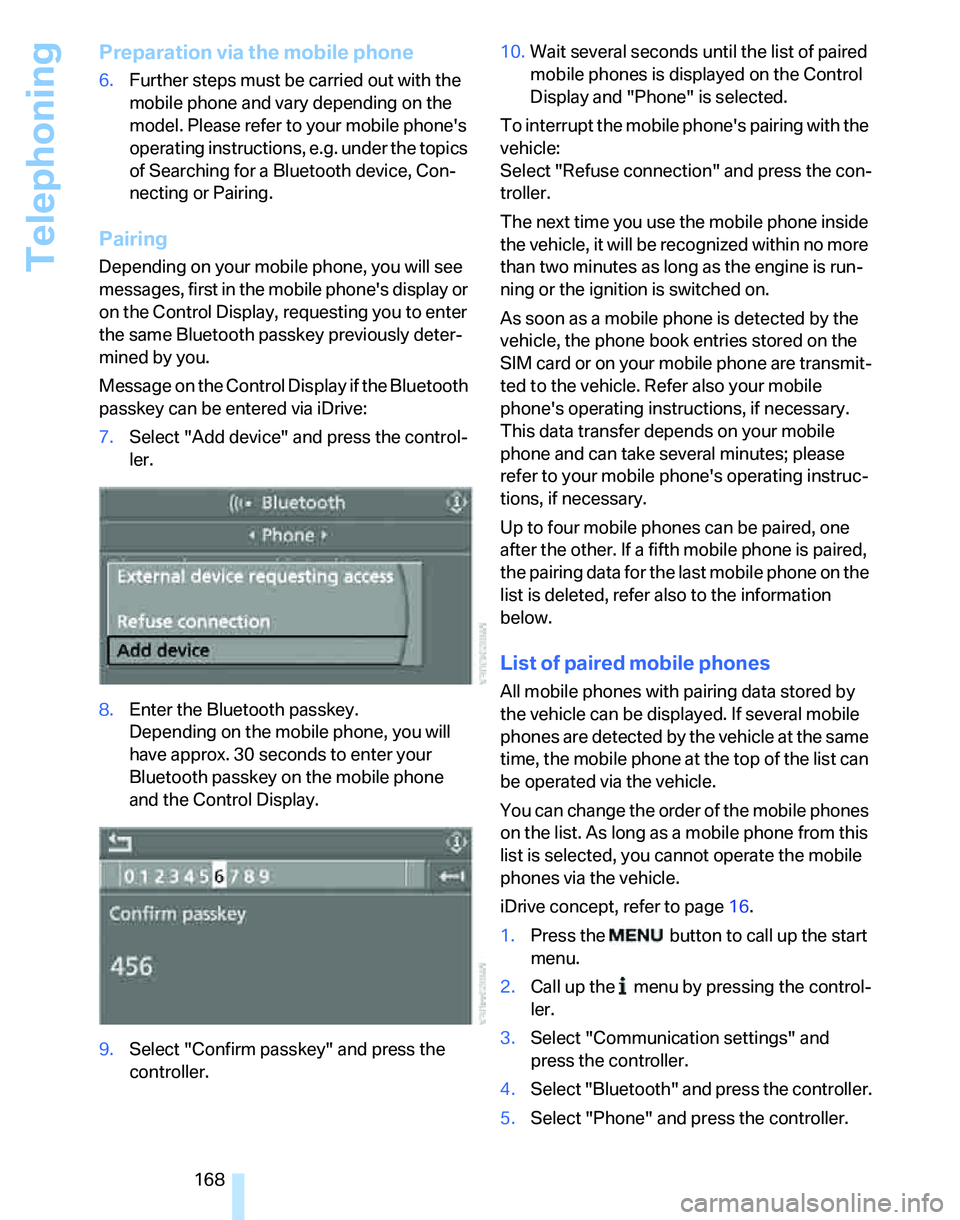
Message on the Control Display if the Bluetooth
passkey can be entered via iDrive:
7.Select "Add device" and press the control-
ler.
8.Enter the Bluetooth passkey.
Depending on the mobile phone, you will
have approx. 30 seconds to enter your
Bluetooth passkey on the mobile phone
and the Control Display.
9.Select "Confirm passkey" and press the
controller.10.Wait several seconds until the list of paired
mobile phones is displayed on the Control
Display and "Phone" is selected.
To interrupt the mobile phone's pairing with the
vehicle:
Select "Refuse connection" and press the con-
troller.
The next time you use the mobile phone inside
the vehicle, it will be recognized within no more
than two minutes as long as the engine is run-
ning or the ignition is switched on.
As soon as a mobile phone is detected by the
vehicle, the phone book entries stored on the
SIM card or on your mobile phone are transmit-
ted to the vehicle. Refer also your mobile
phone's operating instructions, if necessary.
This data transfer depends on your mobile
phone and can take several minutes; please
refer to your mobile phone's operating instruc-
tions, if necessary.
Up to four mobile phones can be paired, one
after the other. If a fifth mobile phone is paired,
the pairing data for the last mobile phone on the
list is deleted, refer also to the information
below.
List of paired mobile phones
All mobile phones with pairing data stored by
the vehicle can be displayed. If several mobile
phones are detected by the vehicle at the same
time, the mobile phone at the top of the list can
be operated via the vehicle.
You can change the order of the mobile phones
on the list. As long as a mobile phone from this
list is selected, you cannot operate the mobile
phones via the vehicle.
iDrive concept, refer to page16.
1.Press the
button to call up the start
menu.
2.Call up the menu by pressing the control-
ler.
3.Select "Communication settings" and
press the controller.
4.Select "Bluetooth" and press the controller.
5.Select "Phone" and press the controller.
Page 172 of 246
Telephoning
170 3.Select the menu and press the controller.
4.Select "Communication settings" and
press the controller.
5.Select "Bluetooth" and press the controller.
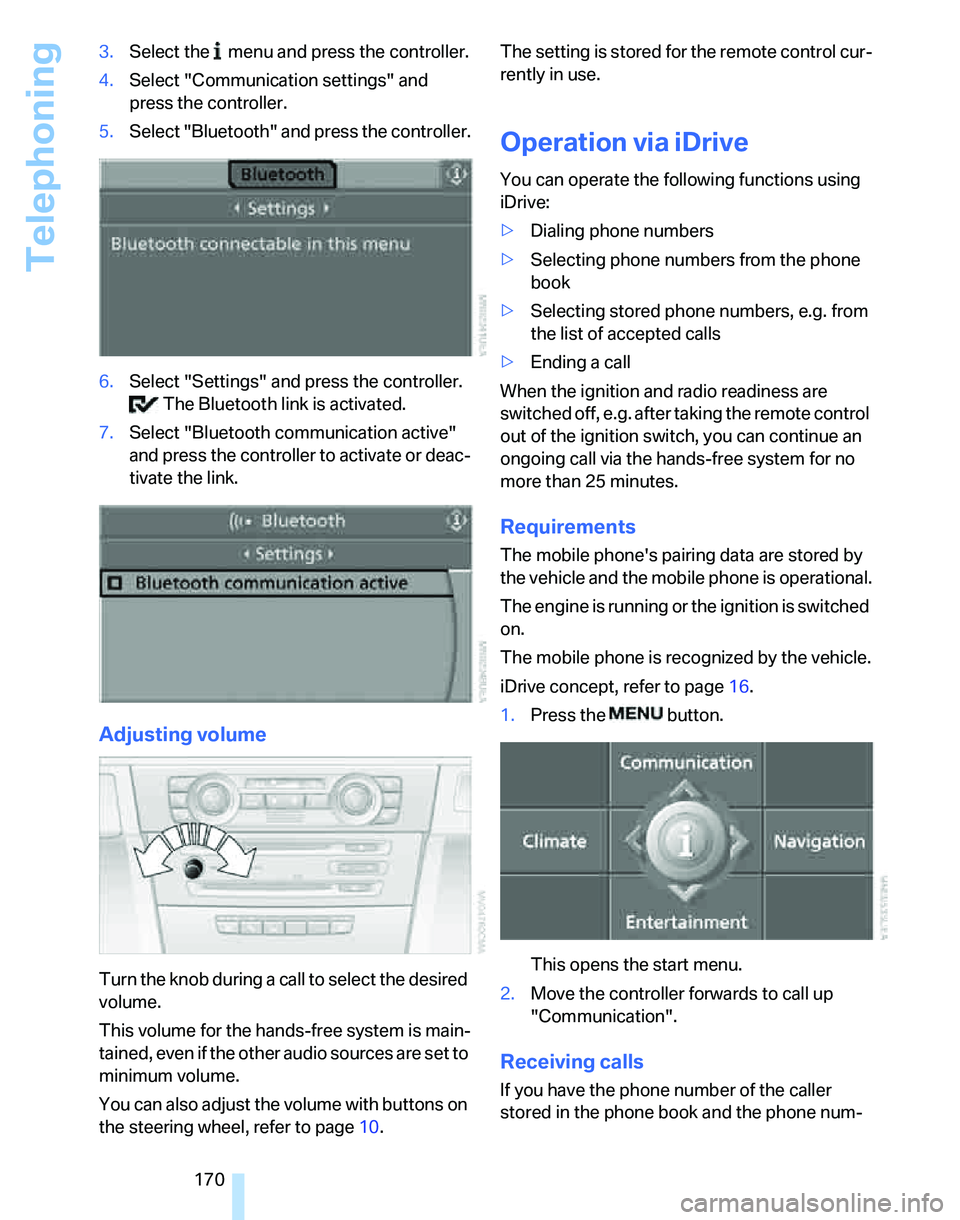
6.Select "Settings" and press the controller.
The Bluetooth link is activated.
7.Select "Bluetooth communication active"
and press the controller to activate or deac-
tivate the link.
Adjusting volume
Turn the knob during a call to select the desired
volume.
This volume for the hands-free system is main-
tained, even if the other audio sources are set to
minimum volume.
You can also adjust the volume with buttons on
the steering wheel, refer to page10.The setting is stored for the remote control cur-
rently in use.
Operation via iDrive
You can operate the following functions using
iDrive:
>Dialing phone numbers
>Selecting phone numbers from the phone
book
>Selecting stored phone numbers, e.g. from
the list of accepted calls
>Ending a call
When the ignition and radio readiness are
switched off, e.g. after taking the remote control
out of the ignition switch, you can continue an
ongoing call via the hands-free system for no
more than 25 minutes.
Requirements
The mobile phone's pairing data are stored by
the vehicle and the mobile phone is operational.
The engine is running or the ignition is switched
on.
The mobile phone is recognized by the vehicle.
iDrive concept, refer to page16.
1.Press the button.
This opens the start menu.
2.Move the controller forwards to call up
"Communication".
Receiving calls
If you have the phone number of the caller
stored in the phone book and the phone num-
Page 176 of 246
Telephoning
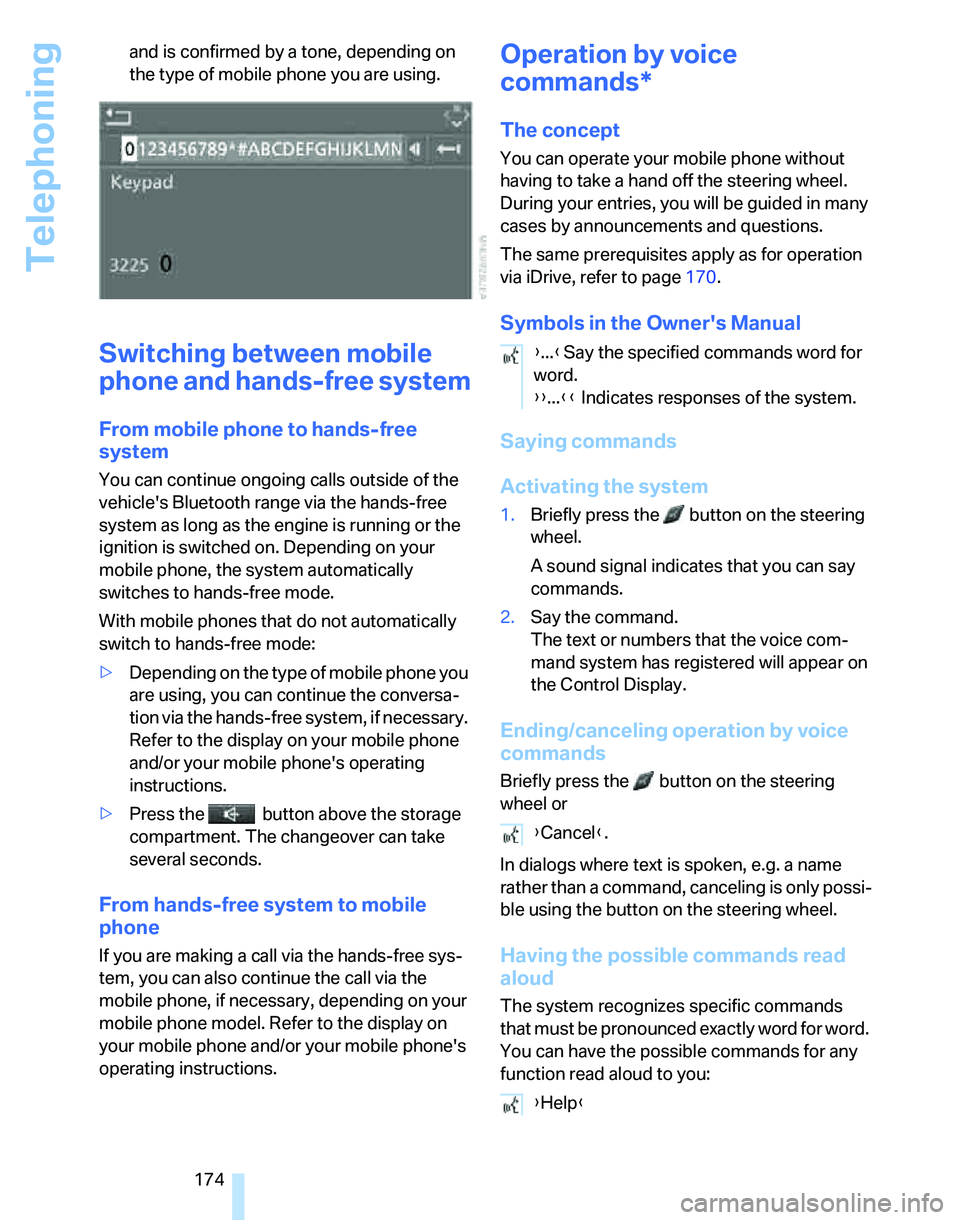
174 and is confirmed by a tone, depending on
the type of mobile phone you are using.
Switching between mobile
phone and hands-free system
From mobile phone to hands-free
system
You can continue ongoing calls outside of the
vehicle's Bluetooth range via the hands-free
system as long as the engine is running or the
ignition is switched on. Depending on your
mobile phone, the system automatically
switches to hands-free mode.
With mobile phones that do not automatically
switch to hands-free mode:
>Depending on the type of mobile phone you
are using, you can continue the conversa-
tion via the hands-free system, if necessary.
Refer to the display on your mobile phone
and/or your mobile phone's operating
instructions.
>Press the button above the storage
compartment. The changeover can take
several seconds.
From hands-free system to mobile
phone
If you are making a call via the hands-free sys-
tem, you can also continue the call via the
mobile phone, if necessary, depending on your
mobile phone model. Refer to the display on
your mobile phone and/or your mobile phone's
operating instructions.
Operation by voice
commands*
The concept
You can operate your mobile phone without
having to take a hand off the steering wheel.
During your entries, you will be guided in many
cases by announcements and questions.
The same prerequisites apply as for operation
via iDrive, refer to page170.
Symbols in the Owner's Manual
Saying commands
Activating the system
1.Briefly press the button on the steering
wheel.
A sound signal indicates that you can say
commands.
2.Say the command.
The text or numbers that the voice com-
mand system has registered will appear on
the Control Display.
Ending/canceling operation by voice
commands
Briefly press the button on the steering
wheel or
In dialogs where text is spoken, e.g. a name
rather than a command, canceling is only possi-
ble using the button on the steering wheel.
Having the possible commands read
aloud
The system recognizes specific commands
that must be pronounced exactly word for word.
You can have the possible commands for any
function read aloud to you:
{...}Say the specified commands word for
word.
{{...}} Indicates responses of the system.
{Cancel}.
{Help}
Page 179 of 246
177
Entertainment
Reference
At a glance
Controls
Driving tips Communications
Navigation
Mobility
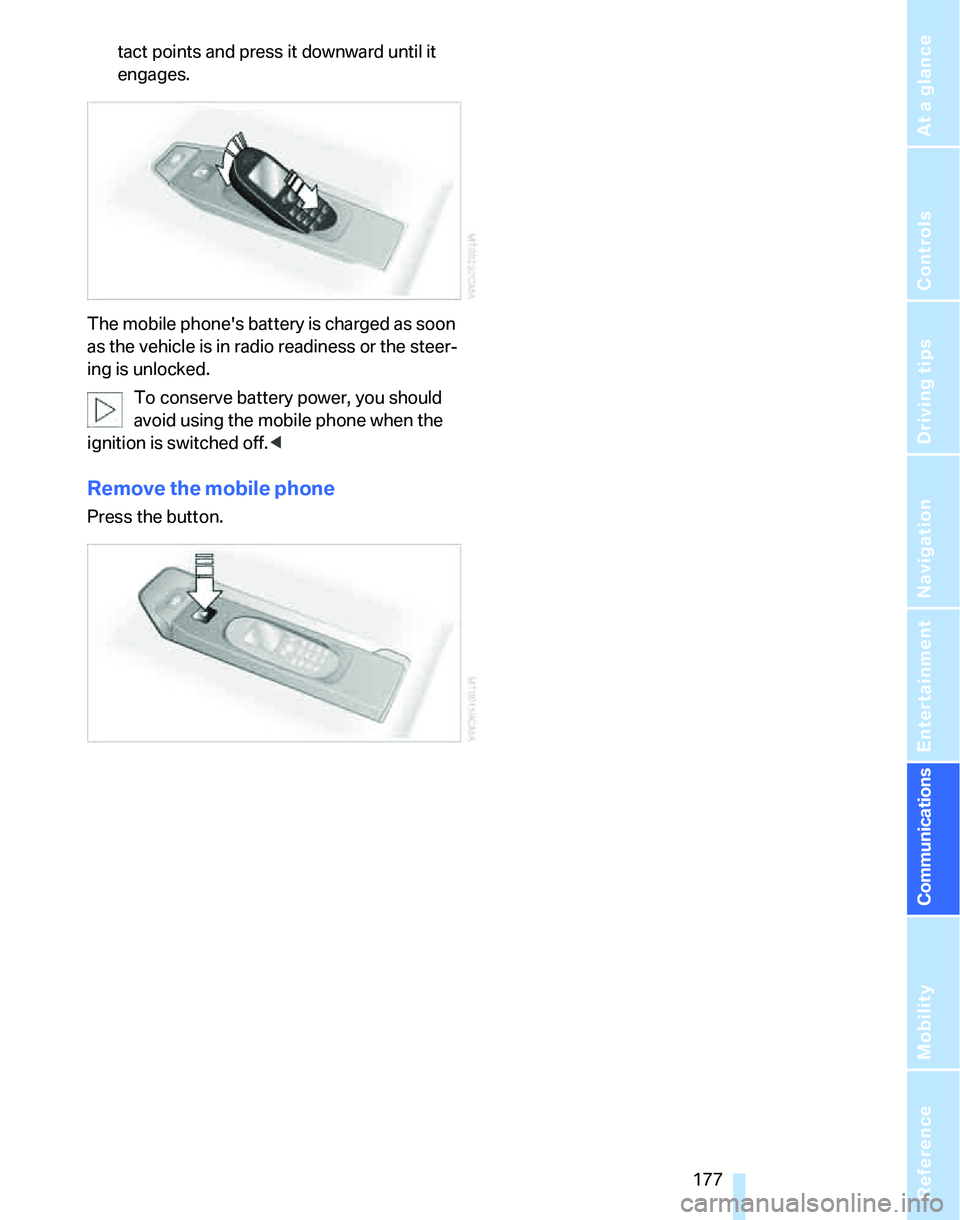
tact points and press it downward until it
engages.
The mobile phone's battery is charged as soon
as the vehicle is in radio readiness or the steer-
ing is unlocked.
To conserve battery power, you should
avoid using the mobile phone when the
ignition is switched off.<
Remove the mobile phone
Press the button.
Page 215 of 246
Mobility
213Reference
At a glance
Controls
Driving tips
Communications
Navigation
Entertainment
of the battery or a starting-aid terminal of
the vehicle to be started.
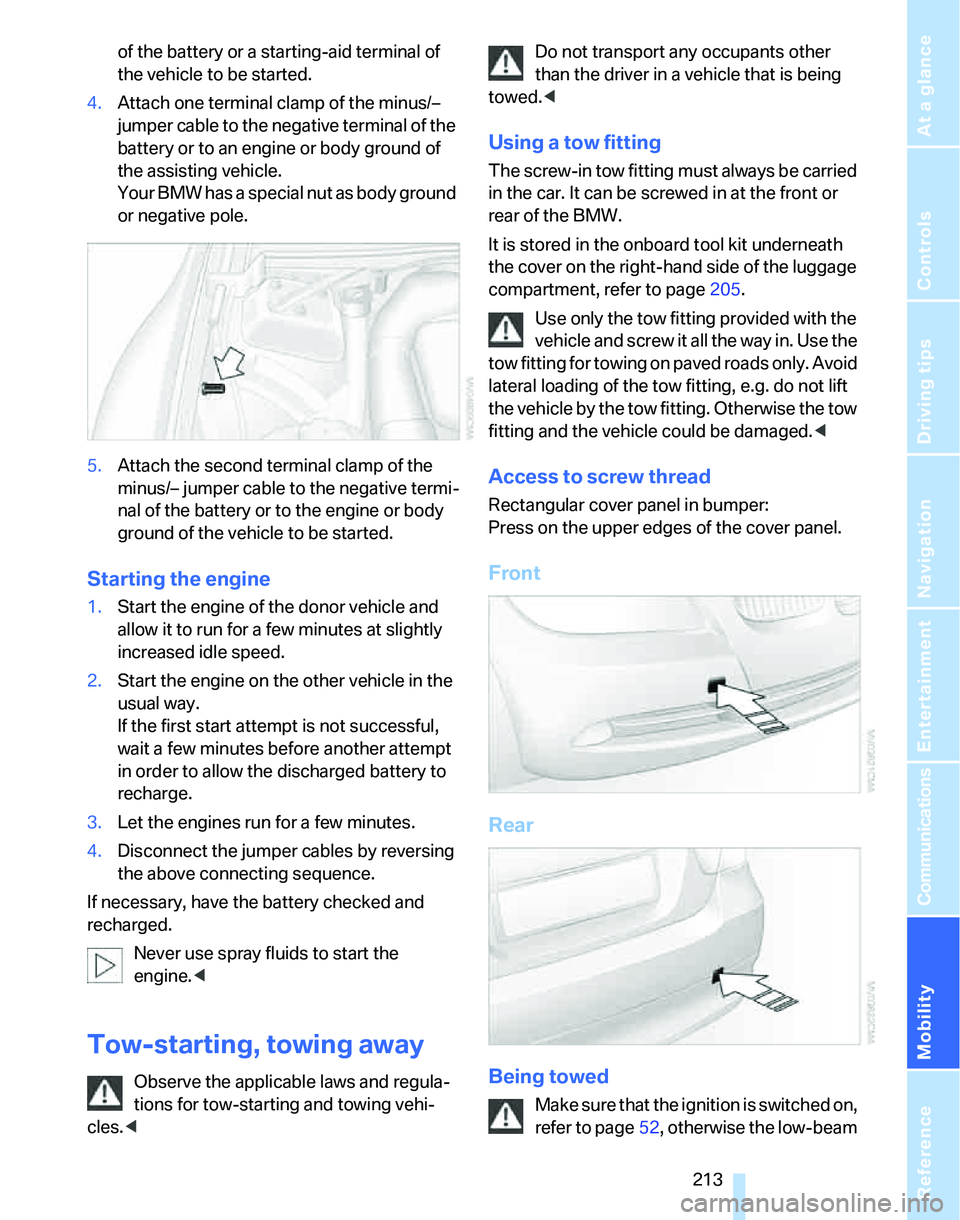
4.Attach one terminal clamp of the minus/–
jumper cable to the negative terminal of the
battery or to an engine or body ground of
the assisting vehicle.
Your BMW has a special nut as body ground
or negative pole.
5.Attach the second terminal clamp of the
minus/– jumper cable to the negative termi-
nal of the battery or to the engine or body
ground of the vehicle to be started.
Starting the engine
1.Start the engine of the donor vehicle and
allow it to run for a few minutes at slightly
increased idle speed.
2.Start the engine on the other vehicle in the
usual way.
If the first start attempt is not successful,
wait a few minutes before another attempt
in order to allow the discharged battery to
recharge.
3.Let the engines run for a few minutes.
4.Disconnect the jumper cables by reversing
the above connecting sequence.
If necessary, have the battery checked and
recharged.
Never use spray fluids to start the
engine.<
Tow-starting, towing away
Observe the applicable laws and regula-
tions for tow-starting and towing vehi-
cles.
towed.<
Using a tow fitting
The screw-in tow fitting must always be carried
in the car. It can be screwed in at the front or
rear of the BMW.
It is stored in the onboard tool kit underneath
the cover on the right-hand side of the luggage
compartment, refer to page205.
Use only the tow fitting provided with the
vehicle and screw it all the way in. Use the
tow fitting for towing on paved roads only. Avoid
lateral loading of the tow fitting, e.g. do not lift
the vehicle by the tow fitting. Otherwise the tow
fitting and the vehicle could be damaged.<
Access to screw thread
Rectangular cover panel in bumper:
Press on the upper edges of the cover panel.
Front
Rear
Being towed
Make sure that the ignition is switched on,
refer to page52, otherwise the low-beam
Page 216 of 246
Giving and receiving assistance
214 headlamps, tail lamps, turn signal indicators and
windshield wipers may be unavailable. If the
electrical system fails, do not attempt to tow-
start or tow away the car. The electric steering
wheel lock cannot be disengaged and the car is
not steerable. Jump starting, refer to page212.
Power steering assistance is not available when
the engine is not running. Thus, braking and
steering will require increased effort.<
Switch on the hazard warning flashers, depend-
ing on local regulations.
Manual transmission
Gearshift lever in idle position.
Automatic transmission
Selector lever in position N.
Changing selector lever positions, refer to
page57.
Do not exceed a towing speed of 45 mph
or 70 km/h and a towing distance of
90 miles/150 km, otherwise the automatic
transmission may be damaged.<
Sequential manual gearbox SMG
With the ignition switched on, engage selector
lever position N, and then switch the ignition
back off.
Towing with a tow bar
The towing vehicle must not be lighter
than the towed vehicle, otherwise it may
be impossible to maintain control.<
The tow fittings used should be on the same
side on both vehicles. Should it prove impossi-
ble to avoid mounting the tow bar at an angle,
please observe the following:
>Clearance and maneuvering capability will
be sharply limited during cornering.
>The tow bar will generate lateral forces if it is
attached offset.
Attach the tow bar to the tow fittings only,
as attaching it to other parts of the vehicle
could result in damage.<
Towing with a tow rope
When starting off in the towing vehicle, make
sure that the tow rope is taut.
To avoid jerking and the associated
stresses on vehicle components when
towing, always use nylon ropes or nylon straps.
Attach the tow rope to the tow fittings only, as
attaching it to other parts of the vehicle could
result in damage.<
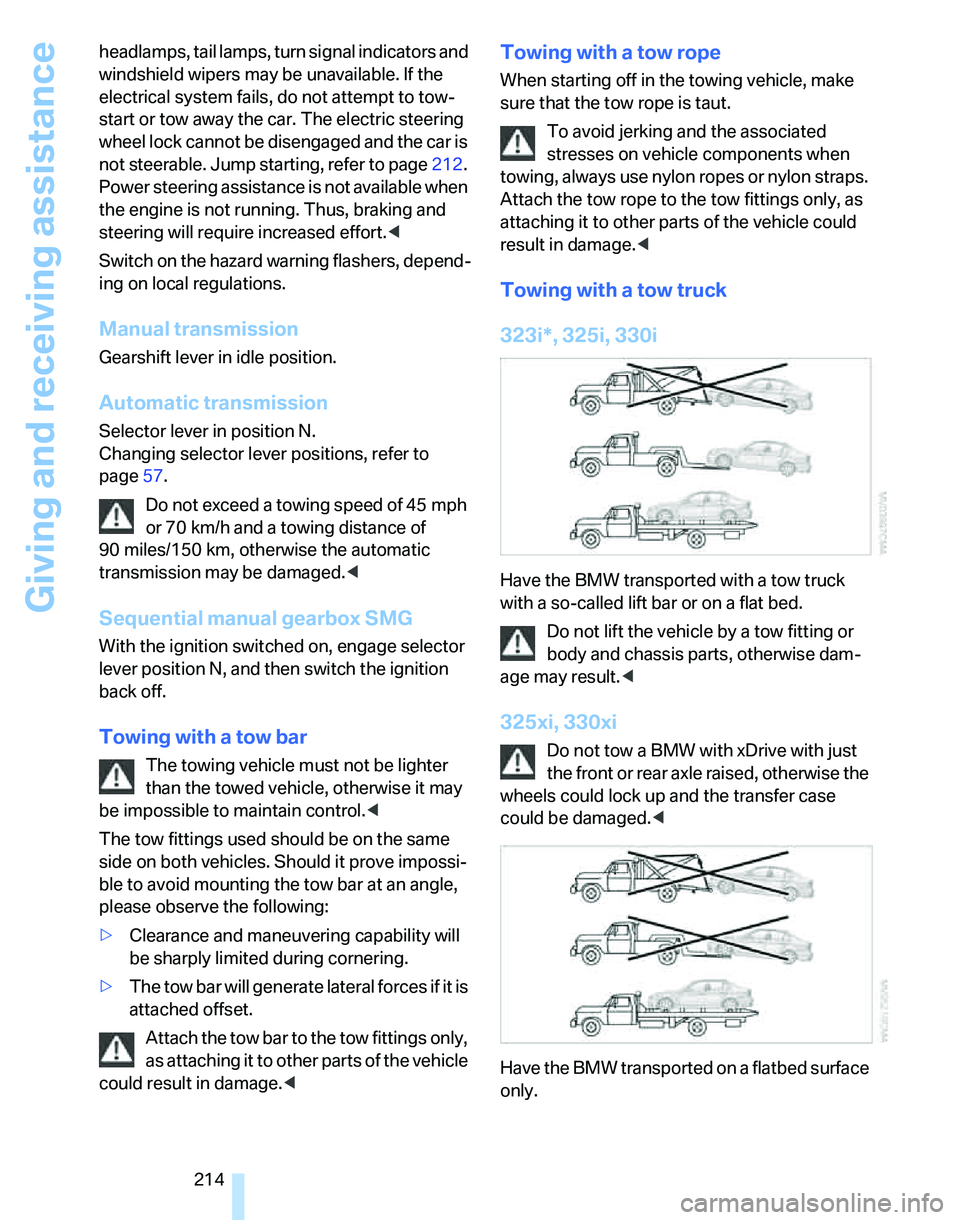
Towing with a tow truck
323i*, 325i, 330i
Have the BMW transported with a tow truck
with a so-called lift bar or on a flat bed.
Do not lift the vehicle by a tow fitting or
body and chassis parts, otherwise dam-
age may result.<
325xi, 330xi
Do not tow a BMW with xDrive with just
the front or rear axle raised, otherwise the
wheels could lock up and the transfer case
could be damaged.<
Have the BMW transported on a flatbed surface
only.
Page 217 of 246
Mobility
215Reference
At a glance
Controls
Driving tips
Communications
Navigation
Entertainment
Tow-starting
If the electrical system fails, do not
attempt to tow-start or tow away the car.
The electric steering wheel lock cannot be dis-
engaged and the car is not steerable. Jump
starting, refer to page212.<
Do not tow-start vehicles with an auto-
matic transmission. Only tow-start vehi-
cles with a catalytic converter with the engine
cold. It is better to jump start the engine, refer to
page212.<
1.Switch on the hazard warning flashers,
comply with local regulations.
2.Switch on the ignition, refer to page52.
3.Shift into 3rd gear. Vehicles with SMG, see
below.
4.Have the vehicle tow-started with the clutch
completely depressed and slowly release
the clutch. After the engine starts, immedi-
ately depress the clutch completely again.
5.Stop at a suitable location, remove the tow
bar or rope and switch off the hazard warn-
ing flashers.
6.Have the vehicle checked.
Vehicles with sequential manual gearbox SMG:
1.Have the vehicle tow-started with the selec-
tor lever in position N.
2.Select sequential mode. The correct gear is
automatically engaged.
325xi, 330xi: do not activate Hill Descent
Control HDC when the vehicle is being
tow-started, page86.<
Page 231 of 246
Reference 229
At a glance
Controls
Driving tips
Communications
Navigation
Entertainment
Mobility
Cleaning, refer to Caring for
your vehicle brochure
Cleaning headlamps60
– washer fluid60
"Climate"98
Clock69
– 12h/24h mode78
– setting time77
Closing
– from inside32
– from outside30
Clothes hooks107
Cockpit10
Cold start, refer to Starting the
engine53
Combined instrument, refer to
Instrument cluster12
Comfort Access, refer to
Convenient access35
Comfort area, refer to Around
the center console14
"Communication"170
"Communication
settings"179
Compact disc, refer to
– CD changer156
– CD player156
Compartment for remote
control, refer to Ignition
lock52
Compass104
Computer70
– displays on Control
Display71
– hour signal78
Computer, refer to iDrive16
"Concert hall" tone
settings146
Condensation, refer to When
the vehicle is parked118
Configuring settings, refer to
Personal Profile29
Confirmation signals for
locking/unlocking of the
vehicle31
Connecting vacuum cleaner,
refer to Connecting
electrical appliances108Consumption display
– average consumption71
Consumption indicator
– Energy Control70
"Continue guidance to
destination?"137
Control Center, refer to
iDrive16
Control Display
– settings73
– switching on/off21
Control Display, refer to
iDrive16
Controller, refer to iDrive16
Controls and displays10
Control unit, refer to iDrive16
Convenience operation
– windows30
Convenience start, refer to
Starting the engine53
Convenient access35
– replacing the battery37
– what to observe before
entering a car wash36
Convenient operation
– windows with convenient
access36
– with convenient access36
Coolant201
– adding201
– checking level201
Coolant temperature69
Cooling, maximum98
Cooling fluid, refer to
Coolant201
Cornering lamps, refer to
Adaptive Head Light95
Country of destination for
navigation126
Courtesy lamps96
Cross-hairs in navigation129
Cruise control60
– active62
– malfunction62
Cruising range70
Cup holders107
Curb weight, refer to
Weights220Current consumption, refer to
Energy Control70
"Current position"140
Current position
– displaying140
– entering132
– storing132
"Customer
Relations"180,182
D
Dashboard, refer to
Cockpit10
Dashboard, refer to
Instrument cluster12
Dashboard lighting, refer to
Instrument lighting96
Data218
– capacities221
– dimensions219
– engine218
– weights220
"Date"79
Date
– setting78
– setting format79
"Date format"79
Daytime driving lamps94
"Daytime running light"95
DBC Dynamic Brake
Control84
DCC, refer to Cruise
control60
"Deactivated"44
Deactivating front passenger
airbags91
Deadlocking, refer to
Locking30
Decommissioning the vehicle
– refer to Caring for your
vehicle brochure
Defect
– door lock32
– fuel filler door186
– glass sunroof39
Defogging windows100
Defrosting windows100