Page 148 of 194
143
General operation
RADIO, CD
NAME, TEL
NAV, INFO
CAR, SETUP the map by light grey lines
�f i g .1 4 9 . Th e r e i s n o r o u t e g u i d a n c e f o r
IPD sections, instea")
Navigation (NAV)143
General operation
RADIO, CD
NAME, TEL
NAV, INFO
CAR, SETUP the map by light grey lines
�f i g .1 4 9 . Th e r e i s n o r o u t e g u i d a n c e f o r
IPD sections, instead you are guided by directional arrows
�fig.149. These directional arrows point in the compass direc-
tion/a direct line to the destination.
I f y o u s h o u l d b e s t a r t i n g y o u r r o u t e g u i d a n c e i n a n I P D a r e a , y o u w i l l
initially be guided by directional arrows. As soon as you leave the
IPD area, route guidance will start . In
�page 142, fig.149 an
example is shown of a directional arrow in an IPD area.
If your destination should lie in an IPD area, the Navigation System
will guid e you up to the star t of the IPD area. In the IPD area you will
be guided by directional arrows.
If your route guidance includes an IPD area, you will be advised of
this by a voice message when route guidance starts (“It is possible
that there a re un fore seen tra ffic reg ulations on the way to the des ti-
nation.”).
Tips
Route guidance is additionally shown by directional arrows in the
instrument cluster display
�page 113 or
�page 114. In an IPD
area, the directional arrows in the instrument cluster display point
in the compass direction/a direct line to the destination.
Map and information displayFig. 150 Navigation: Example of map display with inactive side menu
Fig. 151 Navigation: Example of map display with activated turn list
A�
A1
Page 149 of 194
 144Th e fi g ure s
�page 143, fig.15 0 a nd
�page 143, fig.151 show you
the possible types of information in the map display:
Map orientation
Scale
Estimated distance to the next d")
Navigation (NAV) 144Th e fi g ure s
�page 143, fig.15 0 a nd
�page 143, fig.151 show you
the possible types of information in the map display:
Map orientation
Scale
Estimated distance to the next destination/stopover
Estimated time of arrival to the next destination/stopover
Ve hicle s ymbol
Example of selected map contents �page 155
Turn list inserted in the Setup menu �page 156
The map display modes can be changed �page 151.
A crosshair with selection rectangle helps you select your destina-
tion with the aid of the map
�page 148.
Route guidance is additionally shown by directional arrows in the
instrument cluster display (
�page 113 or
�page 114).
Tips
An underpass or a tunnel is shown by broken lines on the map
display up to a scale of 0.5 mile.
Map display with active side menu
The map display can be changed through the active
side menu.Fig. 152 Navigation: Map display with active side menu–Press the Map control button in the navigation menu.
– Press the control knob to switch to the side menu
�fig.152.
– Select the desired submenu item by rotating and
pressing the control knob and make your changes.
– Press the button, to leave the map side menu.If you have activated the Zoom function
�page 146 or the
crosshairs
�page 149 in the active side menu, you have to press
the button twice in order to leave the map side menu.
A1A�A A�A4A9A:
RETURN
RETURN
Page 150 of 194
145
General operation
RADIO, CD
NAME, TEL
NAV, INFO
CAR, SETUP After you have activated the side menu, you are shown information
(city/street names and longitude/latitude) for the pos")
Navigation (NAV)145
General operation
RADIO, CD
NAME, TEL
NAV, INFO
CAR, SETUP After you have activated the side menu, you are shown information
(city/street names and longitude/latitude) for the position you had
reached at the time of activation.
The following functions can be carried out using the
active map side menu:
Tips
Settings made in an active side menu are not kept after deactiva-
tion. You can enter permanent settings for the map display using
Setup Navigation
�page 151.
Map orientation
Inside side menu activation you can switch back and
forth between direction of travel and North.Fig. 153 Navigation: Map orientation North in the active side menu–Press the Map control button in the navigation menu.
– Press the control knob to switch to the side menu.
– Rotate the control knob to the first map menu item
�fig.153.
– By pressing the control knob, you can switch back and
forth between orientation North �fig.153 and Tr a v e l.
For the time the side menu is active, the changed setting
remains.
Legende
FunctionOrientation �page 145Scale �page 146Map position menu �page 148Activation of map crosshairs �page 149Presentation of map crosshairs �page 149Vehicle symbol
A1A�A A�A4A9
A1
Page 151 of 194
Navigation (NAV) 146
–Press the button �page 18, to leave the map
side menu.When you change the map orientation with the side menu active,
this map orientation remains only for the time the side menu is
active. After the map side menu is deactivated, the orientation
entered in Setup becomes active again
�page 153.
When you make the selection North, the map is oriented to the
North
�page 145, fig.153. The vehicle always remains in the center
of the display.
When you make the selection Drive, the vehicle symbol is oriented
pointing upward. The map rotates around the vehicle.
An active map side menu is deactivated again by pressing the
button
�page 144.
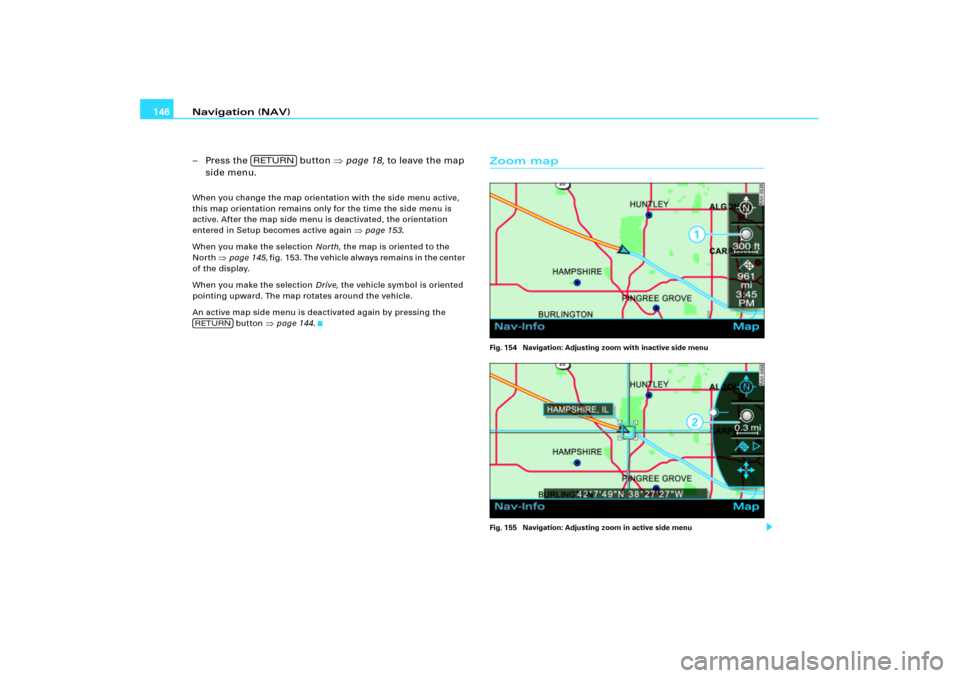
Zoom mapFig. 154 Navigation: Adjusting zoom with inactive side menu
Fig. 155 Navigation: Adjusting zoom in active side menu
RETURN
RETURN
Page 152 of 194
147
General operation
RADIO, CD
NAME, TEL
NAV, INFO
CAR, SETUP
Changing scale with inactive side menu:
–Press the Map control button in the navigation menu.
– Rotate the control kn")
Navigation (NAV)147
General operation
RADIO, CD
NAME, TEL
NAV, INFO
CAR, SETUP
Changing scale with inactive side menu:
–Press the Map control button in the navigation menu.
– Rotate the control knob counterclockwise to zoom into
the map (smaller scale, display of details), or
– Rotate the control knob clockwise, to zoom out of the
map (larger scale, more overview). You are shown the
scale �page 146, fig.154 in the side menu.
Changing scale with inactive side menu:
–Press the Map control button in the navigation menu.
– Press the control knob to switch to the side menu.
– Rotate the control knob to the second menu item.
– Press the control knob to activate the map menu item
Zoom (white highlight) �page 146, fig.155.
– Rotate the control knob counterclockwise to zoom into
the map (smaller scale, display of details), or
– Rotate the control knob clockwise, to zoom out of the
map (larger scale, more overview). You are shown the
scale �page 146, fig.155 in the side menu.
–Press the button �page 18, to leave the map
side menu.The scale can be set from 50 m to 600 km.
When you change the scale with the side menu active, this change
in scale remains only for the time the side menu is active.By pressing the button once, you leave Zoom mode and
you can use other map menu items. Pressing the button
again deactivates the active side menu.
The scales recommended for driving are:
�
on freeways 3.5 km
�
on secondary roads 750 m
�
in cities 200 mTips
If you have activated automatic intersection zoom
�page 159, the
map display automatically changes the scale to intersections or
turn points.
A1
A�
A�
RETURN
RETURN
RETURN
Page 153 of 194
Navigation (NAV) 148Map position menuFig. 156 Navigation: Map position
Fig. 157 Navigation: Map position menu
–Press the Map control button in the navigation menu.
– Press the control knob to switch to the side menu.
– Rotate the control knob to the third menu item
�fig.156.
– Press the control knob.
– Select Detail info, Set as destination, Set as stopover or
Save to directory.You can set the point marked at the time by the crosshairs as a desti-
nation or stopover, or save it to the directory. If additional detailed
information is available for the selected point on the map, you can
display it using the Detail info function.
You can also specify a new point on the map by moving the
crosshairs
�page 149. This new point can then be Set as
destination, Set as stopover or you can Save in directory.
You can use the Set as stopover f u n c t i o n i f y o u h a v e e n t e r e d “ R o u t e
with stopovers” �page 139.
Page 154 of 194
Navigation (NAV)149
General operation
RADIO, CD
NAME, TEL
NAV, INFO
CAR, SETUP
Move map
A new destination or stopover can be set using the
map by moving the crosshairs horizontally and verti-
cally.Fig. 158 Navigation: Moving the crosshairs horizontallyFig. 159 Navigation: Moving the crosshairs vertically
–Press the Map control button in the navigation menu.
– Press the control knob to switch to the side menu.
– Rotate the control knob to the fourth menu item.
– Press the control knob, the horizontal line in the
crosshairs is highlighted in white �fig.158.
– Rotate the control knob to the desired point.
– Press the control knob, the ver tical line in the crosshairs
is highlighted in white �fig.159.
– By pressing the control knob you can switch back and
forth between horizontal and vertical movement.If the crosshairs remain in a new position, detailed information
(street or city name) is displayed for the current position .
Page 155 of 194
Navigation (NAV) 150By pressing the button once, you leave the crosshairs
setting and you can use other map menu items via the active side
menu. Pressing the button again deactivates the side
menu.Nav-Info control buttonInformation dataFig. 160 Navigation: Display for destination Fig. 161 Navigation: Geographic information (latitude, longitude)
–Press the Nav-Info control button in the navigation menu.
You are shown the final destination or next stopover with
address, estimated time of arrival and distance
�fig.160.
– Rotate the control knob to the left. The data for the next
stopovers or the destination are displayed.
– Rotate the control knob to the right. The data for your
current location with its geographical data and the
number of receivable satellites is displayed �fig.161.Your destination will be displayed listing the following information:�
Destination
�
Stopovers
�
Estimated time of arrival
RETURN
RETURN
 148Map position menuFig. 156 Navigation: Map position
Fig. 157 Navigation: Map position menu
–Press the Map control button in the navigation menu.
– Press the control knob to sw")
149
General operation
RADIO, CD
NAME, TEL
NAV, INFO
CAR, SETUP
Move map
A new destination or stopover can be set using the
map by moving the crosshairs horizontally and verti-
cally.F")
 150By pressing the button once, you leave the crosshairs
setting and you can use other map menu items via the active side
menu. Pressing the button again deactivates the side
m")