Page 93 of 194
CD/SD 88Setup MP3Opening and closing SetupFig. 91 Setup MP3: main menu– In an MP3 menu, press the button to open the
main Setup menu for the MP3 function �page 82,
fig.83.
– Press the button again to close the main Setup
menu again.The following settings are possible in Setup MP3:�
Repeat options
�page 88
�
With subdirectories
�page 89
�
Tr a c k d i s p l a y
�page 90
�
Categ. display
�page 90
The sound and tuning settings and the brightness of the display can
be entered using the control buttons
�page 169.
Tips
We recommend that you enter these settings when the vehicle is
stationary. In this way, you can be sure that you are not unneces-
sarily distracted from traffic when performing the procedures that
follow. Please note
�page 9, “Notes on Traffic Safety”.
Repeating MP3Fig. 92 Setup MP3: Repeating MP3 data carrier– Press the function button �page 16 in the MP3
menu.
SETUP
SETUP
SETUP
Page 94 of 194

CD/SD89
General operation
RADIO, CD
NAME, TEL
NAV, INFO
CAR, SETUP
–Select Repeat.
–Select Off, Playlist/Dir., All playlists or Tr a c k �page 88,
fig.92.The tracks from an available MP3 data carrier can be repeated.�
Function Off: The Repeat function is switched off.
�
Function Playlist/Dir.: The MP3 tracks from the current Playliste
or of the current Directory are repeated.
�
Function All playlists: The MP3 tracks from all available Playlists
or of all Directories are repeated.
�
Function Tra c k: The MP3 track currently selected is repeated.Tips
The Repeat options can be combined with the Repeat and Random
functions. You can find more information in the description of the
Random function
�page 86.
SubdirectoriesFig. 93 Setup MP3: Subdirectories activated– Press the fun ction button �page 16 in the MP3
menu.
– Select Repeat �page 88, fig.92.
– Select Playlist/Dir.
– Select With subdirectories an d p re s s t h e co n t ro l k n o b s o
that a check mark
� is displayed behind this function
�fig.93.
Th e fu nc t i o n With subdirectories is available for the Repeat
Playlist/Dir. function. In this way, all subdirectories in a directory are
played as well.
SETUP
Page 95 of 194

CD/SD 90Tr a c k d i s p l a yFig. 94 Setup MP3: Select track display– Press the function button �page 16 in the MP3
menu.
– Select Tr a c k d i s p l a y.
– Select Tr a c k n a m e or File name �fig.94.Tr a c k n a m e
Information about the tracks (e.g. artist, album, etc.) can be read
from a previously stored ID3 tag.
The different information has to be stored first in the ID3 tag, other-
wise no information is available.
If an MP3 data carrier has been inserted and not played, the data
fro m the ID3 tag are read in in the background. If you s ta r t p layback of an MP3 data carrier immediately, the ID3 tag data are displayed
for the track being played.
I f t h e r e a r e n o I D 3 t a g s , o r i f t h e y h a v e n o t b e e n r e a d , n o i n f o r m a t i o n
about the tracks is displayed.
File name
No information about the tracks is displayed.
Category display
If the display “Track name” was selected, the category
display can be used.Fig. 95 Setup MP3: Category display switched on– Press the function button �page 16 in the MP3
menu.
SETUP
SETUP
Page 96 of 194
CD/SD91
General operation
RADIO, CD
NAME, TEL
NAV, INFO
CAR, SETUP
–Select Tr a c k d i s p l a y �page 90, fig.94.
–Select Tr a c k n a m e.
–Select Categ. display on �page 90, fig.95.Information about the category of an MP3 track can be read from a
previously stored ID3 tag. In order for this function to be available,
Tr a c k n a m e must be selected
�page 90.
Page 97 of 194
Adjusting sound settings 92Adjusting sound settingsSetting basic sound characteristicsFig. 96 Sound: Setting the balance (example radio menu)Fig. 97 Sound: Balance adjustment (example radio menu)
– Press the control button for the Sound function from an
audio or Setup menu.
– Select the desired sound setting (e.g. Balance) �fig.96
with the control knob.
– R o t a t e t h e s p e c i f i c c o n t r o l k n o b i n t h e s o u n d a d j u s t m e n t
menu (e.g. Balance) �fig.97 to set the sound character-
istic to your liking.
– B y p r e s s i n g t h e c o n t r o l k n o b o r t h e b u t t o n , t h e
setting is imported and you leave the settings menu.The Display
�fig.97 shows the degree of adjustment.
RETURN
Page 99 of 194

Adjusting sound settings 94
TipsVehicles with a BOSE sound system in conjunction with
an AudioPilot do not have a DSP function. In this case your vehicle
is equipped with dynamic noise compensation
�page 94.
Applies to vehicles: with BOSE sound system in conjunction with AudioPilotDynamic noise compensationVehicles with a BOSE sound system in conjunction with AudioPilot
are equipped with dynamic noise compensation.
Dynamic noise compensation automatically adjust music playback
so that the music is no t drowned out b y no ise . No matter what kind
of ambient noise you have in the vehicle, the music playback level
remains the same.
Dynamic noise compensation takes account of both temporary and
permanent ambient noise.
How does dynamic noise compensation work?
A microphone in the vehicle interior detects both the noise level of
the music playback and intrusive noises. The intrusive noises are
digitally analyzed and evaluated. The system simultaneously
ensures that the music playback level is increased by the frequen-
cie s affe cte d by intrusive noise so that music playback remains at a
constant level for good listening.
Tips
In the event of a malfunction in the AudioPilot system, a gong signal
sounds three times to alert you after the Navigation System is
turned on. Have the AudioPilot system inspected by a qualified
dealership.
Vo l u m e s e t t i n g sFig. 99 Display: Volume settings– Press the control button for the Sound function from an
audio or Setup menu.
– Select Vo lum e set tin g s.
– Select Navigation info.
– Rotate and press the control knob to set the desired
volume.When you adjust the volume for Navigation prompts, a test
announcement is made automatically. This test announcement is
made only if the navigation DVD is in the DVD navigation drive �page 35.
Page 103 of 194
 98NAME (directory)General safety precautionsThe driver is completely responsible for traffic safety
even when driving with the Navigation System active.Fig. 100 Display: WarningWhen")
NAME (directory) 98NAME (directory)General safety precautionsThe driver is completely responsible for traffic safety
even when driving with the Navigation System active.Fig. 100 Display: WarningWhen you set your vehicle in motion and you press the
b ut t o n , a w ar n i n g m e ss ag e i s sh o w n i n t h e d i sp l a y.
Read the warning message carefully and follow the impor-
tant directions.
– Select Accept by pressing the control knob when you
have finished reading the warning message.
Be sure that you always have complete control of your vehicle in all
traffic situations when using the directory.
WARNING
Pay attention first and foremost to your driving! As the driver of
the vehicle, you have total responsibility for operating the vehicle
safely
�page 9, “Notes on Traffic Safety”. Therefore, when using
the Navigation System functions, make certain that you always
have complete control of your vehicle!
IntroductionSelecting NAME function (directory)
Using the function button, a user-specific
directory can be created.– Insert the Navigation DVD into the DVD navigation drive.
– Press the function button �page 16. The main
directory menu �page 99, fig.101 �page 56, fig.53 or
the previously active directory function menu appears in
the display.The function of the directory is user-specific storage of business
and personal contact addresses.
NAME
NAMENAME
Page 104 of 194
99
General operation
RADIO, CD
NAME, TEL
NAV, INFO
CAR, SETUP
Tips
�
If you press the button
�page 16 wi t h i n t h e N a me f un c -
tion, you can program sound and tuning sett")
NAME (directory)99
General operation
RADIO, CD
NAME, TEL
NAV, INFO
CAR, SETUP
Tips
�
If you press the button
�page 16 wi t h i n t h e N a me f un c -
tion, you can program sound and tuning settings using the control
buttons and adjust the brightness for the display.
�
If you have not inserted a navigation DVD into the Navigation
DVD drive, you cannot use the Directory function.
Main directory menuGeneral
Starting from the main directory menu, directory
entries can be administered.Fig. 101 Display: Main directory menu
Entries in the directory are filed as directory cards. Each directory
card contains data fields to store data on the person, on their
address and for communication with this person. These data can
also be used for Navigation
�page 136.
You can store two navigation destinations* for one directory entry,
one navigation destination* for the “business” category, and one
navigation destination* for the “private” category
�page 103. You
can open these stored navigation destinations in the Navigation
m e n u u s i n g t h e c o n t r o l b u t t o n w i t h t h e Memory f u n c t i o n ( l o a d f r o m
directory)
�page 136.
Navigation destinations which you set in the directory as a top desti-
nation
�page 133 are displayed in the main navigation menu
under the function “Start route guidance”.
Using the button (directory), you can call up all entries
without and with stored destination. Via the navigation menu Load
from directory
�page 136, you can call up all entries with stored
navigation destination.
SETUP
NAME
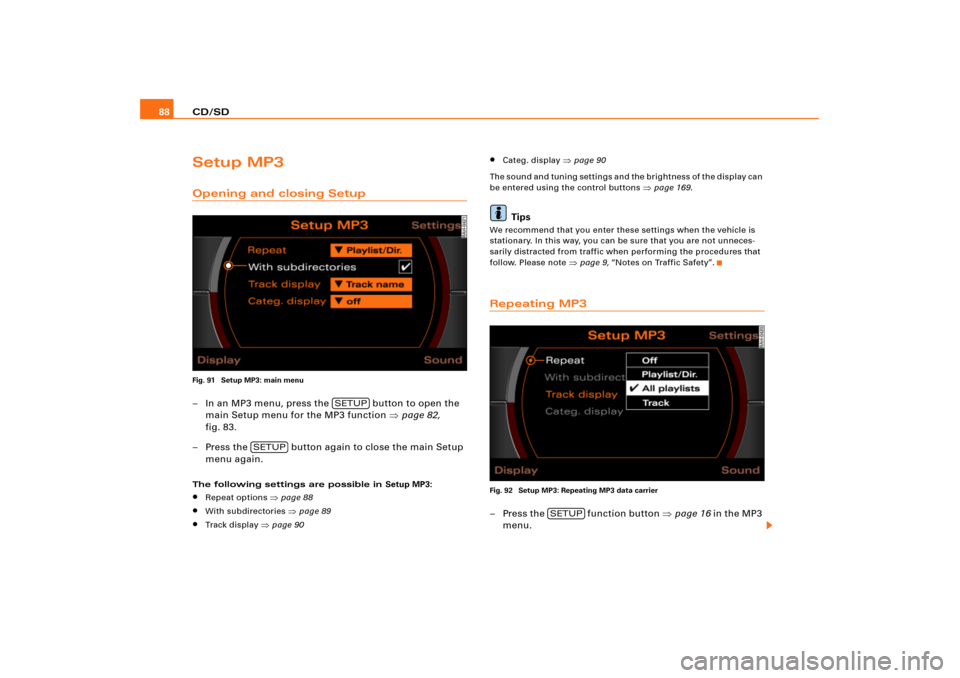
Fig. 97 Sound: Balance adjustment (example radio menu)
�")