Page 28 of 194
General system operation 26
Press the
button
Radio, CD, or
MP3
Increase volume
Press the
button
Radio, CD, or
MP3
Reduce volume
button not applicable.
a)If the radio memory list is shown in the Navigation System display, a radio
station can be selected from the list using the left menu thumbwheel.Button
Function
description
Operating
mode
Application
AC
�
AD
�
AF
Page 29 of 194

Display27
General operation
RADIO, CD
NAME, TEL
NAV, INFO
CAR, SETUP
DisplayOrientationMain menu
Th e m a i n m e n u o r t h e p r e v i o u s l y a c t i v e f u n c t i o n m e n u
appears in the display when a function button is
pressed.Fig. 20 Display overview: Main navigation menuFig. 21 Display overview: Setup main navigation menu
When you press a function button, the main menu or a submenu
assigned to this main function is displayed
�page 16.
If you then press the button, the appropriate main Setup
menu is displayed
�fig.21.
You can open the main Setup menu from a main menu or a
sub men u. For e x amp le , if you press the button in the main
navigation menu
�fig.20 or in a navigation submenu
�page 28,
fig.22, you are shown the main Setup navigation menu �fig.21.
The functions in that menu which can be performed are shown in
the center of the display. If your vehicle is not equipped with a
particular function, no functions are offered in the main menu. You
are shown an appropriate Note instead.
SETUP
SETUP
Page 30 of 194

Display 28The display comprises the following areas identified in the illustra-
tions
�page 27, fig.20 and
�page 27, fig.21:
Title line
The title line shows the main function that you are currently in, e.g.
Navigation
�page 27, fig.20. If Setup is displayed on the title line
as well, you are in a Setup menu
�page 27, fig.21.
Switching between the individual main functions is carried out
through the function keys
�page 16.
Corners of the display
These functions depend on the menu you are currently in and are
operated using the control buttons. The control buttons are logi-
cally assigned to the corners of the screen. The top right corner of
the screen corresponds to the top right control button
�page 17.
Display center
Radio station or track lists are displayed in the center of the display
in radio, CD and MP3 operation. In Navigation, the individual desti-
nation mode is displayed. In the main Setup menus, a list of avail-
able functions is displayed.
Orientation symbols
The different symbols in the display are used to select various addi-
tional functions
�page 29.
SubmenuFig. 22 Display: Navigation submenuThe submenu generally comprises the following areas identified in
the illustration
�fig.22:
Title line
You are also shown the title line in the submenus that were opened
for the individual main functions. This orients you as to which main
function you are in.
Submenu
The subtitle shows detailed information about the selected
submenu option, such as Destination.
Display center
In the center of the display, the available options in the particular
submenu are listed or notes are displayed.
A1A�A A�
A;A�A
Page 35 of 194
Display33
General operation
RADIO, CD
NAME, TEL
NAV, INFO
CAR, SETUP
Control wheelOperation
The “controlwheel” shown in the display, together
with the “controlknob”, allows easy operation of the
basic functions when playing the CD, radio and MP3.Fig. 29 Display: Control wheel (example shows MP3 operation)– Press the corresponding function button, e.g. .
– Press the control button with the Source function.
–Select MP3.
– Press the control button with the MP3 ctrl function.– Rotate the control knob to select a function on the
control wheel �fig.29.
– Confirm your selection by pressing the control knob.
The control wheel is divided into different segments. The func-
tion of the segment depends on the current menu.
Tips
Yo u c a n f i n d t h e d e s c r i p t i o n o f t h e d i f f e r e n t c o n t r o l w h e e l f u n c t i o n s
during radio operation starting on
�page 62, during CD operation
starting on
�page 80 and during MP3 operation starting on
�page 85.
CD/SD
A1A1
Page 36 of 194
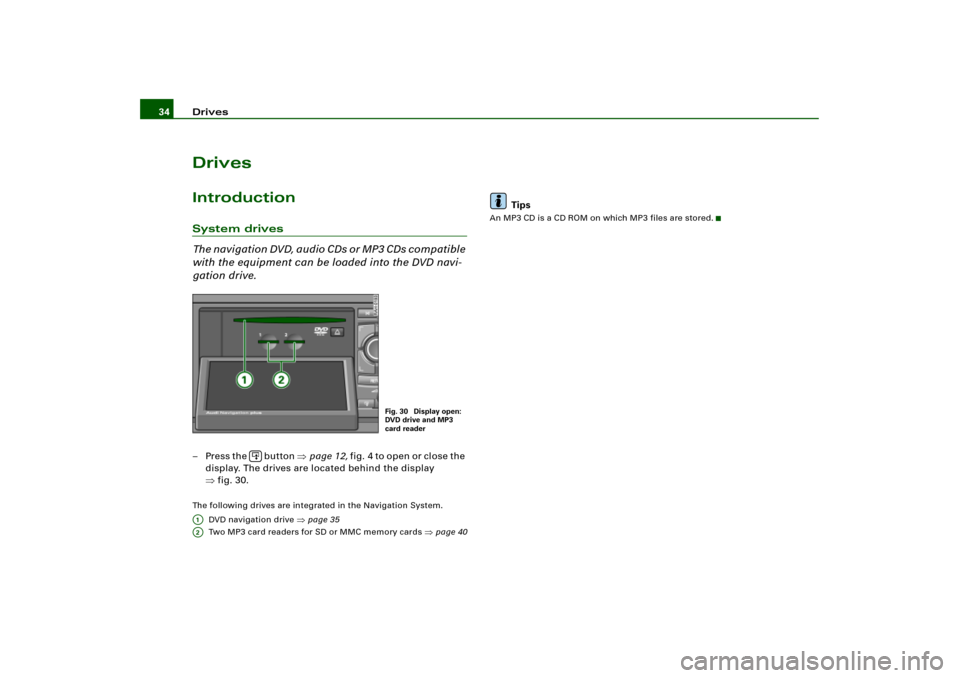
Drives 34DrivesIntroductionSystem drives
The navigation DVD, audio CDs or MP3 CDs compatible
with the equipment can be loaded into the DVD navi-
gation drive.–Press the button �page 12, f i g .4 t o o p e n o r c l o s e t h e
display. The drives are located behind the display
�fig.30.The following drives are integrated in the Navigation System.
DVD navigation drive
�page 35
Two MP3 card readers for SD or MMC memory cards
�page 40
Tips
An MP3 CD is a CD ROM on which MP3 files are stored.
Fig. 30 Display open:
DVD drive and MP3
card reader
�
A1A�
Page 38 of 194

Drives 36Loading navigation DVD– Press the button to open the display.
– Hold the navigation DVD by the hole in the center and the
outer edge �page 51, fig.52.– G ui de t h e n a vi g a t i o n DV D s t ra i g h t ( l a be l s i de u p) i n to t h e
drive . The navigation DVD is pulled in automatically.
Before in ser ting the n avigation DVD, check to make sure the re is n o
DVD/CD already in the drive. If there is a DVD/CD in the drive, push
the Eject button and remove the DVD/CD
�page 37.
The navigation DVD should never be forced into the drive. The navi-
gation DVD is pulled in automatically.
If you are shown the message Please check navigation DVD in the
display, you cannot use the Navigation function. Possible reasons
are described starting on
�page 51.
If you are shown the message Navigation is being initialized in the
display, navigation is in the start phase. As soon as this message
disappears and a navigation menu is displayed, you can use the
navigation feature.
Tips
To ensure problem-free operation, you should use only a clean,
unscratched and undamaged navigation DVD. You can find addi-
tional hints starting on
�page 48.
Fig. 33 Display open:
DVD navigation driveFig. 34 Display open:
Inserting navigation
DVD into the drive
�
A2
A1
Page 39 of 194

Drives37
General operation
RADIO, CD
NAME, TEL
NAV, INFO
CAR, SETUP
Ejecting navigation DVD– Press the button to open the display.
– W h e n t h e d i sp l a y i s f ul l y o pe n , pr e ss t h e E j e c t bu t to n .
The navigation DVD will be ejected.
NoteAlways keep the navigation DVD in a suitable jewel case (e.g. CD
case) to protect it from dirt, dust particles, scratches and other
damage. You can find additional hints starting on
�page 48.
MP3 playerGeneral
The MP3 player recognizes MP3 music files on different
data carriers.MP3 music are normally subject to copyright law in accordance with
the applicable international and national regulations. Without the
p r i o r c o n s e n t o f t h e c o p y r i g h t h o l d e r, d u p l i c a t i o n s m a y n o t b e m a d e
in some countries, not even for personal use.
Please find out about and follow applicable copyright regulations.
As long as you yourself hold these rights, for example, to your own
compositions and recordings or they were granted by the benefi-
ciary, these restrictions naturally do not apply.Storage medium “MP3 CD”
C D s w i t h s t o r e d M P 3 f i l e s c a n b e p l a y e d o n t h e i n t e g r a l
MP3 player.Only MP3 compositions which were stored on a CD in accordance
with the ISO9660 file system (single session and multisession) can
be played. MP3 CDs with a capacity of 650 and 700 MB can be used.
The maximum length for the file names is 8+3 characters.
The maximum number per medium is limited to 400 files.
MPEG-1 layer 3 format is supported by the MP3 player. Fixed bit
rates of 32-320 kbits/s are supported.
Fig. 35 Display open:
Ejecting navigation
DVD
�
A2
A;
Page 42 of 194

Drives39
General operation
RADIO, CD
NAME, TEL
NAV, INFO
CAR, SETUP
– Press the button to open the display �page 38,
fig.36.
– Hold the MP3 CD or audio CD by the hole in the center
and the outer edge �page 38, fig.37.
– Guide the MP3 CD or audio CD straight (label side up)
into the drive . The CD is pulled in automatically.Before inserting the CD, check to make sure there is no CD already
in the drive. If there is a CD in the drive, push the Eject button and
remove the CD
�page 37.
A CD s ho uld never be forced in to the drive. The CD is pulled in auto-
matically. If the CD is inserted wrong side up, you will be alerted by
a message in the open display.
If an MP3 CD has been inserted and not played, the data from the
ID3 tag are read in in the background. If you start playback of an
MP3 CD immediately, the ID3 tag data are displayed for the track
being played.
An audio CD (CD-A) inserted in the DVD navigation drive is played
using the CD function
�page 78. An MP3 CD inserted in the DVD
navigation drive is played using the MP3 function
�page 83.
Note
�
Always keep the navigation DVD that you removed in a suitable
j e w e l c as e (e .g . C D c as e ) to p ro t e c t t he DV D f ro m d i r t , d us t p a r t i c le s ,
scratches and other damage
�page 48.
�
Do not attach labels to the CDs. Heat can cause the label to
b e c o m e d e t a ch e d i n t h e d ri v e , j a m t h e CD a n d c a us e a m a lf un c t io n .
Use a permanent marker to label CDs you have burned yourself.
�
Never expose the navigation DVD to direct sunlight.
Tips
�
Standard 12-cm diameter CDs can be used. Mini CDs with a
diameter of 8 cm (3 inches) or non-circular CDs, known as shape
CDs, must not be used.
�
The use of cleaning CDs can lead to mechanical damage to the
drive.
�
Because of the diversity of CD-R/CD-RW blanks and their
different storage capacities, function may be limited with individual
storage media.
�
If you have not inserted a navigation DVD into the drive, you
cannot use the Navigation and Directory functions.
Ejecting a CD– Press the button to open the display.
�
A2
A1
Fig. 38 Display open:
Ejecting a CD
�
A2
If the radio memory list is shown in th")