Page 77 of 295
 by moving the
pointer ‘‘ ’’ with the INFO button.
Af ter selecting a menu item, enter")
�¼
Select the menu item you want
(‘‘CHG SETTINGS’’, ‘‘DEFAULT
ALL’’ or ‘‘EXIT’’) by moving the
pointer ‘‘ ’’ with the INFO button.
Af ter selecting a menu item, enter
your selection by pressing the
Select/Reset button.
To exit this mode without changing
the current settings, select ‘‘EXIT’’
and press the Select/Reset button.
The display will move to the next
mode.
If you want to change the settings,
select ‘‘CHG SETTINGS’’, and press
the Select/Reset button. The display
will change to the screen shown in
the middle column of this page.
While ‘‘Keyless Memory Settings’’ is
displayed, press the Select/Reset
button. The display will change to
the screen shown above. Auto door lock conditions
Auto door unlock conditions
Keyless lock acknowledgment
conditions
Security relock timer
Headlight auto of f timer
Interior light dimming time
With the vehicle stopped and the
transmission in Park (A/T) or the
parking brake set (M/T), you can
customize some of the vehicle
control settings to your pref erence.
Here are the settings you can
customize:
Multi-Inf ormation Display
K eyless Memory Settings
76
TM
Page 80 of 295

�¼�¼
The next setting menu is ‘‘KEYLESS
LOCK ACKNOWLEDGMENT’’.
If you do not want the beeper to
sound, select ‘‘BEEP OFF’’ and enter
your selection by moving the pointer
with the side of the INFO button. The next setting menu is
‘‘SECURITY RELOCK TIMER’’.
If you unlock the doors with the
remote transmitter, but do not open
any of the doors within 30 seconds,
the doors automatically relock and
the security system sets.
The headlights, parking lights,
taillights and license plate light turn
of f af ter the selected time when you
remove the key from the ignition
switch and close the driver’s door.
You can change this relock time
f rom 30 seconds to 60 or 90 seconds.
Select the desired relock time by
moving the pointer with the side
of the INFO button. The last two setting menus are
‘‘HEADLIGHT AUTO OFF TIMER’’
and ‘‘INTERIOR LIGHT DIMMING
TIME’’.
Select the time (‘‘0S, 15S, 30S or 60
S’’) and enter your selection by
pressing the Select/Reset button.
When you push the LOCK button a
second time within 5 seconds after
you lock the doors with the remote
transmitter, a beep will sound to
verify that doors are locked and the
security system has set.
Multi-Inf ormation Display
Inst rument s and Cont rols
79
Page 81 of 295
�¼
The interior lights f ade out when you
close all doors (see page ). Select
how long it takes f or the interior
lights to f ade out (in seconds) f rom
5S, 15S, or 30S, and enter your
selection by moving the pointer with
the side of the INFO button. To use the system, your cell phone
and the HFL system must be linked.
Not all cell phones are compatible
with this system. Ref er to page
for instructions on how to link
your cell phone to the HFL and how
to receive or make phone calls.
You can receive or make phone-calls
f rom your cell phone through your
vehicle’s HandsFreeLink (HFL)
system without touching your cell
phone.
113 156
Multi-Inf ormation Display
HandsFreeL ink
80
TM
Page 83 of 295
�Î
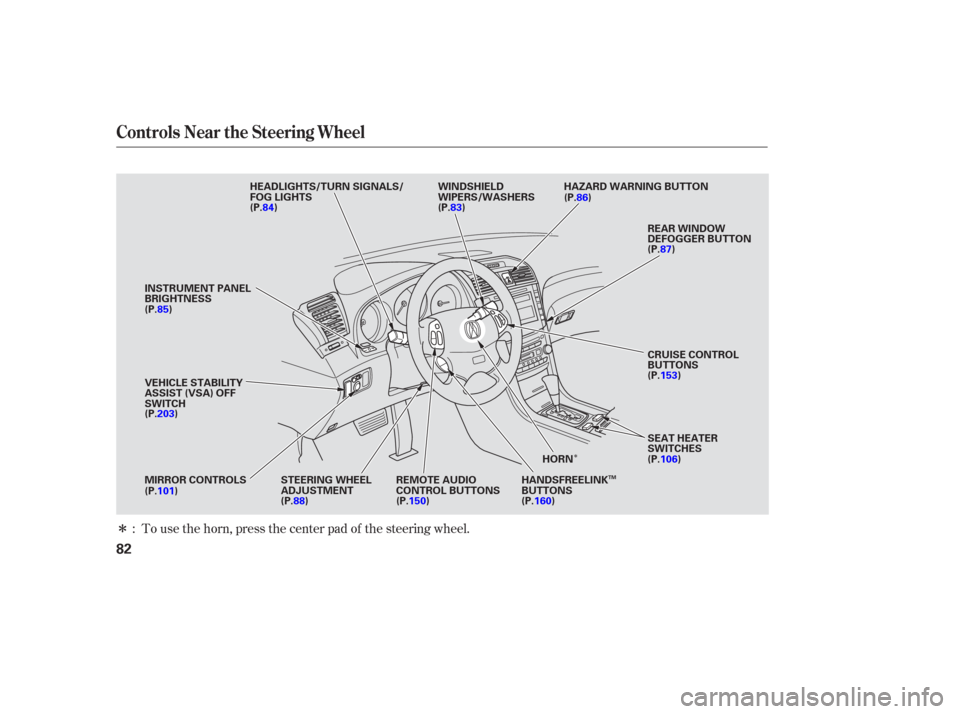
�ÎTo use the horn, press the center pad of the steering wheel.
:
Controls Near the Steering Wheel
82
WINDSHIELD
WIPERS/WASHERS
INSTRUMENT PANEL
BRIGHTNESS HAZARD WARNING BUTTON
HEADLIGHTS/TURN SIGNALS/
FOG LIGHTS
REAR WINDOW
DEFOGGER BUTTON
SEAT HEATER
SWITCHES
HORN
MIRROR CONTROLS STEERING WHEEL ADJUSTMENTREMOTE AUDIO
CONTROL BUTTONS HANDSFREELINK
BUTTONS CRUISE CONTROL
BUTTONS
VEHICLE STABILITY
ASSIST (VSA) OFF
SWITCH (P.84)
(P.85)
(P.203)
(P.101) (P.88)(P.150) (P.160)
(P.83)
(P.86)
(P.106) (P.153) (P.87)
TM
Page 85 of 295

�µ
�µ �µ
Push down on the
lever to signal a lef t turn and up to
signal a right turn. To signal a lane
change, push lightly on the lever,
and hold it. The lever will return to
center when you release it or
complete a turn.
The rotating switch
on the lef t lever controls the lights.
Turning this switch to the ‘‘ ’’
position turns on the parking lights,
taillights, instrument panel lights,
side-marker lights, and rear license
plate lights. Turning the switch to
the ‘‘ ’’ position turns on the
headlights. If you leave the lights on
with the key removed from the
ignition switch, you will hear a
reminder tone when you open the
driver’s door. To switch f rom low
beams to high beams, push the lef t
lever f orward until you hear a click.
The blue high beam indicator will
come on (see page ). Pull it back
to return to low beams. To flash the
high beams, pull the lever back
lightly, then release it. The high
beams will stay on as long as you
hold the lever back.
Turn Signal
Of f
Parking and instrument panel
Headlights on
Fog lights of f (U.S. models)
Fog lights on (U.S. models)
High beams
Flashhighbeams The headlights revert to normal
operation when you turn them on
with the switch. With the headlight switch of f orposition, the high beam
headlights come on with reduced
brightness when you turn the
ignition switch to the ON (II)
position and release the parking
brake. They remain on until you turn
the ignition switch of f , even if you
set the parking brake.
1.
2.
3.
4.
5.
6.
7.
8. 63
Canadian models only
Turn Signal and Headlights
Turn Signal
Headlights
High Beams
Daytime Running L ights
84
Page 86 of 295

�µ
�´ �´
�µ
Turn the f og lights on and of f by
turning the switch next to the
headlight switch.
Adjust the brightness of the
instrument panel by pressing the
or side of the adjustment button.
Press to increase the brightness
and to decrease it. You can adjust
the brightness with the headlight
switch on or of f .
You can use the f og lights only when
the headlights are on low beam.
The level of brightness is shown on
the multi-information display while
you adjust it. It goes out 5 seconds
af ter you f inish adjusting.To reduce glare at night, the
instrument panel illumination dims
when you turn the light switch to
or . Pressing the MAX
button will bring it to the maximum
level.
If your vehicle is equipped with the
navigation system, the navigation
system screen will also go to f ull
brightness. This is most usef ul when
using the headlights during daylight
hours.
U.S. models only
Fog L ights, Instrument Panel Brightness
Fog L ights Instrument Panel Brightness
Inst rument s and Cont rols
85
MAX BUTTON
ADJUSTMENT BUTTON
Page 87 of 295

The automatic lighting of f f eature
turns off the headlights, all other
exterior lights, and the instrument
panel lights within 15 seconds of
removing the key from the ignition
switch and closing the driver’s door.
You can change this 15 second timer
to 0, 30, or 60 seconds (see page ).The lights will turn on again when
you unlock or open the driver’s door.
If you unlock the door, but do not
open it within 15 seconds, the lights
will go off. With the driver’s door
open, you will hear a lights-on
reminder chime.
Push the button between the center
vents to turn on the hazard warning
lights (f our-way f lashers). This
causes all f our outside turn signals
and both indicators in the instrument
panel to f lash. Use the hazard
warning lights if you need to park in
a dangerous area near heavy traffic,
or if your vehicle is disabled.
The automatic lighting of f f eature
activates if you leave the headlight
switch in the ‘‘ ’’ or ‘‘ ’’
position, remove the key, open, then
close the driver’s door.
If you remove the key f rom the
ignition switch with the headlight
switch on, but do not open the door
and get out, the lights will turn of f
af ter 10 minutes. 79
Automatic Lighting Of f , Hazard Warning Button
Automatic L ighting Of f Feature
Hazard Warning Button
86
Page 90 of 295
The master key fits all the locks on
your vehicle.
The valet key works only in the
ignition and the driver’s door lock.
You can keep the trunk pass-through
cover and the glove box locked when
you leave your vehicle and the valet
key at a parking f acility.Youshouldhavereceivedakey
number tag with your key. You will
need this key number if you ever
have to get a lost key replaced. Use
only an Acura-approved key blank.
Donotdropthekeysorsetheavy
objects on them. Protect the key f rom direct
sunlight, high temperature, and
high humidity.
Keep the keys away f rom liquids.
If they get wet, dry them
immediately with a sof t cloth.
The keys do not contain batteries.
Do not try to take them apart. These keys contain electronic
circuits that are activated by the
immobilizer system. They will not
work to start the engine if the
circuits are damaged.
Keys
Inst rument s and Cont rols
89
KEY
NUMBER
TAG MASTER
KEY
(BLACK)VALET
KEY
(GRAY)