Page 188 of 508
3 - 33
INSP
ADJ
STEERING HEAD INSPECTION AND ADJUSTMENT
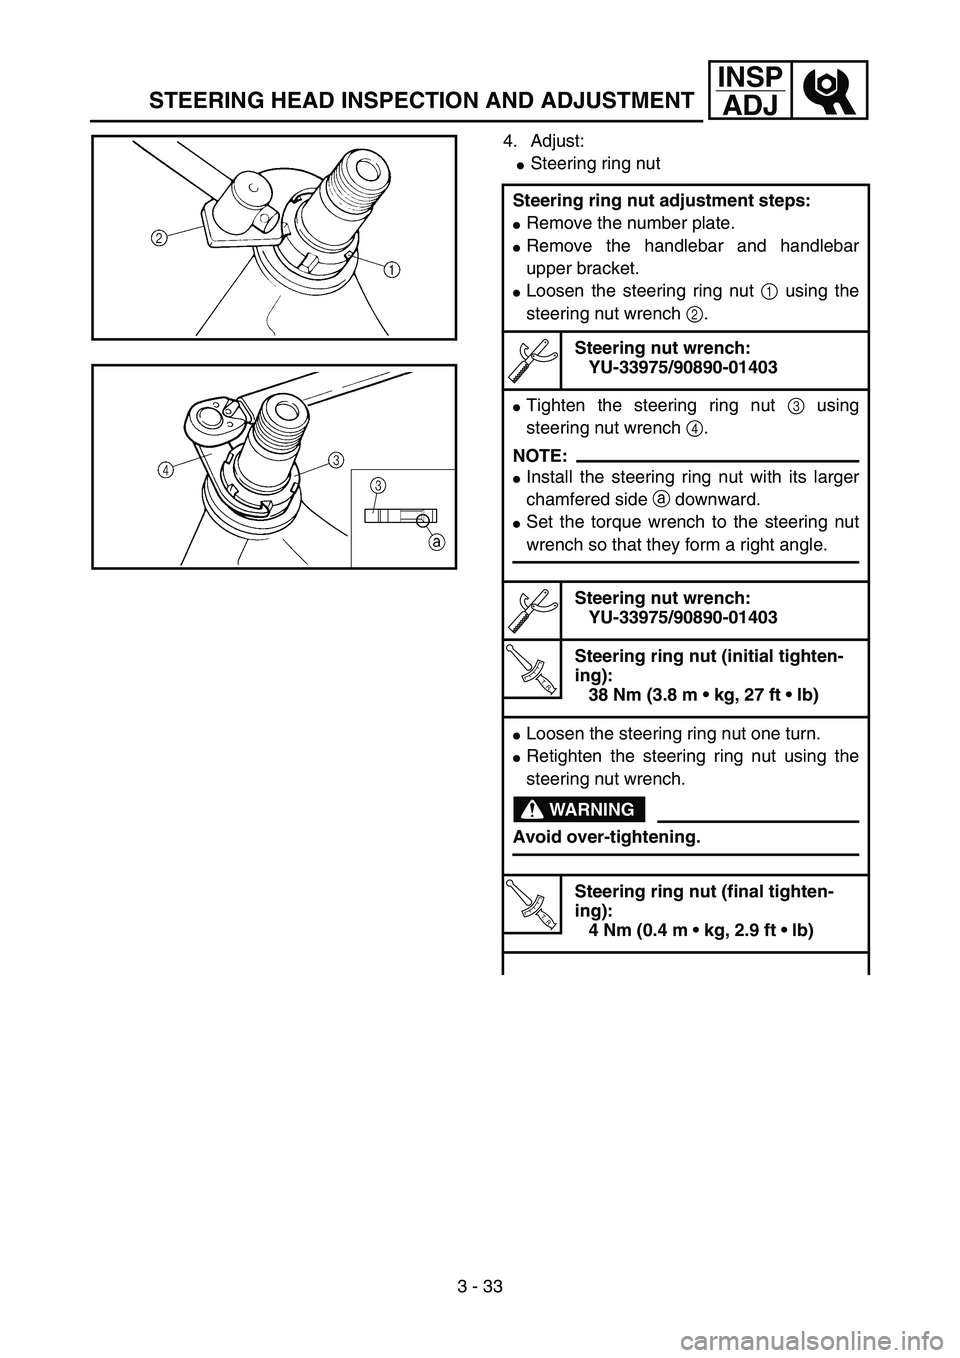
4. Adjust:
�Steering ring nut
Steering ring nut adjustment steps:
�Remove the number plate.
�Remove the handlebar and handlebar
upper bracket.
�Loosen the steering ring nut 1 using the
steering nut wrench 2.
Steering nut wrench:
YU-33975/90890-01403
�Tighten the steering ring nut 3 using
steering nut wrench 4.
NOTE:
�Install the steering ring nut with its larger
chamfered side a downward.
�Set the torque wrench to the steering nut
wrench so that they form a right angle.
Steering nut wrench:
YU-33975/90890-01403
T R..
Steering ring nut (initial tighten-
ing):
38 Nm (3.8 m kg, 27 ft lb)
�Loosen the steering ring nut one turn.
�Retighten the steering ring nut using the
steering nut wrench.
WARNING
Avoid over-tightening.
T R..
Steering ring nut (final tighten-
ing):
4 Nm (0.4 m kg, 2.9 ft lb)
5PA30740
5PA30740
Page 402 of 508
5 - 38
CHAS
25. Loosen:
�Rebound damping adjuster 1
NOTE:
�Loosen the rebound damping adjuster finger
tight.
�Record the set position of the adjuster (the
amount of turning out the fully turned in posi-
tion).
5PA51170
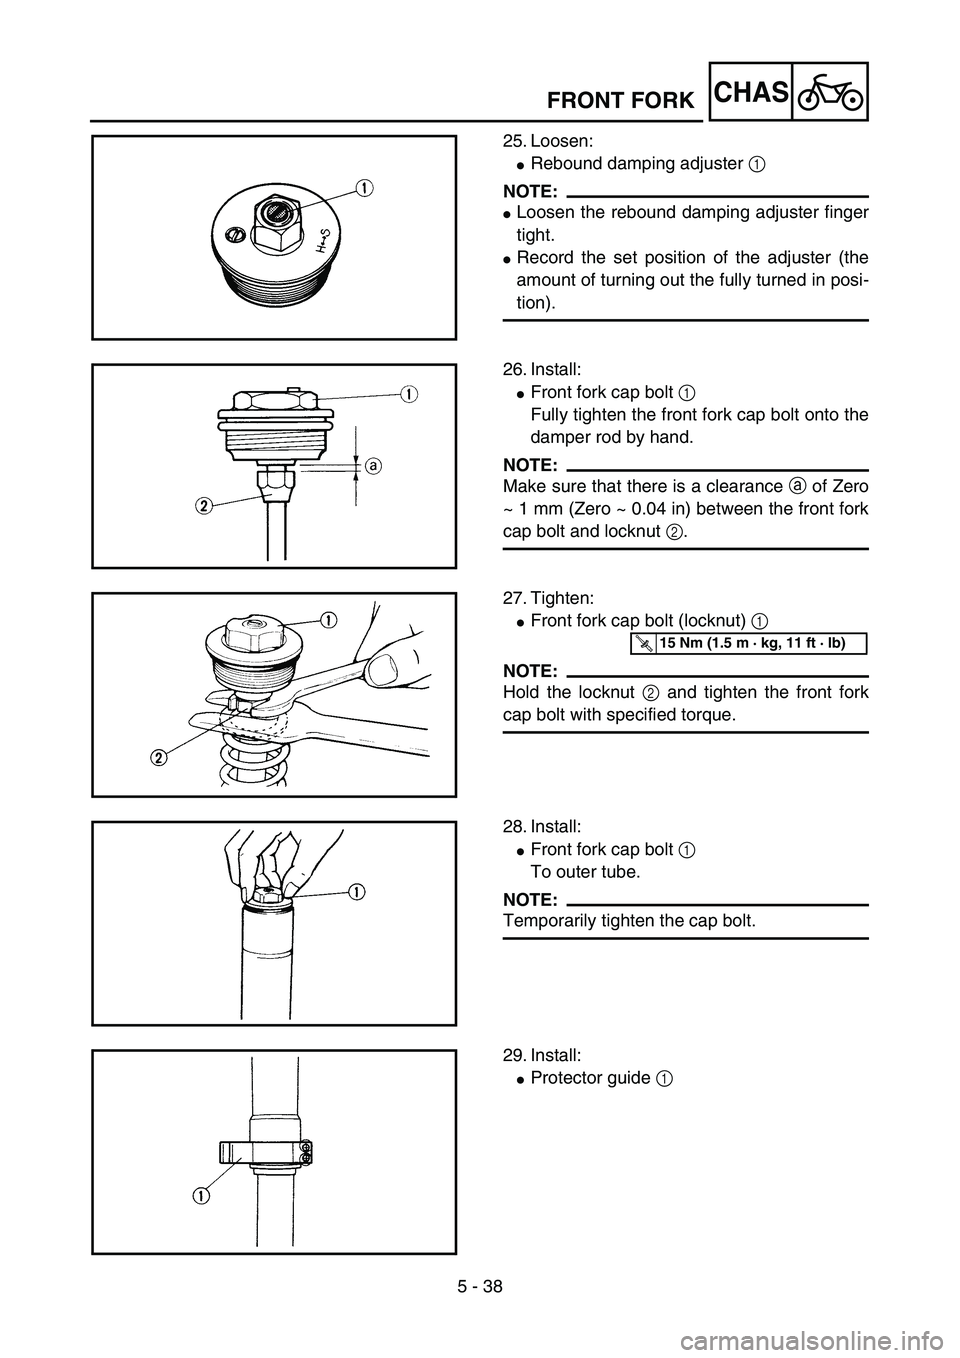
26. Install:
�Front fork cap bolt 1
Fully tighten the front fork cap bolt onto the
damper rod by hand.
NOTE:
Make sure that there is a clearance a of Zero
~ 1 mm (Zero ~ 0.04 in) between the front fork
cap bolt and locknut 2.
5PA51180
27. Tighten:
�Front fork cap bolt (locknut) 1
NOTE:
Hold the locknut 2 and tighten the front fork
cap bolt with specified torque.
5PA51190
T R..15 Nm (1.5 m · kg, 11 ft · lb)
28. Install:
�Front fork cap bolt 1
To outer tube.
NOTE:
Temporarily tighten the cap bolt.
5PA51200
29. Install:
�Protector guide 1
5PA51210
FRONT FORK
Page 404 of 508
5 - 39
CHAS
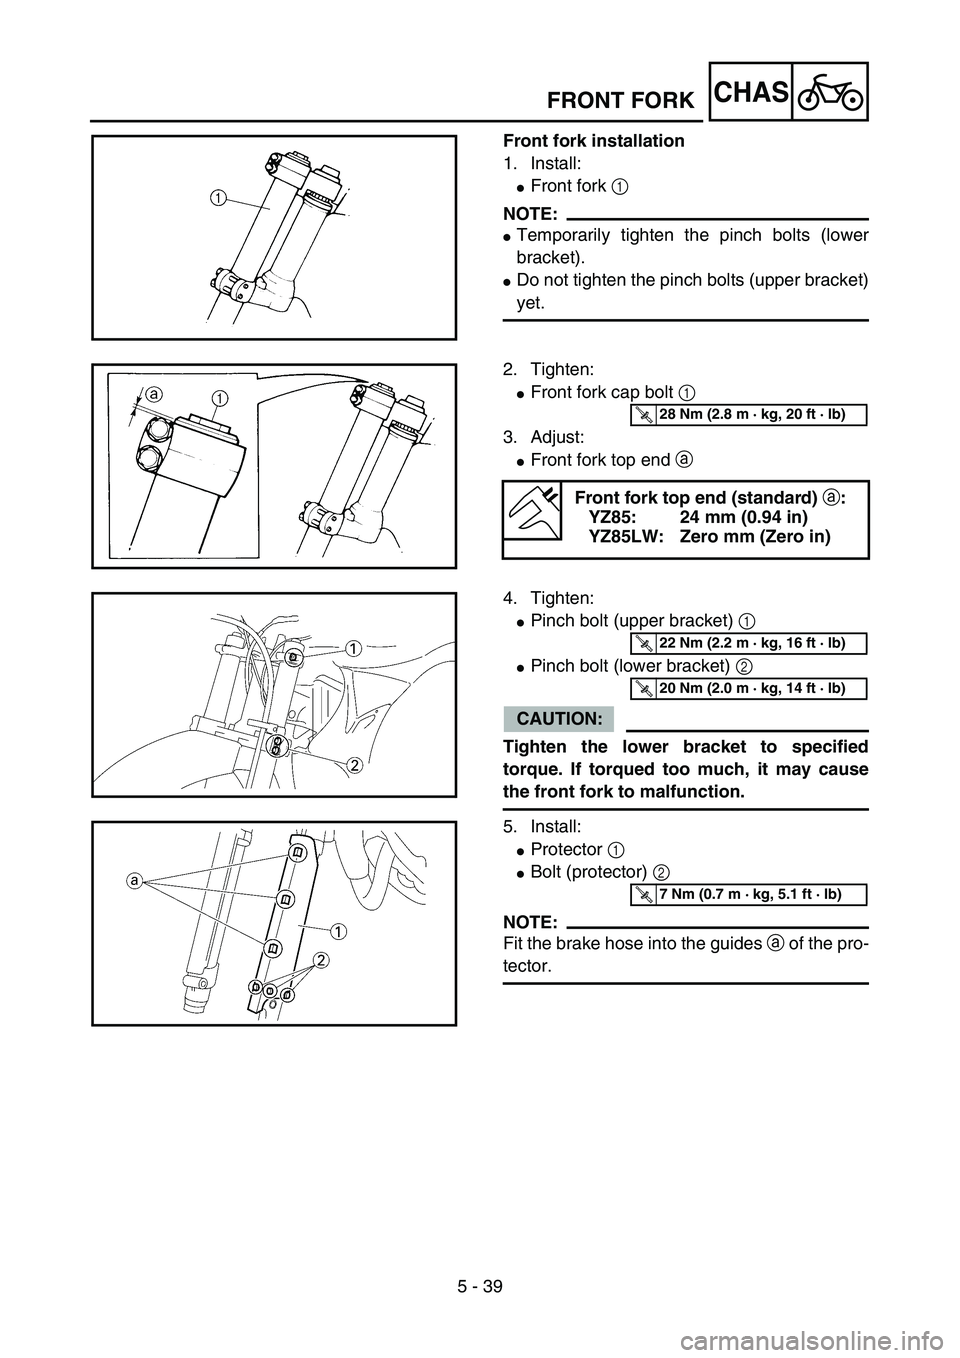
Front fork installation
1. Install:
�Front fork 1
NOTE:
�Temporarily tighten the pinch bolts (lower
bracket).
�Do not tighten the pinch bolts (upper bracket)
yet.
5PA51220
2. Tighten:
�Front fork cap bolt 1
3. Adjust:
�Front fork top end a
Front fork top end (standard) a:
YZ85: 24 mm (0.94 in)
YZ85LW: Zero mm (Zero in)
T R..28 Nm (2.8 m · kg, 20 ft · lb)
5PA51230
4. Tighten:
�Pinch bolt (upper bracket) 1
�Pinch bolt (lower bracket) 2
CAUTION:
Tighten the lower bracket to specified
torque. If torqued too much, it may cause
the front fork to malfunction.5PA51240
T R..22 Nm (2.2 m · kg, 16 ft · lb)
T R..20 Nm (2.0 m · kg, 14 ft · lb)
5. Install:
�Protector 1
�Bolt (protector) 2
NOTE:
Fit the brake hose into the guides a of the pro-
tector.
5PA51260
T R..7 Nm (0.7 m · kg, 5.1 ft · lb)
FRONT FORK
Page 426 of 508
5 - 50
CHAS
9. After tightening the nut, check the steering
for smooth movement. If not, adjust the
steering by loosening the steering ring nut
little by little.
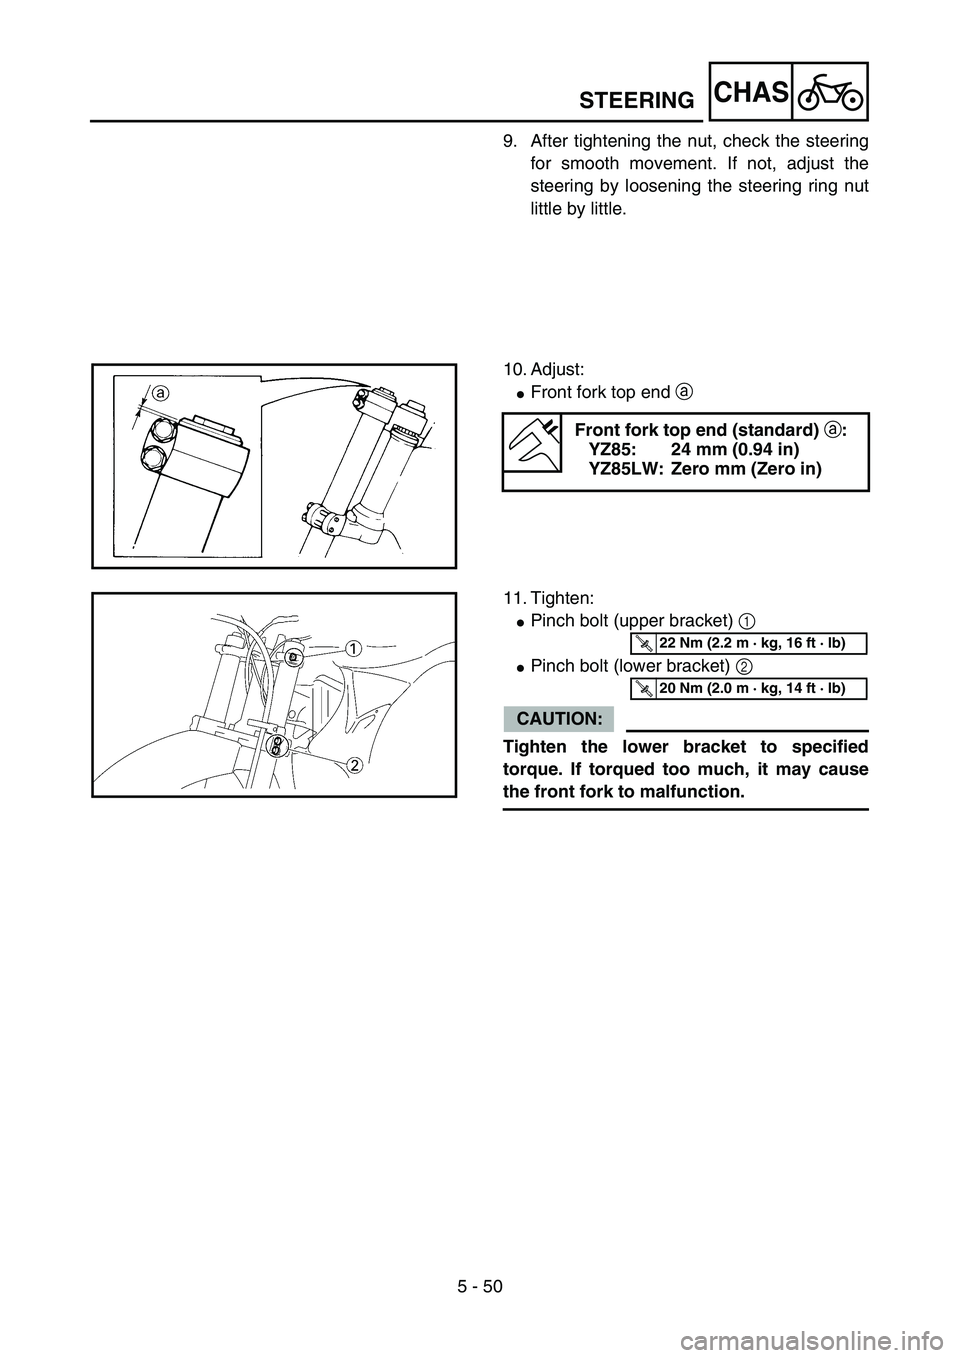
10. Adjust:
�Front fork top end a
Front fork top end (standard) a:
YZ85: 24 mm (0.94 in)
YZ85LW: Zero mm (Zero in)
5PA51600
11. Tighten:
�Pinch bolt (upper bracket) 1
�Pinch bolt (lower bracket) 2
CAUTION:
Tighten the lower bracket to specified
torque. If torqued too much, it may cause
the front fork to malfunction.5PA51610
T R..22 Nm (2.2 m · kg, 16 ft · lb)
T R..20 Nm (2.0 m · kg, 14 ft · lb)
STEERING
Page 500 of 508

7 - 18
TUNSETTING
Suspension setting
�Front fork
NOTE:
�If any of the following symptoms is experienced with the standard position as the base, make
resetting by reference to the adjustment procedure given in the same chart.
�Before any change, set the rear shock absorber sunken length to the standard figure 75 ~ 85 mm
(3.0 ~ 3.3 in).
SymptomSection
Check Adjust
JumpLarge
gapMedium
gapSmall
gap
Stiff over entire range
�{�{�{Compression damping
Oil level (oil amount)
SpringTurn adjuster counterclockwise (about 2 clicks) to
decrease damping.
Decrease oil level by about 5 ~ 10 mm (0.2 ~ 0.4 in).
Replace with soft spring.
Unsmooth movement
over entire range�{�{�{�{Outer tube
Inner tube
Under bracket tightening
torqueCheck for any bends, dents, and other noticeable
scars, etc. If any, replace affected parts.
Retighten to specified torque.
Poor initial
movement�{Rebound damping
Oil sealTurn adjuster counterclockwise (about 2 clicks) to
decrease damping.
Apply grease in oil seal wall.
Soft over entire range,
bottoming out�{�{Compression damping
Oil level (oil amount)
SpringTurn adjuster clockwise (about 2 clicks) to increase
damping.
Increase oil level by about 5 ~ 10 mm (0.2 ~ 0.4 in).
Replace with stiff spring.
Stiff toward stroke end�{Oil level (oil amount) Decrease oil level by about 5 mm (0.2 in).
Soft toward stroke end,
bottoming out�{Oil level (oil amount) Increase oil level by about 5 mm (0.2 in).
Stiff initial movement�{�{�{�{Compression dampingTurn adjuster counterclockwise (about 2 clicks) to
decrease damping.
Low front, tending to
lower front posture�{�{Compression damping
Rebound damping
Balance with rear end
Oil level (oil amount)Turn adjuster clockwise (about 2 clicks) to increase
damping.
Turn adjuster counterclockwise (about 2 clicks) to
decrease damping.
Set sunken length for 80 ~ 85 mm (3.1 ~ 3.3 in) when
one passenger is astride seat (lower rear posture).
Increase oil level by about 5 mm (0.2 in).
“Obtrusive” front, tend-
ing to upper front pos-
ture�{�{Compression damping
Balance with rear end
Spring
Oil level (oil amount)Turn adjuster counterclockwise (about 2 clicks) to
decrease damping.
Set sunken length for 75 ~ 80 mm (3.0 ~ 3.1 in) when
one passenger is astride seat (upper rear posture).
Replace with soft spring.
Decrease oil level by about 5 ~ 10 mm (0.2 ~ 0.4 in).