Page 15 of 64

EAU10450
Main switch
The main switch controls the ignition
and lighting systems. The various
main switch positions are described
below.
EAU10630
ON
All electrical systems are supplied
with power, and the engine can be
started. The key cannot be removed.
EAU10660
OFF
All electrical systems are off. The key
can be removed.
EAUM1020
“h”
The coolant temperature warning light
should come on when the key is tur-
ned to “h”. (See page 3-2.)
EAU10700
LOCK
The steering is locked, and all electri-
cal systems are off. The key can be
removed.
T
o lock the steering
1. Turn the handlebars all the way to
the left.
2. Push the key in from the “OFF”
position, release it, and then turn
it to “LOCK”.
3. Remove the key.
T
o unlock the steering
Insert the key and turn it to “OFF”.
EWA10060
s s
WARNING
Never turn the key to “OFF” or
“LOCK” while the vehicle is
moving, otherwise the electrical
systems will be switched off, which
may result in loss of control or an
accident. Make sure that the vehi-
cle is stopped before turning the
key to “OFF” or “LOCK”.
EAU10980
Indicator lights
1. Turn signal indicator lights
2. High beam indicator light
121
3
INSTRUMENT AND CONTROL FUNCTIONS
3-1
5XL-F8199-E3.qxd 19/09/2005 16:26 Página 15
Page 16 of 64

EAU11030
Turn signal indicator lights “c” and
“
d”
The corresponding indicator light flas-
hes when the turn signal switch is
pushed to the left or right.
EAU11080
High beam indicator light “j”
This indicator light comes on when
the high beam of the headlight is swit-
ched on.
EAU11390
Oil change indicator light “z”
1. Oil change indicator
2. Coolant temperature warning light
This indicator light comes on at the
initial 1000 km (600 mi) and every
3000 km (1800 mi) thereafter to indi-cate that the engine oil should be
changed.
If the engine oil is changed before the
oil change indicator comes on (i.e.
before the periodic oil change interval
has been reached), the indicator light
must be reset after the oil change for
the next periodic oil change to be
indicated at the correct time. (See
page 6-8.)
The electrical circuit of the indicator
light can be checked according to the
following procedure.
1. Set the engine stop switch to “h”
and turn the key to “ON”.
2. Check that the indicator comes
on for a few seconds and then
goes off.
3. If the indicator light does not
come on, have a Yamaha dealer
check the electrical circuit.
NOTE:
The oil change indicator light may
flash when the engine is revved with
the scooter on the centerstand, but
this does not indicate a malfunction.
EAUM1080
Coolant temperature warning light
“
y”
This warning light comes on when the
engine overheats. When this occurs,
stop the engine immediately and
allow the engine to cool.
The electrical circuit of the warning
light can be checked according to the
following procedure.
1. Turn the key to “h”.
2. If the warning light does not
come on, have a Yamaha dealer
check the electrical circuit.
ECA10020
CAUTION
Do not operate the engine if it is
overheated.
12
3
INSTRUMENT AND CONTROL FUNCTIONS
3-2
5XL-F8199-E3.qxd 19/09/2005 16:26 Página 16
Page 18 of 64

When the key is turned to “OFF”, the
voltage/fuel gauge indicates the bat-
tery voltage.
NOTE:
If the battery voltage drops to 10 V,
have a Yamaha dealer check the bat-
tery.
When the key is turned to “ON”, the
voltage/fuel gauge indicates the
amount of fuel in the fuel tank after
indicating the battery voltage for two
seconds. The needle moves towards
“E” (empty) as the fuel level decrea-
ses. When the needle reaches “E”,
refuel as soon as possible.
NOTE:
Do not allow the fuel tank to empty
itself completely.
EAU12330
Anti-theft alarm (optional)
This motorcycle can be equipped
with an optional anti-theft alarm by a
Yamaha dealer. Contact a Yamaha
dealer for more information.
EAUS1210
Clock
To set the clock
1. Turn the key to “ON”.
2. Press the “TRIP” button for two
seconds, and the hour display
will flash.
3. Press the “TRIP” button to set
the hours.
4. Press the “TRIP” button for two
seconds, and the first minute
digit will flash.
5. Press the “TRIP” button to set
the first minute digit.
6. Press the “TRIP” button for two
more seconds, and the second
minute digit will flash.
7. Press the “TRIP” button to set
the second minute digit.
8. Press the “TRIP” button for two
seconds to set the clock.
EAU12343
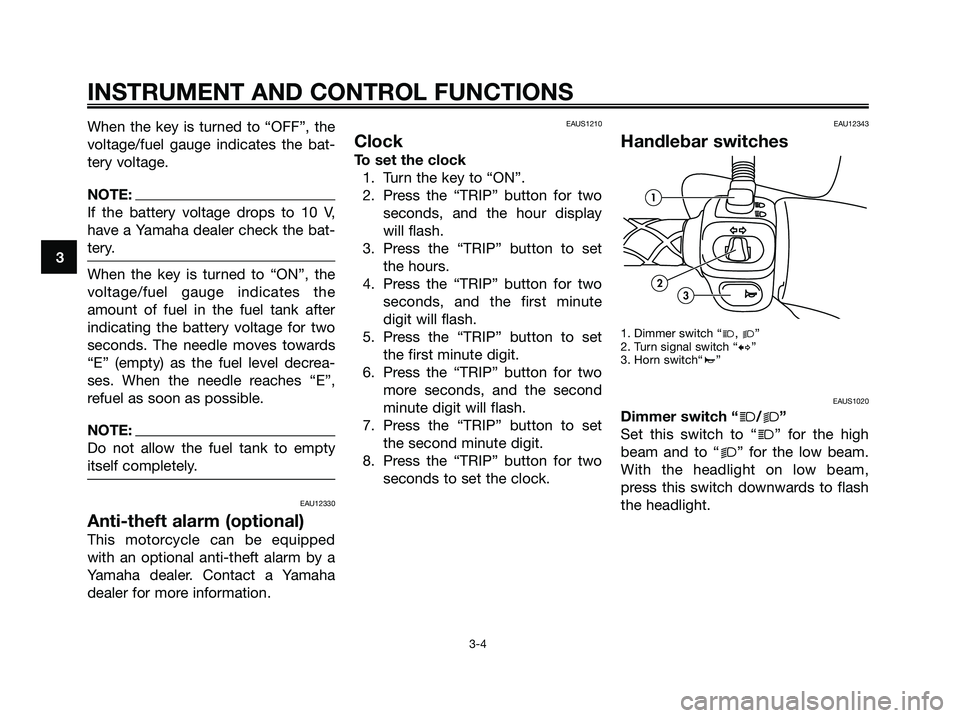
Handlebar switches
1. Dimmer switch “j, k”
2. Turn signal switch “b”
3. Horn switch“a”
EAUS1020
Dimmer switch “j/k”
Set this switch to “
j” for the high
beam and to “
k” for the low beam.
With the headlight on low beam,
press this switch downwards to flash
the headlight.
1
32
3
INSTRUMENT AND CONTROL FUNCTIONS
3-4
5XL-F8199-E3.qxd 19/09/2005 16:26 Página 18