PERIODIC MAINTENANCE AND MINOR REPAIR
6-34
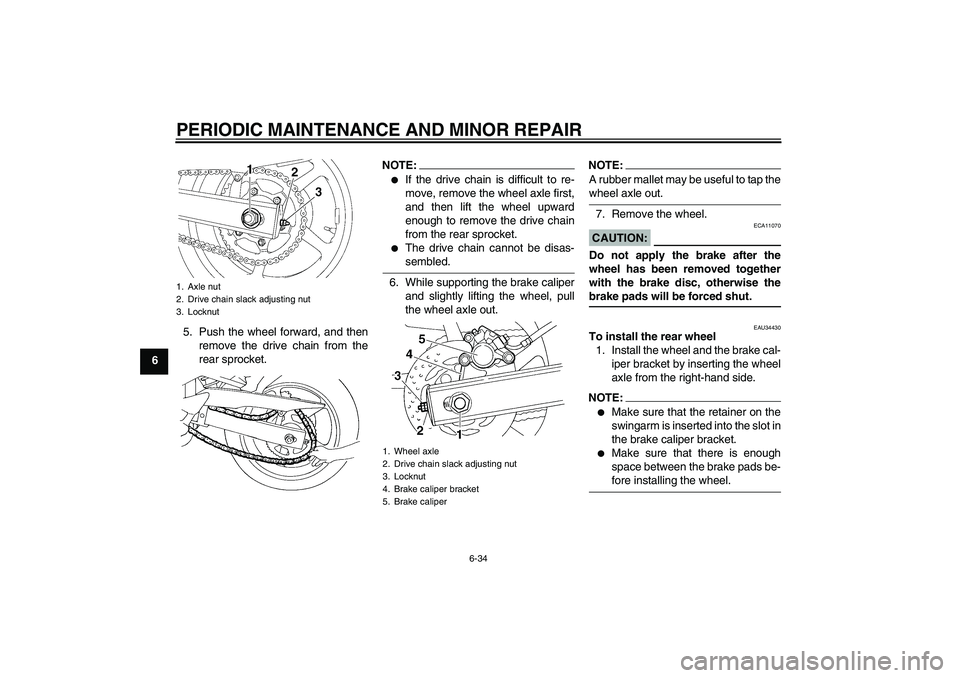
65. Push the wheel forward, and then
remove the drive chain from the
rear sprocket.
NOTE:�
If the drive chain is difficult to re-
move, remove the wheel axle first,
and then lift the wheel upward
enough to remove the drive chain
from the rear sprocket.
�
The drive chain cannot be disas-sembled.
6. While supporting the brake caliper
and slightly lifting the wheel, pull
the wheel axle out.
NOTE:A rubber mallet may be useful to tap thewheel axle out.
7. Remove the wheel.CAUTION:
ECA11070
Do not apply the brake after the
wheel has been removed together
with the brake disc, otherwise thebrake pads will be forced shut.
EAU34430
To install the rear wheel
1. Install the wheel and the brake cal-
iper bracket by inserting the wheel
axle from the right-hand side.NOTE:�
Make sure that the retainer on the
swingarm is inserted into the slot in
the brake caliper bracket.
�
Make sure that there is enough
space between the brake pads be-fore installing the wheel.
1. Axle nut
2. Drive chain slack adjusting nut
3. Locknut
1. Wheel axle
2. Drive chain slack adjusting nut
3. Locknut
4. Brake caliper bracket
5. Brake caliper
U1B3E1E0.book Page 34 Thursday, July 8, 2004 11:49 AM
INDEX
AAir filter element, replacing ................... 6-11
Anti-theft alarm (optional) ....................... 3-8
Auxiliary light bulb, replacing ................ 6-31BBattery .................................................. 6-26
Brake and clutch levers,
checking and lubricating ..................... 6-23
Brake and shift pedals,
checking and lubricating ..................... 6-22
Brake fluid, changing ............................ 6-19
Brake fluid level, checking .................... 6-18
Brake lever ........................................... 3-10
Brake pedal .......................................... 3-11CCables, checking and lubricating .......... 6-21
Care ........................................................ 7-1
Catalytic converter ................................ 3-13
Clutch lever........................................... 3-10
Clutch lever free play, adjusting ........... 6-16
Coolant ................................................... 6-9DDimmer switch ........................................ 3-9
Drive chain, lubricating ......................... 6-21
Drive chain slack .................................. 6-19EEngine break-in ...................................... 5-3
Engine idling speed .............................. 6-12
Engine oil and oil filter cartridge ............. 6-6
Engine stop switch.................................. 3-9
Engine trouble warning light ................... 3-4FFront and rear brake pads, checking .... 6-17
Front fork, checking .............................. 6-24Fuel ....................................................... 3-12
Fuel consumption, tips for reducing ........ 5-3
Fuel tank breather hose ........................ 3-13
Fuel tank cap......................................... 3-11
Fuses, replacing .................................... 6-27
HHandlebar switches ................................. 3-8
Hazard switch.......................................... 3-9
Headlight bulb, replacing....................... 6-28
High beam indicator light......................... 3-4
Horn switch ............................................. 3-9IIdentification numbers ............................. 9-1
Ignition circuit cut-off system ................. 3-16
Immobilizer system .................................3-1
Immobilizer system indicator light ........... 3-4
Indicator and warning lights .................... 3-3KKey identification number ........................ 9-1LLCD tachometer ...................................... 3-5
License plate light bulb, replacing ......... 6-30MMain switch/steering lock ........................ 3-2
Model label .............................................. 9-2
Multi-function display...............................3-5NNeutral indicator light .............................. 3-3OOil level warning light .............................. 3-4PPanel, removing and installing ................ 6-5
Parking ....................................................5-4
Part locations .......................................... 2-1Pass switch ............................................. 3-9
Periodic maintenance and lubrication
chart...................................................... 6-2
Pre-operation check list .......................... 4-2
RRear brake light switch, adjusting ......... 6-17SSafety information ................................... 1-1
Seat ...................................................... 3-13
Shifting .................................................... 5-2
Shift pedal ............................................. 3-10
Shock absorber assembly, adjusting .... 3-15
Sidestand .............................................. 3-16
Sidestand, checking and lubricating ..... 6-23
Spark plugs, checking............................. 6-5
Specifications.......................................... 8-1
Starting the engine.................................. 5-1
Start switch ............................................. 3-9
Steering, checking ................................ 6-25
Storage ................................................... 7-3
Storage compartment ........................... 3-14
Supporting the motorcycle .................... 6-31
Swingarm pivots, lubricating ................. 6-24TTail/brake light bulb, replacing .............. 6-29
Throttle cable free play, adjusting ......... 6-13
Throttle grip and cable,
checking and lubricating ..................... 6-22
Tires ...................................................... 6-13
Tool kit .................................................... 6-1
Troubleshooting .................................... 6-35
Troubleshooting charts ......................... 6-36
Turn signal indicator lights ...................... 3-3
Turn signal light bulb, replacing ............ 6-30
U1B3E1E0.book Page 1 Thursday, July 8, 2004 11:49 AM
 ....................... 3-8
Auxiliary light bulb, replacing ................ 6-31BBattery ....................")