2005 VOLVO S80 instrument panel
[x] Cancel search: instrument panelPage 58 of 123

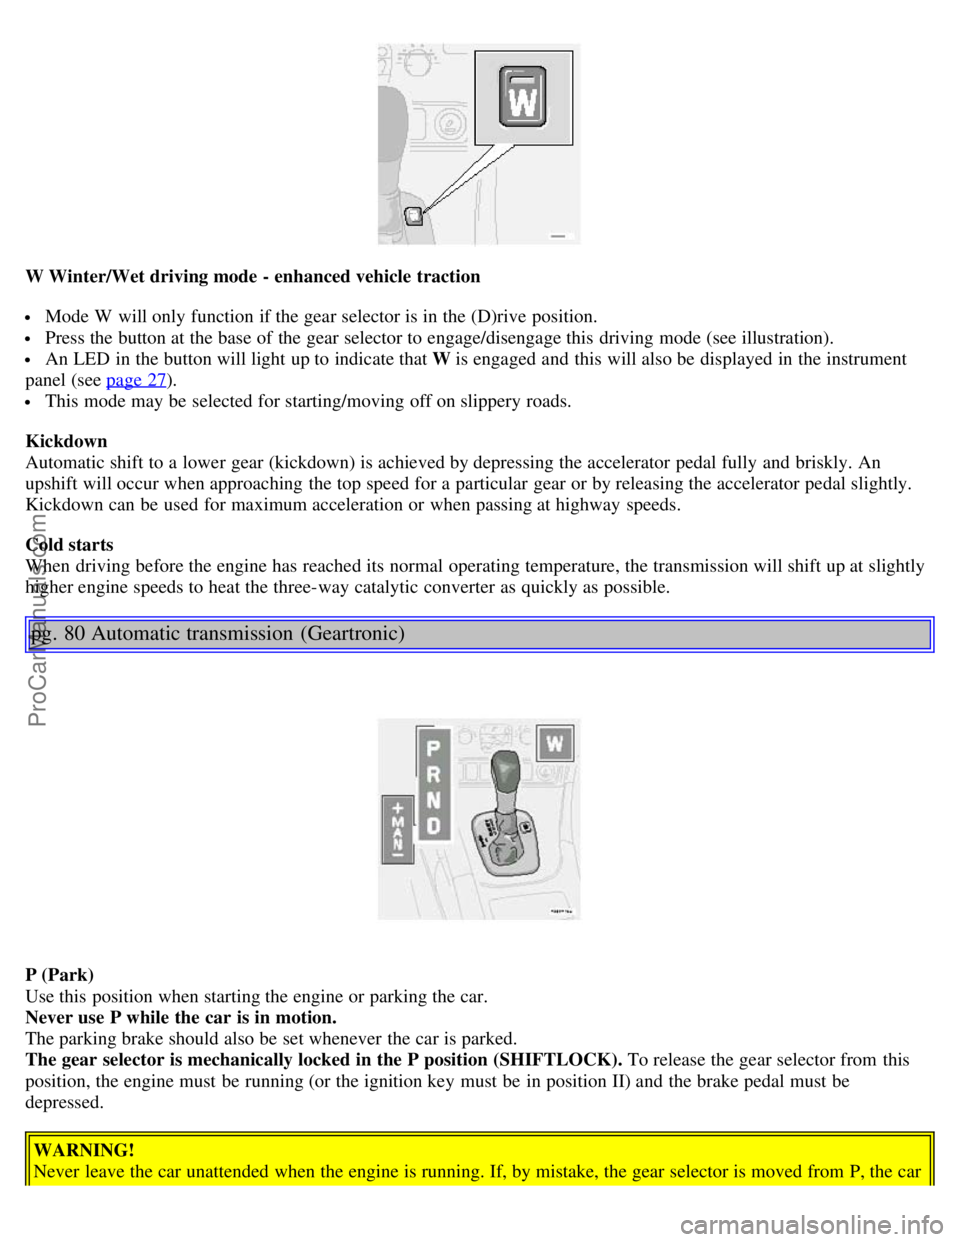
W Winter/Wet driving mode - enhanced vehicle traction
Mode W will only function if the gear selector is in the (D)rive position.
Press the button at the base of the gear selector to engage/disengage this driving mode (see illustration).
An LED in the button will light up to indicate that W is engaged and this will also be displayed in the instrument
panel (see page 27
).
This mode may be selected for starting/moving off on slippery roads.
Kickdown
Automatic shift to a lower gear (kickdown) is achieved by depressing the accelerator pedal fully and briskly. An
upshift will occur when approaching the top speed for a particular gear or by releasing the accelerator pedal slightly.
Kickdown can be used for maximum acceleration or when passing at highway speeds.
Cold starts
When driving before the engine has reached its normal operating temperature, the transmission will shift up at slightly
higher engine speeds to heat the three-way catalytic converter as quickly as possible.
pg. 80 Automatic transmission (Geartronic)
P (Park)
Use this position when starting the engine or parking the car.
Never use P while the car is in motion.
The parking brake should also be set whenever the car is parked.
The gear selector is mechanically locked in the P position (SHIFTLOCK). To release the gear selector from this
position, the engine must be running (or the ignition key must be in position II) and the brake pedal must be
depressed.
WARNING!
Never leave the car unattended when the engine is running. If, by mistake, the gear selector is moved from P, the car
ProCarManuals.com
Page 59 of 123

may start moving.
R (Reverse)
Never engage R while the car is moving forward.
N (Neutral)
Neutral - no gear engaged. Use the parking brake.
D (Drive)
D is the normal driving position and should be used as often as possible to help improve fuel economy. The car should
not be moving when shifting from R to the D position.
Kickdown
Automatic shift to a lower gear (kickdown) is achieved by depressing the accelerator pedal fully and briskly. An
upshift will occur when approaching the top speed for a particular gear or by releasing the accelerator pedal slightly.
Kickdown can be used for maximum acceleration or when passing at highway speeds. Kickdown does not function
when the transmission is in the manual shift (geartronic) mode (see next page).
Shift gate positions
Automatic transmission - adaptive system
The automatic transmission is controlled by an adaptive control system that constantly monitors the way in which the
transmission functions. It senses and adapts each gear shift for optimal performance. The system also monitors your
particular driving style and adapts gear shifting accordingly.
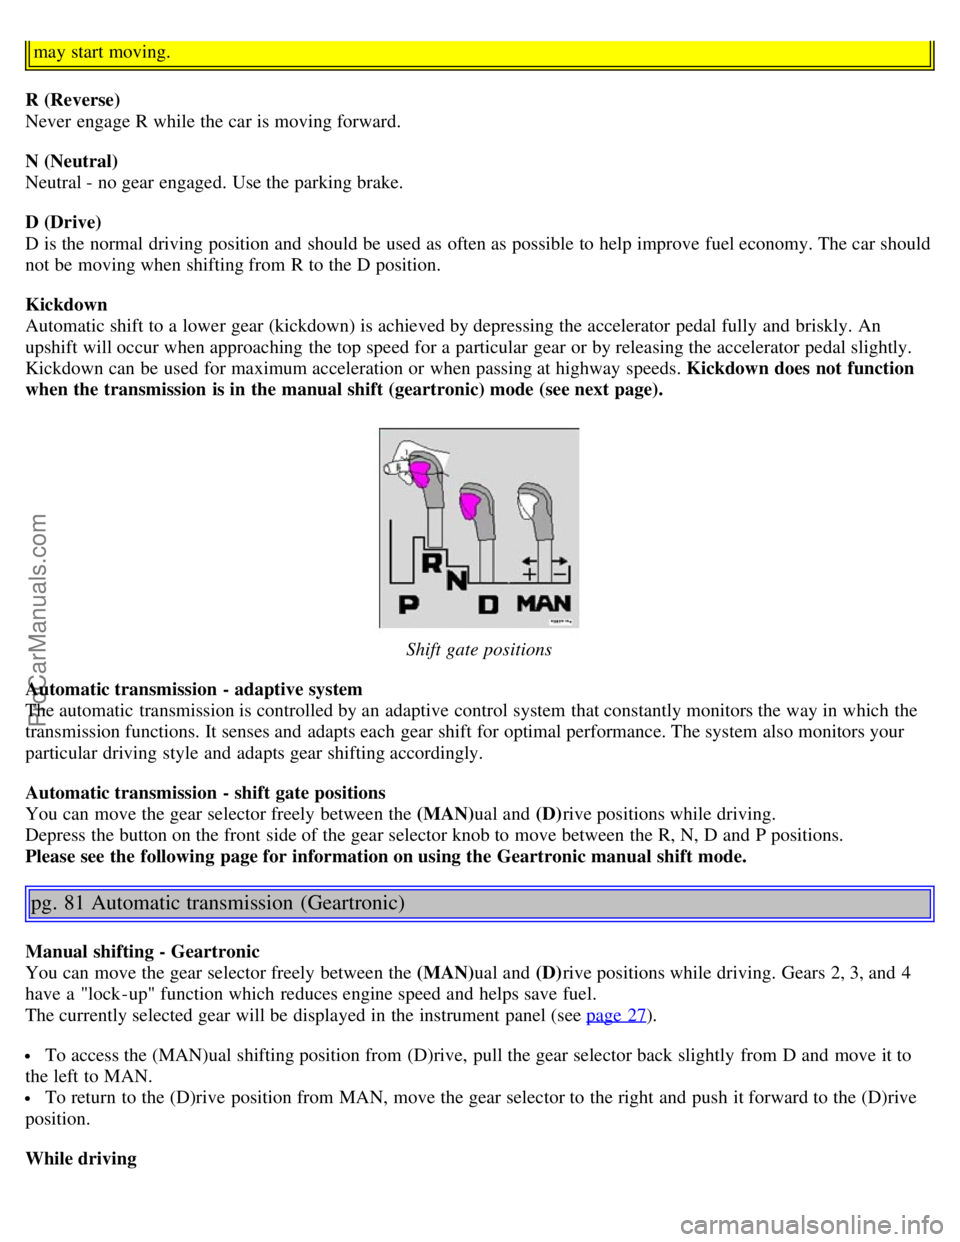
Automatic transmission - shift gate positions
You can move the gear selector freely between the (MAN) ual and (D)rive positions while driving.
Depress the button on the front side of the gear selector knob to move between the R, N, D and P positions.
Please see the following page for information on using the Geartronic manual shift mode.
pg. 81 Automatic transmission (Geartronic)
Manual shifting - Geartronic
You can move the gear selector freely between the (MAN) ual and (D)rive positions while driving. Gears 2, 3, and 4
have a "lock -up" function which reduces engine speed and helps save fuel.
The currently selected gear will be displayed in the instrument panel (see page 27
).
To access the (MAN)ual shifting position from (D)rive, pull the gear selector back slightly from D and move it to
the left to MAN.
To return to the (D)rive position from MAN, move the gear selector to the right and push it forward to the (D)rive
position.
While driving
ProCarManuals.com
Page 60 of 123

If you select the (MAN)ual position while driving, the gear that was being used in the (D)rive position will also
initially be selected in (MAN)ual position.
Move the gear selector forward (toward "+") to shift to a higher gear or rearward (toward "-") to shift to a lower
gear.
If you hold the gear selector toward "-", the transmission will downshift one gear , and will utilize the braking power
of the engine. If the current speed is too high for using a lower gear, the downshift will not occur until the speed has
decreased enough to allow the lower gear to be used.
If you slow down to a very low speed, the transmission will automatically shift down.
When starting in the (MAN)ual position, 3rd gear is the highest gear that may be selected.
NOTE: Kickdown (see previous page) does not function when the transmission is in the manual shift (geartronic)
mode. The gear selector must be in D (Drive) position.
* Models with a 5-cylinder turbo engine have a 5-speed transmission. Fifth gear also has the lock-up function.
W Winter/Wet driving mode - enhanced vehicle traction
Mode W will only function if the gear selector is in the (D)rive position.
Press the button at the base of the gear selector to engage/disengage this driving mode. The position of this button
may vary slightly on certain models.
An LED in the button will light up to indicate that W is engaged and this will also be displayed in the instrument
panel (see page 27
).
This mode may be selected for starting/moving off on slippery roads.
pg. 82 Four -C active chassis system
Four-C (option)
Your car can be optionally equipped with the Four-C (Continuously Controlled Chassis Concept) system.
This system is based on a number of sensors that continuously monitor factors such as the car's lateral and vertical
movements, speed, and movements of the wheels. The sensors receive data up to 500 times per second, which is used
to provide extremely fast and precise adjustment of each shock absorber. The system adjusts the stiffness of the shock
absorbers approximately 100 times per second.
The button in the center console (see the illustration on page 31
) can be used at any time to switch between the two
driving modes: Comfort or Sport.
The system then adjusts the stiffness of the shock absorbers accordingly, for example when the type of road changes,
or if the driver wishes to change driving style. This adjustment takes place instantaneously.
Comfort
ProCarManuals.com
Page 63 of 123

NOTE: Vehicles equipped with automatic transmissions should use (D)rive as often as possible and avoid using
"kickdown" to help improve fuel economy.
Cooling system
The risk for engine overheating is greatest, especially in hot weather, when:
Towing a trailer up steep inclines for prolonged periods at wide open throttle and low engine rpm.
Stopping the engine suddenly after high speed driving (so-called "after-boiling" can occur).
To avoid overheating, the following rules should be followed:
Do not drive for prolonged periods at engine speeds above 4500 rpm if you are towing a trailer in hilly terrain.
Reduce speed when towing a trailer up long, steep inclines. The risk of overheating can be reduced by switching off
the air conditioning system for a short time.
Do not let the engine idle unnecessarily for prolonged periods.
Do not mount auxiliary lamps in front of the grill.
When the risk of overheating is imminent, or in the event of overheating (the temperature gauge goes repeatedly into,
or stays continually in, the red section), the following precautions should be taken:
Switch off the air conditioning system.
Pull off the road, away from traffic, stop the car and put the gear selector into Park. Do not stop the engine!
Switch the heater to full (maximum) position. Increase the engine speed to approx. 2000 rpm (twice idling speed)
until the temperature begins to drop.
If the warning light in the center of the instrument panel is red, and the message "Coolant level low stop engine" is
displayed, switch off the engine as soon as possible.
WARNING!
Do not remove coolant expansion tank cap. The coolant will be extremely hot.
If necessary, see page 132
for information on checking and topping-up the coolant level.
Contents | Top of Page
ProCarManuals.com
Page 69 of 123

When low inflation pressure is detected, TPMS will light up the tire pressure warning light () in the instrument
panel, and will display a message in the text window. The wording of this message is determined by the degree of
inflation pressure loss.
When the tire pressure monitoring system warning light is on, one or more of your tires is significantly under-inflated.
You should stop and check your tires as soon as possible, and inflate them to the proper pressure as indicated on the
vehicle's tire information placard.
Driving on a significantly under-inflated tire causes the tire to overheat and can lead to tire failure. Under-inflation
also reduces fuel efficiency and tire tread life, and may affect the vehicle's handling and stopping ability. Each tire,
including the spare, should be checked monthly when cold and set to the recommended inflation pressure as specified
in the vehicle placard and owner's manual.
NOTE: TPMS indicates low tire pressure but does not replace normal tire maintenance. For information on correct tire
pressure, please refer to the table on page 101
, or consult your Volvo retailer.
Erasing warning messages
When a low tire pressure warning message has been displayed, and the tire pressure warning light has come on:
1. Use a tire pressure gauge to check the inflation pressure of all four tires.
2. Re-inflate the tire(s) to the correct pressure (consult the tire pressure placard or the table on page 101
).
3. Drive the car for at least one minute at a speed of 20 mph (30 km/h) or faster.
This will erase the warning text and the warning light will go out.
WARNING!
Incorrect inflation pressure could lead to tire failure, resulting in a loss of control of the vehicle.
Changing tires
Please note the following when changing or replacing the factory installed TPMS wheels/tires on the vehicle:
Only the factory-mounted wheels are equipped with TPMS sensors in the valves.
If the vehicle is equipped with a temporary spare tire, this tire does not have a TPMS sensor.
If, for example, winter wheels/tires are used that are not equipped with TPMS sensors, the message TIRE PRESSURE
SYSTEM SERVICE REQUIRED will be displayed after the car has been driven for several minutes at approximately
35 mph (50 km/h) or faster.
This message will remain on until wheels with TPMS sensors are mounted on the vehicle and it has been driven for at
least one minute at a speed of 20 mph (30 km/h) or faster.
TPMS valves can be fitted on winter wheels or full-size spare wheels/tires. Consult your Volvo retailer.
CAUTION!
When inflating tires with TPMS valves, press the pump's mouthpiece straight onto the valve to help avoid bending or
otherwise damaging the valve.
pg. 103 Wheels and tires
Self supporting run flat tires (option)
Certain models equipped with the Tire Pressure Monitoring System (TPMS) can also be equipped with self supporting
ProCarManuals.com
Page 70 of 123

run flat tires.
Tires of this type have specially reinforced sidewalls that make it possible to continue driving in the event of a drop in
inflation pressure. Tires of this type are mounted on special rims.
NOTE: Self supporting run flat tires are only available in conjunction with TPMS.
If a self supporting run flat tire should lose inflation pressure, the yellow TPMS warning symbol (
) in the
instrument panel lights up to alert the driver, and a message will be shown in the text window in the instrument panel.
If this occurs, reduce vehicle speed to a maximum of 50 mph (80 km/h). The vehicle can be driven approximately 50
miles (80 km), or somewhat farther if the vehicle is not heavily loaded. The tire should be replaced as soon as
possible.
Hard braking and sudden steering maneuvers should be avoided.
In certain cases, it may be difficult to see which self supporting run flat tire is defective. To determine which tire is
damaged, check the inflation pressure of all four tires.
WARNING!
• Only specially trained persons should mount self supporting run flat tires.
• If self supporting run flat tires are mounted, the vehicle must be equipped with a Tire Pressure Monitoring System.
• After a low pressure warning has been displayed, do not exceed 50 mph (80 km/h).
• Avoid severe cornering and hard braking, and minimize the distance traveled before replacing the self supporting
run flat tire.
• Self supporting run flat tires cannot be repaired. They must be replaced if damaged or punctured.
pg. 104 Wheels and tires
Tire designations
Federal law mandates that tire manufacturers place standardized information on the sidewall of all tires (see the
illustration).
The following information is listed on the tire sidewall:
The tire designation (the following figures are examples of a tire designation):
ProCarManuals.com
Page 83 of 123

38-
pg. 117 Fuses in the passenger compartment
Fuse box in the passenger compartment, behind the plastic cover
This fuse box is located behind the plastic cover below the steering wheel. When replacing a blown fuse, be sure to
replace it with a new one of the same color and amperage (written on the fuse).
Location Amperage
1 Heated passenger's seat (option) 15A
2 Heated driver's seat (option) 15A
3 Horn 15A
4 -
5 -
6 -
7 -
8 Alarm siren 5A
9 Brake light switch feed 5A
10 Instrument panel, climate system, power driver's seat (option) 10A
11 12-volt sockets - front and rear seats 15A
12 -
13 -
14 Headlight wipers (certain models) 15A
15 ABS, STC/DSTC 5A
16 Power steering, Bi -Xenon headlights (option) 10A
17 Driver's side front foglight (option) 7.5A
18 Passenger's side front foglight (option) 7.5A
19 -
20 -
21 Transmission control module, reverse gear block (M66 gearbox) 10A
22 Driver's side high beam 10A
23 Passenger's side high beam 10A
24 -
25 -
26 -
27 -
28 Power passenger's seat (option), audio system 5A
ProCarManuals.com
Page 115 of 123

Fuel filler cap..........74
Fuel filler door..........74
Fuel filler door - unlocking manually..........35
Fuel filter ..........133
Fuel gauge..........27
Fuel requirements..........72
Fuel system..........131, 133, 148
Fuel/emissions systems..........131
Fuses..........114 - 118
G
Gas cap..........74
Gasoline..........72
Gear indicator..........27
Geartronic ..........80
Generator..........149
Generator warning light..........28
Glossary of tire terminology..........105
H
Hand brake..........40
Handling..........85
Hazard warning flashers..........39
Head restraint - center rear..........3
Headlight bulbs - replacing..........119
Headlight wiper blades - replacing..........141
Headlights..........34
Heated front seats..........39
Heated rear window..........39
Heated sideview mirrors..........39
Heating..........47 - 49, 51
Hoisting the car..........134
Home Safe System..........62
HomeLink® ........169, 170, 171
Hood - opening..........135
I
Ignition switch..........38
Immobilizer (start inhibitor)..........65,75
Indicator lights..........28, 29
Inflatable curtain (IC)..........11
Inflation pressure tables..........101
Instrument illumination..........34
Instrument panel..........27
Instruments..........26
Integrated booster cushion ........ 15
Interior Air Quality system .........51
ProCarManuals.com