2005 VOLVO S40 tow
[x] Cancel search: towPage 35 of 127

Personal settings
There are two functions in the climate system that can be set to your preferences:
Blower speed to Auto mode (models with ECC only).
Timer controlled recirculation of the air in the passenger compartment. For information about how to make these
settings, see the Personal settings section on page 62
.
Models equipped with ECC (option)
Sensors
The sunlight sensor on the upper side of the dashboard and the passenger compartment temperature sensor, located
behind the climate system control panel, should not be obstructed.
Side windows and optional moonroof
The electronic climate control system will function best if the windows and moonroof are closed. If you drive with the
windows or moonroof open, it may be preferable to manually adjust the temperature and blower control (the LED in
the AUTO switch should be off).
Acceleration
The air conditioning system is temporarily switched off during full throttle acceleration.
pg. 69 General information
Air vents in the dashboard
A. Open
B. Closed
C. Horizontal air flow
D. Vertical air flow
Direct the outer air vents toward the side windows to defrost.
pg. 70 Manual climate control
ProCarManuals.com
Page 41 of 127

Air to the windows and from dashboard air vents.For good comfort in warm, dry weather.
Airflow directed to the head and chest from the
dashboard air vents.To ensure efficient cooling in a warm
weather.
Air to the floor and windows.
There is also a certain amount of airflow to the
dashboard air vents.For comfortable conditions and good
defrosting in cold weather.
Medium to high blower speed.
Air to the floor and dashboard air vents.
For sunny weather with cool ambient
temperatures.
Air to the floor.
There is a certain amount of airflow to the dashboard and
window air vents.To warm the feet.
Airflow to the windows, dashboard air vents, and floor.
For cooler air toward the feet, or for warmer
air toward the head and chest.
pg. 76 This page intentionally left blank
Contents | Top of Page
ProCarManuals.com
Page 54 of 127

Turn the key in the driver's door lock once to unlock the driver's door only.
Turn the key again (within 10 seconds) to unlock the other doors and the trunk.
One turn with the key toward lock in the driver's door locks all doors and the trunk.
Valet or service locking
By utilizing the remote control with the key blade removed, the valet locking feature enables you to block access to the
trunk and glove compartment for e.g. valet parking or when the car is brought to the retailer for service.
pg. 91 Remote control and key blade
With the valet locking function activated:
The vehicle's doors can be locked or unlocked
The engine can be started
The glove compartment cannot be unlocked
Access to the trunk is blocked (the trunk lid cannot be unlocked or opened, and the rear seat backrests are locked in
the upright position)
To activate the valet locking function:
1. Remove the key blade from the remote control
2. Turn the key blade 180° clockwise in the glove compartment lock to activate the function. (A message appears in
the information display.)
3. Give the parking attendant or service personnel only the remote control (with the key blade removed)
Turn the key blade 180° counterclockwise in the glove compartment lock to deactivate valet locking.
Weak battery in the remote control
When the battery begins to lose its charge, the Information symbol in the instrument panel (see page 39
) lights up and
REMOTE BATTERY LOW VOLTAGE is shown in the information display.
Replacing the battery in the remote control
If the range of the transmitter is noticeably reduced, this indicates that the battery (type CR 2032, 3V) is weak and
should be replaced. To replace the battery:
1. Remove the key blade.
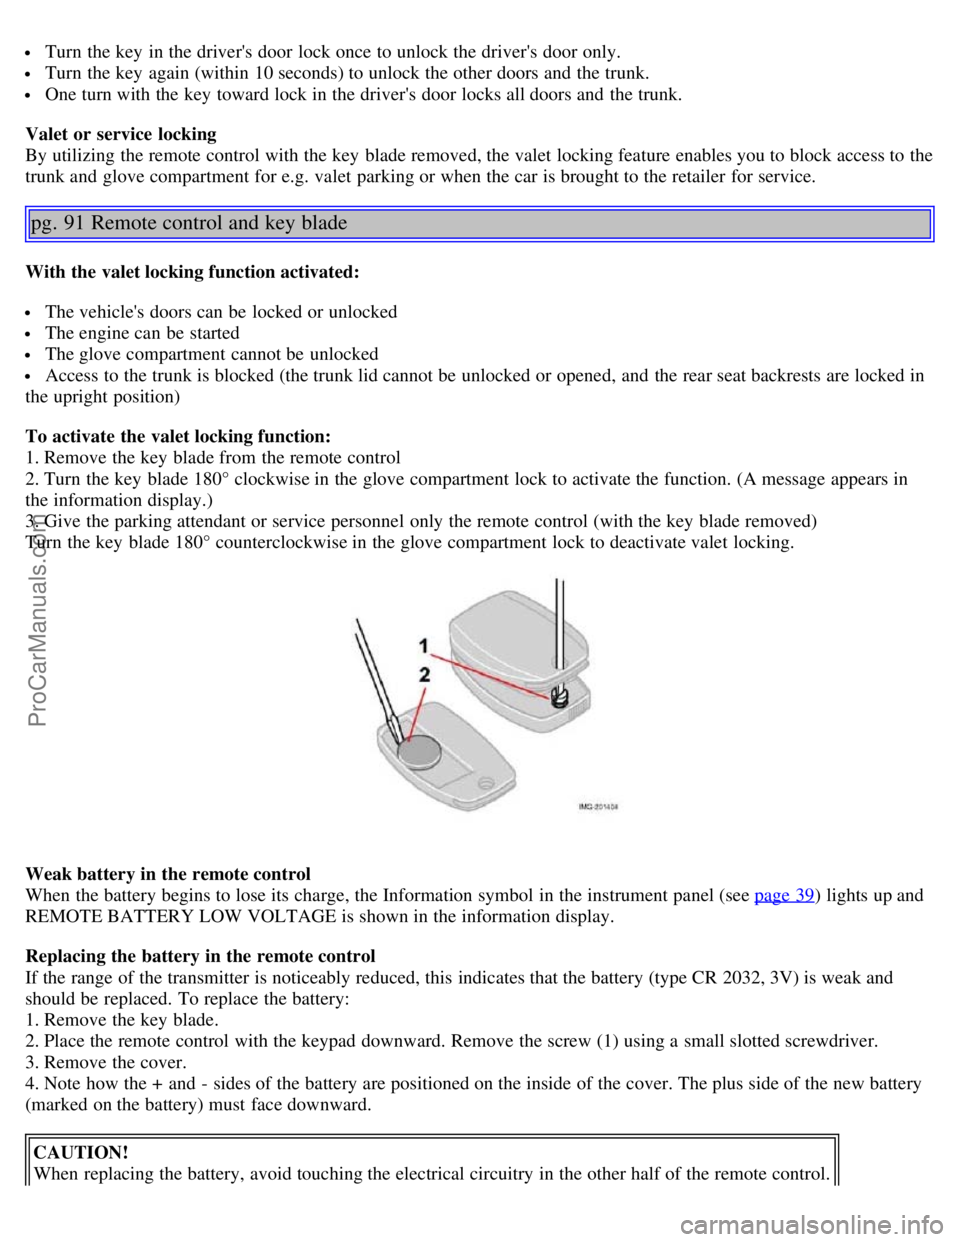
2. Place the remote control with the keypad downward. Remove the screw (1) using a small slotted screwdriver.
3. Remove the cover.
4. Note how the + and - sides of the battery are positioned on the inside of the cover. The plus side of the new battery
(marked on the battery) must face downward.
CAUTION!
When replacing the battery, avoid touching the electrical circuitry in the other half of the remote control.
ProCarManuals.com
Page 57 of 127

The alarm is automatically armed whenever the car is locked with the remote control.
When armed, the alarm continuously monitors a number of points on the car. The following conditions will trigger the
alarm:
The hood is forced open.
The trunk is forced open.
A door is forced open.
The ignition switch is tampered with
An attempt is made to start the car with a non-approved key (a key not coded to the car's ignition).
If there is movement in the passenger compartment (if the car is equipped with the optional movement sensor).
The car is lifted or towed (if the car is equipped with the optional inclination sensor)
The battery is disconnected (while the alarm is armed).
The siren is disconnected when the alarm is disarmed.
The alarm indicator light
The status of the alarm system is indicated by the indicator light on at the top of the dashboard (see illustration):
Indicator light off - the alarm is not armed
The indicator light flashes every two seconds - the alarm is armed
The indicator light flashes rapidly before the ignition is switched on - the alarm has been triggered. The message
"ALARM TRIGGERED, CHECK CAR" will also be displayed.
Fault in the alarm system: If a fault has been detected in the alarm system, a message will be shown in the
information display. Contact your Volvo retailer to have the alarm system inspected and repaired if necessary.
Arming the alarm
Press the LOCK button on the remote control, or press the central lock button on one of the front doors with the door
open. One long flash of the turn signals will confirm that the alarm is armed.
Disarming the alarm
Press the UNLOCK button on the remote control or unlock the doors with the key control. Two short flashes from the
car's direction indicators confirm that the alarm has been deactivated and that all doors are unlocked.
Turning off (stopping) the alarm
If the alarm is sounding, it can be stopped by pressing the UNLOCK button on the remote control or by inserting the
key in the ignition switch.
Audible/visual alarm signal
An audible alarm signal is given by a battery powered siren. The alarm cycle lasts for 30 seconds.
pg. 95 Alarm
ProCarManuals.com
Page 59 of 127

2 0 0 5
VOLVO S40
Chapter 7 - Starting and driving
pg. 97 Starting and driving
General information98
Fuel requirements101
Starting the vehicle104
Manual transmission107
Automatic transmission - Geartronic108
All Wheel Drive (option)110
Brake system111
Stability system113
Rear park assist115
Towing116
Jump starting118
Towing a trailer119
Trailer towing120
Detachable trailer hitch121
Transporting loads122
pg. 98 General information
Economical driving conserves natural resources
Better driving economy may be obtained by thinking ahead, avoiding rapid starts and stops and adjusting the speed of
your vehicle to immediate traffic conditions.
Observe the following rules:
Bring the engine to normal operating temperature as soon as possible by driving with a light foot on the accelerator
pedal for the first few minutes of operation. A cold engine uses more fuel and is subject to increased wear.
Whenever possible, avoid using the vehicle for driving short distances. This does not allow the engine to reach
normal operating temperature.
ProCarManuals.com
Page 65 of 127

Immobilizer: If two of the keys to your vehicle are close together, e.g., on the same key ring when you try to start
the vehicle, this could cause interference in the immobilizer system and result in the vehicle not starting. If this should
occur, remove one of the keys from the key ring before trying to start the vehicle again.
Keylock: Your vehicle is equipped with a keylock system. When the engine is switched off, the gear selector must
be in the (P)ark position before the key can be removed from the ignition switch.
When starting in cold weather, the automatic transmission may shift up at slightly higher engine speeds than normal
until the automatic transmission fluid reaches normal operating temperature.
Do not race a cold engine immediately after starting. Oil flow may not reach some lubrication points fast enough to
prevent engine damage.
WARNING!
Volvo's floor mats are specially manufactured for your car. They must be firmly secured in the clips on the floor so
that they cannot slide and become trapped under the pedals on the driver's side.
pg. 105 Starting the vehicle
CAUTION!
Automatic transmission: The engine should be idling when you move the gear selector. Never accelerate until after
you feel the transmission engage! Accelerating immediately after selecting a gear will cause harsh engagement and
premature transmission wear. Selecting P or N when idling at a standstill for prolonged periods of time will help
prevent overheating of the automatic transmission fluid.
WARNING!
Always place the gear selector in Park and apply the parking brake before leaving the vehicle. Never leave the
vehicle unattended with the engine running.
Always open garage doors fully before starting the engine inside a garage to ensure adequate ventilation. The
exhaust gases contain carbon monoxide, which is invisible and odorless but very poisonous.
pg. 106 Ignition switch and steering wheel lock
0 - Locked position
Remove the key to lock the steering wheel1. Never turn the key to position 0 while driving or when the vehicle is
being towed.
NOTE: A ticking sound may be audible if the key is turned to a position between 0 and I. To stop this sound, turn the
key to position II and back to position 0.
I - Intermediate position
2
Certain accessories, radio, etc. on, daytime running lights off
ProCarManuals.com
Page 69 of 127

To return to the (D)rive position from M , move the gear selector to the left.
While driving
If you select the M position while driving, the gear that was being used in the (D)rive position will also initially be
selected in M position.
Move the gear selector forward (toward "+") to shift to a higher gear or rearward (toward "-") to shift to a lower
gear.
If you hold the gear selector toward "-", the transmission will downshift one gear at a time and will utilize the
braking power of the engine. If the current
pg. 109 Automatic transmission - Geartronic
speed is too high for using a lower gear, the downshift will not occur until the speed has decreased enough to allow the
lower gear to be used.
If you slow to a very low speed, the transmission will automatically shift down.
W - Winter/Wet driving mode - enhanced vehicle traction
Mode W reduces torque at the wheels, which helps improve traction when starting off on a slippery surface.
Once underway, turn off mode W to improve vehicle performance and fuel economy.
Mode W will only function if the gear selector is in the ( D)rive position.
Press the button near the base of the gear selector to engage/disengage this driving mode. The indicator light in the
button will light up when the function is engaged.
Automatic transmission - adaptive system
The automatic transmission is controlled by an adaptive control system that constantly monitors the way in which the
transmission functions. It senses and adapts each gear shift for optimal performance.
Cold starts (turbo engines)
When driving before the engine has reached its normal operating temperature, the transmission will shift up at slightly
higher engine speeds to heat the three-way catalytic converter as quickly as possible.
Kickdown
Automatic shift to a lower gear (kickdown) is achieved by depressing the accelerator pedal fully and briskly. An
upshift will occur when approaching the top speed for a particular gear or by releasing the accelerator pedal slightly.
Kickdown can be used for maximum acceleration or when passing at highway speeds.
NOTE: The gear selector must be in the D (Drive) position for kickdown to function.
Shiftlock override
Shiftlock prevents the gear selector from being moved out of Park unless the ignition key is in position II and the
brake pedal is depressed.
In certain cases it may be necessary to move the gear selector from the Park position manually, for example if the
battery is discharged.
ProCarManuals.com
Page 77 of 127

Bead area of the tire: Area of the tire next to the rim.
Sidewall of the tire: Area between the bead area and the tread.
Tread area of the tire: Area of the perimeter of the tire that contacts the road when mounted on the vehicle.
Rim: The metal support (wheel) for a tire or a tire and tube assembly upon which the tire beads are seated.
Maximum load rating: a figure indicating the maximum load in pounds and kilograms that can be carried by the
tire. This rating is established by the tire manufacturer.
Maximum permissible inflation pressure: the greatest amount of air pressure that should ever be put in the tire.
This limit is set by the tire manufacturer.
Recommended tire inflation pressure: inflation pressure, established by Volvo, which is based on the type of tires
that are mounted on a vehicle at the factory. This inflation pressure is affected by the number of occupants in the car,
the amount of cargo, and the speed at which the vehicle will be driven for a prolonged period. This information can be
found on the tire inflation placard(s) located on the driver's side B-pillar or on the inside of the fuel filler door on
Canadian models, and in the tire inflation table in this chapter.
Cold tires: The tires are considered to be cold when they have the same temperature as the surrounding (ambient)
air. This temperature is normally reached after the car has been parked for at least 3 hours.
pg. 130 Vehicle loading
Vehicle loading
Properly loading your vehicle will provide maximum return of vehicle design performance.
Before loading your vehicle, familiarize yourself with the following terms for determining your vehicle's weight
ratings, with or without a trailer, from the vehicle's Federal/ Canadian Motor Vehicle Safety Standards
(FMVSS/CMVSS) label, and the vehicle's tire information placard:
Curb weight
The weight of the vehicle including a full tank of fuel and all standard equipment. It does not include passengers,
cargo, or optional equipment.
Capacity weight
All weight added to the curb weight, including cargo and optional equipment. When towing, trailer hitch tongue load
is also part of cargo weight.
NOTE: For trailer towing information, please refer to the section "Towing a trailer" on page 120
.
Permissible axle weight
The maximum allowable weight that can be carried by a single axle (front or rear). These numbers are shown on the
Federal/Canadian Motor Vehicle Safety Standards (FMVSS/CMVSS) label. The total load on each axle must never
exceed its maximum permissible weight.
Gross vehicle weight (GVW)
The vehicle's curb weight + cargo + passengers.
NOTE:
The location of the various labels in your vehicle can be found on page 184.
A table listing important weight limits for your vehicle can be found on page 185.
Steps for Determining Correct Load Limit
(1) Locate the statement ''the combined weight of occupants and cargo should never exceed XXX pounds'' on your
vehicle's placard.
(2) Determine the combined weight of the driver and passengers that will be riding in your vehicle.
(3) Subtract the combined weight of the driver and passengers from XXX kilograms or XXX pounds.
(4) The resulting figure equals the available amount of cargo and luggage load capacity. For example, if the ''XXX''
amount equals 1400 lbs. and there will be five 150 lb. passengers in your vehicle, the amount of available cargo and
ProCarManuals.com